2017 SUBARU FORESTER maintenance schedule
[x] Cancel search: maintenance schedulePage 534 of 634

Maintenance schedule
U.S. models
The scheduled maintenance items re-
quired to be serviced at regular intervals
are shown in the“Warranty and Main-
tenance Booklet ”. For details, read the
separate “Warranty and Maintenance
Booklet ”.
Canada models
The scheduled maintenance items re-
quired to be serviced at regular intervals
are shown in the “Warranty and Service
Booklet ”. For details, read the separate
“Warranty and Service Booklet ”.
Except for U.S. and Canada models
Some items of your vehicle are required to
be serviced at scheduled intervals. For
details about your maintenance schedule,
read the separate “Warranty and Main-
tenance Booklet ”.
NOTE
For models with a multi function dis-
play, you can set a reminder to be
displayed when a scheduled mainte-
nance item is almost due. For details,
refer to“Maintenance settings ”F 3-76.
Maintenance precautions
When maintenance and service are re-
quired, it is recommended that all work be
done by an authorized SUBARU dealer.
If you perform maintenance and service
by yourself, you should familiarize yourself
with the information provided in this
section on general maintenance and
service for your SUBARU.
Incorrect or incomplete service could
cause improper or unsafe vehicle opera-
tion. Any problems caused by improper
maintenance and service performed by
you are not eligible for warranty coverage.
WARNING
. Always select a safe area when
performing maintenance on your
vehicle.
. Always be very careful to avoid
injury when working on the vehi-
cle. Remember that some of the
materials in the vehicle may be
hazardous if improperly used or
handled, for example, battery
acid.
. Your vehicle should only be ser-
viced by persons fully competent
to do so. Serious personal injury may result to persons not experi-
enced in servicing vehicles.
. Always use the proper tools and
make certain that they are well
maintained.
. Never get under the vehicle sup-
ported only by a jack. Always use
safety stands to support the
vehicle.
. Never keep the engine running in
a poorly ventilated area, such as
a garage or other closed areas.
. Do not smoke or allow open
flames around the fuel or battery.
This will cause a fire.
. Because the fuel system is under
pressure, replacement of the fuel
filter should be performed only
by your SUBARU dealer.
. Wear adequate eye protection to
guard against getting oil or fluids
in your eyes. If something does
get in your eyes, thoroughly
wash them out with clean water.
. Do not tamper with the wiring of
the SRS airbag system or seat-
belt pretensioner system, or at-
tempt to take its connectors
apart, as that may activate the
system or it can render it inop-
Maintenance and service/Maintenance schedule
–CONTINUED –11-3
Page 542 of 634

and insert it again.
3. Be sure the level gauge is correctly
inserted until it stops.
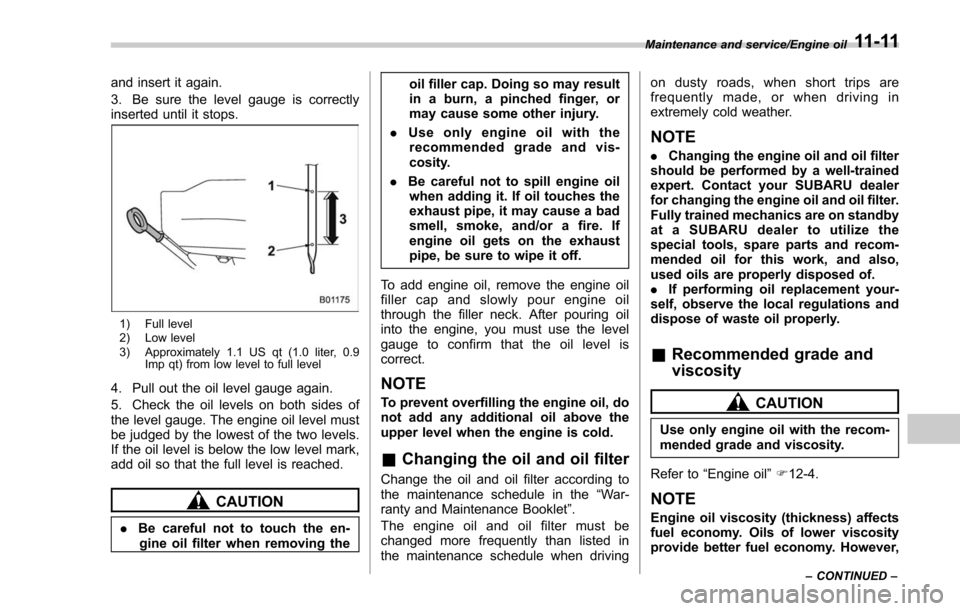
1) Full level
2) Low level
3) Approximately 1.1 US qt (1.0 liter, 0.9Imp qt) from low level to full level
4. Pull out the oil level gauge again.
5. Check the oil levels on both sides of
the level gauge. The engine oil level must
be judged by the lowest of the two levels.
If the oil level is below the low level mark,
add oil so that the full level is reached.
CAUTION
.Be careful not to touch the en-
gine oil filter when removing the oil filler cap. Doing so may result
in a burn, a pinched finger, or
may cause some other injury.
. Use only engine oil with the
recommended grade and vis-
cosity.
. Be careful not to spill engine oil
when adding it. If oil touches the
exhaust pipe, it may cause a bad
smell, smoke, and/or a fire. If
engine oil gets on the exhaust
pipe, be sure to wipe it off.
To add engine oil, remove the engine oil
filler cap and slowly pour engine oil
through the filler neck. After pouring oil
into the engine, you must use the level
gauge to confirm that the oil level is
correct.
NOTE
To prevent overfilling the engine oil, do
not add any additional oil above the
upper level when the engine is cold.
& Changing the oil and oil filter
Change the oil and oil filter according to
the maintenance schedule in the “War-
ranty and Maintenance Booklet ”.
The engine oil and oil filter must be
changed more frequently than listed in
the maintenance schedule when driving on dusty roads, when short trips are
frequently made, or when driving in
extremely cold weather.
NOTE
.
Changing the engine oil and oil filter
should be performed by a well-trained
expert. Contact your SUBARU dealer
for changing the engine oil and oil filter.
Fully trained mechanics are on standby
at a SUBARU dealer to utilize the
special tools, spare parts and recom-
mended oil for this work, and also,
used oils are properly disposed of.
. If performing oil replacement your-
self, observe the local regulations and
dispose of waste oil properly.
& Recommended grade and
viscosity
CAUTION
Use only engine oil with the recom-
mended grade and viscosity.
Refer to “Engine oil ”F 12-4.
NOTE
Engine oil viscosity (thickness) affects
fuel economy. Oils of lower viscosity
provide better fuel economy. However,
Maintenance and service/Engine oil
–CONTINUED –11-11
Page 545 of 634

Maintenance and service/Air cleaner element
CAUTION
.Be careful not to spill engine
coolant when adding it. If coolant
touches the exhaust pipe, it may
cause a bad smell, smoke, and/or
a fire. If engine coolant gets on
the exhaust pipe, be sure to wipe
it off.
. Do not splash the engine coolant
over painted parts. The alcohol
contained in the engine coolant
may damage the paint surface.
! Changing the coolant
It may be difficult to change the coolant.
Have the coolant changed by your
SUBARU dealer if necessary.
The coolant should be changed according
to the maintenance schedule in the
“Warranty and Maintenance Booklet ”.
Air cleaner element
WARNING
Do not operate the engine with the
air cleaner element removed. The air
cleaner element not only filters
intake air but also stops flames if
the engine backfires. If the air
cleaner element is not installed
when the engine backfires, you
could be burned.
CAUTION
When replacing the air cleaner ele-
ment, use a genuine SUBARU air
cleaner element. If it is not used,
there is the possibility of causing a
negative effect to the engine.
The air cleaner element functions as a
filter screen. When the element is perfo-
rated or removed, engine wear will be
excessive and engine life shortened.
It is not necessary to clean or wash the air
cleaner element.
& Replacing the air cleaner
element
Replace the air cleaner element according
to the maintenance schedule in the
“Warranty and Maintenance Booklet ”. Un-
der extremely dusty conditions, replace it
more frequently. It is recommended that
you always use genuine SUBARU parts.
! Non-turbo models
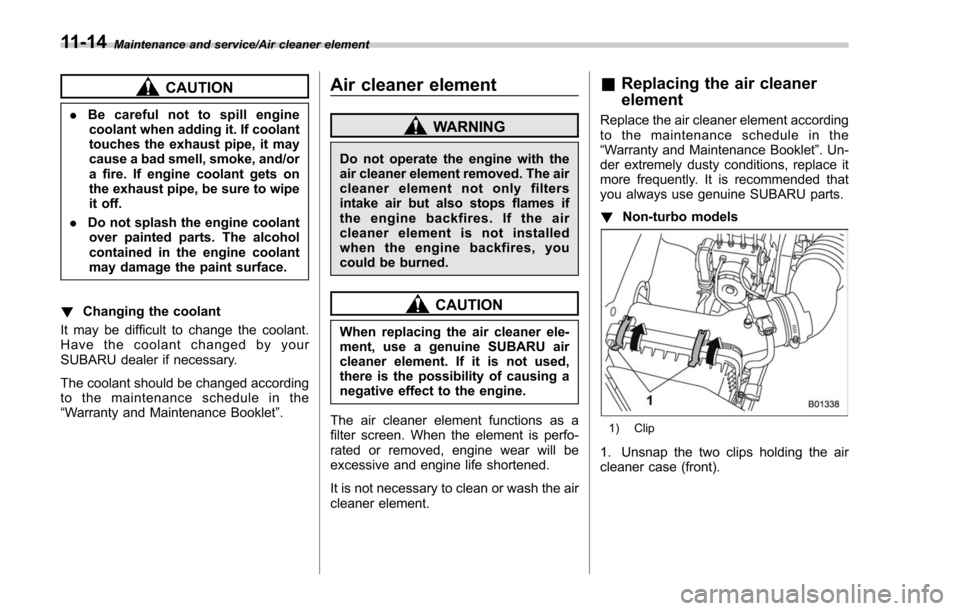
1) Clip
1. Unsnap the two clips holding the air
cleaner case (front).
11-14
Page 547 of 634

Maintenance and service/Spark plugs
the air cleaner element.
3. Clean the inside of the air cleaner case
(both front and rear) with a damp cloth and
install a new air cleaner element.
4. To install the air cleaner case (rear),
insert the three projections on the air
cleaner case (rear) into the slits on the
air cleaner case (front).
5. Install in the reverse order of removal.
Spark plugs
It may be difficult to replace the spark
plugs. It is recommended that you have
the spark plugs replaced by your
SUBARU dealer.
The spark plugs should be replaced
according to the maintenance schedule
in the“Warranty and Maintenance Book-
let ”.
CAUTION
Make sure the cables are replaced in
the correct order.
& Recommended spark plugs
For the recommended spark plugs, refer
to“Electrical system ”F 12-10.
Drive belts
It is unnecessary to check the deflection of
the drive belt periodically because your
engine is equipped with an automatic belt
tension adjuster. However, replacement of
the belt should be done according to the
maintenance schedule in the “Warranty
and Maintenance Booklet ”. Consult your
SUBARU dealer for replacement.
If the drive belt is loose, cracked or worn,
contact your SUBARU dealer.
11-16
Page 548 of 634

Manual transmission oil
It is not necessary to check the transmis-
sion oil level. Check that there are no
cracks, damage or leakage. However, the
oil inspection should be performed ac-
cording to the maintenance schedule in
the“Warranty and Maintenance Booklet ”.
Consult your SUBARU dealer for details.
& Recommended grade and
viscosity
Each oil manufacturer has its own base
oils and additives. Never use different
brands together. For details, refer to
“Manual transmission, front differential
and rear differential gear oil ”F 12-7.
Continuously variable trans-
mission fluid
It is not necessary to check the transmis-
sion fluid level. Check that there are no
cracks, damage or leakage. However, the
fluid inspection should be performed
according to the maintenance schedule
in the “Warranty and Maintenance Book-
let ”. Consult your SUBARU dealer for
details.
Front differential gear oil
(CVT models) and rear differ-
ential gear oil
It is not necessary to check the gear oil
level. Check that there are no cracks,
damage or leakage. However, the oil
inspection should be performed according
to the maintenance schedule in the
“ Warranty and Maintenance Booklet ”.
Consult your SUBARU dealer for details.
& Recommended grade and
viscosity
Each oil manufacturer has its own base
oils and additives. Never use different
brands together. For details, refer to
“Manual transmission, front differential
and rear differential gear oil ”F 12-7.
CAUTION
Using a differential gear oil other
than the specified oil may cause a
decline in vehicle performance.
Maintenance and service/Manual transmission oil11-17
Page 551 of 634

Maintenance and service/Brake booster
Brake booster
If the brake booster does not operate as
described in the following, have it checked
by your SUBARU dealer.
1. With the engine off, depress the brake
pedal several times, applying the same
pedal force each time. The distance the
pedal travels should not vary.
2. With the brake pedal depressed, start
the engine. The pedal should move
slightly down to the floor.
3. With the brake pedal depressed, stop
the engine and keep the pedal depressed
for 30 seconds. The pedal height should
not change.
4. Start the engine again and run for
approximately one minute then turn it off.
Depress the brake pedal several times to
check the brake booster. The brake
booster operates properly if the pedal
stroke decreases with each depression.
Brake pedal
Check the brake pedal free play and
reserve distance according to the main-
tenance schedule in the“Warranty and
Maintenance Booklet ”.
&Checking the brake pedal
free play
1) 0.02 - 0.11 in (0.5 - 2.7 mm)
Stop the engine and firmly depress the
brake pedal several times. Lightly pull the
brake pedal up with one finger to check
the free play with a force of less than 2 lbf
(10 N, 1 kgf).
If the free play is not within proper
specification, contact your SUBARU deal-
er.
&Checking the brake pedal
reserve distance
1) More than 2.56 in (65 mm)
Depress the pedal with a force of approxi-
mately 66 lbf (294 N, 30 kgf) and measure
the distance between the upper surface of
the pedal pad and the floor.
When the measurement is smaller than
the specification, or when the pedal does
not operate smoothly, contact with your
SUBARU dealer.
11-20
Page 552 of 634

Clutch pedal (MT models)
Check the clutch pedal free play according
to the maintenance schedule in the
“Warranty and Maintenance Booklet”.
& Checking the clutch function
Check the clutch engagement and disen-
gagement.
1. With the engine idling, check that there
are no abnormal noises when the clutch
pedal is depressed, and that shifting into
1st or reverse feels smooth.
2. Start the vehicle by releasing the pedal
slowly to check that the engine and
transmission smoothly couple without
any sign of slippage.
&Checking the clutch pedal
free play
1) 0.16 - 0.43 in (4.0 - 11.0 mm)
Lightly depress the clutch pedal down with
your finger until you feel resistance, and
check the free play.
If the free play is not within proper
specification, contact your SUBARU deal-
er.
Hill start assist system
Ensure that the Hill start assist system
operates properly under the following
circumstances.
1. Stop the vehicle on an uphill grade by
depressing the brake pedal (all models)
and clutch pedal (MT models only), with
the engine running.
2. Make sure that the vehicle does not
move backward for several seconds after
the brake pedal is released.
3. Then make sure the vehicle starts
climbing the grade by following the normal
starting procedures.
If the Hill start assist system does not
operate as described above, contact your
SUBARU dealer.
Maintenance and service/Clutch pedal (MT models)11-21
Page 554 of 634

Parking brake stroke
Check the parking brake stroke according
to the maintenance schedule in the
“Warranty and Maintenance Booklet ”.
When the parking brake is properly
adjusted, braking power is fully applied
by pulling the lever up 7 to 8 notches
gently but firmly (approximately 45 lbf [200
N, 20.4 kgf]). If the parking brake lever
stroke is not within the specified range,
have the brake system checked and
adjusted at your SUBARU dealer.
Tires and wheels
& Types of tires
You should be familiar with type of tires
present on your vehicle.
! All season tires
All season tires are designed to provide
an adequate measure of traction, handling
and braking performance in year-round
driving including snowy and icy road
conditions. However all season tires do
not offer as much traction performance as
winter (snow) tires in heavy or loose snow
or on icy roads.
All season tires are identified by “ALL
SEASON ”and/or “M+S ”(Mud & Snow) on
the tire sidewall.
! Summer tires
Summer tires are high-speed capability
tires best suited for highway driving under
dry conditions.
Summer tires are inadequate for driving
on slippery roads such as on snow-
covered or icy roads.
If you drive your vehicle on snow-covered
or icy roads, we strongly recommend the
use of winter (snow) tires.
When installing winter tires, be sure to
replace all four tires. !
Winter (snow) tires
Winter tires are best suited for driving on
snow-covered and icy roads. However
winter tires do not perform as well as
summer tires and all season tires on roads
other than snow-covered and icy roads.
& Tire pressure monitoring
system (TPMS) (if equipped)
The tire pressure monitoring system pro-
vides the driver with a warning message
by sending a signal from a sensor that is
installed in each wheel when tire pressure
is severely low. The tire pressure monitor-
ing system will activate only when the
vehicle is driven. Also, this system may
not react immediately to a sudden drop in
tire pressure (for example, a blow-out
caused by running over a sharp object).
If you adjust the tire pressures in a warm
garage and will then drive the vehicle in
cold outside air, the resulting drop in tire
pressures may cause the low tire pressure
warning light to illuminate. To avoid this
problem when adjusting the tire pressures
in a warm garage, inflate the tires to
pressures higher than those shown on the
tire placard. Specifically, inflate them by an
extra 1 psi (6.9 kPa, 0.07 kgf/cm
2) for
every difference of 10 8F (5.6 8C) between
the temperature in the garage and the
Maintenance and service/Parking brake stroke
–CONTINUED –11-23