2017 SUBARU FORESTER lock
[x] Cancel search: lockPage 30 of 634

Function settings
A SUBARU dealer can change the settings of the functions shown in the following table to meet your personal requirements. Contact
the nearest SUBARU dealer for details. If your vehicle is equipped with a multi function display, the settings for some of these functions
can be changed using the display. For details, refer to“Multi function display”F 3-44.
Item Function Possible settingsDefault setting
Alarm system Alarm system Operation/Non-operation Operation
Monitoring start delay time (after closure of doors) 0 seconds/30 seconds 30 seconds
Impact sensor operation (only models with shock
sensors (dealer option)) Operation/Non-operation Non-operation
Passive arming (models without “keyless access with
push-button start system ”) Operation/Non-operation Non-operation
Dome light and map lights illumination ON/OFFOFF
Keyless access (if equipped) Hazard warning flasher Operation/Non-operation Operation
Audible signal Operation/Non-operation Operation
Audible signal volume Level 1 to 7Level 5
Door unlock selection function (driver ’s door unlock) Driver ’s door only/All doors Driver ’s door only
Door unlock selection function (rear gate unlock) Rear gate only/All doors Rear gate only
Remote keyless entry system Hazard warning flasher Operation/Non-operation Operation
Audible signal Operation/Non-operation Operation
Audible signal volume Level 1 to 7Level 5
Key lock-in prevention Key lock-in prevention Operation/Non-operation Operation
Defogger and deicer system for models
with the automatic climate control system Rear window defogger, outside mirror defogger and
windshield wiper deicer Operation for 15 minutes/
Continuous operationOperation for 15
minutes
– CONTINUED –
25
Page 31 of 634

ItemFunction Possible settingsDefault setting
Dome light Operation of dome light/map light/cargo area light OFF
delay timer OFF/10 seconds/20 sec-
onds/30 seconds30 seconds
Map light
Cargo area light
Battery drainage prevention function Battery drainage prevention function Operation/Non-operation Operation
Seatbelt warning Sounds a chime while driving Operation/Non-operation Operation
Auto on/off headlights (if equipped) Sensitivity of the operation of the auto on/off headlights Low/Mid/High/Max Mid
Reverse gear interlocked rear wiper Reverse gear interlocked rear wiper operation Operation/Non-operation Non-operation*
1
One-touch lane changer Operation of the one-touch lane changer Operation/Non-operation Operation
High beam assist function (if equipped) High beam assist function Operation/Non-operation Operation
Welcome lighting function (if equipped) Welcome lighting function (when approaching) OFF/30 seconds/60 sec- onds/90 seconds30 seconds
Welcome lighting function (when exiting) OFF/30 seconds/60 sec-
onds/90 seconds30 seconds
*1: Except for U.S. model, the default setting will be
“Operation ”.
26
Page 32 of 634

Front seats........................................................... 1-2Manual seat ........................................................ 1-4
Power seat (driver ’s seat —if equipped) .. ............ 1-5
Head restraint adjustment .................................... 1-8
Seat heater (if equipped).................................... 1-9Front seat heater (if equipped) ............................. 1-9
Rear seat heater (if equipped) ............................. 1-10
Rear seats........................................................... 1-11Armrest (if equipped) .......................................... 1-11
Head restraint adjustment ................................... 1-12
Folding down the rear seatback .......................... 1-13
Reclining the seatback (if equipped) ................... 1-15
Seatbelts............................................................. 1-16Seatbelt safety tips ............................................. 1-16
Emergency Locking Retractor (ELR) ................... 1-17
Automatic Locking Retractor/Emergency Locking Retractor (ALR/ELR) ......................................... 1-17
Seatbelt warning light and chime ........................ 1-18
Fastening the seatbelt ........................................ 1-18
Seatbelt maintenance ......................................... 1-24
Front seatbelt pretensioners ............................. 1-25Seatbelt with shoulder belt pretensioner .. ........... 1-25Seatbelt with shoulder belt and lap belt
pretensioners .................................................. 1-26
System monitors ............................................... 1-28
System servicing ............................................... 1-28
Precautions against vehicle modification ............ 1-29
Child restraint systems..................................... 1-29Where to place a child restraint system .............. 1-30
Choosing a child restraint system ...................... 1-32
Installing child restraint systems with ALR/ELR seatbelt ........................................................... 1-32
Installing a booster seat ..................................... 1-36
Installation of child restraint systems by use of lower and tether anchorages (LATCH) .............. 1-37
Top tether anchorages ....................................... 1-40
*SRS airbag (Supplemental Restraint
System airbag) ................................................ 1-42
General precautions regarding SRS airbag
system ............................................................ 1-42
Components ...................................................... 1-49
SUBARU advanced frontal airbag system ........... 1-51
SRS side airbag and SRS curtain airbag ............. 1-61
SRS airbag system monitors .............................. 1-69
SRS airbag system servicing ... .......................... 1-71
Precautions against vehicle modification ............ 1-72
Seat, seatbelt and SRS airbags
1
Page 33 of 634

Seat, seatbelt and SRS airbags/Front seats
Front seats
WARNING
.Never adjust the seat while driv-
ing to avoid loss of vehicle con-
trol and personal injury.
. Before adjusting the seat, make
sure the hands and feet of rear
seat passengers and cargo are
clear of the adjusting mechan-
ism.
. After adjusting the seat, push it
slightly to make sure it is se-
curely locked. If the seat is not
securely locked, it may move or
the seatbelt may not operate
properly.
. Do not put objects under the front
seats. They may interfere with
front seat locking and cause an
accident.
. Seatbelts provide maximum re-
straint when the occupant sits
well back and upright in the seat.
To reduce the risk of sliding
under the seatbelt in a collision,
the front seatbacks should be
always used in the upright posi-
tion while the vehicle is running.
If the front seatbacks are not used in the upright position in a
collision, the risk of sliding under
the lap belt and of the lap belt
sliding up over the abdomen will
increase, and both can result in
serious internal injury or death.
. The SRS airbags deploy with
considerable speed and force.
Occupants who are out of proper
position when the SRS airbag
deploys could suffer very serious
injuries. Because the SRS airbag
needs enough space for deploy-
ment, the driver should always
sit upright and well back in the
seat as far from the steering
wheel as practical while still
maintaining full vehicle control
and the front passenger should
move the seat as far back as
possible and sit upright and well
back in the seat.
WARNING
Place children in the rear seat
properly restrained at all times. The
SRS airbag deploys with consider-
able speed and force and can injure
or even kill children, especially if
they are not restrained or impro-
perly restrained. Because children
are lighter and weaker than adults,
their risk of being injured from
deployment is greater. For that rea-
son, we strongly recommend that
ALL children (including those in
child seats and those that have
outgrown child restraint devices)
sit in the REAR seat properly re-
strained at all times in a child
restraint device or in a seatbelt,
1-2
Page 35 of 634

Seat, seatbelt and SRS airbags/Front seats
&Manual seat
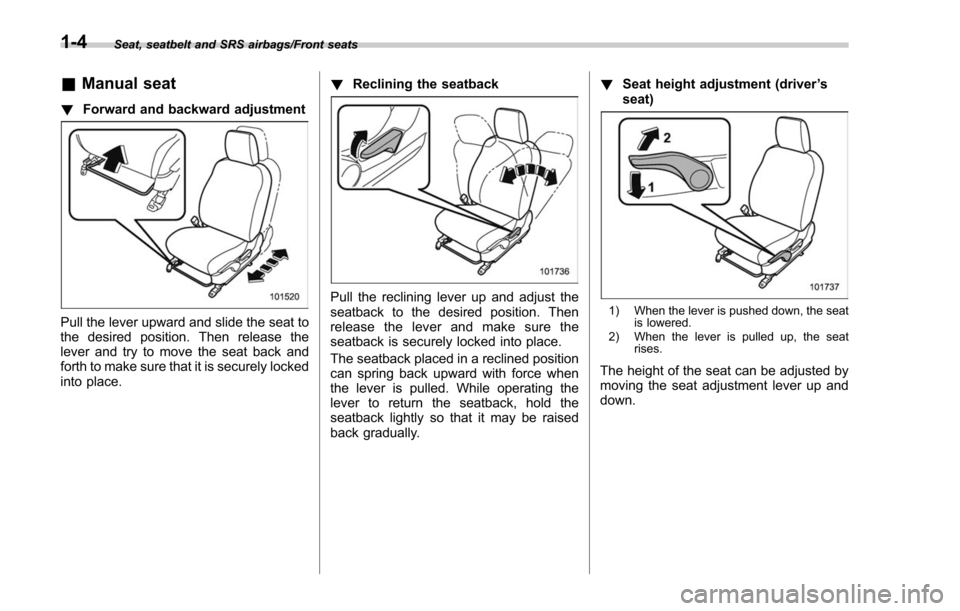
! Forward and backward adjustment
Pull the lever upward and slide the seat to
the desired position. Then release the
lever and try to move the seat back and
forth to make sure that it is securely locked
into place. !
Reclining the seatback
Pull the reclining lever up and adjust the
seatback to the desired position. Then
release the lever and make sure the
seatback is securely locked into place.
The seatback placed in a reclined position
can spring back upward with force when
the lever is pulled. While operating the
lever to return the seatback, hold the
seatback lightly so that it may be raised
back gradually. !
Seat height adjustment (driver ’s
seat)1) When the lever is pushed down, the seat is lowered.
2) When the lever is pulled up, the seat rises.
The height of the seat can be adjusted by
moving the seat adjustment lever up and
down.
1-4
Page 37 of 634

Seat, seatbelt and SRS airbags/Front seats
The following seat positions can be
registered.
.Forward/backward position of the seat
. Angle of seatback
. Angle of seat cushion
. Height of seat
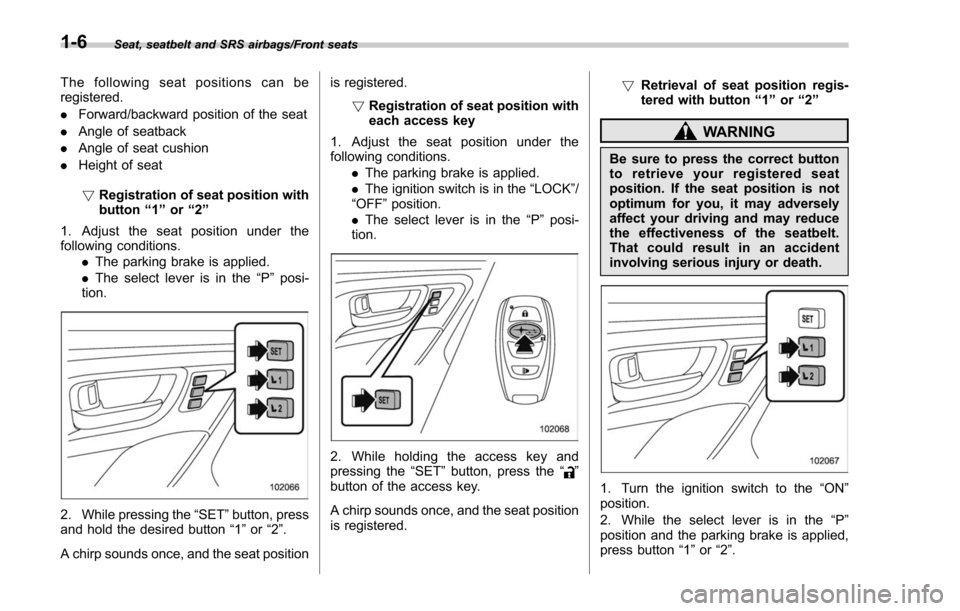
! Registration of seat position with
button “1 ” or “2”
1. Adjust the seat position under the
following conditions. .The parking brake is applied.
. The select lever is in the “P”posi-
tion.
2. While pressing the “SET”button, press
and hold the desired button “1”or “2”.
A chirp sounds once, and the seat position is registered.
!Registration of seat position with
each access key
1. Adjust the seat position under the
following conditions. .The parking brake is applied.
. The ignition switch is in the “LOCK”/
“OFF ”position.
. The select lever is in the “P ” posi-
tion.
2. While holding the access key and
pressing the “SET”button, press the “”
button of the access key.
A chirp sounds once, and the seat position
is registered. !
Retrieval of seat position regis-
tered with button “1 ” or “2 ”
WARNING
Be sure to press the correct button
to retrieve your registered seat
position. If the seat position is not
optimum for you, it may adversely
affect your driving and may reduce
the effectiveness of the seatbelt.
That could result in an accident
involving serious injury or death.
1. Turn the ignition switch to the “ON”
position.
2. While the select lever is in the “P ”
position and the parking brake is applied,
press button “1”or “2”.
1-6
Page 38 of 634

A chirp sounds and the seat moves to the
registered position. When the seat moves
to the registered position, a chirp will
sound.
NOTE
.If a new position is registered for the
same button, the previously registered
seat position is deleted.
. If the vehicle battery is removed, the
registered seat position is not deleted.
. When the button “1 ” or “2 ” is
pressed within 45 seconds after the
driver ’s door is opened, the registered
seat position can be retrieved even if
the ignition switch is in the “LOCK ”or
“ OFF ”position. !
Retrieval of the seat position
registered with access key
1. Hold the registered access key.
2. Unlock the driver ’s door by pressing
the “”button or gripping the door handle.
3. Open the driver ’s door.
A chirp sounds and the seat moves to the
registered position. When the seat moves
to the registered position, a chirp will
sound.
NOTE
. If the registered seat position cannot
be retrieved after performing the pre-
vious procedures, try the following
procedures.
(1) Press the “SET ”button on the
driver ’s door. (2) Press the
“
”button on the
access key or touch the door lock
sensor to lock the doors.
(3) Perform the prior procedures
again.
. If the keyless access function is
disabled, the seat position cannot be
retrieved by gripping the driver ’s door
handle. However, the seat position can
still be retrieved by pressing the “
”
button on the access key. For informa-
tion about how to enable/disable the
keyless access function, refer to “Dis-
abling keyless access function ”F 2-17.
. If a new position is registered for the
same access key, the previously regis-
tered seat position is deleted.
! Clearing the registered seat
position with access key
1. Close the driver ’s door.
2. While holding the access key and
pressing the “SET ”button, press the “
”
button on the access key.
A chirp will sound, and the registered seat
position will be cleared.
Seat, seatbelt and SRS airbags/Front seats
–CONTINUED –1-7
Page 39 of 634

Seat, seatbelt and SRS airbags/Front seats
&Head restraint adjustment
WARNING
. Never drive the vehicle with the
head restraints removed because
they are designed to reduce the
risk of serious neck injury in the
event that the vehicle is struck
from the rear. Also, never install
the head restraints the opposite
way round. Doing so will prevent
the head restraints from func-
tioning as intended. Therefore,
when you remove the head re-
straints, you must reinstall all
head restraints correctly to pro-
tect vehicle occupants.
. All occupants, including the dri-
ver, should not operate a vehicle
or sit in a vehicle ’s seat until the
head restraints are placed in their
proper positions in order to mini-
mize the risk of neck injury in the
event of a crash.
Both the driver ’s seat and front passen-
ger ’s seat are equipped with head re-
straints. Both head restraints are adjusta-
ble in the following ways. !
Head restraint height adjustment
1) Head restraint
2) Release button
To raise:
Pull the head restraint up.
To lower:
Push the head restraint down while
pressing the release button on the top of
the seatback.
To remove:
While pressing the release button, pull out
the head restraint.
To install:
Install the head restraint into the holes that
are located on the top of the seatback until
the head restraint locks. Press and hold
the release button to lower the head
restraint.
Each head restraint should be adjusted so
that the center of the head restraint is
closest to the top of the occupant ’s ears.
NOTE
When the head restraint cannot be
pulled out or installed due to insuffi-
cient clearance between the head re-
straint and the roof, tilt the seat and
then perform the installation and re-
moval tasks.
1-8