2017 SUBARU FORESTER warning light
[x] Cancel search: warning lightPage 441 of 634

Starting and operating/Electronic Brake Force Distribution (EBD) system
Electronic Brake Force Dis-
tribution (EBD) system
The EBD system maximizes the effective-
ness of the brakes by allowing the rear
brakes to supply a greater proportion of
the braking force. It functions by adjusting
the distribution of braking force to the rear
wheels in accordance with the vehicle’s
loading condition and speed.
The EBD system is an integral part of the
ABS and uses some of the ABS compo-
nents to perform its function of optimizing
the distribution of braking force. If any of
the ABS components used by the EBD
system malfunction, the EBD system also
stops working.
When the EBD system is operating, you
may hear a chattering noise or feel a slight
vibration in the brake pedal. This is normal
and does not indicate a malfunction.
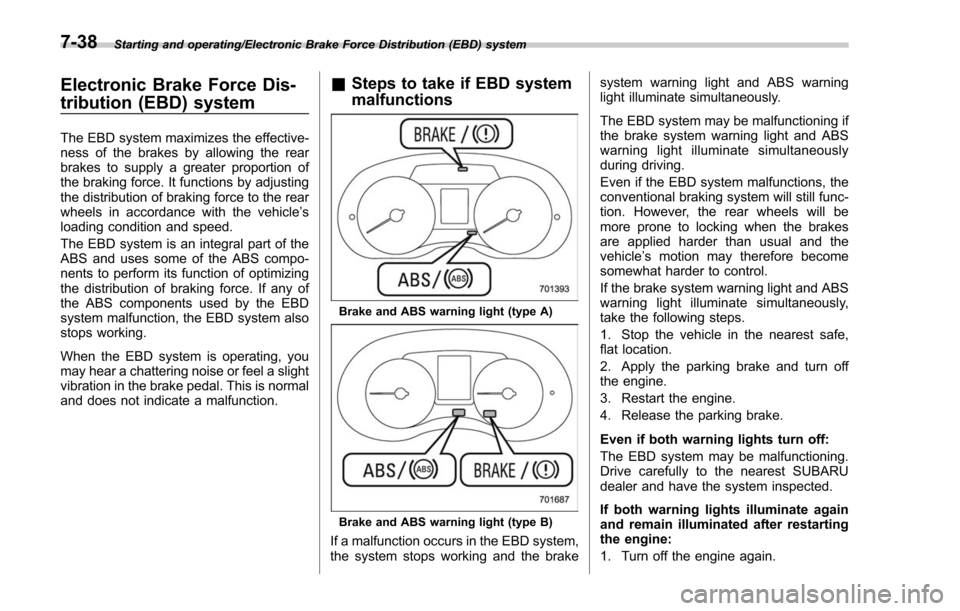
& Steps to take if EBD system
malfunctions
Brake and ABS warning light (type A)
Brake and ABS warning light (type B)
If a malfunction occurs in the EBD system,
the system stops working and the brake system warning light and ABS warning
light illuminate simultaneously.
The EBD system may be malfunctioning if
the brake system warning light and ABS
warning light illuminate simultaneously
during driving.
Even if the EBD system malfunctions, the
conventional braking system will still func-
tion. However, the rear wheels will be
more prone to locking when the brakes
are applied harder than usual and the
vehicle
’s motion may therefore become
somewhat harder to control.
If the brake system warning light and ABS
warning light illuminate simultaneously,
take the following steps.
1. Stop the vehicle in the nearest safe,
flat location.
2. Apply the parking brake and turn off
the engine.
3. Restart the engine.
4. Release the parking brake.
Even if both warning lights turn off:
The EBD system may be malfunctioning.
Drive carefully to the nearest SUBARU
dealer and have the system inspected.
If both warning lights illuminate again
and remain illuminated after restarting
the engine:
1. Turn off the engine again.
7-38
Page 442 of 634

2. Apply the parking brake.
3. Check the brake fluid level. For details
about checking the brake fluid level, refer
to“Checking the fluid level ”F 11-18.
. If the brake fluid level is not below the
“MIN ”mark, the EBD system may be
malfunctioning. Drive carefully to the
nearest SUBARU dealer and have the
system inspected.
. If the brake fluid level is below the
“ MIN ”mark, DO NOT drive the vehicle.
Instead, have the vehicle towed to the
nearest SUBARU dealer for repair.
WARNING
. Driving with the brake system
warning light illuminated is dan-
gerous. This indicates your brake
system may not be working
properly. If the light remains
illuminated, have the brakes in-
spected by a SUBARU dealer
immediately.
. If at all in doubt about whether
the brakes are operating prop-
erly, do not drive the vehicle.
Have your vehicle towed to the
nearest SUBARU dealer for re-
pair.
Vehicle Dynamics Control
system
WARNING
Always use the utmost care in
driving –overconfidence because
you are driving a vehicle with the
Vehicle Dynamics Control system
could easily lead to a serious acci-
dent.
CAUTION
. Even if your vehicle is equipped
with Vehicle Dynamics Control
system, winter tires should be
used when driving on snow-cov-
ered or icy roads; in addition,
vehicle speed should be reduced
considerably. Simply having a
Vehicle Dynamics Control sys-
tem does not guarantee that the
vehicle will be able to avoid
accidents in any situation.
. Activation of the Vehicle Dy-
namics Control system is an
indication that the road being
travelled on has a slippery sur-
face; since having Vehicle Dy- namics Control is no guarantee
that full vehicle control will be
maintained at all times and under
all conditions, its activation
should be seen as a sign that
the speed of the vehicle should
be reduced considerably.
. Whenever suspension compo-
nents, steering components, or
an axle are removed from a
vehicle, have an inspection of
that system performed by an
authorized SUBARU dealer.
. The following precautions should
be observed in order to ensure
that the Vehicle Dynamics Con-
trol system is operating properly:
– All four wheels should be
fitted with tires of the same
size, type, and brand. Further-
more, the amount of wear
should be the same for all
four tires.
– Keep the tire pressure at the
proper level as shown on the
vehicle placard attached to
the driver ’s side door pillar.
– Use only the specified tem-
porary spare tire to replace a
flat tire. With a temporary
spare tire, the effectiveness
Starting and operating/Vehicle Dynamics Control system
–CONTINUED –7-39
Page 445 of 634

Starting and operating/X–mode
OFF indicator light “”on the combination
meter illuminates. The Vehicle Dynamics
Control system will be deactivated and the
vehicle will behave like a model not
equipped with the Vehicle Dynamics Con-
trol system. When the switch is pressed
again to reactivate the Vehicle Dynamics
Control system, the Vehicle Dynamics
Control OFF indicator light turns off.
With the Vehicle Dynamics Control system
deactivated, traction and stability en-
hancement offered by Vehicle Dynamics
Control system is unavailable. Therefore
you should not deactivate the Vehicle
Dynamics Control system except under
above-mentioned situations.
NOTE
. When the switch has been pressed
to deactivate the Vehicle Dynamics
Control system, the Vehicle Dynamics
Control system automatically reacti-
vates itself the next time the ignition
switch is turned to the “LOCK ”/“ OFF ”
position and the engine is restarted.
. If the switch is held down for 30
seconds or longer, the indicator light
turns off, the Vehicle Dynamics Control
system is activated, and the system
ignores any further pressing of the
switch. To make the switch usable
again, turn the ignition switch to the “
LOCK ”/“ OFF ”position and restart the
engine.
. When the switch is pressed to
deactivate the Vehicle Dynamics Con-
trol system, the vehicle ’s running per-
formance is comparable with that of a
vehicle that does not have a Vehicle
Dynamics Control system. Do not de-
activate the Vehicle Dynamics Control
system except when absolutely neces-
sary.
. Even when the Vehicle Dynamics
Control system is deactivated, compo-
nents of the brake control system may
still activate. When the brake control
system is activated, the Vehicle Dy-
namics Control operation indicator
light flashes.
X-mode (if equipped)
WARNING
. Always use the utmost care in
driving –overconfidence be-
cause you are driving a vehicle
with X-mode could easily lead to
a serious accident.
. Always use the utmost care in
driving –overconfidence be-
cause you are driving a vehicle
with hill descent control function
could easily lead to a serious
accident. Be especially careful,
and depress the brake pedal if
necessary when driving on ex-
tremely steep downhill, frozen,
muddy or sandy roads. Failure
to control the vehicle ’sspeed
may cause a loss of control and
result in a serious accident.
CAUTION
. Even if your vehicle is equipped
with X-mode, winter tires or snow
chains should be used when
driving on snow-covered or icy
roads; in addition, vehicle speed
should be reduced considerably.
7-42
Page 447 of 634

Starting and operating/X–mode
X-mode indicator light (type A)
X-mode indicator light (type B)
To activate:
Press the X-mode switch. While the X-
mode is activated, the X-mode indicator light illuminates.
To deactivate:
Press the X-mode switch again. The X-
mode indicator light will turn off when the
X-mode is deactivated.
NOTE
.
Even if you try to activate the X-
mode by pressing the X-mode switch
when the vehicle speed is 12 mph (20
km/h) or more, the X-mode will not be
activated. At this time, a buzzer will
sound twice.
. If the vehicle speed reaches 25 mph
(40 km/h) or more while the X-mode is
activated, a buzzer will sound once and
the X-mode will be deactivated.
NOTE
For models with SI-DRIVE:
. The SI-DRIVE mode will change to
the Intelligent (I) mode when the X-
mode is deactivated.
. The SI-DRIVE mode cannot be chan-
ged while the X-mode is activated. At
this time, a buzzer will sound twice.
. While the engine is running, if any of
the following conditions is met, the X-
mode will be deactivated. In this case, it
is not possible to activate the X-mode.
Also, for models with SI-DRIVE, the mode will change to the Sport (S) mode
and it will not be possible to change to
the other modes.
–The CHECK ENGINE warning
light/malfunction indicator light illu-
minates.
– The AT OIL TEMP warning light
flashes.
– The ABS warning light illumi-
nates.
– The Vehicle Dynamics Control
warning light illuminates.
. If there is a possibility that the
engine could overheat because of a
temperature increase of the engine
coolant, it is not possible to change to
the X-mode. While the vehicle is in the
X-mode, it changes to the Sport (S)
mode when the engine coolant tem-
perature increases.
. It is not possible to activate the X-
mode when the engine is not running,
because the hill descent control func-
tion is not activated.
& Hill descent control function
The hill descent control function will be in
standby mode when the X-mode is acti-
vated and the vehicle speed is less than
approximately 12 mph (20 km/h).
The function will operate when the vehicle
7-44
Page 448 of 634

speed is less than approximately 12 mph
(20 km/h) and the accelerator ratio is less
than approximately 10%.
The function will turn off when the vehicle
speed is more than approximately 12 mph
(20 km/h) and the accelerator pedal is
depressed.
NOTE
.Even while the hill descent control
function is operating, you can vary the
vehicle speed by using the brake pedal
or accelerator pedal.
. During braking by the hill descent
control function, the brake system
warning light will illuminate.
. The hill descent control function
may also operate on a flat road.
. The hill descent control function
may be considered normal when the
following conditions occur.
–An operating sound is heard
briefly from the engine compart-
ment while the hill descent control
function is operating.
– The sensation of depressing the
brake pedal is different, (harder
than usual etc.) when the brake
pedal is depressed during hill des-
cent control function operation. !
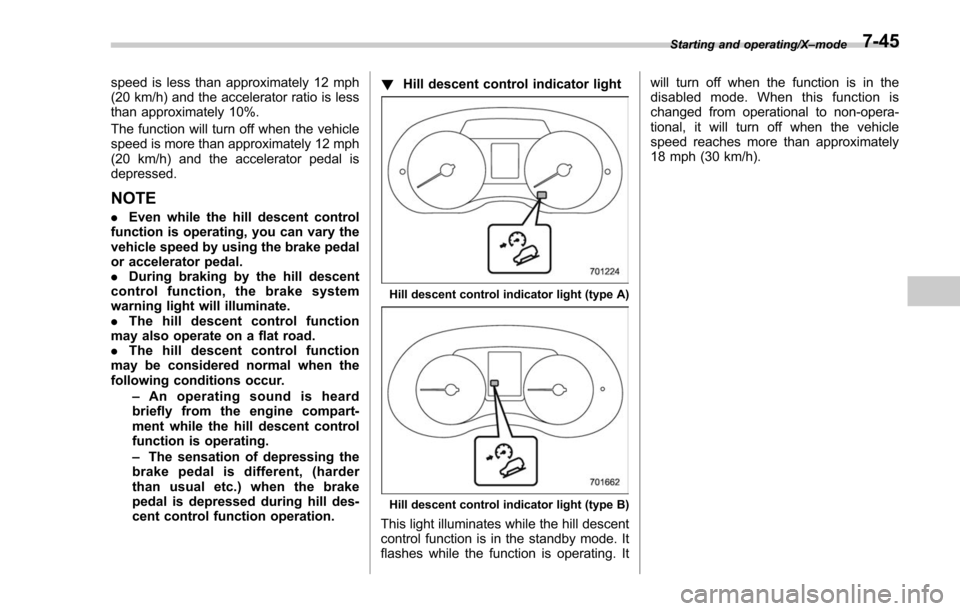
Hill descent control indicator light
Hill descent control indicator light (type A)
Hill descent control indicator light (type B)
This light illuminates while the hill descent
control function is in the standby mode. It
flashes while the function is operating. It will turn off when the function is in the
disabled mode. When this function is
changed from operational to non-opera-
tional, it will turn off when the vehicle
speed reaches more than approximately
18 mph (30 km/h).
Starting and operating/X
–mode7-45
Page 449 of 634

Starting and operating/Tire pressure monitoring system (TPMS) (U.S.–spec. models)
Tire pressure monitoring
system (TPMS) (U.S.-spec.
models)
Low tire pressure warning light (type A)
Low tire pressure warning light (type B)
The tire pressure monitoring system pro-
vides the driver with a warning message.
The tire pressure monitoring system will
activate only when the vehicle is driven at
speeds above 25 mph (40 km/h). Also,
this system may not react immediately to a
sudden drop in tire pressure (for example,
a blow-out caused by running over a
sharp object).
WARNING
. If the low tire pressure warning
light illuminates while driving,
never brake suddenly. Instead,
perform the following procedure.
Otherwise, an accident involving
serious vehicle damage and ser-
ious personal injury could occur.
(1) Keep driving straight ahead while gradually reducing
speed.
(2) Slowly pull off the road to a safe location.
(3) Check the pressure for all four tires and adjust the pressure
to the COLD tire pressure
shown on the tire placard.
The tire placard is located on
the door pillar on the driver ’s
side. Even when the vehicle is driven a
very short distance, the tires get
warm and their pressures in-
crease accordingly. Be sure to
let the tires cool thoroughly be-
fore adjusting their pressures to
the standard values shown on
the tire placard. Refer to “Tires
and wheels” F11-23. The tire
pressure monitoring system
does not function when the ve-
hicle is stationary. After adjusting
the tire pressures, increase the
vehicle speed to at least 25 mph
(40 km/h) to start the TPMS
rechecking of the tire inflation
pressures. If the tire pressures
are now above the severe low
pressure threshold, the low tire
pressure warning light should
turn off a few minutes later.
If this light still illuminates while
driving after adjusting the tire
pressure, a tire may have signifi-
cant damage and a fast leak that
causes the tire to lose air rapidly.
If you have a flat tire, replace it
with a spare tire as soon as
possible.
. When a spare tire is mounted or a
wheel rim is replaced without the
original pressure sensor/trans-
7-46
Page 450 of 634

mitter being transferred, the low
tire pressure warning light will
illuminate steadily after blinking
for approximately one minute.
This indicates the TPMS is un-
able to monitor all four road
wheels. Contact your SUBARU
dealer as soon as possible for
tire and sensor replacement and/
or system resetting.
. Do not inject any tire liquid or
aerosol tire sealant into the tires,
as this may cause a malfunction
of the tire pressure sensors. If
the light illuminates steadily after
blinking for approximately one
minute, promptly contact a
SUBARU dealer to have the sys-
tem inspected.
CAUTION
. Do not place metal film or any
metal parts in the cargo area.
This may cause poor reception of
the signals from the tire pressure
sensors, and the tire pressure
monitoring system will not func-
tion properly.
. FCC WARNING
Changes or modifications not expressly approved by the party
responsible for compliance
could void the user
’s authority
to operate the equipment.
NOTE
This device complies with Part 15 of
the FCC Rules. Operation is subject to
the following two conditions:
. U.S.-spec. models
FCC ID: CWTWD1U781
NOTE
This device complies with Part 15 of
the FCC Rules. Operation is subject to
the following two conditions: (1) This
device may not cause harmful inter-
ference, and (2) this device must
accept any interference received, in-
cluding interference that may cause
undesired operation.
Parking your vehicle
& Parking brake
To set the parking brake, depress the
brake pedal firmly and hold it down until
the parking brake lever is fully pulled up.
To release the parking brake, perform the
following procedure.
1. Pull the lever up slightly.
2. Press the release button.
3. Lower the lever while keeping the
button pressed.
When the parking brake is set while the
engine is running, the parking brake
warning light illuminates. After starting
the vehicle, be sure that the warning light
has turned off before the vehicle is driven.
Refer to “Brake system warning light ”F 3-
Starting and operating/Parking your vehicle
–CONTINUED –7-47
Page 453 of 634

Starting and operating/Hill start assist system
ditions.
.when the clutch pedal is depressed
while the brake pedal is also depressed
(MT models)
. when the vehicle has stopped with the
brake pedal depressed (CVT models)
Braking power is maintained temporarily
(for approximately 2 seconds) by the Hill
start assist system after the brake pedal is
released. The driver is therefore able to
start the vehicle in the same way as on a
level grade, just using the clutch pedal
(MT models only) and accelerator pedal
(all models).
If the braking power of the Hill start assist
system is insufficient after the brake pedal
is released, apply more braking power by
depressing the brake pedal again.
The Hill start assist system may not
operate on slight grades. Also, the Hill
start assist system does not operate in the
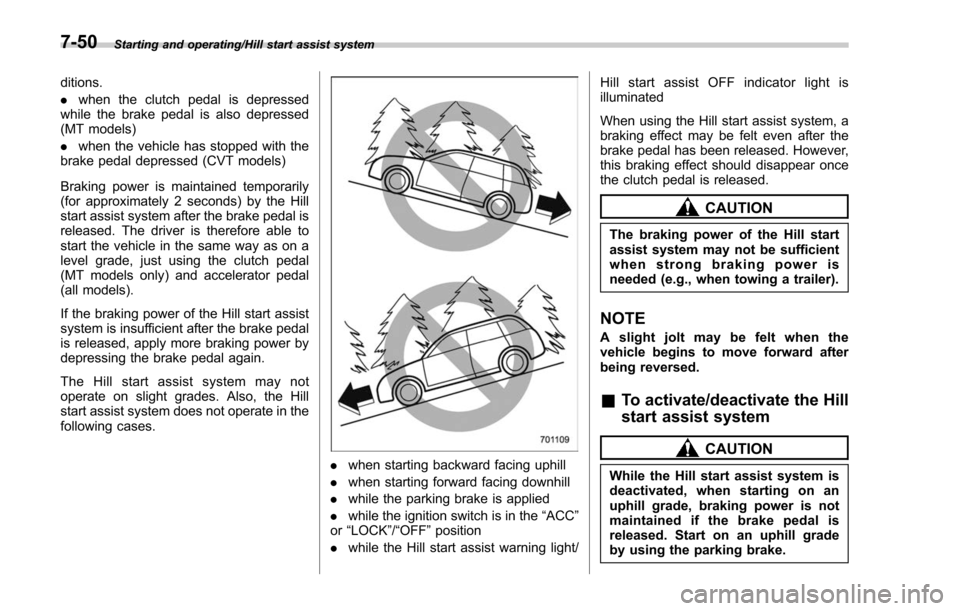
following cases.
. when starting backward facing uphill
. when starting forward facing downhill
. while the parking brake is applied
. while the ignition switch is in the “ACC”
or “LOCK”/ “OFF”position
. while the Hill start assist warning light/ Hill start assist OFF indicator light is
illuminated
When using the Hill start assist system, a
braking effect may be felt even after the
brake pedal has been released. However,
this braking effect should disappear once
the clutch pedal is released.
CAUTION
The braking power of the Hill start
assist system may not be sufficient
when strong braking power is
needed (e.g., when towing a trailer).
NOTE
A slight jolt may be felt when the
vehicle begins to move forward after
being reversed.
&
To activate/deactivate the Hill
start assist system
CAUTION
While the Hill start assist system is
deactivated, when starting on an
uphill grade, braking power is not
maintained if the brake pedal is
released. Start on an uphill grade
by using the parking brake.
7-50