2017 SUBARU BRZ start stop button
[x] Cancel search: start stop buttonPage 11 of 334

Introduction 9
Before Use
•Always replace fuses with fuses of the same specified
capacity (amperage). Using a fuse with a higher capacity
than the specification may result in a fire.
•If a foreign object or water enters the unit, smoke or a
strange odor may be emitted. If such an abnormality occurs,
stop using the unit immediately and contact your SUBARU
dealer. An accident, fire or electric shock may result if you
continue to use the unit under these conditions.
•In a thunderstorm, do not touch the antenna line or the unit.
Lightning may cause an electric shock.
•Do not park or stop in prohibited areas to use the unit.
•If direct sunlight shines into the vehicle, light may reflect off
the product. Be very careful while driving.
•Never use headphones or earphones while driving. Driving
while not being able to hear sounds from outside the vehicle
may result in a traffic accident.
CAUTION
•Although the unit can be used when the ignition switch is
set to either ON or ACC, to protect the battery, start the
engine before using the unit.
•Do not use the unit anywhere other than in a vehicle. Doing
so may result in an electric shock or other injury.
•While driving, keep the volume low enough for you to hear
outside sounds. Driving while not being able to hear sounds
from outside the vehicle may result in an accident.
•Be careful of the volume when turning on the power. If a
loud noise is emitted suddenly when you turn on the power,
it may damage your hearing.
•Do not apply a strong force to the display. Doing so may
result in a malfunction.
•Do not put your fingers or hands into the disc slot or SD
memory card slot. Doing so may result in an injury.
•Do not touch the hot parts of the unit. The hot parts may
burn you.
•Do not use while there is an abnormality such as sound
breakup or distortion. Doing so may result in a fire.
•Using the unit during extremely high or low temperature
may result in mistaken operation or a malfunction. In
particular, the temperature inside the vehicle can often rise
to a high level during the summer. Cool the vehicle, for
example by opening a window, before using the unit.
•Be careful if metal or water enters the unit, or the unit is
exposed to a strong impact, because it may result in a
malfunction.
•The touch buttons on the display screen may not operate
correctly if condensation forms inside them. If this happens,
do not attempt to operate the switches until the
condensation has disappeared.
Page 16 of 334

14 Introduction
Before Use
Turning the Power On or Off
This unit switches on automatically at ignition, and when started for the
first time, it displays the Navigation setting screen*. When the engine is
switched off, the unit also switches off.
* The second and subsequent times that the unit is started, the mode
screen that was last in use is displayed. If the last mode in use was the
Navigation screen, then your current position will be displayed. If it was
the Audio operation screen, then the audio selection that was last playing
will be displayed.
■Turning on the power
1The Caution screen is displayed automatically. When you
touch (I Agree), the “SD Eject” Caution screen
appears.
• To select a language, touch (Languages) to display
the Languages screen. Touch the language that you want to
use from the list. For details, see “Language setting” on Page 35.
2Touch (OK) to display the Navigation setting screen.
• To stop the “SD Eject” Caution screen from being displayed
again, touch
(The
message won't be indicated from now onward) and then touch
(OK).NOTEDo not press on main unit, or "Talk" button on steering wheel without
touching (I Agree) on the Caution screen. Otherwise, Navigation
commands cannot be used.
I Agree
Languages
OK
The message won't be indicated from now onward
OK
<“SD Eject” Caution screen>
I Agree
Page 197 of 334

Audio and Visual 195
Basic Operation
■Adjusting the Sound Quality
You can adjust the sound quality from the low band to the high band.
Adjusting the sound quality
1On the Sound Settings screen, touch (Adjust) in
EQ Settings.
2Touch the sound band that you want to adjust.
3Touch or .
• When you touch and hold, the value changes continuously but
stops at the center value. Touch or again to restart.
• You can also adjust to the desired level by touching the screen.
• The maximum adjustment is +10 and the minimum
adjustment is -10.
• To reset the sound quality, touch (Flat).
• After completing the adjustment, touch to save the
adjusted settings and return to the previous screen.
Saving the sound quality
You can save the adjusted sound quality settings.
1Adjust the sound quality.
2Touch any button from to for 2 seconds or
more.
• Values cannot be saved for (Flat).
Adjust
Flat
Flat
Page 199 of 334

Audio and Visual 197
Basic Operation
Adjusting the audio balance
You can adjust the sound balance from front to rear and left to right.
1On the Sound Settings screen, touch (Adjust) in
Sound Position.
• When your unit is audio system type A, touch (Adjust)
and then start operation from step 3.
2Touch (Fader/Balance).
3Touch the balance point that you want to use.
• To fine adjust, touch any of the balance adjusting buttons
, , or to change the value by 1 step.
When you touch and hold one of the balance adjusting buttons
, , or , the value changes continuously
but stops at the center value. To continue to change the
balance, touch one of the balance adjusting buttons again.
• You can also adjust to the desired balance by touching the
screen.
• Touch (Center) to cancel the Fader/Balance setting and
return to the center value.
• Touch (Position) to return to the previous screen.
(Only for type B)
• After completing the adjustment, touch to save the
adjusted settings and return to the Sound Settings screen.
NOTE
You cannot set the volume balance at the same time as positioning selector
adjustments. (Only for type B)
Adjust
Adjust
Fader/Balance
Center
Position
Page 242 of 334

240 Audio and Visual
Visual Operations
Selecting consecutive files
1Touch or .
•:
Advance to the next file.
( Touch once):
Return to the start of the currently playing file.
( Touch twice or more):
Return to the previous file.
■Fast forwarding and fast reversing
You can fast forward or fast reverse the currently playing video.
1Touch or for 1 second or more.
•:
Fast forward the video.
:
Fast reverse the video.
Fast forward (or fast reverse) operates until you release your
finger from the button.
NOTE
Sound does not output during fast forwarding and fast reversing.
■Pausing a video
1To u c h .
• During pause, touch to restart playback.
■Stopping a video
1To u c h .
■Repeating the video file
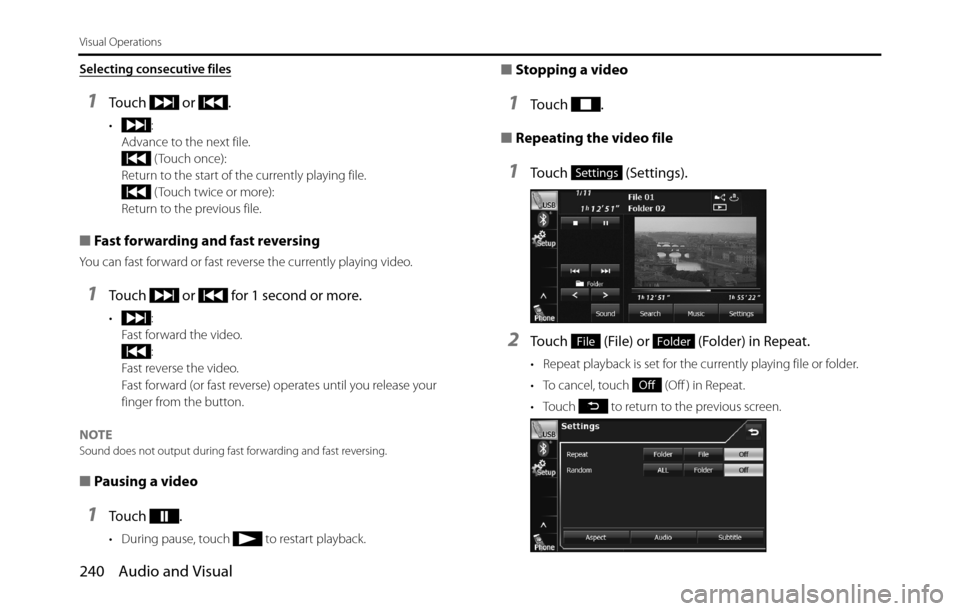
1Touch (Settings).
2Touch (File) or (Folder) in Repeat.
• Repeat playback is set for the currently playing file or folder.
• To cancel, touch (Off ) in Repeat.
• Touch to return to the previous screen.
Settings
FileFolder
Off
Page 273 of 334

Audio and Visual 271
How to Operate Portable Audio Devices
NOTEThe button display will vary depending on each station or content item. (1) Station List
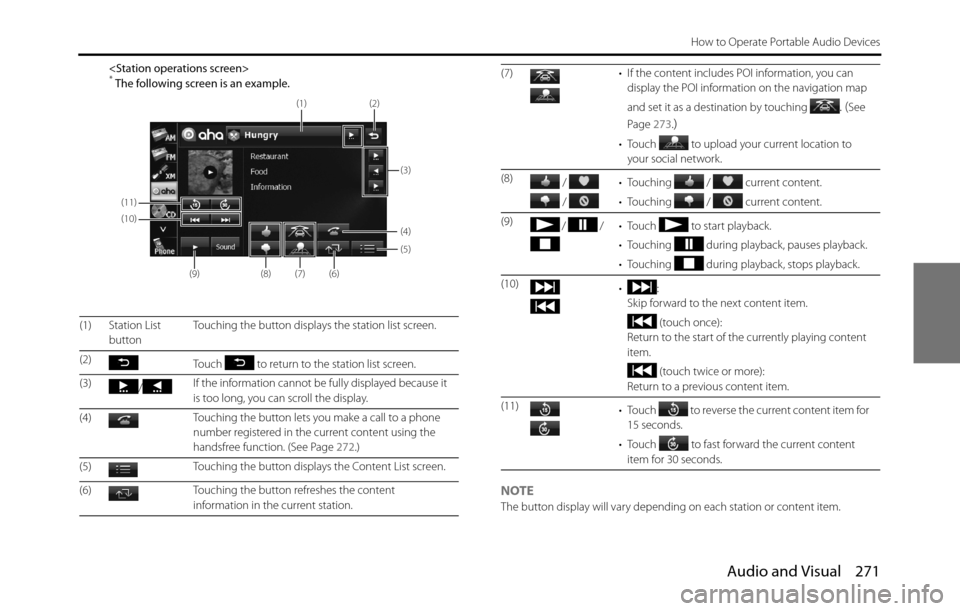
buttonTouching the button displays the station list screen.
(2)
Touch to return to the station list screen.
(3)
/If the information cannot be fully displayed because it
is too long, you can scroll the display.
(4) Touching the button lets you make a call to a phone
number registered in the current content using the
handsfree function. (See Page 272.)
(5) Touching the button displays the Content List screen.
(6) Touching the button refreshes the content
information in the current station.
(11)
(10)
(9)
(8)(7)(6)
(5) (4)
(3) (2)
(1)
(7) • If the content includes POI information, you can
display the POI information on the navigation map
and set it as a destination by touching
. (See
Page 273.
)
• Touch to upload your current location to
your social network.
(8)
/
/ • Touching / current content.
• Touching / current content.
(9)
/ / • Touch to start playback.
• Touching during playback, pauses playback.
• Touching during playback, stops playback.
(10)
•:
Skip forward to the next content item.
(touch once):
Return to the start of the currently playing content
item.
(touch twice or more):
Return to a previous content item.
(11)
• Touch to reverse the current content item for
15 seconds.
• Touch to fast forward the current content
item for 30 seconds.