2017 SUBARU BRZ language
[x] Cancel search: languagePage 16 of 334

14 Introduction
Before Use
Turning the Power On or Off
This unit switches on automatically at ignition, and when started for the
first time, it displays the Navigation setting screen*. When the engine is
switched off, the unit also switches off.
* The second and subsequent times that the unit is started, the mode
screen that was last in use is displayed. If the last mode in use was the
Navigation screen, then your current position will be displayed. If it was
the Audio operation screen, then the audio selection that was last playing
will be displayed.
■Turning on the power
1The Caution screen is displayed automatically. When you
touch (I Agree), the “SD Eject” Caution screen
appears.
• To select a language, touch (Languages) to display
the Languages screen. Touch the language that you want to
use from the list. For details, see “Language setting” on Page 35.
2Touch (OK) to display the Navigation setting screen.
• To stop the “SD Eject” Caution screen from being displayed
again, touch
(The
message won't be indicated from now onward) and then touch
(OK).NOTEDo not press on main unit, or "Talk" button on steering wheel without
touching (I Agree) on the Caution screen. Otherwise, Navigation
commands cannot be used.
I Agree
Languages
OK
The message won't be indicated from now onward
OK
<“SD Eject” Caution screen>
I Agree
Page 25 of 334

Introduction 23
Before Use
Unit Settings
In addition to settings for navigation and audio operations,
the following settings can be performed for the unit.
•Bluetooth setting (See Page 24.)
•Interface Customization (See Page 25.)
•Opening screen setting (See Page 26.)
•Time zone setting (See Page 27.)
•Link to Day/Night View setting (See Page 28.)
•Voice recognition setting (See Page 30.)
•Guide tone setting (See Page 31.)
•Aha Setting (See Page 32.)
•Deleting Personal Data (See Page 33.)
•Initializing Settings menu (See Page 34.)
•Language setting (See Page 35.)
Various Unit Settings
■Displaying the Setup screen
Display the Setup screen to perform various settings.
1Press .
2Touch .
• If is not displayed, touch .
3Touch the button that you want to set.
Setup
Setup
Page 26 of 334

24 Introduction
Before Use
NOTE
:
Perform the Bluetooth settings. (See Page 24.)
(Settings):
Perform the unit settings. (See Page 25 - 34.)
(Software Version):
View information such as the map data that is stored on the unit or version
information for the audio application. (See Page 36.)
(DivX(R) VOD):
Display DivX VOD code. (See Page 244.)
(System Check):
Check the sensitivity of the GPS signal reception, or the connection of the
parking and reverse signals. (See Page 174.)
(Language):
Perform the language setting (See Page 35.)
(SD Eject):
Touch to remove the map SD card or the SD memory card that contains the
picture data. (See Page 16.)
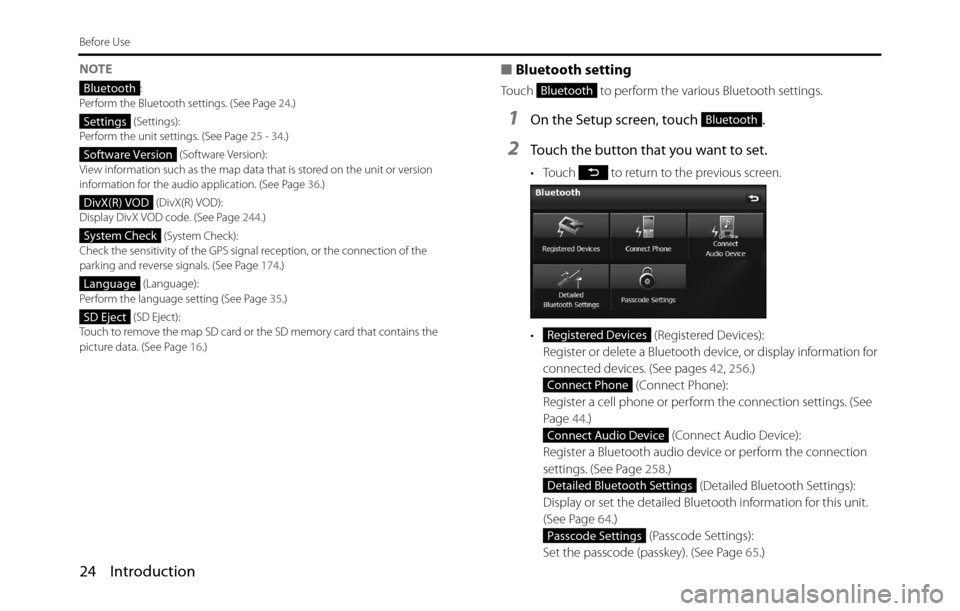
■Bluetooth setting
Touch to perform the various Bluetooth settings.
1On the Setup screen, touch .
2Touch the button that you want to set.
• Touch to return to the previous screen.
• (Registered Devices):
Register or delete a Bluetooth device, or display information for
connected devices. (See pages 42, 256.)
(Connect Phone):
Register a cell phone or perform the connection settings. (See
Page 44.)
(Connect Audio Device):
Register a Bluetooth audio device or perform the connection
settings. (See Page 258.)
(Detailed Bluetooth Settings):
Display or set the detailed Bluetooth information for this unit.
(See Page 64.)
(Passcode Settings):
Set the passcode (passkey). (See Page 65.)
Bluetooth
Settings
Software Version
DivX(R) VOD
System Check
Language
SD Eject
Bluetooth
Bluetooth
Registered Devices
Connect Phone
Connect Audio Device
Detailed Bluetooth Settings
Passcode Settings
Page 37 of 334

Introduction 35
Before Use
2Touch (Initialize).
3Touch (Yes).■Language setting
You can change the navigation and audio display language, and the
voice recognition language.
1On the Setup screen, touch (Language).
2Touch the language that you want to use.
Initialize
Yes
Language
Page 81 of 334

Navigation 79
Read First
This software is designed for optimum performance when
used for car navigation. It does not need a stylus for
operation. You can easily use buttons and maps on the screen
by touching them with the tip of your finger.
When you start the navigation software for the first time, the
initial settings screen is automatically displayed. Follow the
steps below to use the initial settings screen.
1Confirm the end-user license agreement. Touch
(Accept) to continue.
2The Setup Wizard starts. Touch (Next) to continue.
3Select the language and narrator you want to use for
voice guidance messages. Touch (Next) to
continue. You can change this at any time from Sound
and Warnings settings. (See Page 157.)
• When the TTS Voice mode is selected, the voice control
navigation and street guidance can be used. These functions
cannot be used when the Natural Voice mode is selected.
Accept
Next
Next
Page 158 of 334

156 Navigation
Reference Data
Settings Menu
Configures programs and changes operational patterns for
the software. On the navigation menu, touch (More),
and then touch (Settings).
The Settings menu contains a variety of options. Touch or
scroll the list with your finger to view the entire list.
• (Sound and Warnings):
Performs volume adjustment or changes the voice guidance
language. Also enables various warnings and warning settings. (See
Page 157.)
• (Customize Quick Menu):
Allows you to set Quick menu items to suit your needs. Touch the
button you want to change, and then select another function from
the list. (See Page 158.)• ( Traffic):
Sets On/Off of traffic information display and the method to use the
received real-time traffic information on route search. (See Page 160.)
• (Route Settings):
Sets the route search method. Select the type of vehicle you are
using, the road category to use for the route search, and the route
search method. (See Page 161.)
• (Map Settings):
Fine tunes the Map screen appearance. Performs adjustments for
your selected map display, selects from a list of color designs used for
daytime and nighttime, turns the path log on or off, and manages
the spot display categories (allows you to select the type of spot
displayed on the map). (See Page 162.)
• ( Visual Guidance):
Changes settings related to Map screen guidance. (See Page 164.)
• (Units and Formats):
Sets display units and the date display. (See Page 165.)
• ( Trip Monitor):
Contains useful information on the user's distance moved in the trip
logs and path logs. You can save trip logs automatically by turning
this setting on, or save them manually when arriving at a destination.
(See Page 165.)
• (Start Configuration Wizard):
Changes basic software configurations set during the initial setup
process. See step 3 in “Read First” on Page 79.
More
Settings
Sound and Warnings
Customize Quick Menu
Traffic
Route Settings
Map Settings
Visual Guidance
Units and Formats
Trip Monitor
Start Configuration Wizard
Page 159 of 334

Navigation 157
Reference Data
Sound and Warnings
Performs volume adjustment or changes the voice guidance language.
Also enables various warnings and warning settings.
• (Volume):
Touch this button to adjust various volumes in the application. The
type and buttons for various different volumes is displayed on a new
screen. See the following items for more details.
• ( Voice Language):
This button displays the current language for voice guidance. Touch
this button to select a new language/narrator from the available
languages and list of narrators. When you touch an item from the list,
a sample of the audio is played back. Touch after selecting a
new voice language.
• (TTS Pro):
Touch this button to select the frequency of voice information, as
well as turning on or off various voice information such as
information on traffic conditions.• (Verbosity Level):
You can select the Verbosity Level from “Minimal”, “Compact”, or
“Verbose”.
• ( Voice Recognition):
Touch this button to turn on or off talk back voice recognition results,
or change the voice recognition method.
• (Alert Point Settings):
Displays driver warning information on the map. Touch this button
to turn these warnings on or off, and set how far from the danger the
warning should be generated. You can make individual settings for
each type of warning.
• ( Warning Sign Alerts):
Displays driver warning information on the map. Touch this button
to turn these warnings on or off, and set how far from the danger the
warning should be generated. You can make individual settings for
each type of warning.
You can adjust the volume for the following voice categories.
•Guidance:
Changes the volume for the guidance voice (when guiding using a
narrator).
•Alert Beeps:
Changes the volume for audio warnings (the beep).
Adjustment buttons for each audio classification:
•Volume slider:
Adjusts the volume of the associated audio. CAUTION
Be sure to set the volume of the audio at an appropriate level.
Improper volume setting may result in hearing damage or a
traffic accident.
Volume
Voice Language
TTS Pro
Verbosity Level
Voice Recognition
Alert Point Settings
Warning Sign Alerts
Page 167 of 334

Navigation 165
Reference Data
Units and Formats
Sets display units and the date display.
• (Units and Formats):
Sets the units used by the program to measure distance. Voice
guidance languages do not support all units displayed in the list.
You can select to display the time in various international date
formats.
Types of display units and date display settings:
• (Distance):
Switches the units used to display distance.
• (Fuel Economy):
Switches the units used to display fuel consumption.
• (Currency):
Displays the keyboard screen allowing you to enter the currency
name. (For the keyboard, see “Using the Keyboard” on Page 84.)
• (Date Format):
Switches the units used to display the date.
• (Date Delimiter):
Switches the date delimiter.
• (Coordinate Display Format):
Switches the coordinate display format.
Trip Monitor
Contains useful information on the user's distance moved in the trip
logs and path logs. You can save trip logs automatically by turning this
setting on, or save them manually when arriving at a destination. You
can view all logs on the trip monitor. Launch the trip monitor from the
“Others” menu.
• (Enable Auto-Saving):
The trip monitor saves statistical data for the distance traveled. You
can set it so that the route is saved automatically if you need a log
after driving.
•Trip Database Size:
This is not a button. This line indicates the current size of the trip
database. This shows the total for all saved trip logs and path logs.
• (Save Track Log):
You can save path logs (positional order acquired from GPS receiver)
in the trip log.
Units and Formats
Distance
Fuel Economy
Currency
Date Format
Date Delimiter
Coordinate Display Format
Enable Auto-Saving
Save Track Log