2017 SUBARU BRZ audio
[x] Cancel search: audioPage 2 of 334

This supplement contains explanations and instructions for correctly
operating the following systems.
· Navigation System
· Audio and Visual System
· Handsfree System
· Aha Smartphone Application integration
If your vehicle contains one of the systems above, be sure to check the
contents of this supplement carefully.
If you transfer the ownership of the vehicle to another person, make
sure that this supplement is provided with the Owner's Manual inside
the vehicle.
The information, specifications and illustrations in this supplement are
valid at the time of publication. Fuji Heavy Industries reserves the right
to change the specifications and design without prior notice, with no
obligation to perform the same or equivalent changes to vehicles sold
in the past.
This Owner's Manual supplement applies to all models, and describes
all devices, including manufacturer-installed options. This means that
information may be included about devices that are not installed in
your vehicle.
Subaru STARLINK is the “in-car connectivity system” available on select Subaru
vehicles.
FUJI HEAVY INDUSTRIES LTD., TOKYO, JAPAN
is a registered trademark of Fuji Heavy Industries Ltd.
©Copyright 2014, Fuji Heavy Industries Ltd.
Foreword
Page 6 of 334

4
Audio and Visual
Before Using the Audio and Visual System ............................. 182
Precautions When Using the System ................................................. 182
■About the audio and visual system ........................................................................................183
Precautions for Use ................................................................................... 185■About Discs ............................................................................................................................................186
Basic Operation ......................................................................... 189
Switching the Audio Source .................................................................. 189
■Switching the Audio Source .......................................................................................................189
■Source Operations Screen ............................................................................................................190
Volume Control .......................................................................................... 193■Main Volume Control ......................................................................................................................193
■Displaying the Sound Settings Screen .................................................................................194
Audio Operations ...................................................................... 200
Using the Radio .......................................................................................... 200
■Using the Radio ...................................................................................................................................200
Using the XM Radio ................................................................................... 207■Using the XM Radio ..........................................................................................................................207
Using the CD Player .................................................................................. 217■Using the CD Player ..........................................................................................................................217
Using the MP3/WMA Player ................................................................... 221■Using the MP3/WMA Player ........................................................................................................221
■About MP3/WMA ...............................................................................................................................226
■Creating and Playing MP3/WMA Files ..................................................................................229
Using the USB Music File Player ........................................................... 230■Using the USB Music File Player ................................................................................................230
■About USB Devices ...........................................................................................................................235
Visual Operations .......................................................................237
Using the USB Video File Player ............................................................ 237
■Using the USB Video File Player ................................................................................................ 237
■Displaying DivX VOD code .......................................................................................................... 244
■About USB Devices ........................................................................................................................... 246
How to Operate Portable Audio Devices .................................. 248
Using the iPod�“ Player ............................................................................. 248■Using the iPod Player ...................................................................................................................... 248
■
About the Supported iPods ........................................................................................................ 254
Using Bluetooth Audio ............................................................................. 255■Before Using Bluetooth Audio ..................................................................................................255
■Using a Portable Device ................................................................................................................ 261
Using Aha�¥ by HARMAN ........................................................................ 266■About Aha .............................................................................................................................................. 266
■Using Aha Application in your vehicle ................................................................................. 269
Using AUX ..................................................................................................... 274■Using AUX .............................................................................................................................................. 274
Page 13 of 334

Introduction 11
Before Use
Viewing This Document
NOTEIn this document, the unit is generally described using the screens which appear when the optional devices are connected. Navigation is mostly described using the
Heading - upwards 1 screen.
About button display
When a panel button should be pressed, button names are shown as ( , , etc.).
When a touch button on the screen should be touched, button names are shown as or [�c�c�c].
Audio and Visual 217
Audio OperationsUsing the CD PlayerUsing the CD Player
(1) Title information scroll buttons*(2) Settings button
(3) Search button
(4) Track up/down and fast forward (fast reverse) buttons
(5) AUDIO button
* The full title will be displayed unless it is too lengthy. If the length of the
information is too long, title information scroll buttons will be displayed.
■Listening to a CDInsert a CD into the disc slot, and it will start playing.1Press .2To u c h ( C D ) .• The playback starts.
NOTE
•Playback may be intermittent when there is a scratch on the CD or when the
recorded side is dirty. For details, see “About Discs” on Page 186.
•If track titles and other data are recorded in the CD-Text format, they can be
displayed.
•It may not be possible to display the CD-Text of CD-R/RW discs.
(2) (3) (4) (5)(1)
CD
Section titleThe section title is displayed here.Item titleA title is assigned for each item.
Operation titleA title is assigned for each operation
objective.
NOTEDescribes information related to the
operation.
Operation screenThe screen to be operated is displayed.
Operation procedureDescribes the operation.
Follow the numerical order.
Page 14 of 334

12 Introduction
Before Use
About This Unit
Part Names and Operations
You can operate the unit by pressing the buttons on the panel (panel buttons) or by directly touching the buttons displayed on the screen (touch
buttons).
■Panel buttons
Press a panel button to operate it.
(5)
(4)
(1) (2)
(3)
(1) MAP button Press to display the navigation screen.
(2) Voice recognition
buttonPress to use voice recognition control.
(3) AUDIO button Press to use the audio or hands free function.
Press for 1 second or more to adjust the
picture quality or screen brightness.
(4) POWER/VOL button Pressing: Audio Power ON or OFF.
Rotating: Adjust the volume.
(5) EJECT button Press to eject the DISC.
Page 16 of 334

14 Introduction
Before Use
Turning the Power On or Off
This unit switches on automatically at ignition, and when started for the
first time, it displays the Navigation setting screen*. When the engine is
switched off, the unit also switches off.
* The second and subsequent times that the unit is started, the mode
screen that was last in use is displayed. If the last mode in use was the
Navigation screen, then your current position will be displayed. If it was
the Audio operation screen, then the audio selection that was last playing
will be displayed.
■Turning on the power
1The Caution screen is displayed automatically. When you
touch (I Agree), the “SD Eject” Caution screen
appears.
• To select a language, touch (Languages) to display
the Languages screen. Touch the language that you want to
use from the list. For details, see “Language setting” on Page 35.
2Touch (OK) to display the Navigation setting screen.
• To stop the “SD Eject” Caution screen from being displayed
again, touch
(The
message won't be indicated from now onward) and then touch
(OK).NOTEDo not press on main unit, or "Talk" button on steering wheel without
touching (I Agree) on the Caution screen. Otherwise, Navigation
commands cannot be used.
I Agree
Languages
OK
The message won't be indicated from now onward
OK
<“SD Eject” Caution screen>
I Agree
Page 17 of 334

Introduction 15
Before Use
■Turning off the audio
•Press (POWER/VOL).
NOTE
•When the audio power is turned off, on the Source screen, touch the source
to which you want to change. For details, see “Switching the Audio Source” on
Page 189.
•You cannot turn off the navigation power.
Loading and Unloading a Disc
To listen to music, insert a music CD into the slot.
■Loading a disc
1Insert a disc into the slot.
• Hold the disc by the center hole and the edges, and insert it
with the label facing upward.
• When the disc is inserted, playback of the music CD or MP3/
WMA starts.
• For disc details, see “About Discs” on Page 186.
Disc
Page 20 of 334

18 Introduction
Before Use
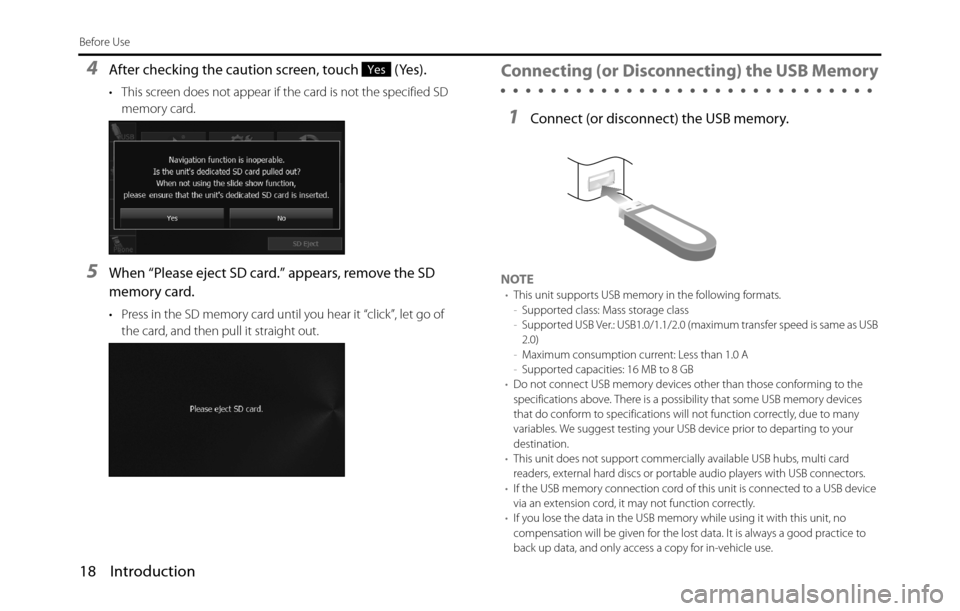
4After checking the caution screen, touch (Yes).
• This screen does not appear if the card is not the specified SD
memory card.
5When “Please eject SD card.” appears, remove the SD
memory card.
• Press in the SD memory card until you hear it “click”, let go of
the card, and then pull it straight out.
Connecting (or Disconnecting) the USB Memory
1Connect (or disconnect) the USB memory.
NOTE•This unit supports USB memory in the following formats.
-Supported class: Mass storage class
-Supported USB Ver.: USB1.0/1.1/2.0 (maximum transfer speed is same as USB
2.0)
-Maximum consumption current: Less than 1.0 A
-Supported capacities: 16 MB to 8 GB
•Do not connect USB memory devices other than those conforming to the
specifications above. There is a possibility that some USB memory devices
that do conform to specifications will not function correctly, due to many
variables. We suggest testing your USB device prior to departing to your
destination.
•This unit does not support commercially available USB hubs, multi card
readers, external hard discs or portable audio players with USB connectors.
•If the USB memory connection cord of this unit is connected to a USB device
via an extension cord, it may not function correctly.
•If you lose the data in the USB memory while using it with this unit, no
compensation will be given for the lost data. It is always a good practice to
back up data, and only access a copy for in-vehicle use.
Yes
Page 21 of 334

Introduction 19
Before Use
•Leaving the USB memory for a long time in a place exposed to direct sunlight
may result in deformation or discoloration due to the high temperature, or
cause a malfunction. In such cases, Fuji Heavy Industries will not give any
compensation. When you are not using the USB memory, keep it in a place
away from direct sunlight. Further, when leaving the vehicle, do not keep the
USB memory inside.
•When the audio source is USB, do not disconnect the USB memory. Doing so
may damage the data in the USB memory. Before disconnecting the USB
memory, turn the ignition switch to the Off position or switch the audio
source to a source other than USB, and then disconnect it.About the Unit Modes
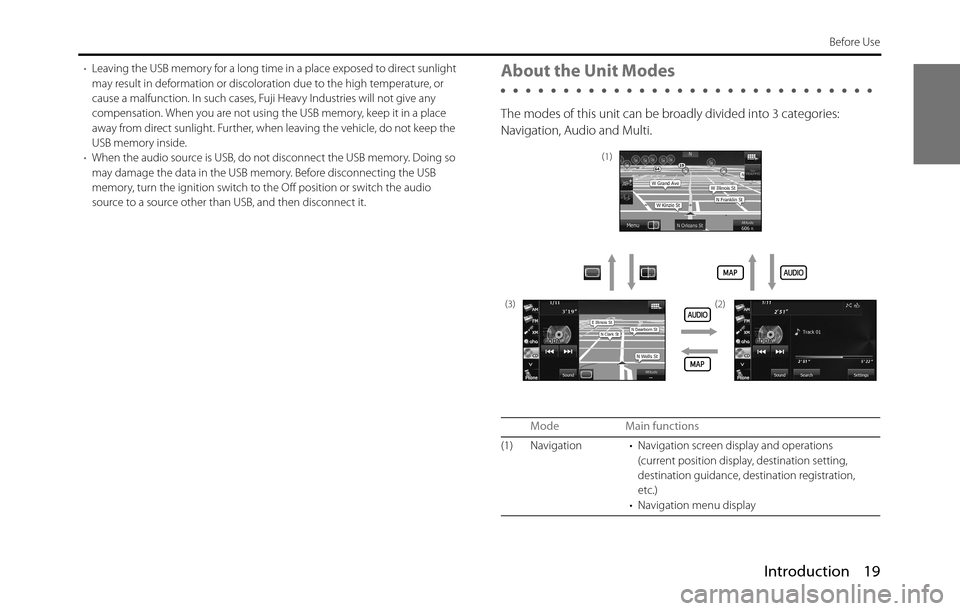
The modes of this unit can be broadly divided into 3 categories:
Navigation, Audio and Multi.
Mode Main functions
(1) Navigation • Navigation screen display and operations
(current position display, destination setting,
destination guidance, destination registration,
etc.)
• Navigation menu display
(1)
(3) (2)