2017 SUBARU BRZ CD player
[x] Cancel search: CD playerPage 6 of 334

4
Audio and Visual
Before Using the Audio and Visual System ............................. 182
Precautions When Using the System ................................................. 182
■About the audio and visual system ........................................................................................183
Precautions for Use ................................................................................... 185■About Discs ............................................................................................................................................186
Basic Operation ......................................................................... 189
Switching the Audio Source .................................................................. 189
■Switching the Audio Source .......................................................................................................189
■Source Operations Screen ............................................................................................................190
Volume Control .......................................................................................... 193■Main Volume Control ......................................................................................................................193
■Displaying the Sound Settings Screen .................................................................................194
Audio Operations ...................................................................... 200
Using the Radio .......................................................................................... 200
■Using the Radio ...................................................................................................................................200
Using the XM Radio ................................................................................... 207■Using the XM Radio ..........................................................................................................................207
Using the CD Player .................................................................................. 217■Using the CD Player ..........................................................................................................................217
Using the MP3/WMA Player ................................................................... 221■Using the MP3/WMA Player ........................................................................................................221
■About MP3/WMA ...............................................................................................................................226
■Creating and Playing MP3/WMA Files ..................................................................................229
Using the USB Music File Player ........................................................... 230■Using the USB Music File Player ................................................................................................230
■About USB Devices ...........................................................................................................................235
Visual Operations .......................................................................237
Using the USB Video File Player ............................................................ 237
■Using the USB Video File Player ................................................................................................ 237
■Displaying DivX VOD code .......................................................................................................... 244
■About USB Devices ........................................................................................................................... 246
How to Operate Portable Audio Devices .................................. 248
Using the iPod�“ Player ............................................................................. 248■Using the iPod Player ...................................................................................................................... 248
■
About the Supported iPods ........................................................................................................ 254
Using Bluetooth Audio ............................................................................. 255■Before Using Bluetooth Audio ..................................................................................................255
■Using a Portable Device ................................................................................................................ 261
Using Aha�¥ by HARMAN ........................................................................ 266■About Aha .............................................................................................................................................. 266
■Using Aha Application in your vehicle ................................................................................. 269
Using AUX ..................................................................................................... 274■Using AUX .............................................................................................................................................. 274
Page 13 of 334

Introduction 11
Before Use
Viewing This Document
NOTEIn this document, the unit is generally described using the screens which appear when the optional devices are connected. Navigation is mostly described using the
Heading - upwards 1 screen.
About button display
When a panel button should be pressed, button names are shown as ( , , etc.).
When a touch button on the screen should be touched, button names are shown as or [�c�c�c].
Audio and Visual 217
Audio OperationsUsing the CD PlayerUsing the CD Player
(1) Title information scroll buttons*(2) Settings button
(3) Search button
(4) Track up/down and fast forward (fast reverse) buttons
(5) AUDIO button
* The full title will be displayed unless it is too lengthy. If the length of the
information is too long, title information scroll buttons will be displayed.
■Listening to a CDInsert a CD into the disc slot, and it will start playing.1Press .2To u c h ( C D ) .• The playback starts.
NOTE
•Playback may be intermittent when there is a scratch on the CD or when the
recorded side is dirty. For details, see “About Discs” on Page 186.
•If track titles and other data are recorded in the CD-Text format, they can be
displayed.
•It may not be possible to display the CD-Text of CD-R/RW discs.
(2) (3) (4) (5)(1)
CD
Section titleThe section title is displayed here.Item titleA title is assigned for each item.
Operation titleA title is assigned for each operation
objective.
NOTEDescribes information related to the
operation.
Operation screenThe screen to be operated is displayed.
Operation procedureDescribes the operation.
Follow the numerical order.
Page 20 of 334

18 Introduction
Before Use
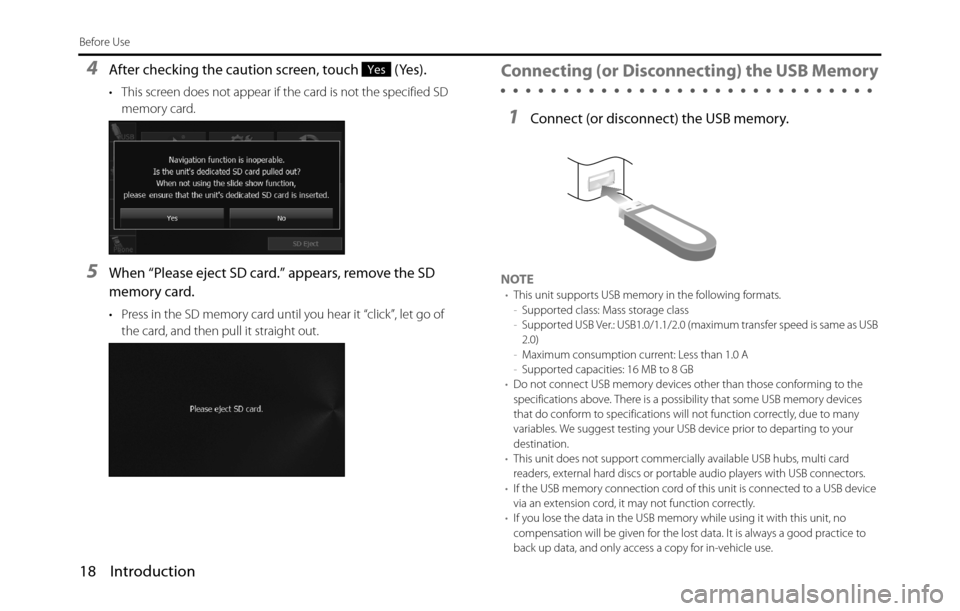
4After checking the caution screen, touch (Yes).
• This screen does not appear if the card is not the specified SD
memory card.
5When “Please eject SD card.” appears, remove the SD
memory card.
• Press in the SD memory card until you hear it “click”, let go of
the card, and then pull it straight out.
Connecting (or Disconnecting) the USB Memory
1Connect (or disconnect) the USB memory.
NOTE•This unit supports USB memory in the following formats.
-Supported class: Mass storage class
-Supported USB Ver.: USB1.0/1.1/2.0 (maximum transfer speed is same as USB
2.0)
-Maximum consumption current: Less than 1.0 A
-Supported capacities: 16 MB to 8 GB
•Do not connect USB memory devices other than those conforming to the
specifications above. There is a possibility that some USB memory devices
that do conform to specifications will not function correctly, due to many
variables. We suggest testing your USB device prior to departing to your
destination.
•This unit does not support commercially available USB hubs, multi card
readers, external hard discs or portable audio players with USB connectors.
•If the USB memory connection cord of this unit is connected to a USB device
via an extension cord, it may not function correctly.
•If you lose the data in the USB memory while using it with this unit, no
compensation will be given for the lost data. It is always a good practice to
back up data, and only access a copy for in-vehicle use.
Yes
Page 22 of 334

20 Introduction
Before Use
Selecting a Mode
Press the following buttons to select the screens.
■Navigation screen
1Press .
■Audio operations screen
1Press .
• Aha operations
• CD, MP3/WMA player operations
• USB music/video file player operations
•AUX
• iPod operations
• Bluetooth audio operations
• Audio menu display
• Audio source selection
• Handsfree operation screen display
• Setup menu display
(3) Multi • Navigation screen and Audio operations screen
selection
• Audio source selection
• Audio source operations
• Navigation screen display and operations
(current position display, destination setting,
destination guidance, destination registration,
etc.)
* Some functions cannot be operated while driving.
Mode Main functions
Page 67 of 334

Introduction 65
Before Use
Display Phone Status
You can set whether or not to display the result of connecting via
Bluetooth to a cell phone when turning the ignition switch from OFF
(LOCK) to ACC or ON.
Display Portable Player Status
You can set whether or not to display the result of connecting via
Bluetooth to a portable player when turning the ignition switch from
OFF (LOCK) to ACC or ON.
■Changing the passcode (passkey)
You can change the passcode (passkey) for cell phone registration to
any number with 4 to 8 digits.
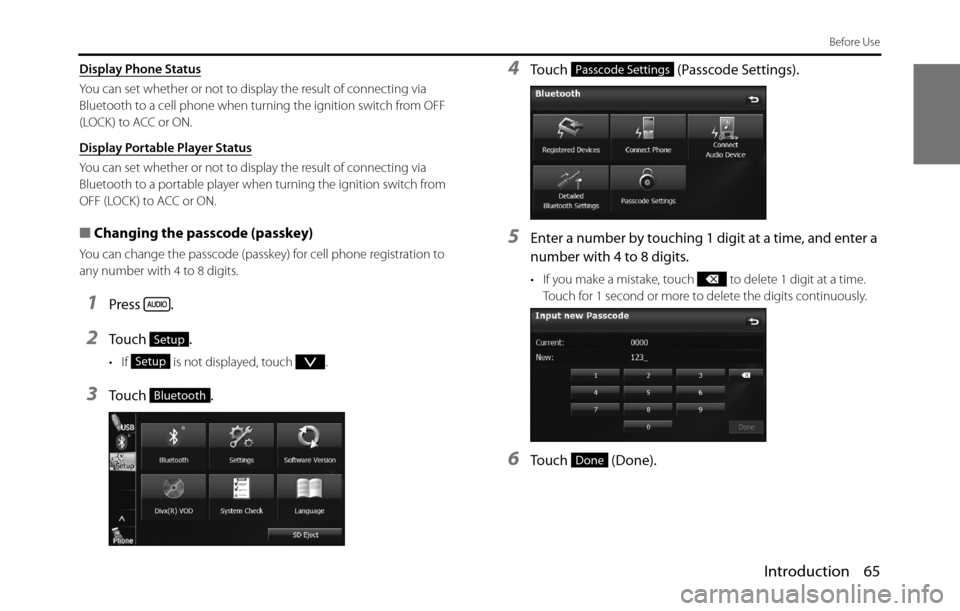
1Press .
2Touch .
• If is not displayed, touch .
3Touch .
4Touch (Passcode Settings).
5Enter a number by touching 1 digit at a time, and enter a
number with 4 to 8 digits.
• If you make a mistake, touch to delete 1 digit at a time.
Touch for 1 second or more to delete the digits continuously.
6Touch (Done).
Setup
Setup
Bluetooth
Passcode Settings
Done
Page 188 of 334

186 Audio and Visual
Before Using the Audio and Visual System
About Discs
NOTE•In cold or rainy weather, just as the interior glass surface becomes fogged,
dew (water condensation) may also form on the unit. When this occurs, disc
playback may jump or stop. Ventilate or dehumidify the air in the vehicle for a
while before resuming playback.
•If a problem occurs, the player function stops automatically to protect its
internal parts. If the player does not operate even when you follow the
on-screen messages, the player may have failed. Consult your SUBARU dealer.
•Playback may jump when the player is subjected to severe vibrations while
traveling over a rough surface.
•Do not use a commercially available lens cleaner because it may damage the
pickup of the player.
■About the supported discs
•An audio disc bearing one of the marks below can be played.
•It is possible that a CD-R (CD-Recordable) or CD-RW (CD-ReWritable) disc will
not play on the unit due to the recording condition, disc characteristics,
scratches, dirt, or deterioration caused by long-term storage in the vehicle.
Also, a CD-R or CD-RW disc that has not been finalized and a CD-R or CD-RW
disc recorded in UDF format cannot be played.
•The CD-TEXT function can be used only for commercially available CDs that
support CD-text. Characters written on CD-R and CD-RW discs may not be
displayed correctly.
•Do not use a CD or See Through disc that has a transparent or semi-
transparent recording area as they may fail to load or unload or play their
contents.•A Copy Control CD (CCCD) may not be played as it does not meet the official
CD Standard.
■Handling discs
•Do not place a disc in direct sunlight. Store each disc in its protective case.
Otherwise, discs may warp and fail to play.
•Do not attach paper-based tape to either the recording side or label side of a
disc. Damage could result.
Page 190 of 334

188 Audio and Visual
Before Using the Audio and Visual System
■Irregularly-shaped CDs
•Irregularly-shaped discs, such as octagonal CDs or heart-shaped CDs, cannot
be played. Do not play this type of disc, even with an adapter.
Damage to the player could result.
■Disc accessories
•Do not use accessories (such as stabilizers, protective seals, laser lens cleaners)
sold for improving sound performance or protecting CDs.
The changes in CD thickness or outside dimensions made by these
accessories may cause problems in the player. •Do not attach any ring-shape protector (or other accessory) to the disc.
Although these protectors are commercially available and said to protect
discs and improve sound quality (and anti-vibration effect), in normal use they
can do more harm than good. The most common problems are disc insertion
and ejection problems and abnormal playback problems due to the protector
ring coming off in the disc mechanism.
CD ring
Page 193 of 334

Audio and Visual 191
Basic Operation