Page 17 of 28

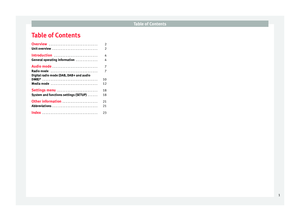
Audio mode
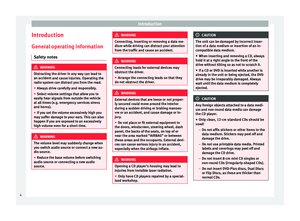
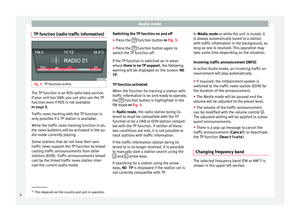
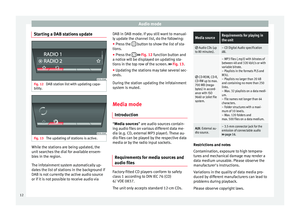
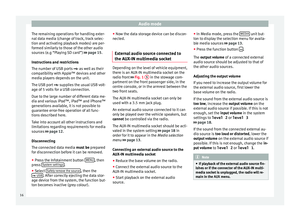
SD card playback Fig. 16
SD card slot. Folder display. Fig. 17
SD card slot. Track display. ●
Insert the SD card with the cut corner facing
up and the s ign on the l
ef
t into the SD card
slot ››› Fig. 1 2 .
● Press the MEDIA unit button.
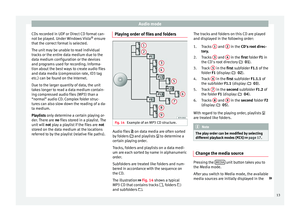
Pl a
y
back of the media source last played is
resumed. To play an SD card, press the button.
In the f
o
l
der display, navigate with the func-
tion button and the adjust button ›››
Fig. 1 14 . Press
to access a higher fold-
er l ev
el
and turn the adjust button to select
the desired folder ››› Fig. 16.
To switch to the next or previous track, press
one of the keys on the unit or
›››
Fig. 1 1 .
K eep one of
the arr
ow buttons pressed to for-
ward or rewind playback.
While playing the SD card, the following func-
tion buttons are available on the bottom
edge of the screen. The active function but-
tons are highlighted.
Function button: Meaning
To change the main directory of the SD card.
To access a higher folder level.
To begin playing. It can also be pressed to
pause playback.
Random play
››› page 17.
To repeat a folder or track. The symbol indi-
cates that the track being played is being re-
peated ››› page 17. Eject SD card
The c
onnect
ed d
ata media must be prepared
for disconnection before it can be removed.
● Press the Infotainment button MENU to
open the m ain menu System setup
.●
Select Safely remove the source ,
then the
SD Card . After correctly ejecting
the data storage device from the system, the
function button becomes inactive (grey col-
our).
● The SD card can be ejected now.
External data storage device connec-
ted through the USB por
t Depending on the country and the unit, there
m
a
y
be one or several USB ports in the
vehicle.
The location of the USB ports depends on
the vehicle in question ››› Booklet Instruc-
tions manual, chapter Storage compartment.
Audio files on an external data medium con-
nected to the USB port can be played and
controlled via the Infotainment system.
Where this manual refers to external data
storage devices, this means USB mass stor-
age devices containing supported audio
files, such as MP3 players, iPods™ and USB
sticks.
Only compatible audio files are shown. Other
files are ignored. »
15
Page 18 of 28
 are per-
formed similarly to those of the other audio
sourc")
Audio mode
The remaining operations for handling exter-
n al
d
ata media (change of track, track selec-
tion and activating playback modes) are per-
formed similarly to those of the other audio
sources (e.g “Playing SD card”) ››› page 15.
Instructions and restrictions
The number of USB ports as well as their
compatibility with Apple™ devices and other
media players depends on the unit.
The USB port supplies the usual USB volt-
age of 5 volts for a USB connection.
Due to the large number of different data me-
dia and various iPod™, iPad™ and iPhone™
generations available, it is not possible to
guarantee error-free operation of all func-
tions described here.
Take into account all other instructions and
limitations regarding requirements for media
sources ››› page 12.
Disconnecting
The connected data media must be prepared
for disconnection before it can be removed.
● Press the Infotainment button MENU , then
pr e
s
s System settings .
● Select Saf
ely
r
emove the source , then the
USB . After correctly ejecting the data stor-
ag e dev ic
e from the system, the function but-
ton becomes inactive (grey colour). ●
Now the dat
a storage device can be discon-
nected.
External audio source connected to
the AUX-IN mu
ltimedia socket Depending on the level of vehicle equipment,
there i
s
an AUX-IN multimedia socket on the
radio front ››› Fig. 1 5 in the stowage com-
par tment
on the front passenger side, in the
centre console, or in the armrest between the
two front seats.
The AUX-IN multimedia socket can only be
used with a 3.5 mm jack plug.
An external audio source connected to it can
only be played over the vehicle speakers, but
cannot be controlled via the radio.
The AUX-IN multimedia socket should be acti-
vated in the system setting ›››
page 18 in
order for it to appear in the Media selection
menu ›››
page 13.
Connecting an external audio source to the
AUX-IN multimedia socket
● Reduce the base volume on the radio.
● Connect the external audio source to the
AUX -IN mu
ltimedia socket.
● Start playback on the external audio
source. ●
In M
edia mode, pr
ess the MEDIA unit but-
t on t
o di
splay the selection menu for availa-
ble media sources ››› page 13.
● Press the function button .
The outp ut
volume of a connected external
audio source should be adjusted to that of
the other audio sources.
Adjusting the output volume
If you need to increase the output volume for
the external audio source, first lower the
base volume on the radio.
If the sound from the external audio source is
too low, increase the output volume on the
external audio source if possible. If this is not
enough, set the input volume in the system
settings to level 2 or level 3
››› page 18.
If the sound from the connected external au-
dio source is too loud or distorted, lower the
output volume on the external audio source if
possible. If this is not enough, change the in-
put volume to level 2 or level 1 . Note
● If p l
ayback of the external audio source fin-
ishes or if the connector of the AUX-IN multi-
media socket is unplugged, the radio will re-
main in the AUX menu.16
Page 19 of 28

Audio mode
●
Inter f
erence noise may be heard if the ex-
ternal audio source is powered from the 12-
volt power socket of the vehicle.
● Please read and observe the manufactur-
er's ins
truction manual for the external audio
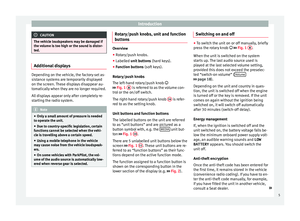
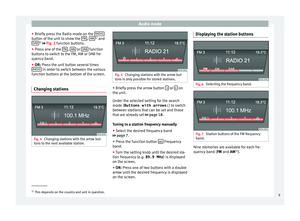
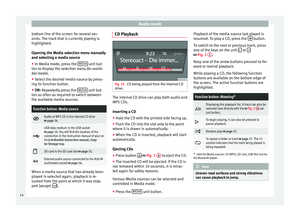
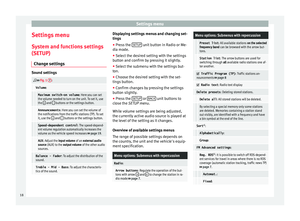
source. Track information display
Fig. 18
Track view during MP3 playback. When an audio CD without CD text is playing,
on
ly
TRACK and the tr
ack number, corre-
sponding to the playing order on the data
medium, are displayed in the centre line of
the screen.
When playing audio files containing addition-
al track information (CD text, ID3 tag with
MP3 files), various types of track information
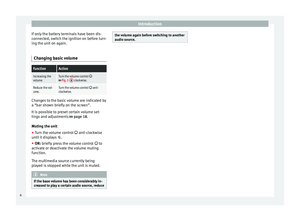
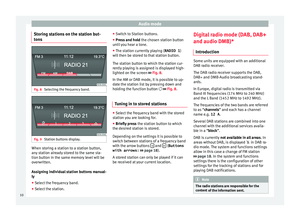
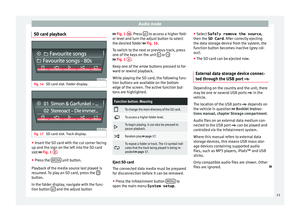
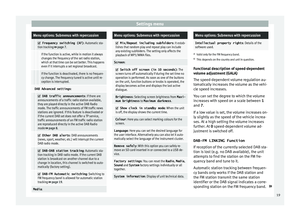
can be displayed ››› Fig. 18. Changing playback mode
Fig. 19
Playback modes in Media mode. Refer to the information on the playing order
of
fi
l
es and folders ››› page 13.
Selecting play modes
● Press a function button to start the corre-
sponding p
layback mode. The function but-
ton is shown highlighted.
Random play: The tracks play in random
order. Random playback remains active for
the corresponding media source until it is
closed for that source.
Repetition: The tracks from the playback
list are replayed.
● Press the function button again to t
ermi-
nate the current playback mode on the track
being played.
● Press the function button again to r
eplay
only the track being played. After pressing once again the repeat function is deactiva-
ted.
17
Page 20 of 28

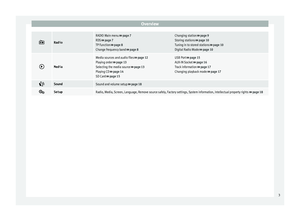
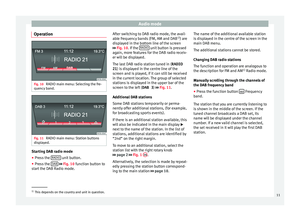
Change settings Sound settings
››› Fig. 1 7:
Volume
:
Maximum switch-on volume : Here you can set
the volume neede")
Settings menu
Settings menu S y
s
tem and functions settings
(SETUP)
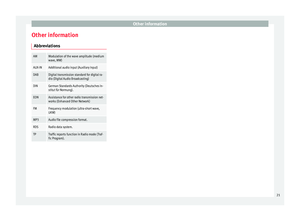
Change settings Sound settings
››› Fig. 1 7:
Volume
:
Maximum switch-on volume : Here you can set
the volume needed to turn on the unit. To set it, use
the +
and – buttons or the settings button.
Announcements
: Here you can set the volume of
the notifications from the traffic stations (TP). To set
it, use the +
and – buttons or the settings button.
Speed-dependent control
: The speed-depend-
ent volume regulation automatically increases the
volume as the vehicle speed increases ››› page 19.
AUX : Adjust the input volume of an external audio
source (AUX) to the output volume of the other audio
sources.
Balance - Fader : To adjust the distribution of the
sound.
Treble - Mid - Bass : To adjust the characteris-
tics of the sound. Displaying settings menus and changing set-
tin
g
s
● Pr
ess the SETUP unit button in Radio or Me-
di a mode.
● Sel ect
the desired setting with the settings
button and c
onfirm by pressing it slightly.
● Select the submenu with the settings but-
ton.
● Choose the de
sired setting with the set-
tings
button.
● Confirm changes by pressing the settings
button s
lightly.
● Press the SETUP or
B
A
CK unit buttons to
c lo
se the
SETUP menu.
While volume settings are being adjusted,
the currently active audio source is played at
the level of the setting as it changes.
Overview of available settings menus
The range of possible settings depends on
the country, the unit and the vehicle's equip-
ment specification.
Menu options: Submenus with repercussion
Radio :
Arrow buttons : Regulate the operation of the but-
tons with arrow and to change the station in ra-
dio mode ››› page 7.
Menu options: Submenus with repercussion
Preset list : All available stations on the selected
frequency band can be browsed with the arrow but-
tons.
Station list : The arrow buttons are used for
switching through all available radio stations one af-
ter another.
Traffic Program (TP)
: Traffic stations an-
nouncements ››› page 8
Radio text
: Radio text display
Delete presets : Deleting stored stations.
Delete all: All stored stations will be deleted.
By selecting a special memory only some stations
are deleted. Memories containing a station stand
out visibly, are identified with a frequency and have
a bin symbol at the end of the line.
Sorta)
:
Alphabetically :
Group:
FM Advanced settings :
Reg. RDSb)
: It is possible to switch off RDS-depend-
ent services for travel in areas where there is no RDS
coverage (automatic station tracking, traffic news TP)
››› page 7.
Automat. :
Fixed:18
Page 21 of 28

: Automatic sta-
tion tracking ››› page 7.
If the function is active, while in motion it always
changes")
Settings menuMenu options: Submenus with repercussion
Frequency switching (AF)
: Automatic sta-
tion tracking ››› page 7.
If the function is active, while in motion it always
changes the frequency of the set radio station,
which at that time can be set better. This happens
even if it interrupts a set regional broadcast.
If the function is deactivated, there is no frequen-
cy change. The frequency tuned is active until re-
ception is interrupted.
DAB Advanced settings :
DAB traffic announcements
: If there are
announcements of a traffic radio station available,
they are played directly in the active DAB Radio
mode. The traffic announcements of FM traffic news
stations are ignored. If this feature is deactivated or
if the current DAB set does not offer a TP service,
traffic announcements of an FM traffic radio station
are reproduced directly in the active DAB Radio
mode ››› page 8.
Other DAB alerts
: DAB announcements
(news, sport, weather, etc.) will interrupt the current
DAB radio mode.
DAB-DAB station tracking
: Automatic sta-
tion tracking in DAB radio mode. If the current DAB
station is broadcast on another channel due to a
change in location, this channel is switched to auto-
matically (factory setting).
DAB-FM Automatic switching
: Switching to
FM frequency band is allowed for automatic station
tracking ››› page 19.
Media :
Menu options: Submenus with repercussion
Mix/Repeat including subfolders
: It estab-
lishes that random play and repeat play can include
any existing subfolders. The setting only affects the
playback of MP3/WMA files.
Screen :
Switch off screen (in 10 seconds)
: The
screen turns off automatically if during the set time no
operation is performed. As soon as one of the buttons
on the unit, function buttons or knobs is operated, the
display becomes active and displays the last active
dialogue.
Brightness : Selecting screen brightness from Maxi-
mum brightness to Maximum darkness .
Show clock in standby mode
: When the unit
is off, the display shows the current time.
Colour : Here you can select marking colours for the
screen.
Language : Here you can set the desired language for
the user interface. Alternatively you can also let it auto-
matically select the language of the instrument cluster.
Remove safely : With this option you can safely re-
move an SD card inserted in or connected to a USB de-
vice.
Factory settings : You can reset the Radio, Media ,
Sound and System factory settings individually or all
together.
System information : Display of unit technical data.
Menu options: Submenus with repercussion
Intellectual property rights : Details of the
software used.
a) Valid only for the FM frequency band.
b) This depends on the country and unit in question.
Functional description of speed-dependent
volume adjustment (GALA)
The speed-dependent volume regulation au-
tomatically increases the volume as the vehi-
cle speed increases.
You can set the degree to which the volume
increases with speed on a scale between 1
and 7.
If a low value is set, the volume increases on-
ly slightly as the speed of the vehicle increa-
ses. At a high setting the volume increases
further. At 0 speed-dependent volume ad-
justment is switched off.
DAB-FM LINKING Function
If reception of the currently selected DAB sta-
tion is lost (e.g. no DAB available), the unit
attempts to find the station on the FM fre-
quency band and tune to it.
Automatic station tracking between frequen-
cy bands only works if the DAB station and
the FM station transmit the same station
identifier or the DAB signal indicates a corre-
sponding station on the FM frequency band. »
19
Page 22 of 28
Settings menu
Once the corresponding FM station has been
f ou
nd,
(FM) is displayed after the station
name. When reception for the corresponding
DAB station returns, the unit will switch back
to DAB mode after a short time.
If the reception of the selected DAB station is
lost and the station cannot be found on the
FM frequency band, the radio will be muted. 20
Page 23 of 28
Other information
Other information Abbr ev
i
ations
AMModulation of the wave amplitude (medium
wave, MW)
AUX-INAdditional audio input (Auxiliary Input)
DABDigital transmission standard for digital ra-
dio (Digital Audio Broadcasting)
DINGerman Standards Authority (Deutsches In-
stitut für Normung).
EONAssistance for other radio transmission net-
works (Enhanced Other Network)
FMFrequency modulation (ultra-short wave,
UKW)
MP3Audio file compression format.
RDSRadio data system.
TPTraffic reports function in Radio mode (Traf-
fic Program). 21
Page 24 of 28


 is displayed after the station
name. When reception for the corresponding
DAB station returns, the unit will switch back
to DAB")

AUX-INAdditional audio input (Auxiliary Input)
DABDigital transmission standard for digital ra")
