Page 49 of 88

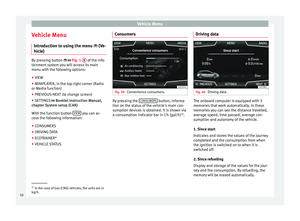
Navigation*
Navigation with images Fig. 38
Images main menu. Selecting an image and starting route guid-
anc
e
B e
ar in mind the requirements and formats of
the compatible images ››› page 25.
● Insert the data storage device with the stor-
ed image
s or connect it to the Infotainment
system.
● Press the Infotainment button
›››
Fig. 1 12 and then select
Im
ag
e s .
● Press the SOURC
E
› ›
› Fig. 38
function button
and select the data storage device where the
images are stored.
● Select the desired image.
● If the image displayed was taken using GPS
localis
ation, the function button will ap-
pe ar
. Pr
ess to start guidance to a destination. Road sign indicators The road sign indicators must be active in the
Navigation Setup menu ›››
page 48.
If road signs for the road being travelled are
stored in the navigation data, the system can
show them on the map display (e.g. a speed
restriction).
Please bear in mind how recent the naviga-
tion data is and the limitations of the system
››› page 37 !
Traffic sign recognition Some vehicles are also equipped with a cam-
er
a f
or tr
affic sign recognition. If traffic sign
recognition is installed in the vehicle and ac-
tivated, the recognised traffic signs and addi-
tional information are displayed in the map
view.
Read and take note of the information and in-
dications provided by the traffic sign recogni-
tion system in the vehicle ›››
Booklet Instruc-
tion Manual.
Route guidance in demo mode If demo mode is activated in the
Naviga-
tion Settings menu ››
›
page 48, an ad-
ditional pop-up window opens when you
start route guidance. ●
Pres
sing the Demo mode function button
s t
ar
ts a “virtual route guidance” to the desti-
nation you have entered.
● If you press the Normal function button, a
“r e
al
route guidance” starts.
The sequence of events and the operations in
virtual route guidance are similar to those in
real route guidance.
Virtual route guidance is repeated when you
reach the fictitious destination and always
starts again from the starting point if not
aborted beforehand.
If the starting point for demo mode has been
defined manually in the Navigation Set-
tings menu, virtual route guidance will start
from the position set.
A manually entered starting point is overwrit-
ten with the current vehicle location if the ve-
hicle moves off. Note
Disable demo mode after use, otherwise you
wi l
l be prompted to choose between virtual
and normal route guidance each time you
start route guidance. 47
Page 50 of 88

Navigation*
Navigation settings Settin g
s ●
Press the SET
TINGS function button in the
main Na
vigation menu.
Function button: function
Route options: To make adjustments to route calculation.
Suggest 3 alternative routes: After starting route guid-
ance, 3 alternative routes are suggested ››› page 39.
Route: Select the route type.
Economical: The route is calculated by taking into
consideration economic factors.
Fast: The fastest route to the destination.
Short: shortest route to the destination, even if it
results in a longer travelling time.
Most frequent routes: Information on the user's most
frequent routes.
Dynamic route: Dynamic route guidance is activated
when a TMC is received ››› page 45.
Avoid motorways and highways: Motorways will be ex-
cluded from the calculation whenever possible.
Avoid ferries and motorail trains: Ferries and motorail
trains will not be considered in the calculation of the
route whenever possible.
Avoid toll roads: Toll roads will be excluded from the
calculation whenever possible.
Avoid tunnels: Tunnels will be excluded from the cal-
culation whenever possible.
Function button: function
Avoid routes requiring toll stickers: Routes requiring toll
stickers will be excluded from the calculation when-
ever possible.
Show available toll stickersa) : To mark the available toll
stickers on the list ( Avoid routes requiring toll stickersmust be active).
Roads requiring toll stickers that have been marked
as having said toll sticker will be taken into account
in the calculation of the route.
Include trailer: Calculate the route and arrival time
for the vehicle with a trailer.
Map: To make adjustments to the visual display of the
map.
Show road signs: The road signs stored in the naviga-
tion data for the road being travelled will be dis-
played during route guidance ››› page 47.
Lane guidance: During route guidance, when driving
and turning on multi-lane roads, an additional dis-
play is shown with lane guidance. This will only ap-
pear if there is information in the database for the
area being driven in.
Show favourites: The stored destinations are shown
on the map as favourites ().
Show POI
Select categories for POI: To select which point of in-
terest categories are displayed on the map
››› page 42.
Show brand logos for POIs: View of category logos
of the selected points of interest (e.g. view of pet-
rol station logos).
Function button: function
Manage memory: To modify saved destinations.
Sort contacts: To select the sequential order of the en-
tries in the phonebook that have (postal) addresses,
see also ››› page 41.
Define home address: To assign or edit a home address,
see also ››› page 42.
Delete my points of interest (POI): To delete the points of
interest stored in the destination memory ››› page 46.
Update my POIs: To update the stored points of interest
››› page 46.
Import destinations (SD/USB): To import electronic busi-
ness cards (vCards) into the destination memory
››› page 46.
Delete user data: To delete the stored destinations
(e.g., the Last destinations or the Destina-
tion memory ).
Navigation announcements: To make adjustments to naviga-
tion announcements.
Volume: To adjust the volume for driving recommen-
dations.
Entertainment fading (nav. announcements): Adjusting the
volume of the active audio source during navigation
instructions.
No voice guidance during call: No audible driving in-
structions will be given during a telephone conversa-
tion.
Note: My POIs: Audible announcement when nearing
a point of interest.
Fuel options: To make adjustments relating to fuel. 48
Page 51 of 88

Navigation*Function button: function
Select preferred fuel station: The selected petrol station
mark will be shown before other points of interest in
the search.
Fuel warning: The warning to refuel is active.
If the fuel level reaches the reserve level, the corre-
sponding warning is generated which permits the
search for petrol stations.
Version information: Information on the stored navigation
data.
Maximum speeds: Shows the speed limits, depending on
the road, for the current country.
Advanced settings: To make advanced adjustments to the
navigation.
Time display: displayed during route guidance.
Estimated time of arrival: The estimated time of arrival
at the final destination is displayed.
Duration: The estimated travelling time to the final
destination is displayed.
Status line: displayed during route guidance.
Destination: The distance calculated to final desti-
nation is displayed.
Next stopover: The calculated distance until next
stopover is displayed.
Note: National border crossed: Displays the speed lim-
its of the country in question when crossing the bor-
der.
Demo mode: When Demo mode is activated and
route guidance is started, virtual guidance to the en-
tered destination can be initiated ››› page 47.
Function button: function
Define demo mode starting point: if demo mode is acti-
vated, a fictitious starting point for virtual route
guidance can be defined when the vehicle is sta-
tionary.
a) This function depends on the country. 49
Page 52 of 88
 By pressing button
›››
Fig. 1 9 of the info-
tainment sy
stem you will access its main
menu with the followi")
Vehicle Menu
Vehicle Menu Intr oduction t
o u
sing the menu (Ve-
hicle) By pressing button
›››
Fig. 1 9 of the info-
tainment sy
stem you will access its main
menu with the following options:
● VIEW
● MINIPLAYER, in the top right corner (Radio
or Media f
unction)
● PREVIOUS-NEXT (to change screen)
● SETTINGS ››
›
Booklet Instruction Manual,
chapter System setup (CAR)
With the function button VIEW you can ac-
c e
s
s the following information:
● CONSUMERS
● DRIVING DATA
● ECOTRAINER*
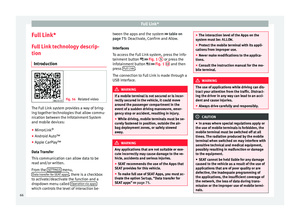
● VEHICLE STATUS Consumers Fig. 39
Convenience consumers. By pressing the
C
ONSUMERS button, informa-
tion on the s t
at
us of the vehicle's main con-
sumption devices is obtained. It is shown via
a consumption indicator bar in l/h (gal/h) 1)
. Driving data Fig. 40
Driving data. The onboard computer is equipped with 3
memorie
s
th
at work automatically. In these
memories you can see the distance travelled,
average speed, time passed, average con-
sumption and autonomy of the vehicle.
1. Since start
Indicates and stores the values of the journey
completed and the consumption from when
the ignition is switched on to when it is
switched off.
2. Since refuelling
Display and storage of the values for the jour-
ney and the consumption. By refuelling, the
memory will be erased automatically. 1)
In the case of Gas (CNG) vehicles, the units are in
kg/h.
50
Page 53 of 88
 for 99")
Vehicle Menu
3. Long-term
The memor y
r
ecords the values for a specific
number of partial trips, up to a total of 19
hours and 59 minutes or 99 hours and 59 mi-
nutes, or 1999.9 km (or miles) for 9999 km
(or miles), depending on the model of instru-
ment panel.
When one of these values is reached (de-
pending on the version of the instrument
panel), the memory is automatically deleted
and it starts counting from 0 again.
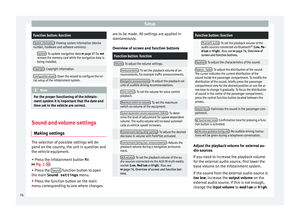
Ecotrainer* Fig. 41
CAR Menu Ecotrainer. Fig. 42
Driving style symbols. Open ECOTRAINER menu
● When the vehicle is stopped, press the in-
f ot
ainment
button ››› Fig. 1 9 .
● Press the VIEW function button and then
sel ect
ECOTRAINER .
If
the corresponding equipment is available,
the ECOTRAINER will provide information on
driving style. The information on driving style
is only evaluated and displayed when mov-
ing forward.
∅ ECO points: Driving style display
This indicates the driving style since starting
the vehicle on a scale of 0 to 100. The higher
the score displayed, the more efficient the
driving style. To see more information, press
the display. It shows statistics for the last 30
minutes of driving since starting the vehicle.
If the car has not yet been driven for 30 mi- nutes, it shows values from the last trip in
grey.
∅
l/100 km: Average fuel consumption
Shows the average fuel consumption. The
value is calculated by using the kilometres
covered since starting the vehicle. To see
more information, press the display. It shows
statistics for the last 30 minutes of driving
since starting the vehicle. If the car has not
yet been driven for 30 minutes, it shows val-
ues from the last trip in grey.
ECO tips: Tips on how to save fuel
By pressing the ECO tips function button, you
c an
v
iew tips on how to save fuel. These tips
can only be viewed when the vehicle is stop-
ped.
Evaluation of efficient driving style
The efficiency of the driving style is reflected
by different elements on the display.
Display ››› Fig. 41: Meaning
1Different symbols are shown on the left of the col-
umns that report on the current driving style ››› ta-
ble on page 52.
2
The white column is an indication of where the ef-
ficiency graph begins (from left to right).
It shows the position of the evaluation that is cur-
rently being performed.
» 51
Page 54 of 88

Vehicle MenuDisplay
››› Fig. 41: Meaning
3
Bars to represent acceleration.
The position of the car represents the acceleration.
If speed is constant, the car remains in the central
area. When accelerating or braking, the car moves
forward or backward respectively.
4
Columns to show driving style efficiency.
On the horizon, the columns represent the effi-
ciency of the driving style in a retrospective man-
ner and move from left to right every five seconds
or so. The higher the height of the columns, the
more efficient the driving style.
The colour of the sky represents the average of the
last three minutes. The colour changes from grey
(less efficient) to blue (more efficient).
Symbols ››› Fig. 42: Meaning
AForesight when driving. If sudden changes of ac-
celeration occur, driving style efficiency is re-
duced.
BGear-change indicator.
CThe current vehicle speed is having a negative im-
pact on fuel consumption.
DEcological driving style. Vehicle status
Fig. 43
Standard representation: vehicle sta-
t u
s. Fig. 44
Standard representation: vehicle sta-
t u s. Press the
V
ehic
l
e status button to access infor-
m ation on the Vehicle status
me
s
sages
and Start-Stop System . The Vehicle sta-
tus messages are displayed ››› Fig. 43, in ad-
dition to being specified on the correspond-
ing button. Depending on the parts affected by these
mess
ages, they will be indicated in different
colours (depending on their significance) in
the vehicle display.
To access the Tyre Pressure Monitor-
ing System you must press the Previous or
Ne xt buttons.
Fr om thi
s
same menu, using the button
SET , the tyre pressures are stored.
Note
The values that appear in the figures
›› ›
Fig. 39, ››› Fig. 40, ››› Fig. 43 and ››› Fig. 44
are indicative and may vary depending on the
features. 52
Page 55 of 88

Telephone management sys-
t em (PHONE)
Intr oduction t
o the telephone
management system
General information Fig. 45
Related video The Telephone functions describe")
Telephone management system (PHONE)
Telephone management sys-
t em (PHONE)
Intr oduction t
o the telephone
management system
General information Fig. 45
Related video The Telephone functions described below
c
an be u
sed thr
ough the Infotainment system
if there is a mobile telephone connected to it
via Bluetooth ®
›››
page 55.
In order for the mobile telephone to be able
to connect to the Infotainment system the tel-
ephone must be equipped with Bluetooth®
.
If there is no mobile telephone connected to
the Infotainment system, the telephone man-
agement system will not be available.
The instructions shown on the screen for the
telephone menus will depend on the mobile
telephone used. There may be variations.
Only use compatible Bluetooth ®
devices. For
further information on compatible Blue- tooth
®
products, ask your nearest SEAT deal-
er or chec
k on the internet.
Use the instruction manual of the mobile tel-
ephone and of any accessories.
If you detect any operating issues between
your mobile telephone and the Infotainment
system, restart your mobile by switching it off
and on again.
You may experience poor reception or may be
cut off in areas where the signal is weak.
Most electronic devices are shielded against
HF (high-frequency) signals. In any case, the
electronic equipment may not be protected
from the HF signals of the telephone man-
agement system. This may cause interfer-
ence. WARNING
Speaking by telephone and operating the mo-
bi l
e telephone whilst driving can distract you
from the road and cause an accident.
● Always drive carefully and responsibly.
● Select volume settings that allow you to
eas
ily hear signals from outside the vehicle
at all times (e.g. emergency services sirens
and horns).
● In areas of little or no coverage or, in some
case
s, in a tunnel, garage or underpass, your
call may be cut off and you may not be able to
make even emergency calls. WARNING
If a mobile telephone is not secured or is in-
corr ectly
secured in the vehicle, it could move
around the passenger compartment in the
event of a sudden driving manoeuvre or emer-
gency stop, resulting in injury.
● While the vehicle is in motion, always se-
cure the mo
bile telephone properly outside
the airbag deployment zone. WARNING
Mobile telephones may interfere with and al-
ter the c orr
ect operation of pacemakers if
they are carried directly over them.
● Maintain a minimum distance of at least
20 centimetre
s between the aerials of the
mobile telephone and the pacemaker, as mo-
bile phones may affect the functioning of
pacemakers.
● Do not carry your switched-on mobile tele-
phone in your br
east pocket directly over the
pacemaker.
● If you suspect interference, switch off the
mobi
le telephone immediately. CAUTION
High speeds, poor weather or road conditions
and the quality of
reception can all affect the
quality of a telephone conversation in the ve-
hicle. » 53
Page 56 of 88

Note
● Re s
trictions on the use of devices using
Bluetooth ®
technology may apply in some
countries. For further information, contact the
local authorities.
�")
Telephone management system (PHONE)
Note
● Re s
trictions on the use of devices using
Bluetooth ®
technology may apply in some
countries. For further information, contact the
local authorities.
● If you wish to connect a device to the tele-
phone manag
ement system via Bluetooth ®
technology, consult the safety warnings in its
instruction manual. Only use compatible
Bluetooth ®
devices. Areas where special regulations apply
Switch off the mobile telephone and the mo-
b
i
l
e’s Bluetooth ®
function in places with a
risk of explosion. In the majority of cases,
these places are signposted, but not always
clearly ››› in General information on
p ag
e 53
. They include, for example:
● the vicinity of chemical pipelines and tanks
● The lower decks of boats and ferries.
● In the proximity of vehicles that run on liq-
uid gas
(such as propane or butane).
● places where the air is laden with chemi-
cals
or particles such as flour, dust or metal
powder.
● all other places where the vehicle engine
must
be switched off. WARNING
Switch off the mobile phone in areas with a
risk of
explosion! The mobile telephone can
automatically connect to the mobile tele-
phone network again if it loses the Blue-
tooth ®
connection to the telephone manage-
ment system. CAUTION
In areas where special regulations apply or
the use of mo
bile telephones is prohibited,
both the telephone and the telephone man-
agement system must be switched off. The
radiation produced by the mobile telephone
when switched on may interfere with sensi-
tive technical and medical equipment, possi-
bly resulting in a malfunction or damage to
the equipment. Bluetooth
® Bluetooth
®
tec
hno
logy allows a mobile tele-
phone to be connected to your vehicle's tele-
phone management system. In order to use
the telephone management system with a
mobile telephone with Bluetooth ®
technolo-
gy, it is first necessary to pair them.
Some Bluetooth ®
mobile telephones detect
and automatically connect when turning on
the ignition if a connection has been previ-
ously established. For this to take place the
telephone must be switched on and its Blue- tooth
®
function activated, and there must be
no active Bluet
ooth®
connection with other
devices.
Bluetooth ®
connections are free.
Bluetooth ®
is a registered trademark of
Bluetooth ®
SIG, Inc.
Bluetooth profiles ®
When a mobile phone is connected to the tel-
ephone management system, a data ex-
change takes place via one of the Bluetooth ®
profiles.
● Bluetooth ®
hands-fr
ee profile (HFP): If a
mobile telephone is connected to the tele-
phone manager through the HFP, calls can be
made wirelessly through the hands-free de-
vice. This function also requires other Blue-
tooth ®
profiles such as the phonebook
download.
● Audio profile (A2DP): Bluetooth ®
profi
le for
transmitting audio with stereo quality. This
function can also connect other additional
Bluetooth profiles for managing and control-
ling playback.
● Message profile (MAP): Bluetooth ®
profi
le
to access mobile device messages. Note
To prevent them from being heard through
the spe ak
ers, the button and mobile tele-
phone alert tones must be disconnected. 54