Page 33 of 88

Audio and Media Mode
Opening a track list
● From the MEDIA m ain menu, pr
e ss the
SELECTION
› ››
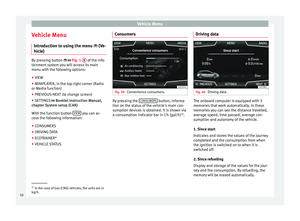
Fig. 21
function button to open
the track list. The track that is currently play-
ing is highlighted ››› Fig. 24.
● Search through the track list and press the
desir
ed track.
If there is information available on the track,
the track is displayed (for audio CDs) or the
name of the file (MP3), rather than Track +
number .
Overview of the function buttons on the track
list
Function button: function
AOpen the Sources menu. Select another
Media source by pressing it.
B
Indicates the media source being explored.
If pressed it goes to the root folder of the
device indicated on the icon.
CD: Internal CD drive ››› page 32.
SD CARD 1, SD CARD 2*: SD memory card
››› page 32.
USB 1, USB 2*: External data storage device
connected to the USB port ››› page 33.
BT AUDIO: External media player connected
by Bluetooth ®
››› page 34.
AUX: Audio source connected to the AUX-IN
socket ››› page 34
Function button: function
CPress the function button to open the top
folder of the media source.
Starts playback of the first track.
Repeat all tracks.
Repeats all the tracks that are on the same
memory level as the track being played at
that moment. If in the
Media Settings
menu
Mix/Repeat including subfolders is acti-
vated, it also includes the subfolders
››› page 35.
Random play.
Includes all the tracks that are on the same
memory level as the track being played at
that moment. If in the
Media Settings
menu
Mix/Repeat including subfolders is acti-
vated, it also includes the subfolders
››› page 35.
CLOSE ×To close the track list. Note
The tracks, folders and playlists can also be
select ed b
y turning the setup button, and can
be played or opened by pressing it. Database view
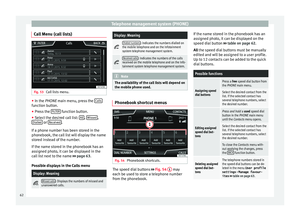
Fig. 25
Media mode: database view From the track list, press the
Sho w d
at
abase view option. The content of the
c urr
ent
Media source will be displayed classi-
fied by Playlists ,
Ar
ti
s
ts ,
A
l
b ums ,
Genr
e
s ,
T r
ac
ks and
V
ideo
s
› ›
› Fig. 23 .
To return to the folder view, press the Show folder view option from the
S
ELE
CTION Menu.
31
Page 34 of 88

Audio and Media Mode
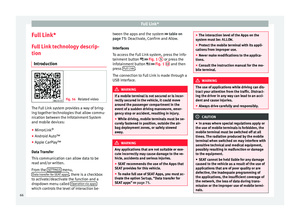
Inserting or ejecting a CD Fig. 26
Slots for data storage devices in the
glo v
e c
ompartment. The driver should refrain from operating the
u
nit
whi
le the vehicle is in motion. Insert or
change the data storage device before mov-
ing off!
The CD drive can play audio CDs and audio
data CDs.
Inserting a CD
● Hold the CD with the printed side facing up.
● Push the CD into the slot ›››
Fig. 26 3 to
the point wher
e it
is drawn in automatically.
Ejecting a CD
● Press button
1 .
● The CD in the drive will be ejected and
mu s
t
be removed within approximately
10 seconds. If the CD is not removed within the 10 sec-
onds, it i
s automatically retracted for security
reasons without activating the CD mode.
Unreadable or defective CD
If the data on an inserted CD cannot be read
or a defective CD is inserted, the correspond-
ing warning appears on screen.
Depending on the unit, unreadable CDs are
ejected 3 times automatically and inserted
again to initiate another three attempts be-
fore said message is displayed. Note
● Uneven r o
ad surfaces and strong vibrations
can cause playback to jump.
● When the temperature inside the unit is too
high, loadin
g and playback of CDs is disa-
bled.
● If after inserting a number of different CDs
and receiv
ing the CD drive error every
time, contact a qualified workshop. Insert or eject a memory card
Depending on the features and the country,
the
v
ehic
le may have one or two slots for SD
cards. Inserting a memory card
Insert
the compatible memory card, bevelled
edge first and with the label face up (con-
tacts face down), into slot ››› Fig. 26 2 , until
pr operly
in
serted.
If a memory card cannot be inserted, make
sure it is positioned correctly and is compati-
ble with the unit.
Removing a memory card
The inserted memory cards must be prepared
for removal.
● From the main Media menu, press the
SETTINGS button to open the Media Set-
tings menu or pr e
s
s the infotainment but-
ton ››› Fig. 1 9 and then press
Settin
g
s , to
open the System settings menu.
● Press the R
emo
v
e safely function button. A
dr opdo
wn menu ap
pears with the following
options: SD1 Card, SD2 Card*, USB1 and
USB2*. After correctly ejecting the memory
card from the system, the function button be-
comes inactive (grey colour).
● Press the inserted memory card. The mem-
ory c
ard “jumps” to the eject position.
● Remove the memory card.
Unrea
dable memory card
If a memory card is inserted and the data
cannot be read, the relevant warning ap-
pears.
32
Page 35 of 88

Audio and Media Mode
External data storage device connec-
t ed t
o USB por
t Depending on the features and the country,
the v
ehic
le may have one or two USB connec-
tions. For their location consult the ››› Booklet
Instruction Manual.
Audio files on an external data storage de-
vice connected to the USB port can be
played and controlled via the Infotainment
system.
Where this manual refers to external data
storage devices, this means USB mass stor-
age devices containing supported audio
files, such as MP3 players, iPods™ and USB
sticks.
Only supported audio files are displayed and
played. Other files are ignored.
Further operation of the external data medi-
um (changing track, selecting tracks and
playback modes) is described in the appro-
priate chapters of this manual ›››
page 25.
Instructions and restrictions
Compatibility with Apple™ devices and other
media players depends on the unit.
The USB port supplies the usual USB volt-
age of 5 volts for a USB connection.
External hard disks with a capacity greater
than 32 GB must be reformatted for the
FAT32 file system in some circumstances. You will find the necessary software and informa-
tion on the Internet
.
T
ake into account all other instructions and
limitations regarding requirements for media
sources ››› page 25.
iPod™, iPad™ and iPhone™
Depending on the country and the equip-
ment, iPods™, iPads™ or iPhones™ can be
connected using the device's USB cable to
the USB port of the vehicle and used as
audio sources.
After connecting an iPod™, iPad™ or
iPhone™, the specific list views of the iPod
are displayed in the upper selection level
( Playlists , Artists , Albums,
Tracks , Podcasts etc.).
Possible error messages after connecting an
external data storage device
Error mes-
sageCauseProcedure
The device
is not
compatibleThe external
data carrier
cannot be
played or com-
munication is
not possible
with the adapt-
er cable being
used.Check the connec-
tion and make sure
the external data
storage device is
working correctly.
If possible, update
the external data
storage device soft-
ware.
Error mes-
sageCauseProcedure
The device does not
workCommunication
fault.Check the connec-
tion and make sure
the external data
medium is working
correctly.
Due to the large number of different data storage devi-
ces and various iPod™, iPad™ and iPhone™ genera-
tions available, it is not possible to guarantee fault-free
operation of all functions described here. Disconnecting
An
y
c
onnected data storage devices must be
prepared before their disconnection in order
to remove them.
● From the main Media menu, press the
SETTINGS button to open the Media Set-
tings menu or pr e
s
s the infotainment but-
ton ›››
Fig. 1 12 and then press
Settin
g
s , to
open the System settings menu.
● Press the R
emo
v
e safely function button. A
dr opdo
wn menu ap
pears with the following
options: SD1 Card, SD2 Card*, USB1 and
USB2*. After correctly ejecting the data stor-
age device from the system, the function but-
ton becomes inactive (grey colour).
● Now the data storage device can be discon-
nected. »
33
Page 36 of 88

Audio and Media Mode
Note
● Do not c onnect
an external media player at
the same time to play music via Bluetooth ®
and via the USB port with the Infotain-
ment system, as this could cause playback
limitations.
● If the external player is an Apple™ device,
it cannot
be simultaneously connected by
USB and by Bluetooth ®
.
● If a connected device is not recognised, dis-
connect a
ll the connected devices and try
connecting the device again.
● Do not use memory card adaptors, USB ex-
tens
ion cords or USB hubs! External audio source connected to
the A
UX
-IN mu
ltimedia socket Depending on the equipment and country
ther
e m
a
y be an AUX-IN multimedia socket
››› Booklet Instruction Manual.
In order to connect the external audio source
to the AUX-IN socket, a suitable cable is re-
quired with a 3.5 mm jack that is inserted in-
to the AUX-IN socket of the vehicle.
The connected external audio source is
played over the vehicle speakers and cannot
be controlled via the Infotainment system
controls.
The connection of an external audio source is
indicated by AUX on the screen. Connecting an external audio source to the
AUX-IN mu
ltimedia socket
● Lower the base volume on the Infotainment
syst
em.
● Connect the external audio source to the
AUX-IN mu
ltimedia socket.
● Start playback on the external audio
source.
● In the MEDIA m
ain menu, press the SOURCE function button and select
A
UX .
The outp ut
volume of the connected external
audio source should be adjusted to the vol-
ume of the other audio sources ››› page 76.
Information on operating an external audio
source connected to the AUX-IN multimedia
socket
OperationEffect
Selection of another au-
dio source from the Info-
tainment system.The external audio source
continues to run in the
background.
Stopping playback on the
external audio source.The infotainment system
remains in the AUX menu.
Disconnecting the plug
from the AUX-IN multime-
dia socket.The infotainment system
remains in the AUX menu. Note
● Ple a
se read and observe the manufactur-
er's instruction manual for the external audio
source.
● Interference noise may be heard if the ex-
terna
l audio source is powered from the 12-
volt power socket of the vehicle. Connecting an external audio source
vi
a Bluet
ooth® Bluetooth
®
Audio mode al lo
w
s you to listen
to audio files being played on a Bluetooth ®
audio source (e.g., a mobile telephone) con-
nected via Bluetooth ®
(audio playback by
Bluetooth ®
) over the vehicle speakers.
Conditions ● The Bluetooth ®
audio source mu
st support
the A2DP Bluetooth ®
profile.
● In the Bluetooth settings menu, the
Bluetooth Audio (A2DP/AVRCP) function must
be activ at
ed ›
›› page 63.
Starting Bluetooth ®
audio transfer
● Activate Bluetooth ®
vis
ibility on the exter-
nal Bluetooth ®
audio source (e.g., mobile tel-
ephone).
● Lower the base volume on the Infotainment
syst
em.
34
Page 37 of 88

Audio and Media Mode
● In the MEDIA m ain menu, pr
e
ss the SOURCE function button and select
B
T audio .
● Press Se
ar
c
h for new device in order to con-
nect an e
xt
ernal Bluetooth ®
audio source for
the first time ››› page 54.
● OR: Select a Bluetooth ®
ext
ernal audio
source from the list.
● Please refer to the instructions on the
scr
een of the Infotainment system and on the
Bluetooth ®
audio source regarding the rest
of the procedure.
You may still need to manually start playback
on the Bluetooth ®
source.
When playback on the Bluetooth ®
audio
source is stopped, the Infotainment system
remains in Bluetooth ®
Audio mode.
Controlling playback
The extent to which the Bluetooth ®
audio
source can be controlled via the Infotainment
system depends on the connected Blue-
tooth ®
audio source.
The available functions will depend on the
Bluetooth ®
Audio profile that the connected
external player supports.
With media players that support the AVRCP
Bluetooth ®
profile, playback on the Blue-
tooth ®
audio source can be automatically
started or stopped when the unit is switched
to Bluetooth ®
Audio mode or to a different
audio source. In addition, it is possible to view or change the track via the Infotainment
syst
em. Note
● Due t o the l
arge number of possible Blue-
tooth ®
audio sources, it is not possible to
guarantee fault-free operation of all descri-
bed functions.
● Always switch off the warning and service
tones
on a connected Bluetooth ®
audio
source, e.g. key tones on a mobile telephone,
to prevent possible interference noise and
malfunctions.
● Depending on the external player connec-
ted, the re
sponse time of the system can
vary.
● Do not connect an external media player to
pla
y music via Bluetooth ®
and via the USB
port ››› page 33 at the same time with the
Infotainment system, as this could cause
playback limitations.
● If the external player is an Apple™ device,
it cannot
be simultaneously connected by
USB and by Bluetooth ®
. Media Settings
●
Select the MEDIA main menu b
y
pressing
the Infotainment button ›››
Fig. 1 4 ●
Press the S
ET
TINGS function button to open
the Media Settings menu.
Function button: function
Sound: Sound settings ››› page 76.
Mix/Repeat including subfolders: Subfolders will be inclu-
ded in the selected playback mode ››› page 25.
Bluetooth: Bluetooth ®
settings ››› page 63
Remove safely: In order to prepare the external data stor-
age devices for their removal or disconnection. See also
››› page 32, Insert or eject a memory card and
››› page 33, External data storage device connected to
USB port
.
Traffic programme (TP): The TP function (traffic news sta-
tion tracking) is active ››› page 22. Images
Fig. 27
Images main menu. Using the Ima
ge
s
menu, image files can be
viewed (e.g. photos) individually or as a sli-
deshow. »
35
Page 38 of 88
.
● Press the Infotainment button
›››
Fig. 1 12 and then press")
Audio and Media Mode
The image files must be stored on a compati-
b l
e d
ata storage device (e.g., a CD or an SD
card).
● Press the Infotainment button
›››
Fig. 1 12 and then press the
Im
ag
e s func-
tion b utt
on.
● Pr
ess the SOURCE function button to select
the sour c
e wher
e the pictures in question are
located.
Function button: function
SOURCEViewing and selecting the source.
SELEC-
TIONOpens a list of image files.
The image viewed was obtained via GPS lo-
calisation and upon pressing this function
button, the navigator menu opens to start a
route to this destination.
/ Rotate the view of the image to the left or
the right.
Reset the view of the image.
To stop the playback of a slideshow. The function button changes to .
To continue the playback of a slideshow.
The function button changes to .
Function button: function
/
To change to the PREVIOUS
or NEXT im-
age.
The same function can be performed by
sliding your finger horizontally across the
screen.
SET- TINGSOpen the Image settings menu. Enlarging or reducing the view
To en
l
arge or reduce the view of the image
displayed:
● Turn the adjustment knob.
● OR: Stretch or reduce the image on the
s c
reen using 2 fingers.
Rotating the view/image
To rotate an image, in addition to the buttons
provided for this ( / ), you can also press
on the screen (e.g. with your thumb) and,
while continuing to press with your thumb,
slide another finger (e.g. your index finger)
around it like a compass either clockwise (to
rotate the image to the right) or anti-clock-
wise (to turn the image to the left). This will
rotate the image 90° with respect to its cur-
rent position. Requirements for viewing images
Image filesMaximum resolution
BMP4MP
JPEG4MP (Progressive Mode)
JPG64MP
GIF4MP
PNG4MP
Image settings
Open the Image settings
menu
● In the Ima ges main menu, press the
S ET
TINGS function button.
Function button: function
Image view: To adjust the viewing format of the image.
Automatic
: The images are shown in scale in rela-
tion to the size of the screen (the image may not be
displayed in its entirety).
Full : The full images are displayed on the screen.
Display time: To adjust the display time of the images
during a slideshow.
Repeat slideshow: The active slideshow will be repeated
indefinitely. 36
Page 39 of 88

Navigation*
Navigation*
Nav ig
ation, entr
y and control
Introduction Fig. 28
Related video General information
The c
urr
ent
vehicle position is determined by
means of the GPS satellite system (Global Po-
sitioning System). Sensors in the vehicle
measure distances that have been driven.
The measurement values are compared with
the detailed map data and the road informa-
tion stored therein. Traffic reports, if any, will
also be taken into account in the route calcu-
lation (dynamic route guidance
››› page 45). Using all the data available,
the Infotainment system calculates the opti-
mum route to the destination.
The destination is defined by entering an ad-
dress or a point of interest, e.g. a petrol sta-
tion or hotel.
Spoken instructions and visual guidance on
the navigation unit and on the instrument
panel will direct you to your destination. Depending on the country, some infotain-
ment sys
tem functions can no longer be se-
lected when the vehicle is travelling above a
certain speed. This is not a malfunction, but
simply a legal requirement.
Navigation messages When the Infotainment system is unable to
rec
eiv
e any data from GPS satellites (due to a
dense tree canopy, underground car park),
navigation can still continue using the vehi-
cle sensors.
Possible navigation limitations
In areas that are not or are only partially digi-
tised on the data storage device (e.g. insuffi-
cient definition of one-way streets and road
categories), the Infotainment system will still
attempt to provide route guidance.
If navigation data are unavailable or incom-
plete, the navigation system may be unable
to determine the exact vehicle position. As a
result, the navigation may not be as exact as
usual.
Navigation area and updating of navigation
data
Roads and streets are subject to constant
change (e.g. new roads, changes to street
names and building numbers). Therefore, if
the navigation data is not updated, then er- rors or inaccuracies may occur during guid-
ance.
S
EA
T recommends updating navigation data
on a regular basis. Up to date navigation da-
ta can be acquired at a SEAT dealer.
Use navigation data from a memory
card. The SD card is initially to be found inserted in
SD car
d s
lot 2.
To update navigation data visit our website:
www.seat.com.
● Insert the memory card ›››
page 32 .
● Do not remove the memory card while test-
ing. W
ait for the testing icon to disappear.
If the inserted memory card contains valid
navigation data, the following message ap-
pears: “The source contains a valid
navigation database ”. It is now possible
to navigate with the memory card data. When
the memory card is no longer needed by the
hardware, it will be prepared for removal
››› page 32. Note
● The inser t
ed memory card must be pre-
pared before it is ejected ››› page 32. » 37
Page 40 of 88

Navigation*
●
Pre s
s the Infotainment button
››› Fig. 1 12 ; then press
Settings to open
the System settings menu.
● Nav
igation is not possible without the SD
card.
● Do not
remove the memory card while the
navig
ation data is in use. This could damage
the memory card!
● The navigation memory card may not be
used as
memory for other files. The infotain-
ment system will not recognise the files
saved.
● SEAT recommends only using original SEAT
memory c
ards to use navigation data. The
use of other memory cards could limit its op-
eration. Navigation main menu
Fig. 29
Navigation main menu The navigation functions are only enabled
when n
av
ig
ation data for the current area are
available on the Infotainment system.
The Navigation main menu allows you to se-
lect a new destination, call up a previously
used or stored destination and search for
points of interest.
Opening the main Navigation menu
● Press the Infotainment system button
›››
Fig. 1 3 to open the last menu that was
open in n av
ig
ation.
● If the main Navigation menu i
s not dis-
played, press the Infotainment button
››› Fig. 1 3 again until the main
Navigation
menu ap pe
ars.
● OR: Press the function button to return,
menu b y
menu, t
o the main Navigation
menu.
Function buttons and messages on the main
Navigation menu
Function button: function
AThe split screen is displayed ››› page 43.
BMessages and function buttons on the map dis-
play ››› page 44.
NEW DESTINATION: To enter a new destination
››› page 38.
ROUTE: During route guidance ››› page 40.
Function button: function
MY DESTS.: To activate or manage stored destinations
››› page 41.
POI: Search for points of interest (car parks, fuel sta-
tions and restaurants) within a particular search area
››› page 42.
VIEW: To modify or activate or deactivate the split
screen and show POI ››› Fig. 29 A
››› page 43.
SETTINGS: Open the Navigation Settings menu
››› page 48. New destination (enter destination)
Fig. 30
Search screen. ●
In the Na vigation main menu, press the
New de s
tination function button.
● Press the Option
s function button and se-
l ect
the r
equired type of destination
38