2017 RENAULT ZOE light
[x] Cancel search: lightPage 179 of 220

5.11
The bulbs are under pres-
sure and can break when
replaced.
Risk of injury.
REAR AND SIDE LIGHTS: changing bulbs (2/2)
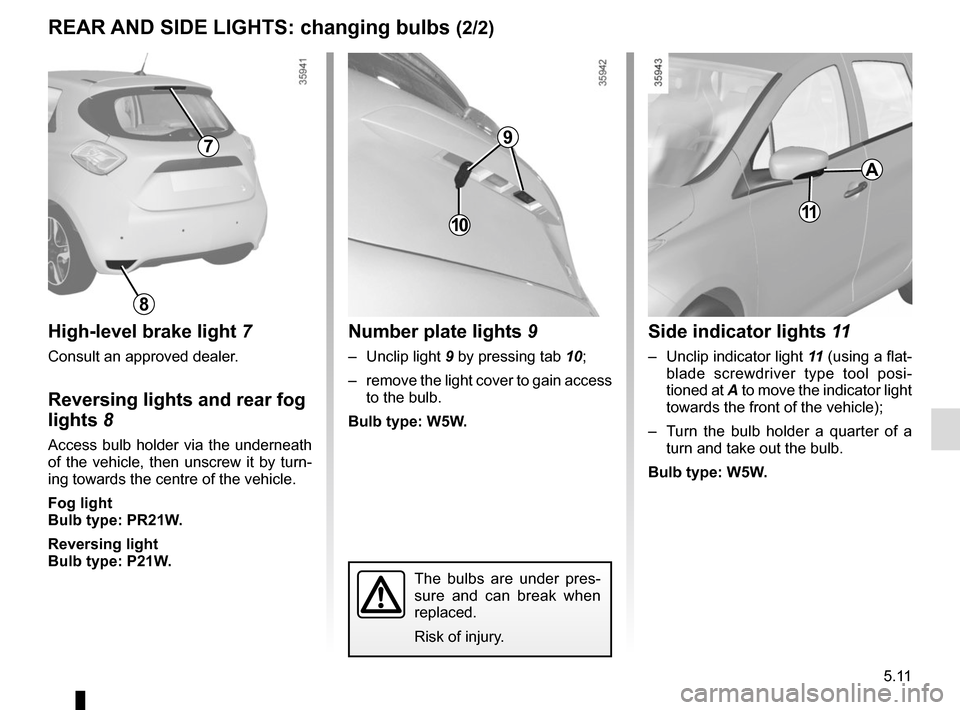
High-level brake light 7
Consult an approved dealer.
Reversing lights and rear fog
lights 8
Access bulb holder via the underneath
of the vehicle, then unscrew it by turn-
ing towards the centre of the vehicle.
Fog light
Bulb type: PR21W.
Reversing light
Bulb type: P21W.
Side indicator lights 11
– Unclip indicator light 11 (using a flat-
blade screwdriver type tool posi-
tioned at A to move the indicator light
towards the front of the vehicle);
– Turn the bulb holder a quarter of a turn and take out the bulb.
Bulb type: W5W.
11
A
Number plate lights 9
– Unclip light 9 by pressing tab 10;
– remove the light cover to gain access to the bulb.
Bulb type: W5W.
10
8
79
Page 180 of 220

5.12
INTERIOR LIGHTING: changing bulbs
The bulbs are under pres-
sure and can break when
replaced.
Risk of injury.
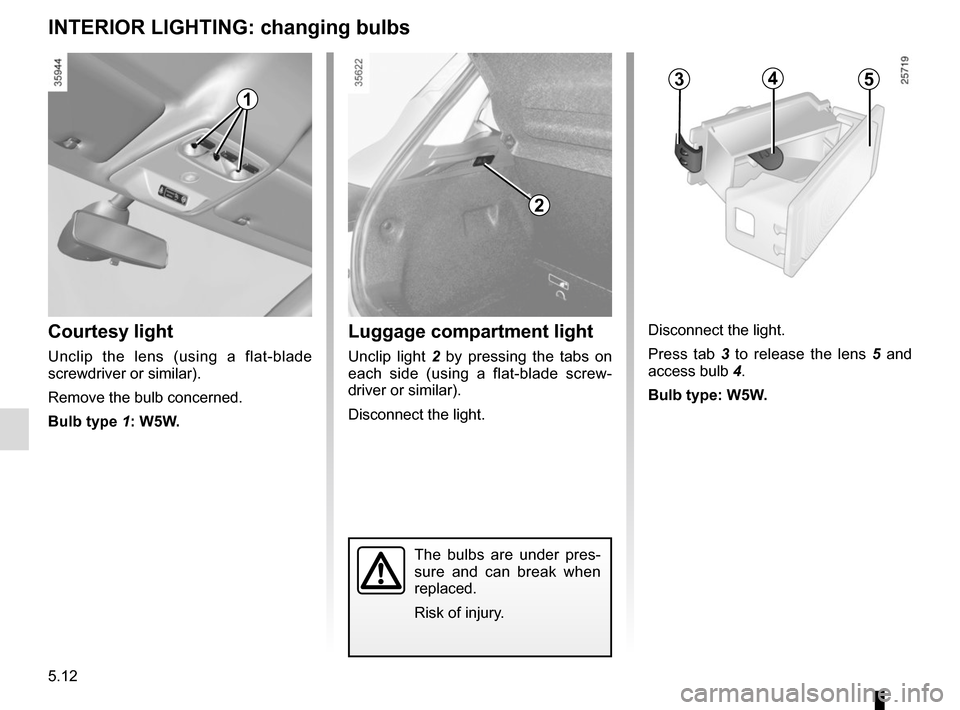
Courtesy light
Unclip the lens (using a flat-blade
screwdriver or similar).
Remove the bulb concerned.
Bulb type 1: W5W.
345
Disconnect the light.
Press tab 3 to release the lens 5 and
access bulb 4.
Bulb type: W5W.
2
Luggage compartment light
Unclip light 2 by pressing the tabs on
each side (using a flat-blade screw-
driver or similar).
Disconnect the light.
1
Page 182 of 220

5.14
FUSES (2/2)
Allocation of fuses
(the presence of certain fuses depends
on the vehicle equipment level)
1 Brake light;
2 Horn;
3 Instrument panel;
4 Automatic door locking;
5 Direction indicator lights;
6 Cigarette lighter;
7 Windscreen washer;
8 Radio;
9 Rear windscreen wiper;
1
2
3
4
5
6
7
8
9
10
11
12
13
14
10 Front ceiling light and boot light;
11 Pedestrian horn;
12 Brake switch;
13 Driver’s window winder;
14 Heated door mirrors.
Check the fuse in question
and replace it, if neces-
sary, by a fuse of the same
rating.
If a fuse is fitted where the rating is
too high, it may cause the electrical
circuit to overheat (risk of fire) in the
event of an item of equipment using
an excessive amount of current.
Page 186 of 220

5.18
WINDSCREEN WIPER BLADES
Replacing wiper blades 1
With the ignition on and the engine
switched off, lower the windscreen
wiper stalk completely: they stop
slightly away from the bonnet.
Lift wiper arm 3 , pull tab 2 (move-
ment A) and push the blade upwards.
To refit
Slide the blade along the arm until it
clips on. Make sure that the blade is
correctly locked in position. Return the
windscreen wiper stalk to the park po-
sition.
1
2
3
Keep monitoring the condition of the
wiper blades. How long they last de-
pends on you:
– clean the blades and the wind- screen regularly with soapy
water;
– do not use them when the wind- screen is dry;
– free them from the windscreen when they have not been used
for a long time.
A
– In frosty weather, make
sure that the wiper blades
are not stuck by ice (to
avoid the risk of the motor
overheating).
– Check the condition of the wiper
blades.
They should be replaced as soon
as they become less efficient: ap-
proximately once a year.
When changing the blade, when it
has been removed, do not let the
wiper arm fall against the window:
risk of breaking the window.Rear screen wiper blade 4
– Lift wiper arm 6;
– pivot blade 4 until some resistance is
met (movement C);
– depending on the vehicle, press tab 5, then remove the blade by pull-
ing it (movement B).
To refit
To refit the wiper blade, proceed in re-
verse order to removal. Make sure that
the blade is correctly locked in position.
4
5
B
C
6
Page 188 of 220

5.20
Once you have finished towing, press
the engine start button twice (risk of
running down the 12 V battery).
If the lever is stuck in P, even though
you are depressing the brake pedal, the
lever can be released manually.
To do this, unclip the cover at the base
of the lever.
Simultaneously press at the location 7
and the unlocking button 6 on the lever.
TOWING, BREAKDOWN (2/3)
6
7
In the event of an energy
fault: towing
In the event of a fully discharged trac-
tion battery:
– the warning light 2
Ṏ flashes;
– the indicator 1 shows an empty bat-
tery.
It is possible to recover on a flatbed
truck or tow the vehicle using the tow
eye, following the instructions below.
When the engine is stop-
ped, steering and braking
assistance are not opera-
tional.
Before towing, unlock the steering
column: engage the lever 5 in posi-
tion N, insert the card in the reader 4
then press the engine starting button 3
for approximately two seconds.
The column is unlocked, the accessory
functions are supplied: the vehicle lights
can be used (hazard warning lights,
brake lights etc.). The towed vehicle’s
lights must be switched on at night.
The speed specified by current legisla-
tion for towing must always be obser-
ved.
3
5
4
1
2
Page 190 of 220

5.22
OPERATING FAULTS (1/4)
The following advice will enable you to carry out quick, temporary repai\
rs. For safety reasons you should always contact
an approved dealer as soon as possible.
FAULTSPOSSIBLE CAUSESWHAT TO DO
Impossible to charge the traction bat-
tery.
The charging flap warning light flashes
red. The outdoor temperature is lower
than -26°C.
Recharge your vehicle in a more suitable
environment. If necessary, please refer to
the information on “Towing: breakdown re-
covery” in Section 5.
No electrical current in the wall
socket or poor connection of cable
to domestic socket. Check your installation (circuit breaker, pro-
grammer, etc.).
Check the connections (socket, etc.).
Please refer to the information on “Electric
vehicle: charging” in Section 1.
The cord is defective. Please see an authorised dealer to replace
it.
Impossible to charge the traction bat-
tery.
The charging flap warning light flashes
blue. The charging cord is not correctly
locked to the vehicle. Plug the charging cord correctly to the ve-
hicle. Refer to the information on “Electric
vehicle: charging” in Section 1.
The activation of the air conditioning
using the card RENAULT fails to work. The card RENAULT is outside its
area of action.Step closer to the vehicle.
One of the usage conditions is not
complied with. Please refer to the information on “Air-
conditioning: remote control activation” in
Section 3.
Page 193 of 220

5.25
OPERATING FAULTS (4/4)
Electrical equipmentPOSSIBLE CAUSESACTION REQUIRED
The headlights
are not working. Only one: – blown bulb,
Replace the bulb.
– disconnected wire or incorrectly-posi- tioned connector, Check and reconnect the wire or the con-
nector.
Both: – if the circuit is fused. Check and replace if necessary.
The headlights do not switch off. Faulty electrical controls. Consult an approved dealer.
Traces of condensation in the lights. This is not a fault. The presence of traces of condensation in lights is a natural phe-
nomenon linked to variations in tempera-
ture.
These traces soon disappear when the
lights are switched on.
Page 213 of 220

7.1
ALPHABETICAL INDEX (1/5)
A
ABS ....................................................................\
...2.16 → 2.20
accessories........................................................................\
5.17
accessories socket ............................................................ 3.22
additional methods of restraint .....................1.37 → 1.40, 1.43
side protection ............................................................. 1.42
to the front seat belts .......................................1.37 → 1.40
to the rear seat belts ........................................1.37 → 1.41
adjusting your driving position ........................................... 1.33
air bag....................................................................1.37 → 1.43
activating the front passenger air bags ........................ 1.57
deactivating the front passenger air bags .................... 1.55
air conditioning .............................1.20 – 1.21, 3.4 → 3.8, 3.15
air vents ...................................................................... 3.2 – 3.3
anti-corrosion check ..............................................6.13 → 6.17
anti-corrosion protection ...................................................... 4.9
anti-lock braking system: ABS ...............................2.16 → 2.20
armrest: front ..................................................................\
............ 3.20
ashtray ................................................................\
............... 3.22
audible and visual signals.................................................. 1.79
B
battery........................................................................\
........ 1.63
12 volt battery maintenance ......................................................... 4.6 – 4.7
12 volt battery ............................................1.2 → 1.6, 4.6 – 4.7
bonnet........................................................................\
. 4.2 – 4.3
brake fluid ........................................................................\
.... 4.5
bulbs changing ........................................................... 5.10 – 5.11
C
central door locking ......................................1.26, 1.29 → 1.31
changing a bulb ...................................................... 5.10 – 5.11
changing gear ............................................................. 2.5 – 2.6 charge meter .............................................................. 1.66, 2.7
charging cord .......................................1.8
→ 1.15, 1.20 – 1.21
charging flap ............................................................1.8 → 1.15
charging socket ..................................... 1.2 → 1.6, 1.8 → 1.15
child restraint/seat .............................1.44 – 1.45, 1.47 → 1.57
child safety..1.18 – 1.19, 1.24, 1.28, 1.44 – 1.45, 1.47 → 1.57,
3.16 – 3.17
child seats..........................................1.44 – 1.45, 1.47 → 1.54
children ........................... 1.18 – 1.19, 1.27 – 1.28, 1.44 – 1.45
children (safety) ............................................. 1.24, 3.16 – 3.17
cleaning: inside the vehicle .............................................. 4.11 – 4.12
clock ....................................................................... 1.75 – 1.76
closing the doors ...................................................1.27 → 1.30
connected services .............................................................. 1.3
control instruments ................................................1.62 → 1.68
controls ...............................................................\
...1.58 → 1.61
coolant ................................................................\
................. 4.4
courtesy light ............................................................ 3.18, 5.12
courtesy mirrors ................................................................. 3.18
cruise control ................................................1.63, 2.21 → 2.27
cruise control-speed limiter....................................2.21 → 2.27
D
dashboard..............................................................1.58 → 1.61
daytime running lights................................................. 1.81, 5.9
deadlocking the doors ....................................................... 1.26
display .................................................1.58 → 1.66, 2.29, 3.29
doors.............................................................. 1.27 – 1.28, 1.31
doors/tailgate ................................................. 1.26 – 1.28, 1.31
driver’s position .....................................................1.58 → 1.64
driving .............................. 2.2 → 2.6, 2.10 – 2.11, 2.13 → 2.29
driving position settings ............................................................1.33 → 1.36
driving recommendations ........................................ 2.7 → 2.11