Page 49 of 96

GB.47
RECHARGING STATION
Saving new recharging
stations
When you recharge your vehicle at a
new recharging terminal, it will be auto-
matically saved in the system.
You can also create and manage
your own recharging stations in the
“Settings” menu, by selecting “EV set-
tings”. Please refer to the “Navigation
settings” section.
The “Charging station” menu is only
available on electric vehicles.
Go to the
Recharging station
menu
To access the “Charging station” menu:
– press “Navigation”, then select
“Drive to... ”;
– in the “Drive to...” menu, select “Charging station”.
“Near my location”
This option enables you to find the
recharging stations closest to your
current position.
“In town”
Select this service to find recharg-
ing stations in the town/city your are
visiting.
“Near Home”
This option provides a list of recharg-
ing stations close to your home.
“Along route”
This option shows a list of recharg-
ing stations that you can use during
your trip.
“Near destination”
This option gives a list of recharging
stations near your destination.
“Last recharging station”
This option enables you to find the
coordinates of the last recharging
station used.
Page 50 of 96

GB.48
RANGE
The range distance is only available for
electric vehicles.
Attainability of the
destination
The classic map display indicates
whether the battery level of your elec-
tric vehicle is sufficient to reach your
destination:
– chequered flag: the vehicle can reach your destination at the current
battery level;
– chequered flag with lightning symbol on red background: look for a re-
charging station to avoid running out
of power.
Low battery warning
When the charge level reaches the
minimum alert level on the instrument
panel, the system automatically pro-
poses a list of recharging stations near
your current location.
Deactivating the low battery
warning
This option enables you to deactivate
the automatic proposal of recharging
stations when the battery level is low:
– from the “Navigation” menu, select “Settings” then “EV settings”.
– select the “Disable low battery warn- ing” option.
Select this option again to reactivate
the low battery alert.
Note: if the ongoing guidance is indi-
cating an attainable charging point, the
low battery alert will not be triggered.
Range view
– In guidance mode, from the route summary screen: you can see the
route portions (zones) that are at-
tainable (in green) and non-attaina-
ble (in red);
– when not in guidance mode, from the “attainable zone” main menu: your
range distance is shown as a radi-
ous around your vehicle’s current
position.
Page 51 of 96

GB.49
ADDING, MANAGING SAVED ADDRESSES
Save an address from a
recent destination
– In the “Drive to...” menu, select “Recent destinations”;
– select the recent destination you wish to save;
– on the screen/map, press “ +” then
“Add to saved locations”;
– give a name to an address, then press “Next”;
– If the “Home” address is not regis- tered, the system asks if the saved
address is your home, select “Yes”
or “No”. A message confirms that the
address has been saved.
– If the “Home” address is registered, the system offers to select this ad-
dress.
Renaming a saved address
– From the main menu, press “Navigation” then “Settings” then
“Manage saved locations”;
– select an address saved in the memory that you wish to remember;
– on the screen/map, press “Rename”;
– enter the new name for the saved address, then press “Next” to con-
firm.
Deleting a saved address
– From the “Manage saved locations” menu, select the saved address you
wish to delete;
– on the screen/map, press “Delete”;
– a message asks you to confirm the deletion - press “Yes” to confirm or
“No” to cancel.
Accessing saved
addresses
To access saved addresses, from the
main menu press “Navigation”, then
“Drive to...”, then “Saved locations”.
Page 52 of 96

Accessing the navigation
settings
From the “Navigation” menu, press
“Settings”, then select the element you
wish to change:
– Turn off voice guidance;
–")
GB.50
NAVIGATION SETTINGS (1/2)
Accessing the navigation
settings
From the “Navigation” menu, press
“Settings”, then select the element you
wish to change:
– Turn off voice guidance;
– Route planning;
– Show POI on map;
– Manage POIs;
– Voice;
– EV settings;
– Set home location;
– Manage saved locations;
– Switch map;
– Change map colours;
– Car symbol;
– Advanced (Settings).
Turn off voice
guidance
This menu enables you to activate or
deactivate voice guidance.
Route planning
This menu allows you to define your
preferences for:
Type of journey
Select a journey type. The recom-
mended journey criterion is “Quickest”.
“IQ Routes™"
After selecting the journey criterion, the
system lets you activate/deactivate the
“IQ Routes™” function.
The “IQ Routes™” function finds the
best route according to estimated aver-
age traffic and actual speeds measured
on the roads.
High-occupancy vehicle lanes
High-occupancy vehicle lanes are
routes that favour your vehicle’s energy
savings.
Show POI on map
This menu lets you display or hide Point
of Interest (POI) categories on the map.
Manage POIs
A point of interest (POI) is a service,
establishment or tourist area close to a
location (start point, destination city, en
route, etc.). POIs are classed in differ-
ent categories, e.g. restaurants, muse-
ums, car parks, etc. There are several
options to find a point of interest:
– category;
– the name of the desired POI.
This menu allows you to add, change
or delete POIs or POI categories.
Voice
This menu lets you choose the syn-
thetic or stored voice.
Page 53 of 96

EV settings
This menu allows you to create and
manage your own recharging stations
as well as those detected automatically
by the system.
Set home location
This me")
GB.51
NAVIGATION SETTINGS (2/2)
EV settings
This menu allows you to create and
manage your own recharging stations
as well as those detected automatically
by the system.
Set home location
This menu lets you set or change your
home address.
Manage saved
locations
This menu lets you add, delete or
rename your saved addresses.
Switch map
Use this menu if you are installing more
than one map saved on your card SD.
To change maps, select “Switch map”,
then select the map required.
Change map
colours
Select “Change map colours”, then
choose the day and night colours you
want. You can download new colours.
Car symbol
This menu allows you to change the ve-
hicle icon on the navigation map 3D.
Advanced
This menu enables you to change the
following advanced settings:
– Map information;
– Map behaviour;
– Traffic source.
Map information
This menu enables you to display or
hide certain information such as the
address number before the street
name, the street names, the name of
the street after the current street, and
the current street name on the map.
Map behaviour
This menu enables you to set the fol-
lowing behaviours
– show lane images;
– in 2D mode, rotate the map with the vehicle's direction;
– automatically move to 3D when guid- ance is launched;
– automatically zoom in 2D mode;
– automatically zoom in 3D mode.
Traffic source
This menu enables you to choose
the traffic information source from a
preset list.
Page 54 of 96

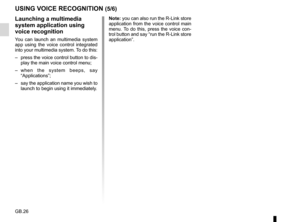
Selecting a wavelength
Select the required waveband (AM, FM
or DR) by pressing 1:
– AM;
– FM;
– DR.
You can also select the waveband
using the steering colum")
GB.52
LISTENING TO THE RADIO (1/5)
Selecting a wavelength
Select the required waveband (AM, FM
or DR) by pressing 1:
– AM;
– FM;
– DR.
You can also select the waveband
using the steering column control (refer
to the control details).
Choose an FM or AM radio
station
There are different modes for choosing
a radio station.
After having selected the wavelength,
select the mode by pressing tabs 3, 4
or 5.
Three search modes are available:
– “Frequency” mode (tab 3);
– “List” mode (tab 4);
– “Preset” mode (tab 5).
These modes can be changed with the
steering column control. “Preset” mode
This operation mode allows you to
recall on demand those stations which
you have already stored (refer to infor-
mation on “Storing a station” in this sec-
tion).
Press the buttons 2 (numbered 1 to 6)
to select your stored stations.
You can also change a saved station
using the steering column control.
Preset List Frequency
1
345
2
2
Accessing the
radio
Touchscreen
From the main menu, press
“Multimedia”, then “Radio”.
Radio front panel / Multimedia front
panel
Press the “Radio” button on the panel
to select the radio source.
Page 55 of 96
To select a radio station DR
(terrestrial digital radio)
There are different modes for choosing
a radio station.
After selecting the waveband, select
the mode by p")
GB.53
LISTENING TO THE RADIO (2/5)To select a radio station DR
(terrestrial digital radio)
There are different modes for choosing
a radio station.
After selecting the waveband, select
the mode by pressing the tabs 15 or 16.
Two search modes are available:
– “List” mode (tab 15);
– “Preset” mode (tab 16).
These modes can be changed with the
steering column control.
“Frequency” mode
This mode allows stations to be
searched for either manually or au-
tomatically by scanning the selected
range of frequencies.
To scan the frequency range:
– manually run through the frequen-
cies in steps by repeatedly press-
ing 9 or 11 ;
– automatically go to the next station by pressing 8 or 12;
– move the cursor 10 to find the re- quired frequency.
“List” mode
This mode displays a list of available
radio stations. These are listed alpha-
betically (FM band only).
Tap 6 or 7 to scroll through all the sta-
tions or slide your finger on the touch-
screen.
To update this list, please see the fol-
lowing pages.
The names of the radio stations that do
not use the RDS system will not appear
on the screen. Only their frequency is
displayed and sorted at the beginning
of the list.
Preset List Frequency
811912
6
7
Preset List Frequency
3.BNR
1.Arrow
4.Jazz FM 2.Decibel5.Radio Pop
10
Radio DR1
Preset List
1615
13
14
AF | i-Traffic
Page 56 of 96

Pop-up menu “+”.
FM or AM
From one of the three modes, press “+”
to:
– change the source (Radio, USB, SD, etc.);
– add a station to your favourites;
�")
GB.54
LISTENING TO THE RADIO (3/5)
Pop-up menu “+”.
FM or AM
From one of the three modes, press “+”
to:
– change the source (Radio, USB, SD, etc.);
– add a station to your favourites;
– save a station;
– get text information;
– access the radio settings.
Storing a station
From “Frequency” mode or “List” mode,
press “+” then “Save as preset”.
You can also press one of the preset
buttons until you hear a beep.
You can store up to 6 stations per band.
“List” mode
This mode displays a list of available
radio stations.
Tap
13 or 14 to scroll through all the sta-
tions or slide your finger on the touch-
screen.
To update this list, please see the fol-
lowing pages.
“Preset” mode
This operation mode allows you to
recall on demand those stations which
you have already stored (refer to infor-
mation on “Storing a station” in this sec-
tion).
Press the buttons (numbered 1 to 6) to
select your stored stations.
You can also change a saved station
using the steering column control. Text information (Radio text)
Some FM radio stations broadcast
text information relating to their pro-
grammes (e.g. song titles).
Note: this information is only available
for certain radio stations.
DR (terrestrial digital radio)
From one of the two modes, press “+”
to:
– change the source (Radio, USB, SD,
etc.);
– Save as preset;
– display radio text;
– digital radio services;
– settings.
Storing a station
From “List” mode, press “+”, then “Save
as preset”.
You can also press one of the preset
buttons until you hear a beep.
You can store up to six radio stations.