2017 RENAULT ESPACE System
[x] Cancel search: SystemPage 45 of 130

2.13
“Event types”
Select this option to open a list of traf-
fic incident types. For each type of in-
cident:
– press On on line Consider event so that the system takes into account
each incident of the type selected
when calculating the route.
– press “On” on line “Visible” to show the incident on the route.
Note: to obtain the traffic information
service, you will need a paid subscrip-
tion.
Note: the rest of the options given
below are only available if this function
is activated.
“Detour”
Activate this option to enable the navi-
gation system to use traffic information
in real time to calculate your route.
If incidents are affecting your route, the
navigation system may suggest a diver-
sion.
You can choose the period of delay
from which you wish the system to sug-
gest a diversion.
The system can, depending on your se-
lection, either suggest the diversion or
follow it automatically.
TRAFFIC (1/2)
Precautions regarding
navigation
Use of the navigation
system does not in any way
replace the responsibility or vigi-
lance of the driver when driving the
vehicle.
“Traffic” menu
From the home screen, press Menu,
Navigation then Traffic to access up-
dated road and traffic information from
the best local sources.
“Traffic” uses information broadcast
over TMC (Traffic Message Channel)
on the FM band. This service indicates
events in the form of dots on the map. It
covers the main routes.
Traffic settings
Press the pop-up menu button, then
Settings to access the following set-
tings:
“Traffic”
Activate this option to receive traffic in-
formation. If you have subscribed to the
on-line service, you can benefit from
real-time information with better cover-
age. If not, you will receive TMC traffic
information.
The availability of the “Traffic” serv-
ices may vary.
Page 46 of 130
2.14
TRAFFIC (2/2)
Traffic display
The navigation system indicates traffic
incidents:
– with an alternate color on the map;
– by displaying traffic icons on the map.
A traffic icon is displayed on the naviga-
tion screen to show you whether traf-
fic incidents are announced. When an
incident occurs on your route, an icon
indicates the type of upcoming incident
on your route.
Precautions regarding
navigation
Use of the navigation
system does not in any way
replace the responsibility or vigi-
lance of the driver when driving the
vehicle.
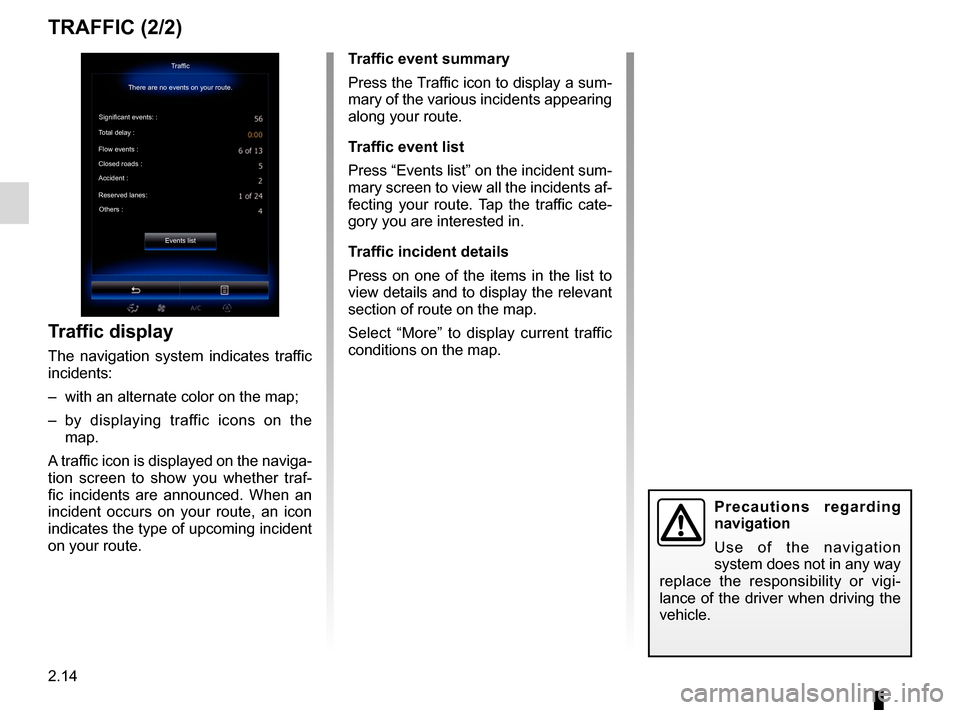
Traffic event summary
Press the Traffic icon to display a sum-
mary of the various incidents appearing
along your route.
Traffic event list
Press “Events list” on the incident sum-
mary screen to view all the incidents af-
fecting your route. Tap the traffic cate-
gory you are interested in.
Traffic incident details
Press on one of the items in the list to
view details and to display the relevant
section of route on the map.
Select “More” to display current traffic
conditions on the map.Traffic
There are no events on your route.
Significant events: :
Total delay :
Flow events :
Closed roads :
Accident :
Reserved lanes: Others :
Events list
Page 47 of 130
2.15
ROUTE (1/4)
Edit route
Current GPS Position
Add
Precautions regarding
navigation
Use of the navigation
system does not in any way
replace the responsibility or vigi-
lance of the driver when driving the
vehicle.
Add
Add
Go
1
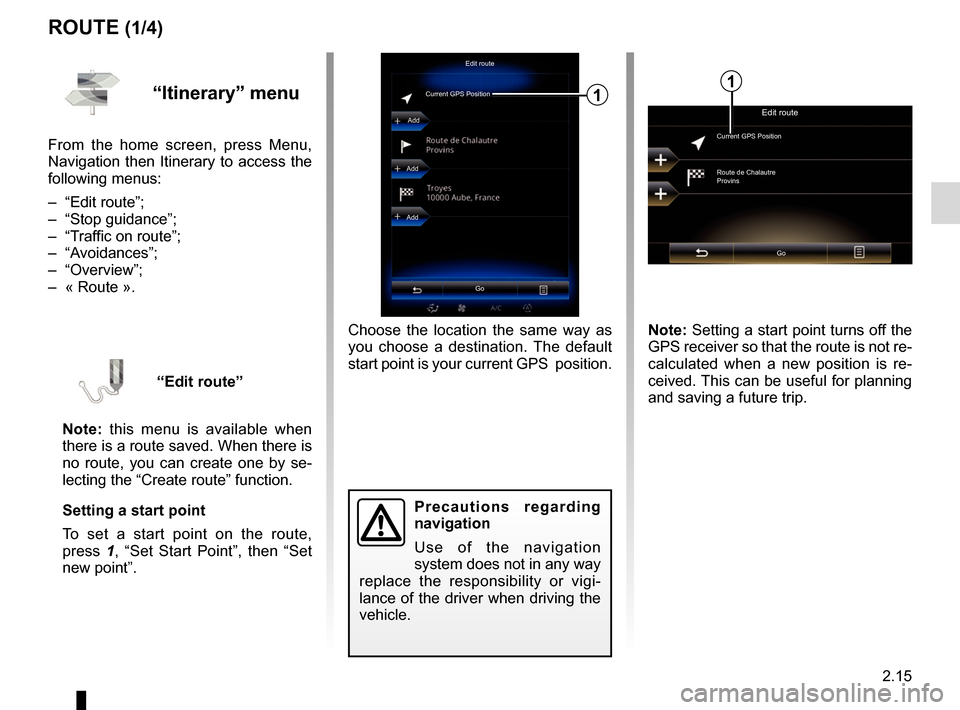
Choose the location the same way as
you choose a destination. The default
start point is your current GPS position.
“Itinerary” menu
From the home screen, press Menu,
Navigation then Itinerary to access the
following menus:
– “Edit route”;
– “Stop guidance”;
– “Traffic on route”;
– “Avoidances”;
– “Overview”;
– « Route ».
“Edit route”
Note: this menu is available when
there is a route saved. When there is
no route, you can create one by se-
lecting the “Create route” function.
Setting a start point
To set a start point on the route,
press 1, “Set Start Point”, then “Set
new point”.
Edit route
Current GPS Position
Route de Chalautre
Provins
Go
Note: Setting a start point turns off the
GPS receiver so that the route is not re-
calculated when a new position is re-
ceived. This can be useful for planning
and saving a future trip.
1
Page 48 of 130
2.16
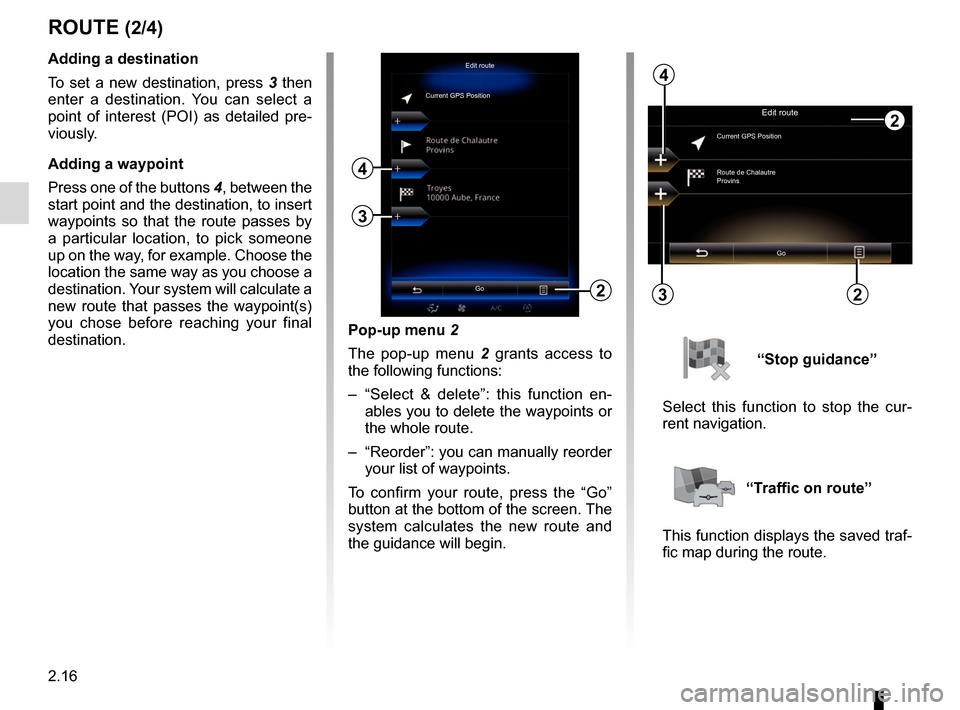
Pop-up menu 2
The pop-up menu 2 grants access to
the following functions:
– “Select & delete”: this function en- ables you to delete the waypoints or
the whole route.
– “Reorder”: you can manually reorder your list of waypoints.
To confirm your route, press the “Go”
button at the bottom of the screen. The
system calculates the new route and
the guidance will begin.
ROUTE (2/4)
2
Edit route
Current GPS PositionAdding a destination
To set a new destination, press 3 then
enter a destination. You can select a
point of interest (POI) as detailed pre-
viously.
Adding a waypoint
Press one of the buttons 4, between the
start point and the destination, to insert
waypoints so that the route passes by
a particular location, to pick someone
up on the way, for example. Choose the
location the same way as you choose a
destination. Your system will calculate a
new route that passes the waypoint(s)
you chose before reaching your final
destination.
3
4
Edit route
Current GPS Position
Route de Chalautre
Provins
Go
3
4
“Stop guidance”
Select this function to stop the cur-
rent navigation.
“Traffic on route”
This function displays the saved traf-
fic map during the route.
Go22
Page 49 of 130
2.17
– “Specific road”: to avoid a road on your route. For example, you can
skip a road where you expect heavy
traffic, but the Traffic system has not
warned you about it.
– “Restore original route”: to cancel detours you set previously.
In all cases you are presented with a
map screen, where you can see the
avoided section, the detour and the es-
timated change in length and duration
and the duration in relation to your ini-
tially calculated route.
To confirm your settings, press “Accept”.
ROUTE (3/4)
OverviewShort.
Go
“Avoidances”
To avoid certain sections of the route
in the event of a traffic jam not flagged
up by the system, select “Avoidances”
from the “Itinerary” menu.
You can choose to avoid the follow-
ing elements:
– “Specific sections”: to avoid a cer- tain type of road on the route. For
example, you can skip a section of
motorway or a ferry.
– “Guidance portion”: to indicate a preferred distance over which the
saved route should be avoided.
The screen displays the distance,
the avoided section of the route
and the detour on the map. You
can also see the estimated route
length and duration change com-
pared to the original route on the
top of the screen.
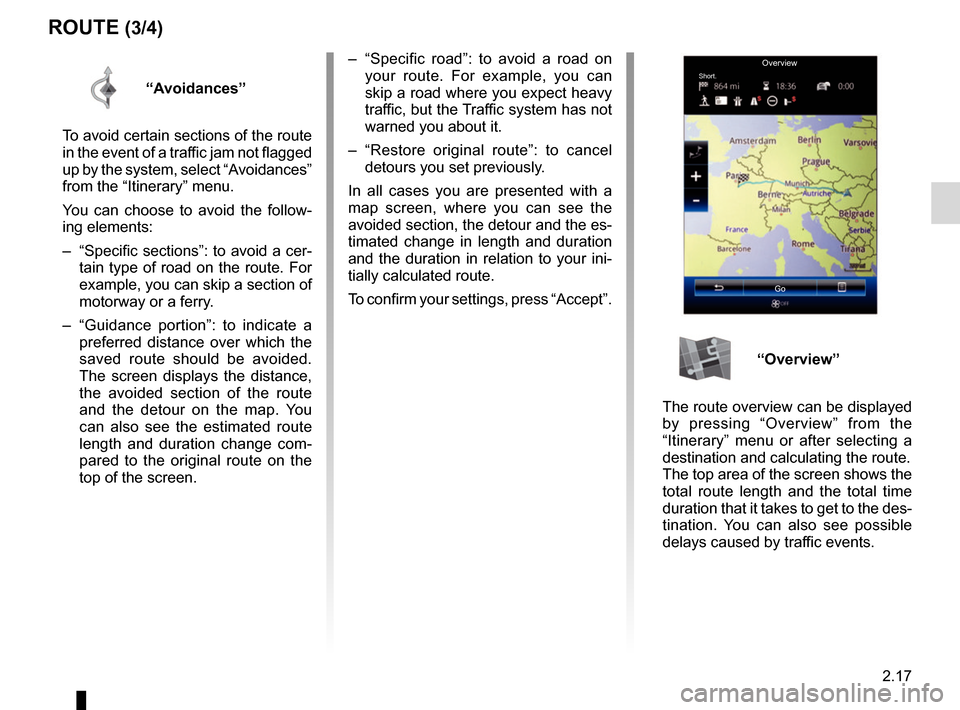
“Overview”
The route overview can be displayed
by pressing “Overview” from the
“Itinerary” menu or after selecting a
destination and calculating the route.
The top area of the screen shows the
total route length and the total time
duration that it takes to get to the des-
tination. You can also see possible
delays caused by traffic events.
Page 51 of 130
2.19
NAVIGATION SETTINGS (1/4)
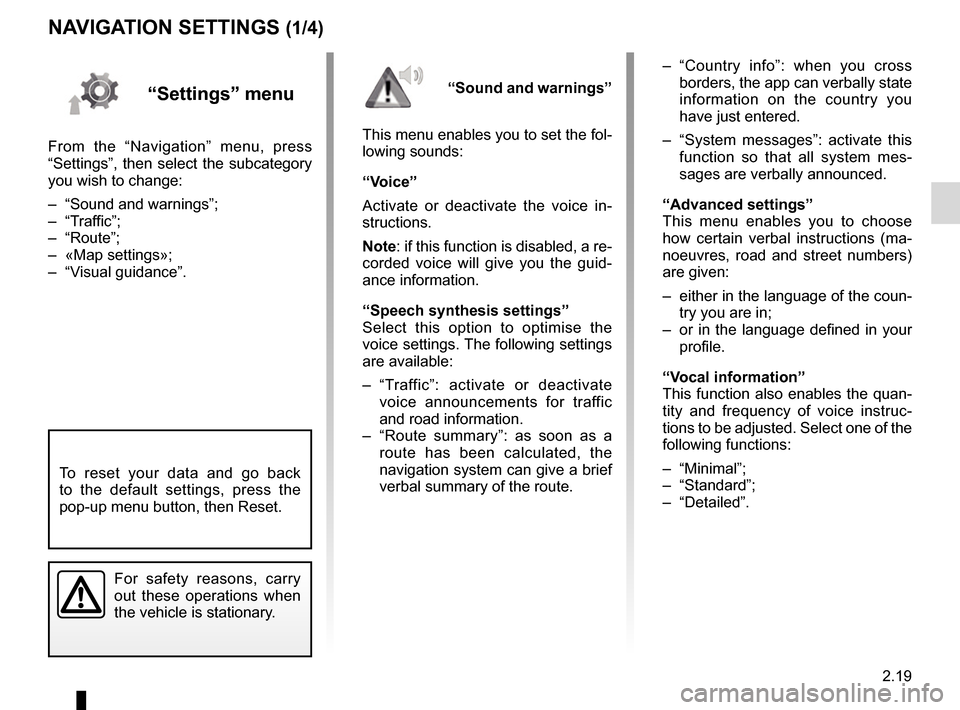
“Settings” menu
From the “Navigation” menu, press
“Settings”, then select the subcategory
you wish to change:
– “Sound and warnings”;
– “Traffic”;
– “Route”;
– «Map settings»;
– “Visual guidance”.– “Country info”: when you cross
borders, the app can verbally state
information on the country you
have just entered.
– “System messages”: activate this function so that all system mes-
sages are verbally announced.
“Advanced settings”
This menu enables you to choose
how certain verbal instructions (ma-
noeuvres, road and street numbers)
are given:
– either in the language of the coun- try you are in;
– or in the language defined in your profile.
“Vocal information”
This function also enables the quan-
tity and frequency of voice instruc-
tions to be adjusted. Select one of the
following functions:
– “Minimal”;
– “Standard”;
– “Detailed”.
“Sound and warnings”
This menu enables you to set the fol-
lowing sounds:
“Voice”
Activate or deactivate the voice in-
structions.
Note: if this function is disabled, a re-
corded voice will give you the guid-
ance information.
“Speech synthesis settings”
Select this option to optimise the
voice settings. The following settings
are available:
– “Traffic”: activate or deactivate voice announcements for traffic
and road information.
– “Route summary”: as soon as a route has been calculated, the
navigation system can give a brief
verbal summary of the route.
For safety reasons, carry
out these operations when
the vehicle is stationary.
To reset your data and go back
to the default settings, press the
pop-up menu button, then Reset.
Page 52 of 130
2.20
NAVIGATION SETTINGS (2/4)
“Speed warning”
Maps may contain information about
the speed limits of the road segments.
The navigation system is able to warn
you if you exceed the current limit. This
information may not be available for
your region, or may not be fully correct
for all roads on the map.
The following warning types are avail-
able:
– “Speed limit always visible”: acti-vate this function so that the speed
limit for the section of road taken is
always displayed on the navigation
screen.
– “Speed warning”: the current speed limit is displayed in red and flashes
on the map when you exceed it.
– “Overspeed warning sound”: a beep sounds when you exceed the speed
limit.“Safety warnings”
This function enables you to get a beep
and/or visual warning when you ap-
proach sensitive areas such as near
schools, level crossings, hazardous
areas, etc.
You can programme the navigation
system so that it displays these in-
creased vigilance points on the map,
and so that you can be warned by a
beep when you approach these areas.
For some of these areas, there is a
legal or recommended speed limit. The
beep may differ depending on whether
you are driving under or over the speed
limit.
Choose to be warned when approach-
ing these increased vigilance areas or
only when you are exceeding the speed
limit.
Precautions regarding
navigation
Use of the navigation
system does not in any way
replace the responsibility or vigi-
lance of the driver while driving the
vehicle.
In certain countries it is illegal to ac-
tivate the camera warning option
and this could lead to prosecution.
“Warning sign alerts”
Activate this function to be informed
when approaching specific sections of
road (obstacles, tight corners, cross-
ings, etc.) by road sign displays on
the map screen. For each category
of warning sign, set the warning type
(audio and/or visual) and the distance
from the hazard from which you want to
receive a warning.
Page 57 of 130
3.3
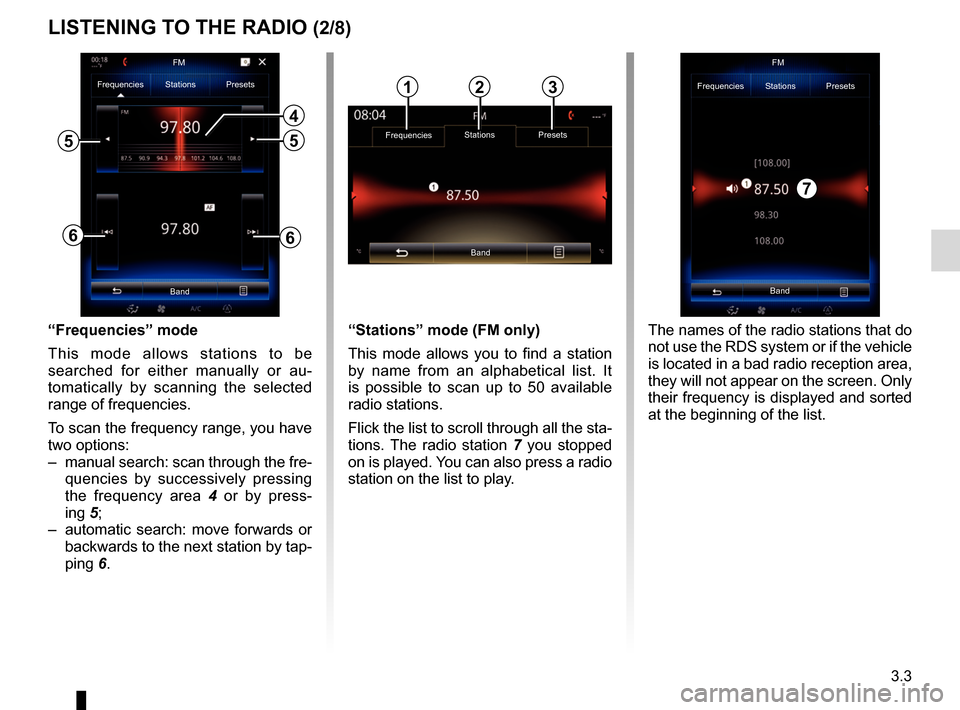
“Frequencies” mode
This mode allows stations to be
searched for either manually or au-
tomatically by scanning the selected
range of frequencies.
To scan the frequency range, you have
two options:
– manual search: scan through the fre-quencies by successively pressing
the frequency area 4 or by press-
ing 5;
– automatic search: move forwards or backwards to the next station by tap-
ping 6.
4
66
Frequencies Stations Presets
Band
55
“Stations” mode (FM only)
This mode allows you to find a station
by name from an alphabetical list. It
is possible to scan up to 50 available
radio stations.
Flick the list to scroll through all the sta-
tions. The radio station 7 you stopped
on is played. You can also press a radio
station on the list to play.
Band FM
Frequencies Stations Presets
The names of the radio stations that do
not use the RDS system or if the vehicle
is located in a bad radio reception area,
they will not appear on the screen. Only
their frequency is displayed and sorted
at the beginning of the list.
LISTENING TO THE RADIO (2/8)
Frequencies Stations Presets
Band
123
7
FM