2017 RENAULT ALASKAN heater
[x] Cancel search: heaterPage 150 of 340

Reversing on
asteep downhill
When moving the vehicle down ahill, the distance
guide lines and the vehicle width guide lines are
shown further than the actual distance. For example,
the display shows 1m(3ft) to the place j
A, but the
actual 1m(3f t) distance on the hill is the place
j B. Note that any object on the hill is viewed in the
monitor closer than it appears. Reversing near
aprojecting object
The dynamic predictive course lines jAm ay show
that the vehicle is not touching the object. However,
the vehicle may hit the object if it projects over the
actual moving course. WARNING
The distance viewed on the monitor is for refer-
ence only and may be different than the actual
distance between the vehicle and displayed ob-
jects.
The predictive course linesj
Ad onot touch the
object in the display. However, the vehicle may hit
the object if it projects over the actual moving
course. JVH0894XZ NAA1695
4-18 Display screen, heater and air conditioner, and audio system
Page 151 of 340

There may be
asmall visible distance between the
vehicle and the object in the bird’s-eye view j
Bon
the monitor. Moving closer to
aprojecting object
The position jCi sshown further than the position
j Bi nthe display. However, the position jCi sactu-
ally at the same distance as the position j
A. The
vehicle may hit the object when moving toward the
position j
Ai fthe object projects over the actual
moving course. HOW TO ADJUST THE SCREEN
VIEW
To adjust the display brightness of the 360° Cam-
era, use the settings described in the separately
provided Touchscreen Navigation owner’s manual.
Do not adjust the settings while the vehicle is mov-
ing. Make sure the handbrake is firmly applied.
OPERATING TIPS
• The screen displayed on the 360° Camera will
automatically return to the previous screen
3min-
utes after the
pushed while the shift lever is in aposition other
than the R(Reverse) position.
• When the view is switched, the display images
on the screen may be displayed with some de-
lay.
• When the temperature is extremely high or low,
the screen may not display objects clearly. This
is not
amalfunction.
• When strong light shines directly on to the cam-
era, objects may not be displayed clearly. This is
not
amalfunction.
• The screen may flicker under fluorescent light.
This is not
amalfunction.
• The colours of objects on the 360° Camera dis-
play may differ somewhat from the actual colour
of objects. This is not
amalfunction. NAA1696 NAA1 169
Display screen, heater and air conditioner, and audio system 4-19
Page 152 of 340

•
Objects on the monitor may not be clear and the
colour of the object may differ in adark environ-
ment. This is not amalfunction.
• There may be differences in sharpness between
each camera view of the bird’s-eye view.
• If dirt, rain or snow accumulates on the camera,
the 360° Camera may not display objects clearly.
Clean the camera.
• Do not use alcohol, benzine or thinner to clean
the camera. This will cause discoloration. To
clean the camera, wipe with
acloth that has
been dampened with adiluted mild cleaning
agent and then wipe with adry cloth.
• Do not damage the camera because the monitor
screen may be adversely affected.
• Do not use wax on the camera lens. Wipe off any
wax with
aclean cloth that has been dampened
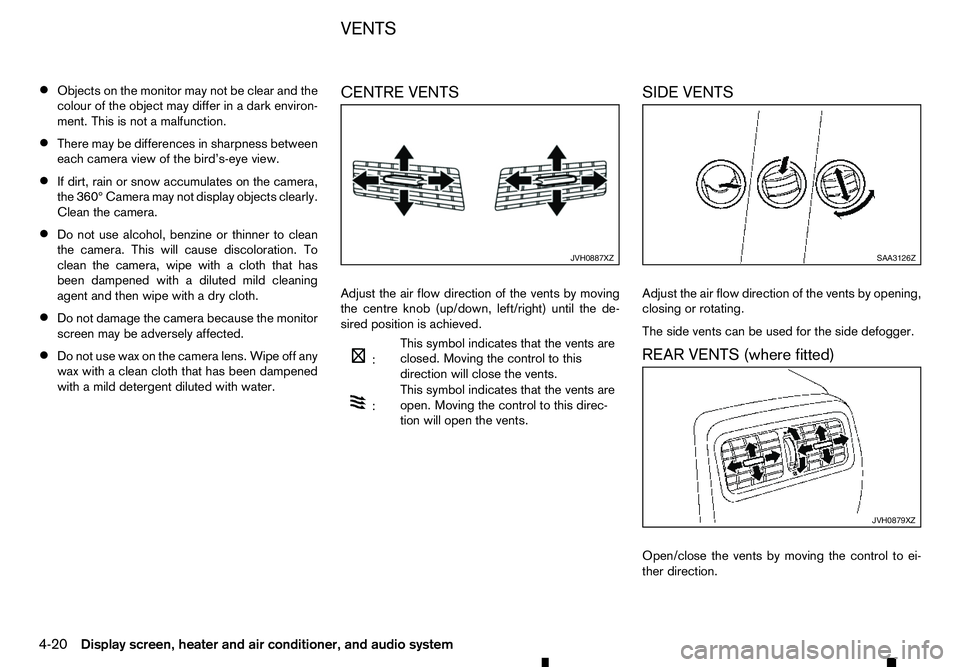
with amild detergent diluted with water. CENTRE VENTS
Adjust the air flow direction of the vents by moving
the centre knob (up/down, left/right) until the de-
sired position is achieved.
m :
This
symbol indicates that the vents are
closed. Moving the control to this
direction will close the vents.
m :
This
symbol indicates that the vents are
open. Moving the control to this direc-
tion will open the vents. SIDE VENTS
Adjust the air flow direction of the vents by opening,
closing or rotating.
The side vents can be used for the side defogger.
REAR VENTS (where fitted)
Open/close the vents by moving the control to ei-
ther direction. JVH0887XZ SAA3126Z
JVH0879XZ
VENTS
4-20 Display screen, heater and air conditioner, and audio system
Page 153 of 340

m:
This
symbol indicates that the vents are
closed. Moving the control to this
direction will close the vents.
m :
This
symbol indicates that the vents are
open. Moving the control to this direc-
tion will open the vents.
Adjust the air flow direction of the vents by moving
the centre knob (up/down, left/right) until the de-
sired position is achieved. WARNING
• The heater and air conditioner operate only
when the engine is running.
• Never leave children or adults who would nor-
mally require the support of others alone in
the vehicle. Pets should not be left alone ei-
ther. They could unknowingly activate
switches or controls, or move the vehicle, and
inadvertently become involved in
aserious ac-
cident and injure themselves. On hot, sunny
days, temperatures in aclosed vehicle could
quickly become high enough to cause severe
or possibly fatal injuries to people or animals.
• Do not use the recirculation mode for long
periods as it may cause the interior air to be-
come stale and the windows to fog up.
• Do not adjust the heating and air conditioning
controls while driving so that full attention may
be given to vehicle operation.
The heater and air conditioner operate when the
engine is running. The air blower will operate even if
the engine is turned off and the ignition switch is
placed in the ONposition.
NOTE
• Condensation forms inside the air condition-
ing unit when the air conditioner (where fit-
ted) is running, and is safely discharged un-
derneath your vehicle.
Traces of water on the ground are therefore
normal. •
Odours from inside and outside the vehicle
can build up in the air conditioner unit. Odour
can enter the passenger compartment
through the vents.
• When parking, set the heater and air condi-
tioner controls to turn off air recirculation to
allow fresh air into the passenger compart-
ment. This should help reduce odours inside
the vehicle.
HEATER AND AIR CONDITIONER
Display screen, heater and air conditioner, and audio system 4-21
Page 154 of 340

OPERATING TIPS (models with
automatic air conditioner)
When the engine coolant temperature and outside
air temperature are low, the air flow from the foot
outlets may not operate. However, this is not amal-
function. After the coolant temperature warms up,
the air flow from the foot outlets will operate nor-
mally. The sensors
jAa ndjB, located on the instrument
panel, help maintain aconstant temperature. Do not
put anything on or around the sensors. SAA2324Z
NAA1865
4-22 Display screen, heater and air conditioner, and audio system
Page 155 of 340

MANUAL AIR CONDITIONER AND
HEATER (Type A)
1. Air recirculation button
2. Rear defogger
button (See “Defogger
switch (where fitted)” in the “2. Instruments
and controls” section.) (where fitted)
3. Temperature control dial
4. A/C
(air conditioner) button
5. Fan speed control dial
6. Air flow control dial
Controls
Turning system on/off:
To turn on the system, turn the fan speed control dial out of the <0> position. Turn the dial
counter clockwise to the <0> position to turn off the
system. Fan speed control:
Turn the fan speed control dial clockwise to
increase the fan speed.
Turn the fan speed control dial anticlockwise
to decrease the fan speed.
Temperature control:
Turn the temperature control dial to set the desired
temperature. Turn the dial between the middle and
the right position to select the hot temperature. Turn
the dial between the middle and the left position to
select the cool temperature. Air flow control:
This dial allows you to select the air flow outlets.
m —
Air
flows from centre and side vents.
m
—
Air
flows from centre and side vents
and foot outlets.
m —
Air
flows mainly from the foot outlets.
m
—
Air
flows from the defogger and foot
outlets.
m —
Air
flows mainly from the defogger
outlets.
Outside air circulation:
Push the air recirculation button. (The indica-
tor light will turn off.) The air flow is drawn from out-
side the vehicle.
Select the outside air circulation mode for normal
heating or air conditioning operation.
Air recirculation:
Push the air recirculation button. (The indica-
tor light will illuminate.)
The air flow is recirculated inside the vehicle.
A/C (Air Conditioner) operation:
Push the A/Cbutton to turn on or off the air condi-
tioner. When the air conditioner is on, the A/Cindi-
cator light on the button illuminates. JVH0928XZ
Display screen, heater and air conditioner, and audio system
4-23
Page 156 of 340

Heater operation
Heating:
This mode is used to direct heated air from the foot
outlets.
1. Push the air recirculation button for normal
heating. (The indicator light will turn off.)
2. Turn the air flow control dial to the position.
3. Turn the fan speed control
dial to the de-
sired position.
4. Turn the temperature control dial to the desired position between the middle and the hot (right)
position.
Ventilation:
This mode directs outside air from the side and
centre vents.
1. Push the air recirculation button. (The indi-
cator light will turn off.)
2. Turn the air flow control dial to the position.
3. Turn the fan speed control
dial to the de-
sired position.
4. Turn the temperature control dial to the desired position.
Defrosting or defogging:
This mode directs the air to the defogger outlets to
defrost/defog the windows.
1. Turn the air flow control dial to the position.2. Push the air recirculation
button. (The indi-
cator light will turn off.)
3. Turn the fan speed control dial to the de-
sired position.
4. Turn the temperature control dial to the desired position between the middle and the hot (right)
position.
• To remove frost from the windscreen quickly,
turn the temperature control dial to the maximum
position and the fan speed control dial to
the maximum position.
• If it is difficult to defog the windscreen, turn the
A/C
button on.
Bi-level heating:
This mode directs cool air from the side and centre
vents and warm air from the foot outlets. When the
temperature control dial is turned to the maximum
hot or cool position, the air between the vents and
the foot outlets is the same temperature.
1. Push the air recirculation button. (The indi-
cator light will turn off.)
2. Turn the air flow control dial to the position.
3. Turn the fan speed control
dial to the de-
sired position.
4. Turn the temperature control dial to the desired position. Heating and defogging:
This mode heats the interior and defogs the win-
dows.
1. Push the air recirculation button. (The indi-
cator light will turn off.)
2. Turn the air flow control dial to the position.
3. Turn the fan speed control dial to the desired
position.
4. Turn the temperature control dial to the maximum hot (right) position.
Air conditioner operation
The air conditioner system should be operated for
approximately 10 minutes at least once amonth.
This helps prevent damage to the air conditioner
system due to the lack of lubrication.
Cooling:
This mode is used to cool and dehumidify the air.
1. Push the air recirculation button. (The indi-
cator light will turn off.)
2. Turn the air flow control dial to the position.
3. Turn the fan speed control dial to the desired
position.
4. Push the A/Cbutton on. (The A/Cindicator light
will illuminate.)
5. Turn the temperature control dial to the desired position between the middle and the cool (left)
position.
4-24 Display screen, heater and air conditioner, and audio system
Page 157 of 340

Av
isible mist may be seen coming from the vents in
hot, humid conditions as the air is cooled rapidly.
This does not indicate amalfunction.
• For quick cooling when the outside temperature
is high, push the air recirculation button.
(The indicator light will turn on.) Be sure to return
the air recirculation button to turn off for
normal cooling.
Dehumidified heating:
This mode is used to heat and dehumidify the air.
1. Push the air recirculation button. (The indi-
cator light will turn off.)
2. Turn the air flow control dial to the position.
3. Turn the fan speed control
dial to the de-
sired position.
4. Push the A/Cbutton on. (The A/Cindicator light
will illuminate.)
5. Turn the temperature control dial to the desired position between the middle and the hot (right)
position.
Dehumidified defogging:
This mode is used to defog the windows and dehu-
midify the air.
1. Push the air recirculation button. (The indi-
cator light will turn off.)
2. Turn the air flow control dial to the position.
3. Turn the fan speed control
dial to the de-
sired position. 4. Push the
A/Cbutton on. (The A/Cindicator light
will illuminate.)
5. Turn the temperature control dial to the desired position.
Display screen, heater and air conditioner, and audio system 4-25