2017 RENAULT ALASKAN window
[x] Cancel search: windowPage 129 of 340

Do not hang any objects on the mirror or apply
glass cleaner. Doing so will reduce the sensitivity
of the sensor j
C, resulting in improper opera-
tion.
OUTSIDE REARVIEW MIRRORS WARNING
• Never touch the outside rearview mirrors
while they are in motion. Doing so may pinch
your fingers or damage the mirror.
• Never drive the vehicle with the outside rear-
view mirrors folded. This reduces rear view
visibility and may lead to an accident.
• Objects viewed in the outside mirror are
closer than they appear (where fitted).
• The picture dimensions and distance in the
outside mirrors are not real.
Adjusting
Remote control type: The outside rearview mirror remote control operates
when the ignition switch is in the
ACCorON posi-
tion.
1. Turn the switch to select the left
mirror ➀.
2. Adjust each mirror by pushing the switch until the desired position is achieved ➁.
Defogging (where fitted)
The outside rearview mirrors will be heated when
the rear window defogger switch is operated.
Folding
Manual type:
Fold the outside rearview mirror by pushing it to-
ward the rear of the vehicle. Remote control type:
The outside rearview mirror remote control operates
when the ignition switch is in the
ACCorON posi-
tion.
The outside rearview mirrors automatically fold when
the outside rearview mirror folding switch is pushed
in. To unfold, push to the switch again.
CAUTION
Continuously performing the fold/unfold opera-
tion of the outside rearview mirror may cause the switch to stop the operation. JVP0326XZ SP A1829Z JVP0327XZ
Pre-driving checks and adjustments
3-25
Page 139 of 340
j
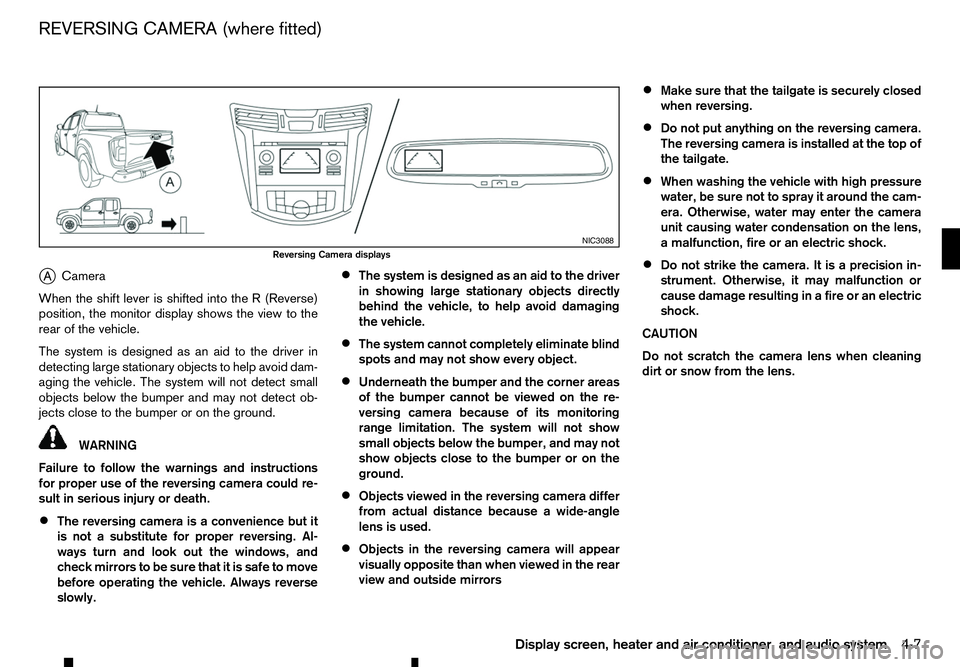
A Camera
When the shift lever is shifted into the
R(Reverse)
position, the monitor display shows the view to the
rear of the vehicle.
The system is designed as an aid to the driver in
detecting large stationary objects to help avoid dam-
aging the vehicle. The system will not detect small
objects below the bumper and may not detect ob-
jects close to the bumper or on the ground. WARNING
Failure to follow the warnings and instructions
for proper use of the reversing camera could re-
sult in serious injury or death.
• The reversing camera is
aconvenience but it
is not asubstitute for proper reversing. Al-
ways turn and look out the windows, and
check mirrors to be sure that it is safe to move
before operating the vehicle. Always reverse
slowly. •
The system is designed as an aid to the driver
in showing large stationary objects directly
behind the vehicle, to help avoid damaging
the vehicle.
• The system cannot completely eliminate blind
spots and may not show every object.
• Underneath the bumper and the corner areas
of the bumper cannot be viewed on the re-
versing camera because of its monitoring
range limitation. The system will not show
small objects below the bumper, and may not
show objects close to the bumper or on the
ground.
• Objects viewed in the reversing camera differ
from actual distance because
awide-angle
lens is used.
• Objects in the reversing camera will appear
visually opposite than when viewed in the rear
view and outside mirrors •
Make sure that the tailgate is securely closed
when reversing.
• Do not put anything on the reversing camera.
The reversing camera is installed at the top of
the tailgate.
• When washing the vehicle with high pressure
water, be sure not to spray it around the cam-
era. Otherwise, water may enter the camera
unit causing water condensation on the lens,
am
alfunction, fire or an electric shock.
• Do not strike the camera. It is
aprecision in-
strument. Otherwise, it may malfunction or
cause damage resulting in afire or an electric
shock.
CAUTION
Do not scratch the camera lens when cleaning
dirt or snow from the lens. NIC3088
Reversing Camera displays
REVERSING CAMERA (where fitted)
Display screen, heater and air conditioner, and audio system4-7
Page 143 of 340
•
Do not use alcohol, benzine or thinner to clean
the camera. This will cause discoloration. To
clean the camera, wipe with acloth dampened
with diluted mild cleaning agent and then wipe
with adry cloth.
• Do not damage the camera as the monitor screen
may be adversely affected.
• Do not use wax on the camera window. Wipe off
any wax with
aclean cloth dampened with mild
detergent diluted with water.
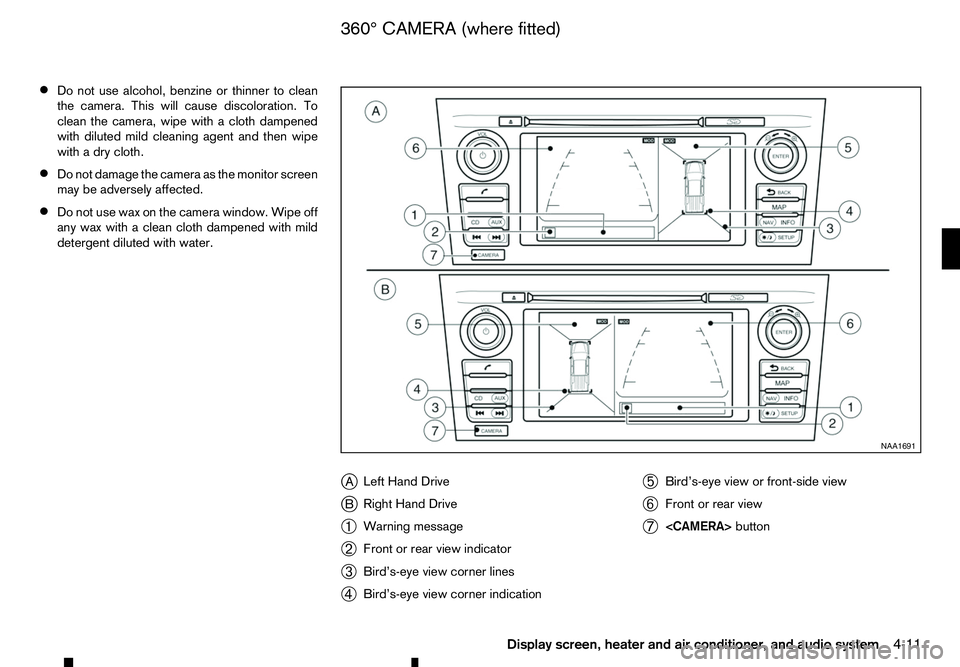
jA Left Hand Drive
j B Right Hand Drive
➀ Warning message
➁ Front or rear view indicator
➂ Bird’s-eye view corner lines
➃ Bird’s-eye view corner indication ➄
Bird’s-eye view or front-side view
➅ Front or rear view
➆
button NAA1691
360° CAMERA (where fitted)
Display screen, heater and air conditioner, and audio system 4-11
Page 144 of 340

With the ignition switch in the ON position, push the
(Reverse) position to operate the 360° Camera. The
monitor displays various views of the position of the
vehicle.
NOTE
At first operation, the corner lines are blinking
yellow for about 3seconds. This is not amalfunc-
tion but areminder to be cautious.
Available views:
• Bird’s-eye View
The surrounding view of the vehicle.
• Front-side View
The view around and ahead of the front passen-
ger’s side wheel.
• Front view
The view to the front of the vehicle.
• Rear view
The view to the rear of the vehicle.
The system is designed as an aid to the driver in
situations such as slot parking or parallel parking. There are some areas where the system will not
show objects. When in the front or the rear view dis-
play, an object below the bumper or on the ground
may not be viewed
➀.W
hen in the bird’s-eye view,
at all object near the seam of the camera viewing
areas will not appear in the monitor ➁. WARNING
• The 360° Camera is intended for day time use.
Do not use the system in bad light conditions.
• The 360° Camera is
aconvenience feature. It
is not asubstitute for proper vehicle opera-
tion because it has areas where objects can-
not be viewed. The four corners of the vehicle
in particular, are blind spots where objects do
not appear in the bird’s-eye, front or rear
views. Always look out the windows and check
to be sure that it is safe to move. The driver is
always responsible for safety during parking
and other manoeuvres.
• Do not use the 360° Camera with the outside
mirror in the stored position, and make sure
that the tailgate is securely closed when op-
erating the vehicle using the 360° Camera.
• The distance between objects viewed on the
360° Camera differs from the actual distance.
• The cameras are installed on the front grille,
the outside mirrors and above the rear num-
ber plate. Do not put anything on the cam-
eras.
• When washing the vehicle with high-pressure
water, be sure not to spray it around the cam-
eras. Otherwise, water may enter the camera
unit causing water condensation on the lens,
am alfunction, fire or an electric shock. NAA1864
4-12 Display screen, heater and air conditioner, and audio system
Page 153 of 340

m:
This
symbol indicates that the vents are
closed. Moving the control to this
direction will close the vents.
m :
This
symbol indicates that the vents are
open. Moving the control to this direc-
tion will open the vents.
Adjust the air flow direction of the vents by moving
the centre knob (up/down, left/right) until the de-
sired position is achieved. WARNING
• The heater and air conditioner operate only
when the engine is running.
• Never leave children or adults who would nor-
mally require the support of others alone in
the vehicle. Pets should not be left alone ei-
ther. They could unknowingly activate
switches or controls, or move the vehicle, and
inadvertently become involved in
aserious ac-
cident and injure themselves. On hot, sunny
days, temperatures in aclosed vehicle could
quickly become high enough to cause severe
or possibly fatal injuries to people or animals.
• Do not use the recirculation mode for long
periods as it may cause the interior air to be-
come stale and the windows to fog up.
• Do not adjust the heating and air conditioning
controls while driving so that full attention may
be given to vehicle operation.
The heater and air conditioner operate when the
engine is running. The air blower will operate even if
the engine is turned off and the ignition switch is
placed in the ONposition.
NOTE
• Condensation forms inside the air condition-
ing unit when the air conditioner (where fit-
ted) is running, and is safely discharged un-
derneath your vehicle.
Traces of water on the ground are therefore
normal. •
Odours from inside and outside the vehicle
can build up in the air conditioner unit. Odour
can enter the passenger compartment
through the vents.
• When parking, set the heater and air condi-
tioner controls to turn off air recirculation to
allow fresh air into the passenger compart-
ment. This should help reduce odours inside
the vehicle.
HEATER AND AIR CONDITIONER
Display screen, heater and air conditioner, and audio system 4-21
Page 156 of 340
Heater operation
Heating:
This mode is used to direct heated air from the foot
outlets.
1. Push the air recirculation button for normal
heating. (The indicator light will turn off.)
2. Turn the air flow control dial to the position.
3. Turn the fan speed control
dial to the de-
sired position.
4. Turn the temperature control dial to the desired position between the middle and the hot (right)
position.
Ventilation:
This mode directs outside air from the side and
centre vents.
1. Push the air recirculation button. (The indi-
cator light will turn off.)
2. Turn the air flow control dial to the position.
3. Turn the fan speed control
dial to the de-
sired position.
4. Turn the temperature control dial to the desired position.
Defrosting or defogging:
This mode directs the air to the defogger outlets to
defrost/defog the windows.
1. Turn the air flow control dial to the position.2. Push the air recirculation
button. (The indi-
cator light will turn off.)
3. Turn the fan speed control dial to the de-
sired position.
4. Turn the temperature control dial to the desired position between the middle and the hot (right)
position.
• To remove frost from the windscreen quickly,
turn the temperature control dial to the maximum
position and the fan speed control dial to
the maximum position.
• If it is difficult to defog the windscreen, turn the
A/C
button on.
Bi-level heating:
This mode directs cool air from the side and centre
vents and warm air from the foot outlets. When the
temperature control dial is turned to the maximum
hot or cool position, the air between the vents and
the foot outlets is the same temperature.
1. Push the air recirculation button. (The indi-
cator light will turn off.)
2. Turn the air flow control dial to the position.
3. Turn the fan speed control
dial to the de-
sired position.
4. Turn the temperature control dial to the desired position. Heating and defogging:
This mode heats the interior and defogs the win-
dows.
1. Push the air recirculation button. (The indi-
cator light will turn off.)
2. Turn the air flow control dial to the position.
3. Turn the fan speed control dial to the desired
position.
4. Turn the temperature control dial to the maximum hot (right) position.
Air conditioner operation
The air conditioner system should be operated for
approximately 10 minutes at least once amonth.
This helps prevent damage to the air conditioner
system due to the lack of lubrication.
Cooling:
This mode is used to cool and dehumidify the air.
1. Push the air recirculation button. (The indi-
cator light will turn off.)
2. Turn the air flow control dial to the position.
3. Turn the fan speed control dial to the desired
position.
4. Push the A/Cbutton on. (The A/Cindicator light
will illuminate.)
5. Turn the temperature control dial to the desired position between the middle and the cool (left)
position.
4-24 Display screen, heater and air conditioner, and audio system
Page 157 of 340
Av
isible mist may be seen coming from the vents in
hot, humid conditions as the air is cooled rapidly.
This does not indicate amalfunction.
• For quick cooling when the outside temperature
is high, push the air recirculation button.
(The indicator light will turn on.) Be sure to return
the air recirculation button to turn off for
normal cooling.
Dehumidified heating:
This mode is used to heat and dehumidify the air.
1. Push the air recirculation button. (The indi-
cator light will turn off.)
2. Turn the air flow control dial to the position.
3. Turn the fan speed control
dial to the de-
sired position.
4. Push the A/Cbutton on. (The A/Cindicator light
will illuminate.)
5. Turn the temperature control dial to the desired position between the middle and the hot (right)
position.
Dehumidified defogging:
This mode is used to defog the windows and dehu-
midify the air.
1. Push the air recirculation button. (The indi-
cator light will turn off.)
2. Turn the air flow control dial to the position.
3. Turn the fan speed control
dial to the de-
sired position. 4. Push the
A/Cbutton on. (The A/Cindicator light
will illuminate.)
5. Turn the temperature control dial to the desired position.
Display screen, heater and air conditioner, and audio system 4-25
Page 159 of 340
A/C (Air Conditioner) operation:
Push the A/Cbutton to turn on or off the air condi-
tioner. When the air conditioner is on, the A/Cindi-
cator light on the button illuminates.
Heater operation
Heating:
This mode is used to direct heated air from the foot
outlets.
1. Push the air recirculation button for normal
heating. (The indicator light will turn off.)
2. Push the button. (The indicator light will
turn on.)
3. Turn the fan speed control dial to the de-
sired position.
4. Turn the temperature control dial to the desired position between the middle and the hot (right)
position.
Defrosting or defogging:
This mode directs the air to the defogger outlets to
defrost/defog the windows.
1. Turn the fan speed control dial to the de-
sired position.
2. Push the front defogger button. (The indi-
cator lights on the front defogger button
and the
A/C button will turn on.) Then the air
recirculation indicator light will turn off. 3. Turn the temperature control dial to the desired
position between the middle and the hot (right)
position.
To remove frost from the windscreen quickly,
turn the temperature control dial to the maximum
hot (right) position and the fan speed control dial to the maximum position. For the best
bi-level heating performance, do not select the
air recirculation mode. For the best defogging
performance, do not select the air recirculation
mode.
Bi-level heating:
This mode directs cool air from the side/centre vents
and warm air from the foot outlets. (When the tem-
perature control dial is turned to the maximum hot
(right) or cool (left) position, the temperatures from
the side/centre vents and the foot outlets will be the
same.)
1. Push the air recirculation button. (The indi-
cator light will turn off.)
2. Push the button. (The indicator light will
turn on.)
3. Turn the fan speed control dial to the de-
sired position.
4. Turn the temperature control dial to the desired position. Heating and defogging:
This mode heats the interior and defogs the win-
dows.
1. Push the air recirculation button. (The indi-
cator light will turn off.)
2. Push the button. (The indicator light will
turn on.)
3. Turn the fan speed control dial to the de-
sired position.
4. Turn the temperature control dial to the maximum hot (right) position.
Air conditioner operation
The air conditioner system should be operated for
approximately 10 minutes at least once amonth.
This helps prevent damage to the air conditioner
system due to the lack of lubrication.
Cooling:
This mode is used to cool and dehumidify the air.
1. Push the air recirculation button. (The indi-
cator light will turn off.)
2. Push the button. (The indicator light will
turn on.)
3. Turn the fan speed control dial to the de-
sired position.
4. Push the A/Cbutton. (The indicator light will turn
on.)
Display screen, heater and air conditioner, and audio system 4-27