2017 RENAULT ALASKAN tow
[x] Cancel search: towPage 250 of 340

Your new vehicle was designed to be used primarily
to carry passengers and luggage.
Towing atrailer will place additional loads on your
vehicle’s engine, drive train, steering, braking and
other systems. The towing of atrailer will exagger-
ate other conditions such as sway caused by cross-
winds, rough road surfaces or passing trucks.
Your driving style and speed must be adjusted ac-
cording to the circumstances. Before towing a
trailer, see an approved dealer or qualified work-
shop for an explanation about the proper use of tow-
ing equipment.
OPERATING PRECAUTIONS
• Avoid towing
atrailer during the running-in pe-
riod.
• Before driving, make sure that the lighting sys-
tem of the trailer works properly.
• Observe the legal maximum speeds for trailer
operation.
• Avoid abrupt starts, accelerations and stops.
• Avoid sharp turns and lane changes.
• Always drive your vehicle at
amoderate speed.
• Follow the trailer manufacturer’s instructions.
• Choose proper coupling devices (trailer hitch,
safety chain, roof carrier, etc.) for your vehicle
and trailer. These devices are available from an
approved dealer or qualified workshop where
you can also obtain more detailed information
about trailer towing. •
Never allow the total trailer load (trailer weight
plus its cargo weight) to exceed the maximum
set for the vehicle and the coupling device. See
an approved dealer or qualified workshop for
more information.
• The trailer must be loaded so that heavy goods
are placed over the axle. The maximum allowable
vertical load on the trailer hitch must not be ex-
ceeded.
• Have your vehicle serviced more often than at
the intervals specified in
aseparate maintenance
booklet.
• Trailer towing requires more fuel than under nor-
mal circumstances because of
aconsiderable
increase in traction power and resistance.
While towing atrailer, check the engine coolant
temperature indicator to prevent the vehicle from
overheating.
TYRE PRESSURE
When towing atrailer, inflate the vehicle tyres to the
maximum recommended COLD tyre pressure (for
full loading) indicated on the tyre placard.
Do not tow atrailer when the vehicle is installed with
at emporary spare tyre or acompact spare tyre.
SAFETY CHAINS
Always use asuitable chain between the vehicle
and trailer. The chain should be crossed and should
be attached to the hitch, not to the vehicle bumper
or axle. Be sure to leave enough slack in the chain
to permit turning corners. TRAILER BRAKES
Ensure that trailer brakes are installed as required
by local regulations. Also check that all other trailer
equipment conforms to local regulations.
Always block the wheels on both the vehicle and
trailer when parking. Apply the hand brake on the
trailer where fitted. Parking on
asteep slope is not
recommended.
If parking on asteep slope is unavoidable, place the
shift lever in the P(Park) position (Automatic trans-
mission model), or in an appropriate position
(Manual transmission model), and turn the front
wheels towards the kerb.
TRAILER DETECTION (where fitted)
When towing atrailer with agenuine RENAULT tow
bar electrical kit and the turn signal switch is used,
the electrical system of the vehicle will detect the
additional electrical load of the trailer lighting. As a
result, the direction indicator tone will be different.
TRAILER TOWING
5-48
Starting and driving
Page 255 of 340

6
In case of emergency
In case of emergency
Hazard warning flasher switch ................................. 6-2
Flat tyre ................................................................... 6-2 Stopping vehicle ................................................. 6-2
Changing flat tyre (for models with spare tyre) .... 6-2
Repairing flat tyre (for models with emergency
tyre puncture repair kit) ....................................... 6-6 Jump starting ........................................................... 6-10
Push starting ........................................................... 6-12
If your vehicle overheats........................................... 6-12
Towing your vehicle ................................................. 6-13
Towing precautions ............................................ 6-13
Towing recommended by RENAULT................... 6-13
Page 257 of 340

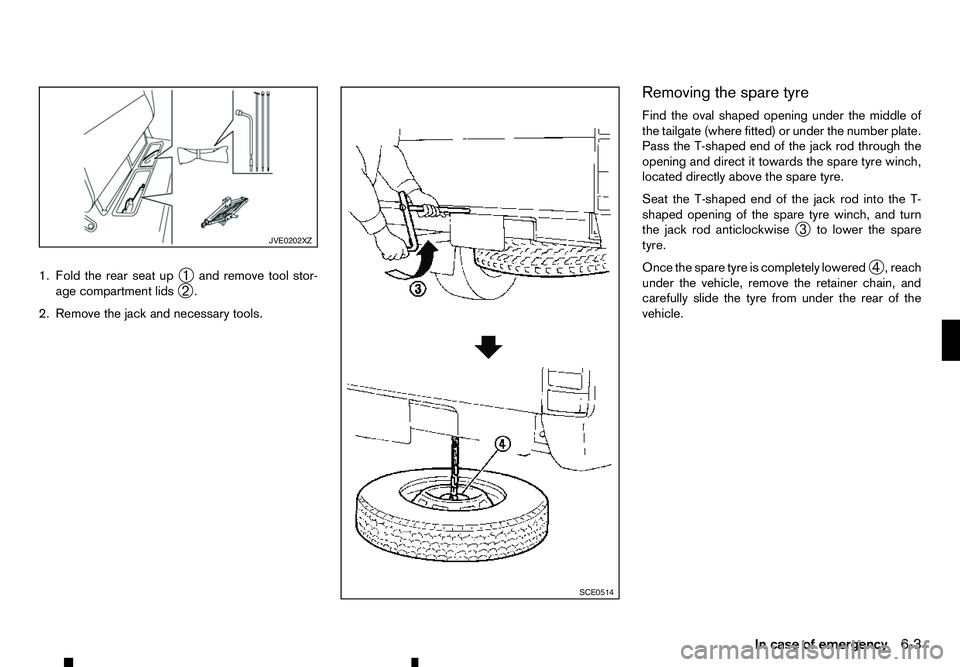
1. Fold the rear seat up
➀and remove tool stor-
age compartment lids ➁.
2. Remove the jack and necessary tools. Removing the spare tyre
Find the oval shaped opening under the middle of
the tailgate (where fitted) or under the number plate.
Pass the T-shaped end of the jack rod through the
opening and direct it towards the spare tyre winch,
located directly above the spare tyre.
Seat the T-shaped end of the jack rod into the T-
shaped opening of the spare tyre winch, and turn the jack rod anticlockwise ➂to lower the spare
tyre.
Once the spare tyre is completely lowered ➃,r
each
under the vehicle, remove the retainer chain, and
carefully slide the tyre from under the rear of the
vehicle. JVE0202XZ
SCE0514
In case of emergency
6-3
Page 260 of 340

Installing spare tyre
WARNING
• Never use wheel nuts which are not provided
with your vehicle. Incorrect wheel nuts or im-
properly tightened wheel nuts may cause the
wheel to become loose or come off. This
could cause an accident.
• Never use oil or grease on the wheel studs or
nuts. This may cause the wheel nuts to be-
come loose.
1. Clean any mud or dirt from the surface between the wheel and hub.
2. Carefully put the spare tyre on and tighten the wheel nuts with your fingers. Check that all the
wheel nuts contact the wheel surface horizon-
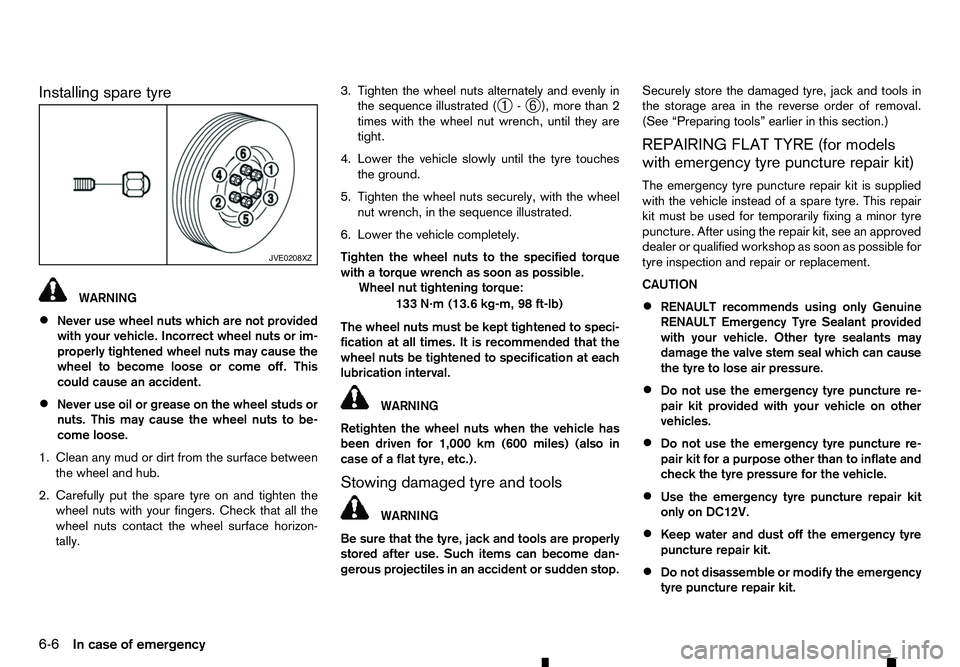
tally. 3. Tighten the wheel nuts alternately and evenly in
the sequence illustrated ( ➀-
➅ ), more than 2
times with the wheel nut wrench, until they are
tight.
4. Lower the vehicle slowly until the tyre touches the ground.
5. Tighten the wheel nuts securely, with the wheel nut wrench, in the sequence illustrated.
6. Lower the vehicle completely.
Tighten the wheel nuts to the specified torque
with atorque wrench as soon as possible.
Wheel nut tightening torque:
133 N·m (13.6 kg-m, 98 ft-lb)
The wheel nuts must be kept tightened to speci-
fication at all times. It is recommended that the
wheel nuts be tightened to specification at each
lubrication interval. WARNING
Retighten the wheel nuts when the vehicle has
been driven for 1,000 km (600 miles) (also in
case of aflat tyre, etc.).
Stowing damaged tyre and tools WARNING
Be sure that the tyre, jack and tools are properly
stored after use. Such items can become dan-
gerous projectiles in an accident or sudden stop. Securely store the damaged tyre, jack and tools in
the storage area in the reverse order of removal.
(See “Preparing tools” earlier in this section.)
REPAIRING FLAT TYRE (for models
with emergency tyre puncture repair kit)
The emergency tyre puncture repair kit is supplied
with the vehicle instead of aspare tyre. This repair
kit must be used for temporarily fixing aminor tyre
puncture. After using the repair kit, see an approved
dealer or qualified workshop as soon as possible for
tyre inspection and repair or replacement.
CAUTION
• RENAULT recommends using only Genuine
RENAULT Emergency Tyre Sealant provided
with your vehicle. Other tyre sealants may
damage the valve stem seal which can cause
the tyre to lose air pressure.
• Do not use the emergency tyre puncture re-
pair kit provided with your vehicle on other
vehicles.
• Do not use the emergency tyre puncture re-
pair kit for
apurpose other than to inflate and
check the tyre pressure for the vehicle.
• Use the emergency tyre puncture repair kit
only on DC12V.
• Keep water and dust off the emergency tyre
puncture repair kit.
• Do not disassemble or modify the emergency
tyre puncture repair kit. JVE0208XZ
6-6 In case of emergency
Page 263 of 340

NOTE
Use the power socket located on the lower
part of the cockpit ➀.
7. Check the specified tyre pressure on the tyre placard that is affixed to the driver’s side centre
pillar.
8. Place the ignition switch in the ACC position. Then turn the compressor switch to the ON (−)
position and inflate the tyre up to the pressure
that is specified on the tyre placard affixed to the
driver’s side centre pillar if possible, or to the
minimum of 180 kPa (1.8 bar, 26 psi), for tyre
205R16 250 kPa (2.5 bar, 36 psi). Turn the air
compressor off briefly in order to check the tyre
pressure with the pressure gauge.
If the tyre is inflated to higher than the specified
pressure, adjust the tyre pressure by releasing
air with the pressure release valve. The cold tyre
pressures are shown on the tyre placard affixed
to the driver’s side centre pillar. WARNING
To avoid serious personal injury while using
the emergency tyre puncture repair kit.
• Securely tighten the compressor hose to
the tyre valve. Failure to do so can cause
the sealant to spray into the air and get
into your eyes or on your skin.
• Do not stand directly beside the damaged
tyre while it is being inflated because of
the risk of rupture. If there are any cracks
or bumps, turn the compressor off imme-
diately.
CAUTION
• Do not operate the compressor for more
than 10 minutes. If the tyre pressure does
not increase to the specified pressure
within 10 minutes, the tyre may be seri-
ously damaged and the tyre cannot be re-
paired with this tyre repair kit. Contact an
approved dealer or qualified workshop.
9. When the tyre pressure is at the specified value, close the pressure release valve and turn the air
compressor off. If the pressure cannot be in-
flated to the specified value, the air compressor
can be turned off at the minimum of 180 kPa (1,8
bar, 26 psi) for tyre 205R16 250 kPa (2,5 bar, 36
psi). Remove the power plug from the power
outlet and quickly remove the hose from the tyre
valve. Attach the protective cap and valve cap.
Properly stow the emergency tyre puncture re-
pair kit in the storage location. WARNING
To avoid serious personal injury when stowing
the emergency tyre puncture repair kit, keep the
sealant bottle screwed into the compressor. Fail-
ure to do so can cause the sealant to spray into
the air and get into your eyes or on the skin.
10. Immediately drive the vehicle for 10 minutes or
3–10 km (2–6 miles) (if the road situation al-lows) at aspeed of 80 km/h (50 MPH) or less.
11. After driving 10 km (6 miles), or 10 minutes, screw the air tube of the air compressor se-
curely onto the tyre valve. Check the tyre pres-
sure with the pressure gauge.
The temporary repair is completed if the tyre
pressure does not drop.
Make sure the pressure is adjusted to the pres-
sure that is specified on the tyre placard before
driving.
If the tyre pressure drops under 130 kPa (19
psi):
The tyre cannot be repaired with this tyre punc-
ture repair kit. Contact an approved dealer or quali-
fied workshop.
If the tyre pressure is 130 kPa (19 psi) or more
but less than the specified pressure:
Turn the compressor switch to the ON (−) position
and inflate the tyre up to the specified pressure.
Then repeat the step from 8. NCE479
In case of emergency
6-9
Page 266 of 340

11. Start the engine of the jumped vehicle
jBi nthe
normal manner.
CAUTION
Never keep the starter motor engaged for
more than 10 seconds. If the engine does not
start right away, place the ignition switch in
the “LOCK” position and wait at least 10 sec-
onds before trying again.
12. After the engine is started, carefully disconnect the jumper cables in the opposite sequence
from that illustrated ( ➃,
➂ ,
➁ ,
➀ ).
13. Remove and dispose of the cloth properly as it may be contaminated with corrosive acid.
14. Replace the vent caps, if removed. Do not attempt to start the engine by pushing the
vehicle.
CAUTION
• Automatic Transmission (AT) model cannot
be started by pushing. Attempting to do so
may cause damage to the transmission.
• Three-way catalyst equipped model should
not be started by pushing. Attempting to do
so may cause damage to the three-way cata-
lyst.
• Diesel Oxidation Catalyst equipped model
should not be started by pushing. Attempting
to do so may cause damage to the catalyst.
• Never try to start the engine by towing. When
the engine starts, the forward surge could
cause the vehicle to collide with the towing
vehicle. WARNING
• Never continue driving if your vehicle over-
heats. Doing so could cause engine damage
and/or avehicle fire.
• Never open the bonnet if steam is coming
out.
• Never remove the radiator or coolant reser-
voir cap while the engine is hot. If the radiator
or coolant reservoir cap is removed when the
engine is hot, pressurised hot water will spurt
out and possibly cause burning, scalding or
serious injury.
• If steam or coolant is coming from the engine,
stand clear of the vehicle to prevent getting
scalded.
• The engine cooling fan can start at any time
when the coolant temperature exceeds pre-
set degrees.
• Be careful not to allow your hands, hair, jewel-
lery or clothing to come into contact with, or
to get caught in the cooling fan or drive belts.
If your vehicle is overheating, or if you feel alack of
engine power, detect unusual noise, etc., take the
following steps:
1. Safely move the vehicle off the road away from traffic.
2. Turn on the hazard indicator flashers.
3. Apply the parking brake.
PUSH STARTING
IF YOUR VEHICLE OVERHEATS
6-12 In case of emergency
Page 267 of 340

4.
Automatic transmission model:
Move the shift lever to the P(Park) position.
Manual transmission model:
Move the shift lever to the N(Neutral) position.
DO NOT STOP THE ENGINE.
5. Open all the windows.
6. Turn off the air conditioner. Move the tempera- ture control to maximum hot and the fan control
to high speed.
7. Get out from the vehicle.
8. Visually inspect and listen for steam or coolant escaping from the radiator before opening the
bonnet. Wait until no steam or coolant can be
seen before proceeding.
9. Open the engine bonnet.
10. Visually inspect if the cooling fan is running.
11. Visually inspect the radiator and radiator hoses for leakage. If the cooling fan is not running or
the coolant is leaking, stop the engine.
12. After the engine cools down, check the coolant level in the reservoir with the engine running.
Do not open the radiator or coolant reservoir
cap.
13. Add coolant to the reservoir if necessary.
Have your vehicle inspected/repaired at an
approved dealer or qualified workshop. When towing your vehicle, local regulations for tow-
ing must be followed. Incorrect towing equipment
could damage your vehicle. To assure proper tow-
ing and to prevent accidental damage to your ve-
hicle, RENAULT recommends that you have profes-
sional road assistance personnel tow your vehicle. It
is advisable to have the professional road assistant
carefully read the following precautions.
TOWING PRECAUTIONS
• Be sure that the transmission, steering system
and powertrain are in working condition before
towing. If any units are damaged, the vehicle
must be towed using
adolly or flatbed tow truck.
(Two- Wheel Drive (2WD) model)
• RENAULT recommends that your vehicle be
towed with the driving wheels off the ground.
(Two- Wheel Drive (2WD) model)
• To tow
avehicle with automatic transmission,
and appropriate vehicle dolly MUSTbe placed
under the towed vehicles drive wheels. Always
follow the dolly manufacturer’s recommenda-
tions when using their product.
• Always attach safety chains before towing.
• Never tow Four-Wheel Drive (4WD) model with
any of the wheels on the ground as this may
cause serious and expensive damage to the driv-
etrain. TOWING RECOMMENDED BY
RENAULT
Towing Two-Wheel Drive (2WD) models
Front wheels on the ground:
1. Place the ignition switch in the “ON” position and
turn all accessories off. NCE482
TOWING YOUR VEHICLE
In case of emergency6-13
Page 268 of 340

2. Secure the steering wheel in
astraight ahead
position with rope or similar device.
3. Move the shift lever to the N(Neutral) position.
4. Release the parking brake.
5. Attach safety chains before towing.
Rear wheels on the ground:
RENAULT recommends that towing dollies be used
under the rear wheels when towing your vehicle or
the vehicle be placed on aflatbed tow truck as illus-
trated.
CAUTION
Never tow Automatic Transmission (AT) model
with the rear wheels on the ground. Doing so will
cause serious and expensive damage to the
transmission.
Manual Transmission (MT) model:
If you have to tow aMTvehicle with rear wheels on
the ground, perform the following procedures.
CAUTION
Observe the following restricted towing speeds
and distances.
• Speed: Below 50 km/h (30 MPH)
• Distance: Less than 65 km (40 miles)
1. Place the ignition switch in the “ON” position and turn all accessories off.
2. Move the shift lever to the N(Neutral) position.
3. Release the parking brake. 4. Attach safety chains whenever towing.
All four wheels on the ground:
RENAULT recommends that the vehicle be placed
on
aflatbed tow truck as illustrated.
CAUTION
Never tow Automatic Transmission (AT) model
with all four wheels on the ground. Doing so will
cause serious and expensive damage to the driv-
etrain.
Manual Transmission (MT) model:
If you have to tow aMTvehicle with all four wheels
on the ground, perform the following procedures.
CAUTION
• Never tow
aManual Transmission (MT) model
backward with all four wheels on the ground.
• Observe the following restricted towing
speeds and distances.
–S
peed: Below 50 km/h (30 MPH)
–D istance: Less than 65 km (40 miles)
1. Place the ignition switch in the “ON” position and turn all accessories off.
2. Move the shift lever to the N(Neutral) position.
3. Release the parking brake.
6-14 In case of emergency