2017 PEUGEOT PARTNER TEPEE ELECTRIC ESP
[x] Cancel search: ESPPage 178 of 252
140
Manual gearbox
The gearbox does not require any
maintenance (no oil change).
Only use products recommended by
PEUGEOT or products of equivalent
quality and specification.
In order to optimise the operation of
components as important as those in the
braking system, PEUGEOT selects and
offers very specific products.
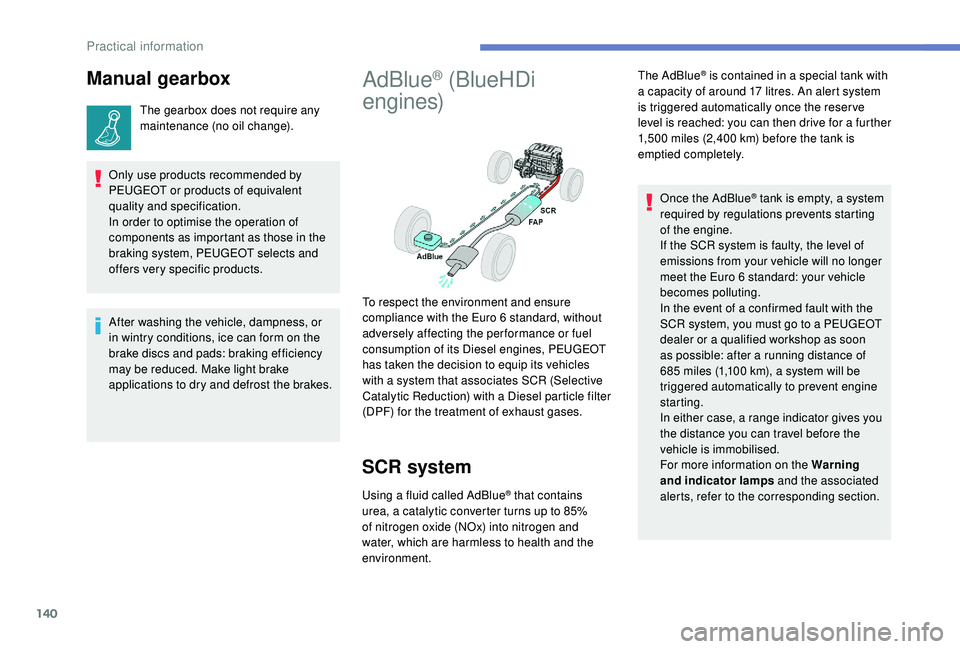
AdBlue® (BlueHDi
engines)
SCR system
Using a fluid called AdBlue® that contains
urea, a catalytic converter turns up to 85%
of nitrogen oxide (NOx) into nitrogen and
water, which are harmless to health and the
environment. The AdBlue
® is contained in a special tank with
a capacity of around 17 litres. An alert system
is triggered automatically once the reser ve
level is reached: you can then drive for a further
1,500
miles (2,400 km) before the tank is
emptied completely.
To respect the environment and ensure
compliance with the Euro 6 standard, without
adversely affecting the per formance or fuel
consumption of its Diesel engines, PEUGEOT
has taken the decision to equip its vehicles
with a system that associates SCR (Selective
Catalytic Reduction) with a Diesel particle filter
(DPF) for the treatment of exhaust gases. Once the AdBlue
® tank is empty, a system
r
equired by regulations prevents starting
of the engine.
If the SCR
system is faulty, the level of
emissions from your vehicle will no longer
meet the Euro 6 standard: your vehicle
becomes polluting.
In the event of a confirmed fault with the
SCR system, you must go to a PEUGEOT
dealer or a qualified workshop as soon
as possible: after a running distance of
685
miles (1,100
km), a system will be
triggered automatically to prevent engine
starting.
In either case, a range indicator gives you
the distance you can travel before the
vehicle is immobilised.
For more information on the Warning
and indicator lamps and the associated
alerts, refer to the corresponding section.
After washing the vehicle, dampness, or
in wintry conditions, ice can form on the
brake discs and pads: braking efficiency
may be reduced. Make light brake
applications to dry and defrost the brakes.
Practical information
Page 181 of 252
143
Temporary puncture
repair kit
The kit is located in a storage compartment
under the front seat.
Vehicles supplied with a temporary puncture
repair kit do not have a spare wheel or the
corresponding tools ( jack, wheelbrace, etc.).
The temporary puncture repair kit comprises a
compressor and a bottle of sealant.
Using the kit
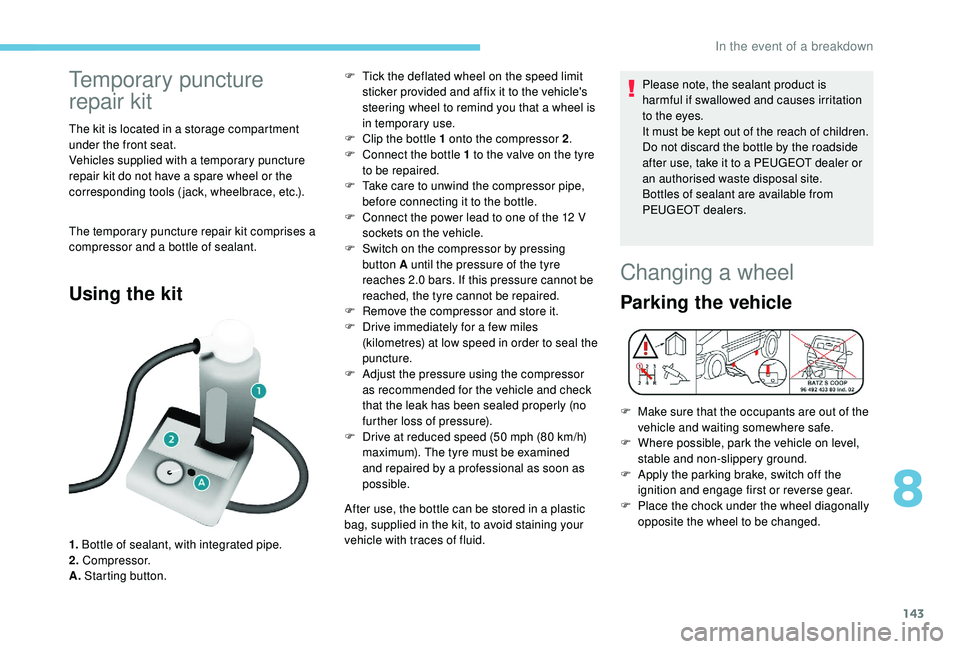
1. Bottle of sealant, with integrated pipe.
2. Compressor.
A. Starting button. F
T
ick the deflated wheel on the speed limit
sticker provided and affix it to the vehicle's
steering wheel to remind you that a wheel is
in temporary use.
F
C
lip the bottle 1 onto the compressor 2
.
F
C
onnect the bottle 1 to the valve on the tyre
to be repaired.
F
T
ake care to unwind the compressor pipe,
before connecting it to the bottle.
F
C
onnect the power lead to one of the 12 V
sockets on the vehicle.
F
S
witch on the compressor by pressing
button A until the pressure of the tyre
reaches 2.0 bars. If this pressure cannot be
reached, the tyre cannot be repaired.
F
R
emove the compressor and store it.
F
D
rive immediately for a few miles
(kilometres) at low speed in order to seal the
puncture.
F
A
djust the pressure using the compressor
as recommended for the vehicle and check
that the leak has been sealed properly (no
further loss of pressure).
F
D
rive at reduced speed (50 mph (80 km/h)
maximum). The tyre must be examined
and repaired by a professional as soon as
possible.
After use, the bottle can be stored in a plastic
bag, supplied in the kit, to avoid staining your
vehicle with traces of fluid. Please note, the sealant product is
harmful if swallowed and causes irritation
to the eyes.
It must be kept out of the reach of children.
Do not discard the bottle by the roadside
after use, take it to a PEUGEOT dealer or
an authorised waste disposal site.
Bottles of sealant are available from
PEUGEOT dealers.
Changing a wheel
Parking the vehicle
F Make sure that the occupants are out of the
vehicle and waiting somewhere safe.
F
W
here possible, park the vehicle on level,
stable and non-slippery ground.
F
A
pply the parking brake, switch off the
ignition and engage first or reverse gear.
F
P
lace the chock under the wheel diagonally
opposite the wheel to be changed.
8
In the event of a breakdown
Page 185 of 252
147
Never go underneath a vehicle that is
supported only by a jack (use an axle stand).
Never use an electric screwdriver instead of
the wheelbrace.
Refitting the repaired wheel
The wheel is refitted in the same way as the
spare wheel; do not forget to refit the wheel
trim.For more information on Identification
markings
, including the tyre label, refer to
the corresponding section.
For more information on Tyre under-
inflation detection , including
recommendations after changing a wheel
with a tyre under-inflation detection
sensor, refer to the corresponding section.
F
S
ecure the carrier on the hook, then raise
the carrier by tightening the bolt with the
wheelbrace.
F
T
ighten the bolt fully and check that the
wheel is held flat against the floor.
If not, repeat the procedure.
Fitting the wheel trim on
the rim
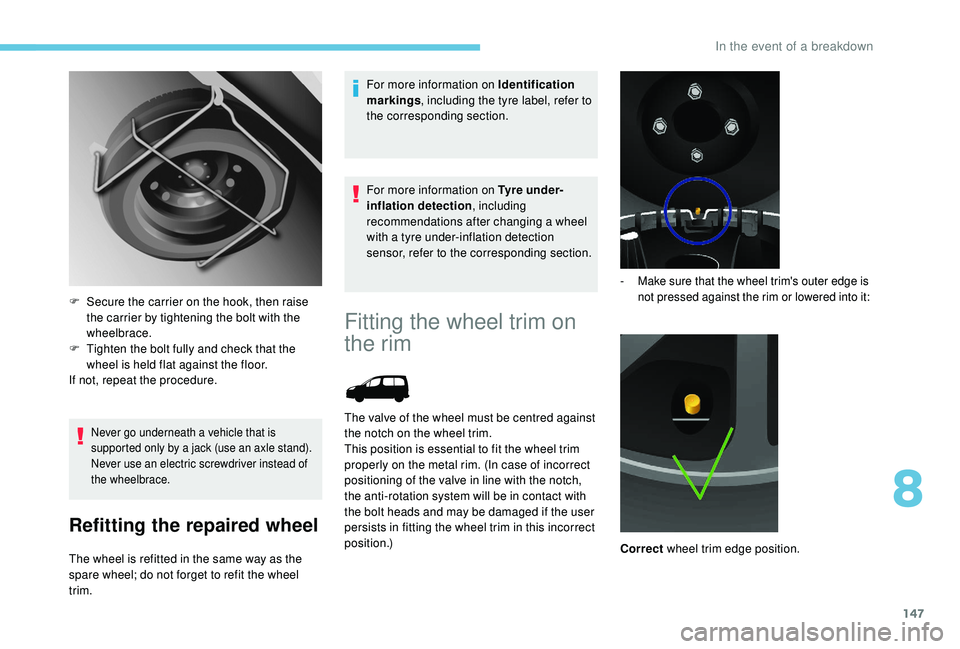
The valve of the wheel must be centred against
the notch on the wheel trim.
This position is essential to fit the wheel trim
properly on the metal rim. (In case of incorrect
positioning of the valve in line with the notch,
the anti-rotation system will be in contact with
the bolt heads and may be damaged if the user
persists in fitting the wheel trim in this incorrect
position.)
- Make sure that the wheel trim's outer edge is not pressed against the rim or lowered into it:
Correct wheel trim edge position.
8
In the event of a breakdown
Page 190 of 252
152
Rear lamps
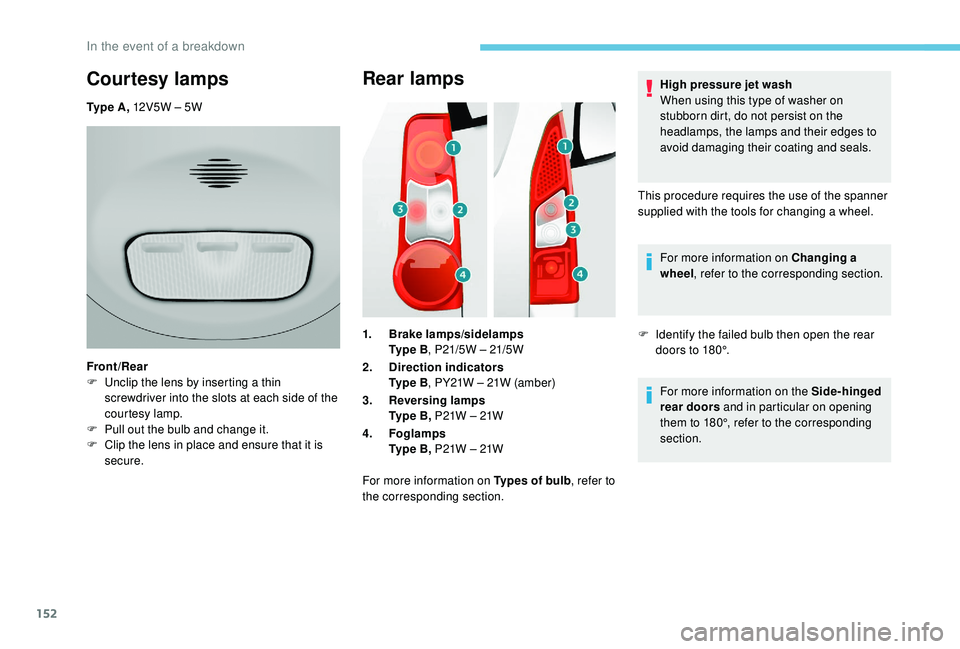
1.Brake lamps/sidelamps
Ty p e B , P21/5W – 21/5W
2. Direction indicators
Ty p e B , PY21W – 21W (amber)
3. Reversing lamps
Ty p e B , P21W – 21W
4. Foglamps
Ty p e B , P21W – 21W
For more information on Types of bulb , refer to
the corresponding section. High pressure jet wash
When using this type of washer on
stubborn dirt, do not persist on the
headlamps, the lamps and their edges to
avoid damaging their coating and seals.
This procedure requires the use of the spanner
supplied with the tools for changing a wheel. For more information on Changing a
wheel , refer to the corresponding section.
F I dentify the failed bulb then open the rear
doors to 180°.
For more information on the Side-hinged
rear doors and in particular on opening
them to 180°, refer to the corresponding
section.
Courtesy lamps
Ty p e A , 12V5W – 5W
Front/Rear
F
U
nclip the lens by inserting a thin
screwdriver into the slots at each side of the
courtesy lamp.
F
P
ull out the bulb and change it.
F
C
lip the lens in place and ensure that it is
secure.
In the event of a breakdown
Page 192 of 252

154
Third brake lamp
Ty p e A , W16W – 16W
F
U
nscrew the two nuts.
F
P
ush the pins.
F
I
f necessary, disconnect the connector to
remove the lamp.
F
C
hange the bulb.
Changing a fuse
The fuse boxes are located: Professional repairers: for complete
information on the fuses and relays,
consult the wiring information and
diagrams available through the dealer
network.
Removing and fitting a fuse
GoodFailed
PEUGEOT accepts no responsibility for
the cost incurred in repairing your vehicle
or for rectifying malfunctions resulting
from the installation of accessories
not supplied or not recommended by
PEUGEOT and not installed in accordance
with the specifications, in particular when
the combined power consumption of all
of the additional equipment connected
exceeds 10
milliamperes.
-
i
n the lower dashboard on the left-hand side
(behind the cover).
-
u
nder the bonnet (near the battery).
If fitted on your vehicle, an
additional fuse box is provided
for towing, the towbar and the
connections for body and platform
cab conversions. It is located on
the right-hand side behind the
load stop partition.
The information given concerns only those
fuses which can be changed by the user using
the tweezers located behind the dashboard
storage compartment on the right-hand side.
For any other work, visit a PEUGEOT dealer or
a qualified workshop. Before changing a fuse, the cause of the fault
must be found and rectified.
F
U
se the tweezers.
Always replace a faulty fuse with a fuse of
the same rating.
In the event of a breakdown
Page 195 of 252
157
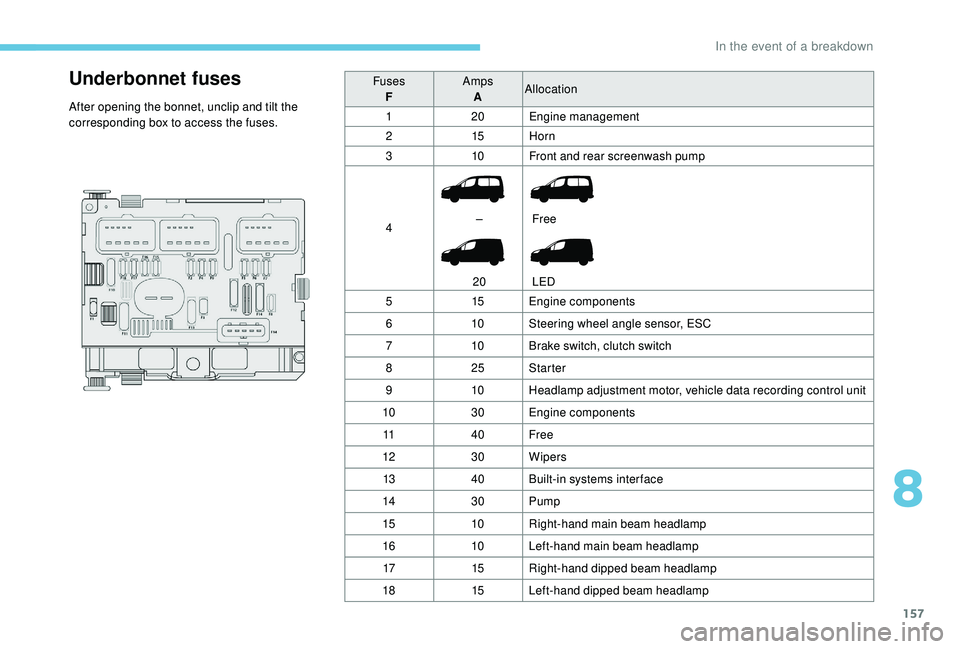
Underbonnet fuses
After opening the bonnet, unclip and tilt the
corresponding box to access the fuses.Fuses
F Amps
A Allocation
1 20Engine management
2 15Horn
3 10Front and rear screenwash pump
4 –
20 Free
LED
5 15Engine components
6 10Steering wheel angle sensor, ESC
7 10Brake switch, clutch switch
8 25Starter
9 10Headlamp adjustment motor, vehicle data recording control unit
10 30Engine components
11 40Free
12 30Wipers
13 40Built-in systems inter face
14 30Pump
15 10Right-hand main beam headlamp
16 10Left-hand main beam headlamp
17 15Right-hand dipped beam headlamp
18 15Left-hand dipped beam headlamp
8
In the event of a breakdown
Page 197 of 252
159
Economy mode
When the engine is switched off and the key is
left in the ignition on position, certain functions
(windscreen wipers, electric windows, courtesy
lamps, audio system, etc.) can be used for a
combined duration of no more than than thirty
minutes, so as not to discharge the battery.
After thirty minutes the active functions are
put on standby and the battery warning lamp
flashes with a message displayed in the screen.
In order to restore the use of these functions
immediately, start the engine and let it run for a
few minutes.
The time available to you will then be double
the period for which the engine is left running.
However, this period will always be between
five and thirty minutes.The engine will not start if the battery is
discharged.
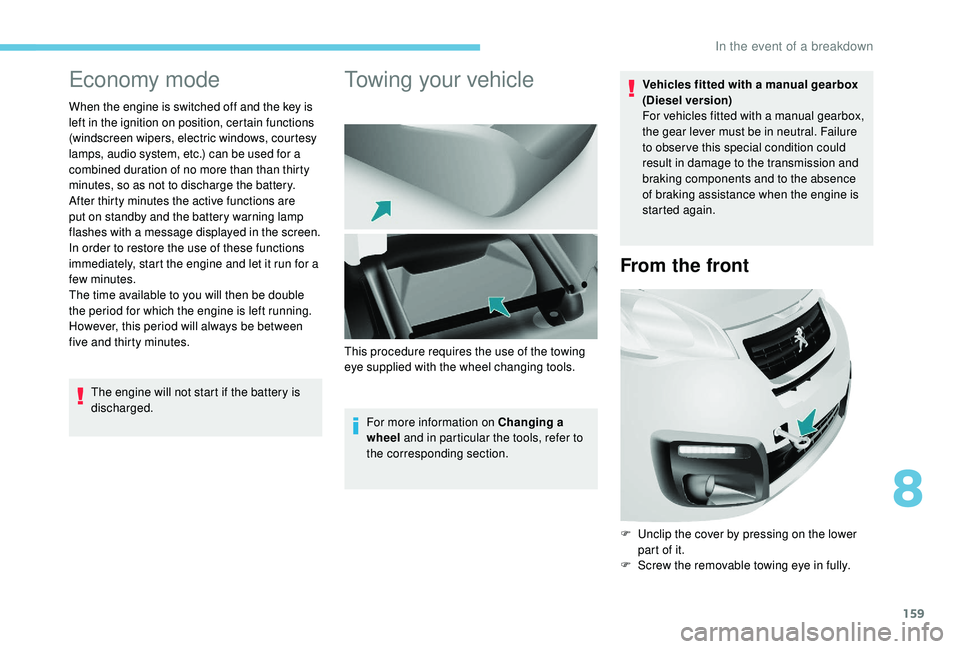
Towing your vehicle
For more information on Changing a
wheel and in particular the tools, refer to
the corresponding section. Vehicles fitted with a manual gearbox
(Diesel version)
For vehicles fitted with a manual gearbox,
the gear lever must be in neutral. Failure
to obser ve this special condition could
result in damage to the transmission and
braking components and to the absence
of braking assistance when the engine is
started again.
From the front
F Unclip the cover by pressing on the lower
part of it.
F
S
crew the removable towing eye in fully.
This procedure requires the use of the towing
eye supplied with the wheel changing tools.
8
In the event of a breakdown
Page 199 of 252

161
Characteristics of engines
and towed loads
Engines
The engine specifications (capacity, max.
power, max. speed, energy, CO
2 emissions,
etc.) associated with your vehicle are indicated
on the registration document, as well as in
sales brochures.
These characteristics correspond to the values
type-approved on a test bed, under conditions
defined in European legislation (Directive
1999/99/EC).
For more information, contact a PEUGEOT
dealer or a qualified workshop.
Weights and towed loads
The weights and towed loads relating to
your vehicle are indicated on the registration
document, as well as in sales brochures.
These values are also indicated on the
manufacturer's plate or label.
For more information, contact a PEUGEOT
dealer or a qualified workshop. The GTW values and the towed loads listed are
valid for a maximum altitude of 1,000
metres.
The towed load must be reduced by steps of
10% for each additional 1,000 metres.
The maximum authorised nose weight
corresponds to the weight permitted on the
towball.
GT W: Gross train weight.
When exterior temperatures are high,
the vehicle per formance may be limited
in order to protect the engine. When the
exterior temperature is higher than 37°C,
limit the towed weight.
Towing using a lightly loaded vehicle can
adversely affect roadholding.
Braking distances are increased when
towing a trailer.
When using a vehicle to tow, never
exceed a speed of approximately 60 mph
(100
km/h) (obser ve the local legislation
in force). If the exterior temperature is high, it is
recommended that the engine is allowed
to idle for 1 to 2
minutes after the vehicle
comes to a stop, to facilitate its cooling.
9
Technical data