2017 PEUGEOT 5008 fold seats
[x] Cancel search: fold seatsPage 80 of 404
78
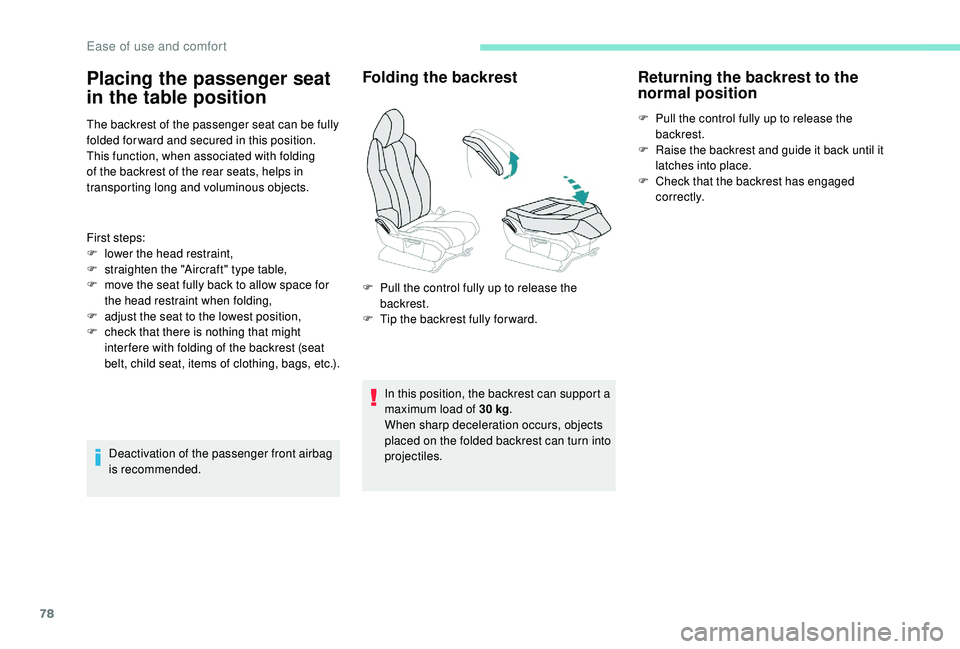
The backrest of the passenger seat can be fully
folded for ward and secured in this position.
This function, when associated with folding
of the backrest of the rear seats, helps in
transporting long and voluminous objects.
First steps:
F
l
ower the head restraint,
F
s
traighten the "Aircraft" type table,
F
m
ove the seat fully back to allow space for
the head restraint when folding,
F
a
djust the seat to the lowest position,
F
c
heck that there is nothing that might
inter fere with folding of the backrest (seat
belt, child seat, items of clothing, bags, etc.).
Deactivation of the passenger front airbag
is recommended.
Folding the backrest
In this position, the backrest can support a
maximum load of 30 kg.
When sharp deceleration occurs, objects
placed on the folded backrest can turn into
projectiles.
Returning the backrest to the
normal position
F Pull the control fully up to release the backrest.
F
R
aise the backrest and guide it back until it
latches into place.
F
C
heck that the backrest has engaged
c o r r e c t l y.
Placing the passenger seat
in the table position
F Pull the control fully up to release the backrest.
F
T
ip the backrest fully for ward.
Ease of use and comfort
Page 87 of 404
85
Second row seats
Rear head restraints
The rear head restraints can be removed.
To remove a head restraint:
F
p
ull the head restraint as far up as it will go,
F
p
ress the lug A to release the head restraint
and remove it completely,
F
s
tow the head restraint. To refit a head restraint:
F
i
nsert the head restraint rods into the guides
in the corresponding seat backrest,
F
p
ush the head restraint down as far as it will
go,
F
p
ress the lug A to free the head restraint
and push it down.
Never drive with passengers seated at
the rear when the head restraints are
removed; they must be in place and in the
high position.
Seat adjustments
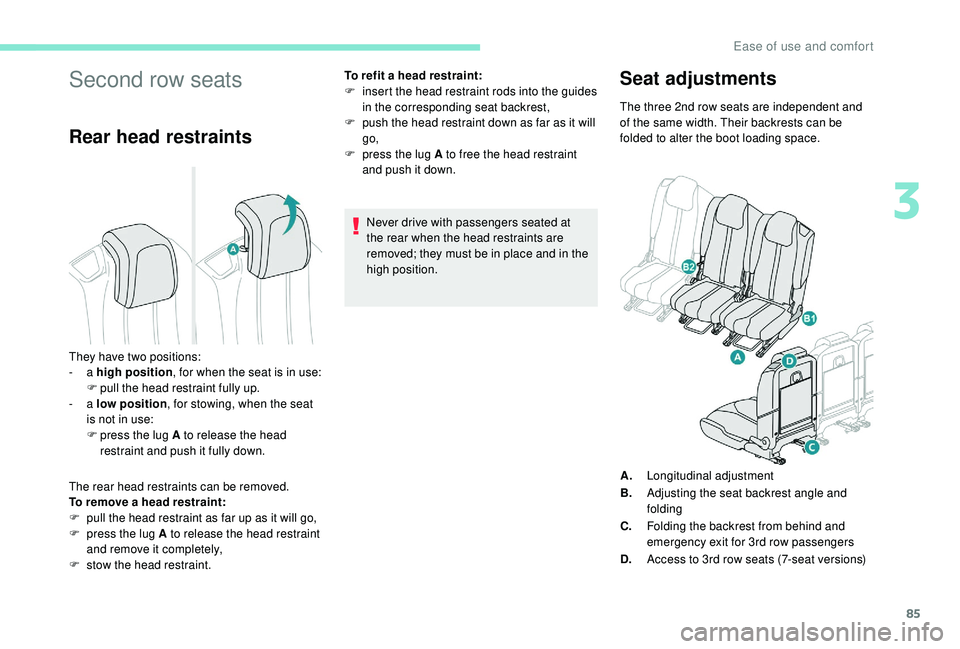
They have two positions:
- a high position , for when the seat is in use:
F
p
ull the head restraint fully up.
-
a low position , for stowing, when the seat
is not in use:
F
p
ress the lug A to release the head
restraint and push it fully down. The three 2nd row seats are independent and
of the same width. Their backrests can be
folded to alter the boot loading space.
A. Longitudinal adjustment
B. Adjusting the seat backrest angle and
folding
C. Folding the backrest from behind and
emergency exit for 3rd row passengers
D. Access to 3rd row seats (7-seat versions)
3
Ease of use and comfort
Page 88 of 404
86
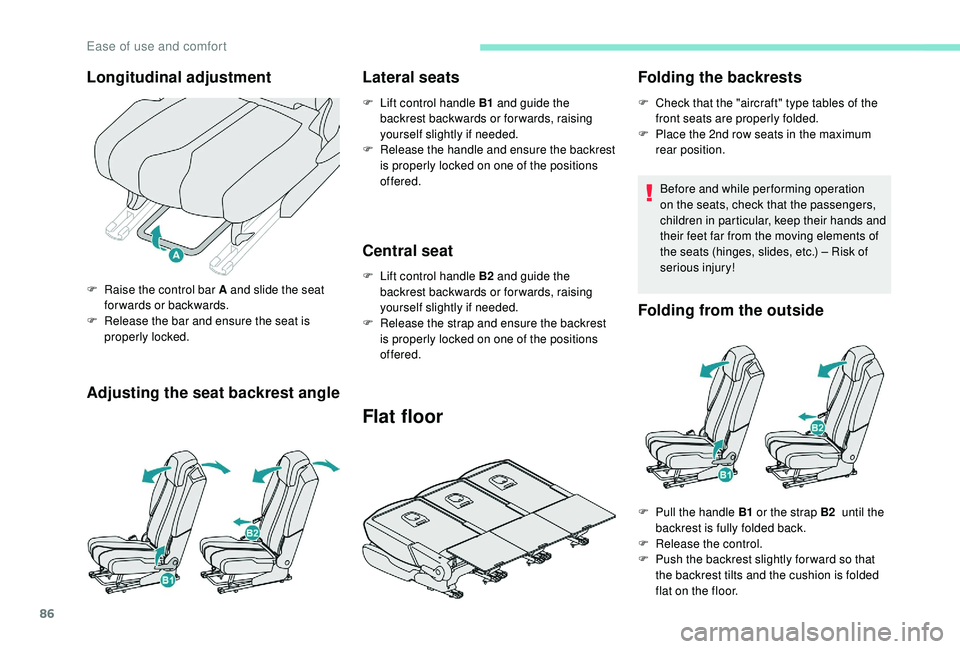
Adjusting the seat backrest angleLateral seats
F Lift control handle B1
and guide the
backrest backwards or for wards, raising
yourself slightly if needed.
F
R
elease the handle and ensure the backrest
is properly locked on one of the positions
offered.
Central seat
F Lift control handle B2 and guide the
backrest backwards or for wards, raising
yourself slightly if needed.
F
R
elease the strap and ensure the backrest
is properly locked on one of the positions
offered.
Flat floor
Folding the backrests
F Check that the "aircraft" type tables of the front seats are properly folded.
F
P
lace the 2nd row seats in the maximum
rear position.
Before and while per forming operation
on the seats, check that the passengers,
children in particular, keep their hands and
their feet far from the moving elements of
the seats (hinges, slides, etc.) – Risk of
serious injury!
Folding from the outside
Longitudinal adjustment
F Raise the control bar A and slide the seat
forwards or backwards.
F
R
elease the bar and ensure the seat is
properly locked.
F
P
ull the handle B1 or the strap B2 until the
backrest is fully folded back.
F
R
elease the control.
F
P
ush the backrest slightly for ward so that
the backrest tilts and the cushion is folded
flat on the floor.
Ease of use and comfort
Page 89 of 404
87
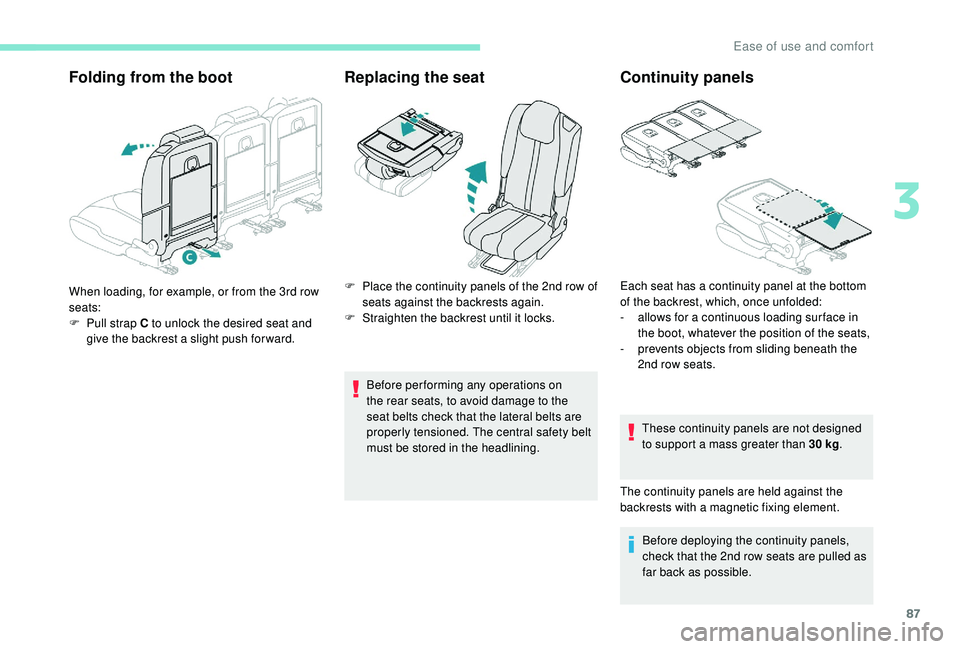
Folding from the bootReplacing the seat
Before performing any operations on
the rear seats, to avoid damage to the
seat belts check that the lateral belts are
properly tensioned. The central safety belt
must be stored in the headlining.
Continuity panels
When loading, for example, or from the 3rd row
seats:
F
P
ull strap C to unlock the desired seat and
give the backrest a slight push for ward. F
P lace the continuity panels of the 2nd row of
seats against the backrests again.
F
S
traighten the backrest until it locks.Each seat has a continuity panel at the bottom
of the backrest, which, once unfolded:
-
a
llows for a continuous loading sur face in
the boot, whatever the position of the seats,
-
p
revents objects from sliding beneath the
2nd row seats.
These continuity panels are not designed
to support a mass greater than 30
kg.
The continuity panels are held against the
backrests with a magnetic fixing element. Before deploying the continuity panels,
check that the 2nd row seats are pulled as
far back as possible.
3
Ease of use and comfort
Page 90 of 404
88
Access to third row seatsThird row seats
Third row seats are accessed via the second
row lateral seats.
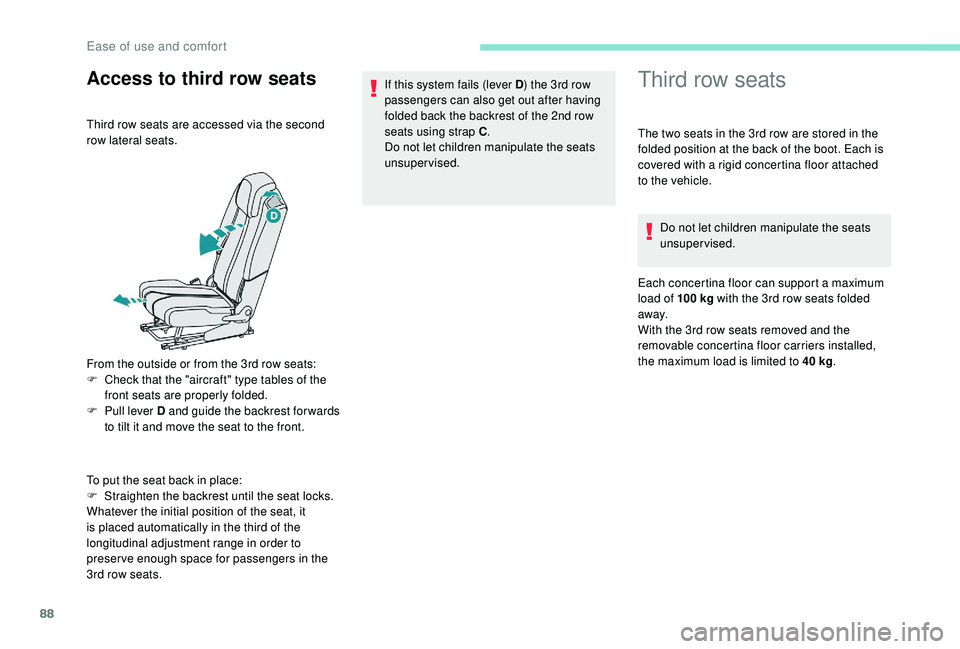
From the outside or from the 3rd row seats:
F
C
heck that the "aircraft" type tables of the
front seats are properly folded.
F
P
ull lever D and guide the backrest for wards
to tilt it and move the seat to the front.
To put the seat back in place:
F
S
traighten the backrest until the seat locks.
Whatever the initial position of the seat, it
is placed automatically in the third of the
longitudinal adjustment range in order to
preserve enough space for passengers in the
3rd row seats. If this system fails (lever D
) the 3rd row
passengers can also get out after having
folded back the backrest of the 2nd row
seats using strap C .
Do not let children manipulate the seats
unsupervised. The two seats in the 3rd row are stored in the
folded position at the back of the boot. Each is
covered with a rigid concertina floor attached
to the vehicle.
Do not let children manipulate the seats
unsupervised.
Each concertina floor can support a maximum
load of 100
kg with the 3rd row seats folded
away.
With the 3rd row seats removed and the
removable concertina floor carriers installed,
the maximum load is limited to 40
kg.
Ease of use and comfort
Page 91 of 404
89
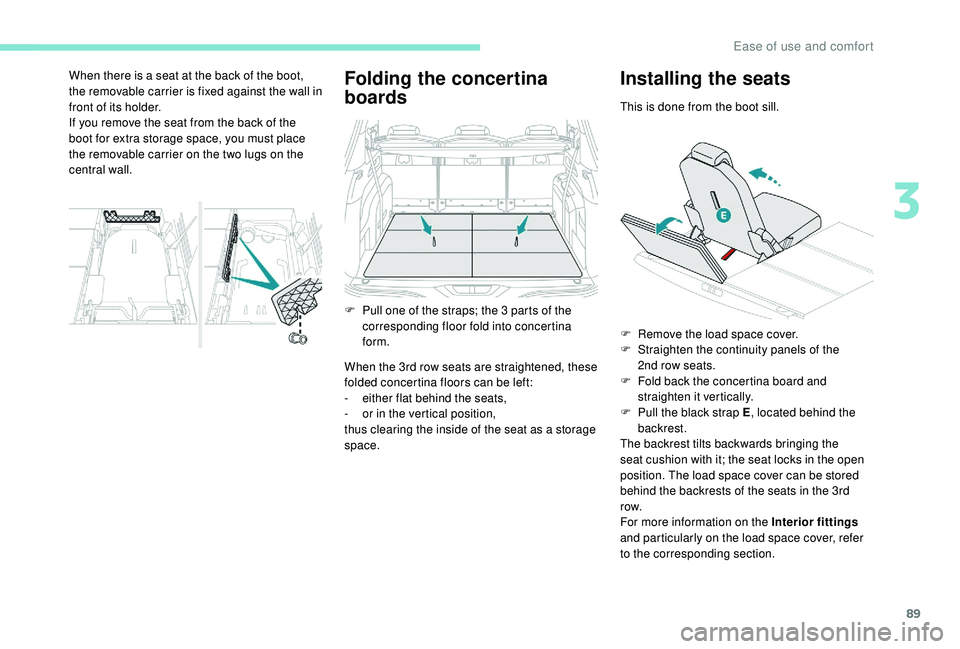
Folding the concertina
boards
When the 3rd row seats are straightened, these
folded concertina floors can be left:
-
ei
ther flat behind the seats,
-
o
r in the vertical position,
thus clearing the inside of the seat as a storage
space.
Installing the seats
This is done from the boot sill.
When there is a seat at the back of the boot,
the removable carrier is fixed against the wall in
front of its holder.
If you remove the seat from the back of the
boot for extra storage space, you must place
the removable carrier on the two lugs on the
central wall.
F
P
ull one of the straps; the 3
parts of the
corresponding floor fold into concertina
form. F
R
emove the load space cover.
F
S
traighten the continuity panels of the
2nd row seats.
F
F
old back the concertina board and
straighten it vertically.
F
P
ull the black strap E , located behind the
backrest.
The backrest tilts backwards bringing the
seat cushion with it; the seat locks in the open
position. The load space cover can be stored
behind the backrests of the seats in the 3rd
row.
For more information on the Interior fittings
and particularly on the load space cover, refer
to the corresponding section.
3
Ease of use and comfort
Page 92 of 404
90
Rear head restraints
The rear head restraints can be removed.
To remove a head restraint:
F
p
ull the head restraint as far up as it will go,
F
p
ress the lug A to release the head restraint
and remove it completely,
F
s
tow the head restraint.
Never drive with passengers seated at
the rear when the head restraints are
removed; they must be in place and in the
high position.
Removal of the seats
Seat storage
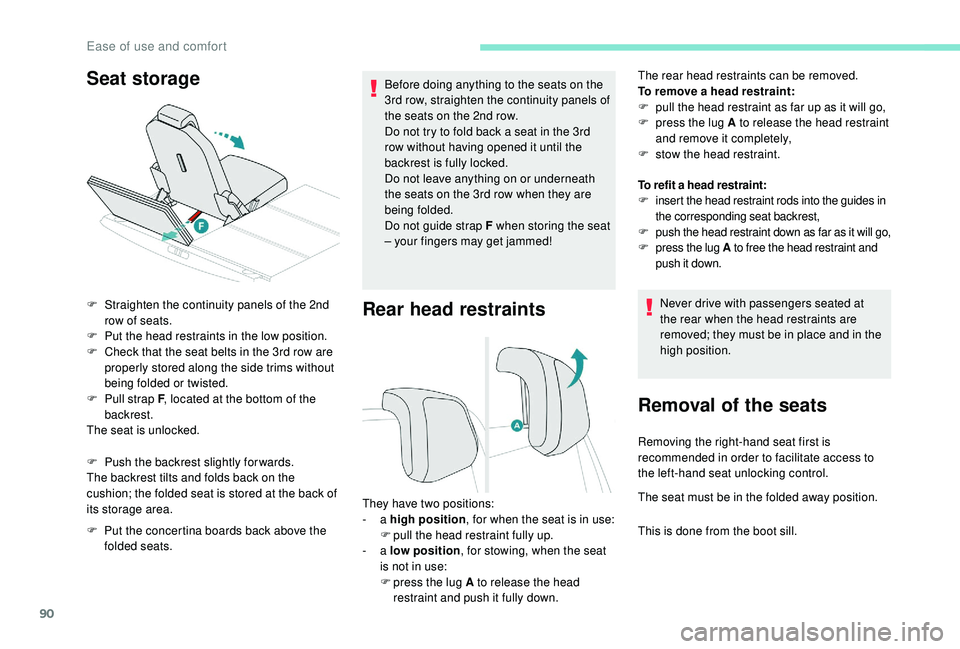
F Straighten the continuity panels of the 2nd
row of seats.
F
P
ut the head restraints in the low position.
F
C
heck that the seat belts in the 3rd row are
properly stored along the side trims without
being folded or twisted.
F
P
ull strap F , located at the bottom of the
backrest.
The seat is unlocked.
F
P
ush the backrest slightly for wards.
The backrest tilts and folds back on the
cushion; the folded seat is stored at the back of
its storage area.
F
P
ut the concertina boards back above the
folded seats. Before doing anything to the seats on the
3rd row, straighten the continuity panels of
the seats on the 2nd row.
Do not try to fold back a seat in the 3rd
row without having opened it until the
backrest is fully locked.
Do not leave anything on or underneath
the seats on the 3rd row when they are
being folded.
Do not guide strap F when storing the seat
– your fingers may get jammed!
They have two positions:
- a high position , for when the seat is in use:
F
p
ull the head restraint fully up.
-
a low position , for stowing, when the seat
is not in use:
F
p
ress the lug A to release the head
restraint and push it fully down. To refit a head restraint:
F
i
nsert the head restraint rods into the guides in
the corresponding seat backrest,
F
p
ush the head restraint down as far as it will go,
F
p
ress the lug A
to free the head restraint and
push it down.
Removing the right-hand seat first is
recommended in order to facilitate access to
the left-hand seat unlocking control.
The seat must be in the folded away position.
This is done from the boot sill.
Ease of use and comfort
Page 93 of 404
91
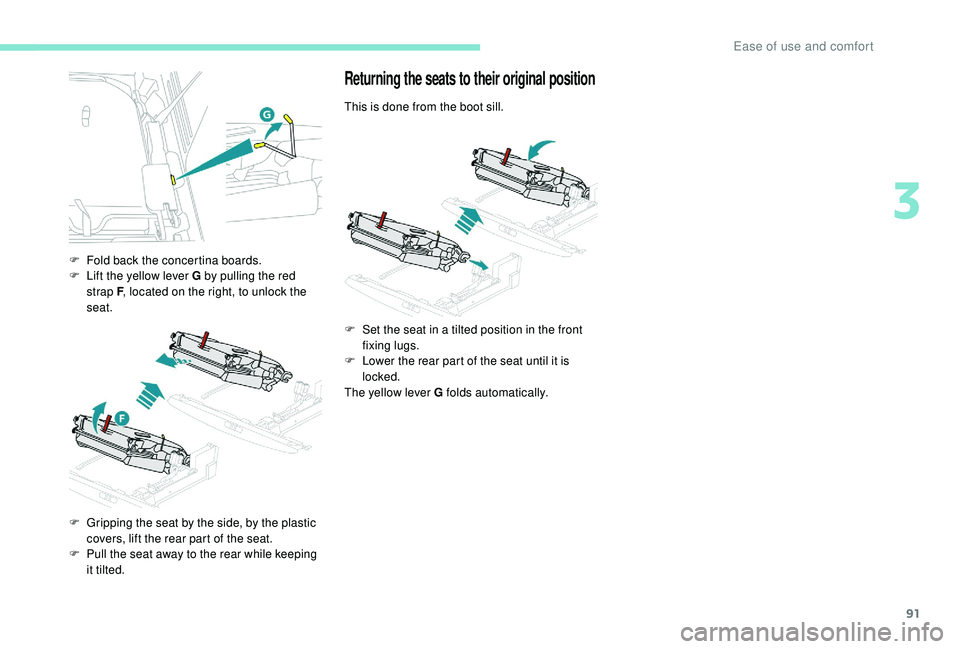
F Fold back the concertina boards.
F L ift the yellow lever G by pulling the red
strap F , located on the right, to unlock the
seat.
F
G
ripping the seat by the side, by the plastic
covers, lift the rear part of the seat.
F
P
ull the seat away to the rear while keeping
it tilted.
Returning the seats to their original position
This is done from the boot sill.
F
S
et the seat in a tilted position in the front
fixing lugs.
F
L
ower the rear part of the seat until it is
locked.
The yellow lever G folds automatically.
3
Ease of use and comfort