2017 PEUGEOT 5008 tow
[x] Cancel search: towPage 270 of 404
268
For more information on the Spare wheel, refer
to the corresponding section. All of these tools are specific to your
vehicle and may vary depending on
equipment.
Do not use them for any other purposes.
The jack must only be used to change
a wheel with a damaged or punctured tyre.
Do not use any jack other than the one
supplied with this vehicle.
If the vehicle does not have its original
jack, contact a PEUGEOT dealer or a
qualified workshop to obtain the correct
jack for it.
The jack meets European standards,
as defined in the Machinery Directive
2006/42/CE.
The jack does not require any
maintenance.
Access to the tools
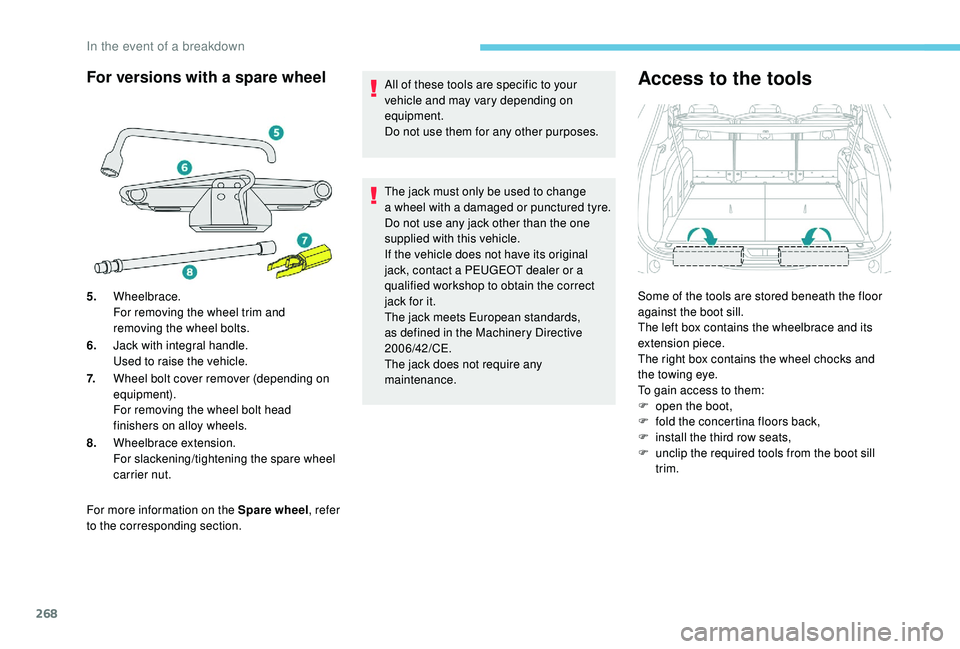
Some of the tools are stored beneath the floor
against the boot sill.
The left box contains the wheelbrace and its
extension piece.
The right box contains the wheel chocks and
the towing eye.
To gain access to them:
F
o
pen the boot,
F
f
old the concertina floors back,
F
i
nstall the third row seats,
F
u
nclip the required tools from the boot sill
trim.
For versions with a spare wheel
5. Wheelbrace.
For removing the wheel trim and
removing the wheel bolts.
6. Jack with integral handle.
Used to raise the vehicle.
7. Wheel bolt cover remover (depending on
equipment).
For removing the wheel bolt head
finishers on alloy wheels.
8. Wheelbrace extension.
For slackening/tightening the spare wheel
carrier nut.
In the event of a breakdown
Page 272 of 404
270
Composition of the kit
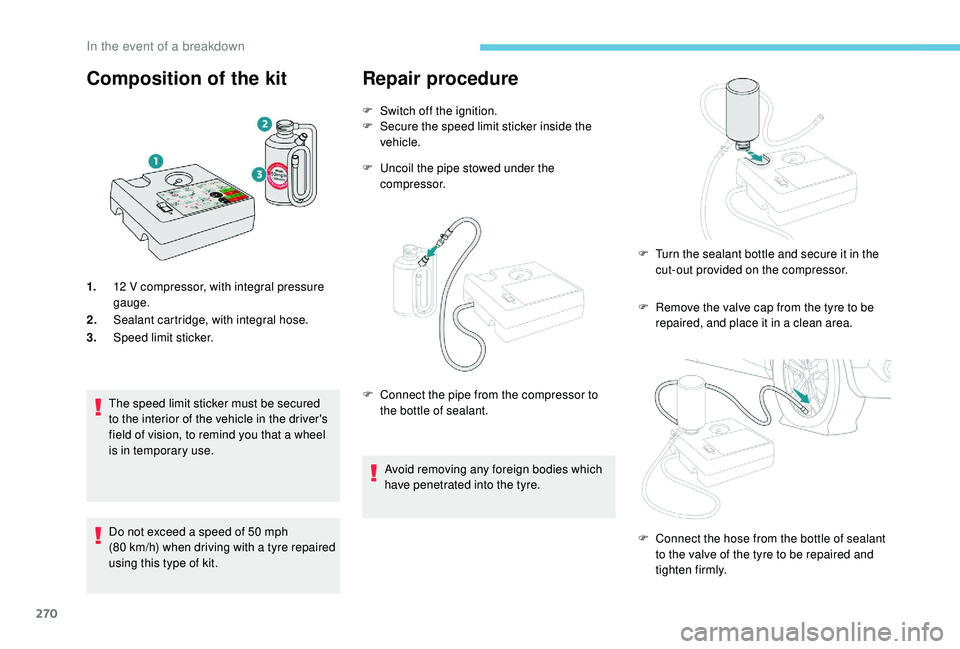
1.12 V compressor, with integral pressure
gauge.
2. Sealant cartridge, with integral hose.
3. Speed limit sticker.
The speed limit sticker must be secured
to the interior of the vehicle in the driver's
field of vision, to remind you that a wheel
is in temporary use.
Do not exceed a speed of 50
mph
(80
km/h) when driving with a tyre repaired
using this type of kit.
Repair procedure
F Switch off the ignition.
F S ecure the speed limit sticker inside the
vehicle.
F
U
ncoil the pipe stowed under the
compressor.
F
R
emove the valve cap from the tyre to be
repaired, and place it in a clean area.
F
C
onnect the pipe from the compressor to
the bottle of sealant.
Avoid removing any foreign bodies which
have penetrated into the tyre. F
T
urn the sealant bottle and secure it in the
cut-out provided on the compressor.
F
C
onnect the hose from the bottle of sealant
to the valve of the tyre to be repaired and
tighten firmly.
In the event of a breakdown
Page 273 of 404
271
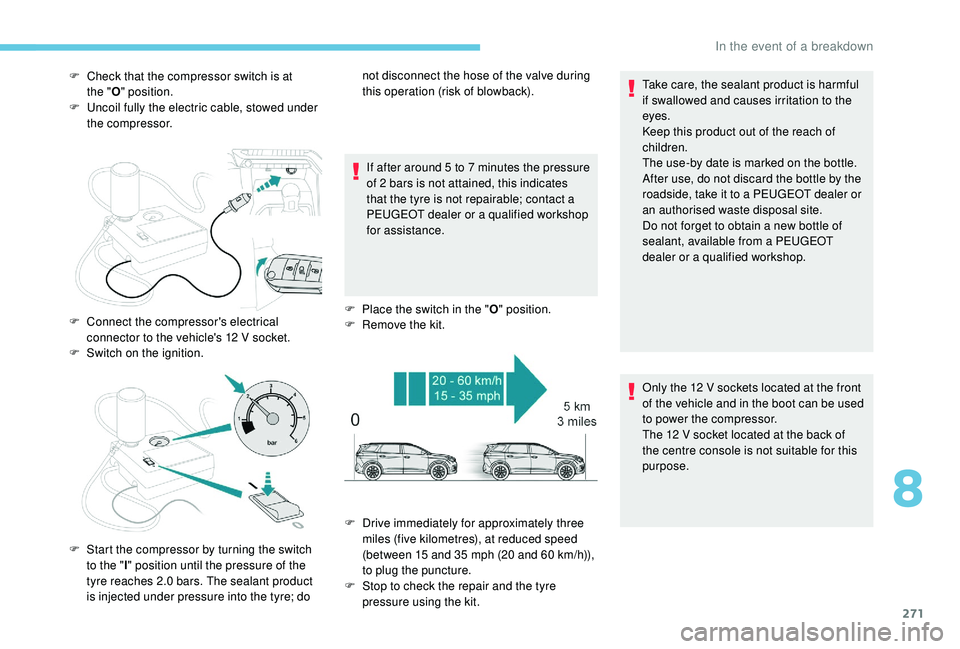
F Check that the compressor switch is at the " O" position.
F
U
ncoil fully the electric cable, stowed under
the compressor.
If after around 5
to 7 minutes the pressure
of 2
bars is not attained, this indicates
that the tyre is not repairable; contact a
PEUGEOT dealer or a qualified workshop
for assistance.
F
P
lace the switch in the "O" position.
F
R
emove the kit.Take care, the sealant product is harmful
if swallowed and causes irritation to the
eyes.
Keep this product out of the reach of
children.
The use-by date is marked on the bottle.
After use, do not discard the bottle by the
roadside, take it to a PEUGEOT dealer or
an authorised waste disposal site.
Do not forget to obtain a new bottle of
sealant, available from a PEUGEOT
dealer or a qualified workshop.
F
C
onnect the compressor's electrical
connector to the vehicle's 12
V socket.
F
S
witch on the ignition.
F
S
tart the compressor by turning the switch
to the " l" position until the pressure of the
tyre reaches 2.0
bars. The sealant product
is injected under pressure into the tyre; do not disconnect the hose of the valve during
this operation (risk of blowback).
F
D
rive immediately for approximately three
miles (five kilometres), at reduced speed
(between 15
and 35 mph (20 and 60 km/h)),
to plug the puncture.
F
S
top to check the repair and the tyre
pressure using the kit. Only the 12
V sockets located at the front
of the vehicle and in the boot can be used
to power the compressor.
The 12
V socket located at the back of
the centre console is not suitable for this
purpose.
8
In the event of a breakdown
Page 274 of 404
272
Checking / adjusting tyre
pressures
You can also use the compressor,
without injecting sealant, to check and, if
necessary, adjust the tyre pressures
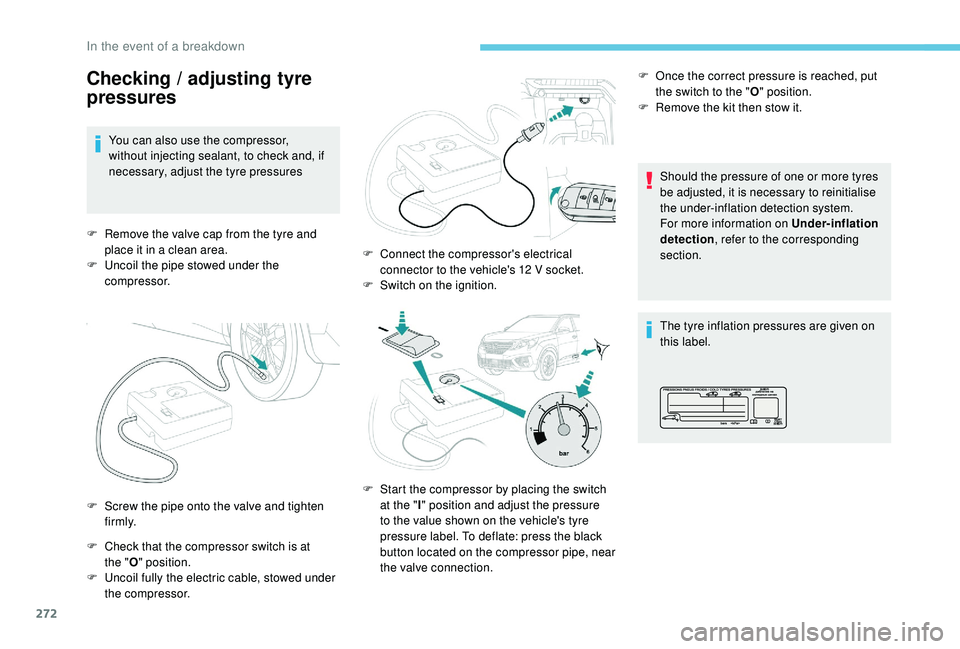
F
R
emove the valve cap from the tyre and
place it in a clean area.
F
U
ncoil the pipe stowed under the
compressor.
F
C
heck that the compressor switch is at
the " O" position.
F
U
ncoil fully the electric cable, stowed under
the compressor. Should the pressure of one or more tyres
be adjusted, it is necessary to reinitialise
the under-inflation detection system.
For more information on Under-inflation
detection
, refer to the corresponding
section.
The tyre inflation pressures are given on
this label.
F
S
crew the pipe onto the valve and tighten
f i r m l y. F
C
onnect the compressor's electrical
connector to the vehicle's 12
V socket.
F
S
witch on the ignition.
F
S
tart the compressor by placing the switch
at the " I" position and adjust the pressure
to the value shown on the vehicle's tyre
pressure label. To deflate: press the black
button located on the compressor pipe, near
the valve connection. F
O
nce the correct pressure is reached, put
the switch to the " O" position.
F
R
emove the kit then stow it.
In the event of a breakdown
Page 280 of 404
278
After changing a wheel
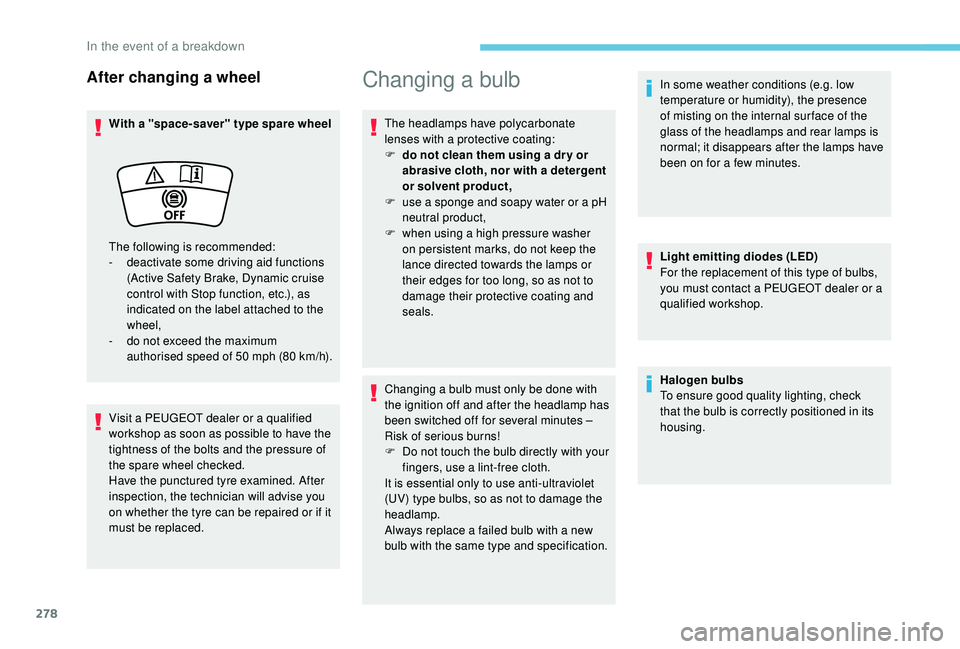
With a "space-saver" type spare wheel
Visit a PEUGEOT dealer or a qualified
workshop as soon as possible to have the
tightness of the bolts and the pressure of
the spare wheel checked.
Have the punctured tyre examined. After
inspection, the technician will advise you
on whether the tyre can be repaired or if it
must be replaced.
Changing a bulb
The headlamps have polycarbonate
lenses with a protective coating:
F
d
o not clean them using a dr y or
abrasive cloth, nor with a detergent
or solvent product,
F
u
se a sponge and soapy water or a pH
neutral product,
F
w
hen using a high pressure washer
on persistent marks, do not keep the
lance directed towards the lamps or
their edges for too long, so as not to
damage their protective coating and
seals.
Changing a bulb must only be done with
the ignition off and after the headlamp has
been switched off for several minutes –
Risk of serious burns!
F
D
o not touch the bulb directly with your
fingers, use a lint-free cloth.
It is essential only to use anti-ultraviolet
(UV) type bulbs, so as not to damage the
headlamp.
Always replace a failed bulb with a new
bulb with the same type and specification. In some weather conditions (e.g. low
temperature or humidity), the presence
of misting on the internal sur face of the
glass of the headlamps and rear lamps is
normal; it disappears after the lamps have
been on for a few minutes.
Light emitting diodes (LED)
For the replacement of this type of bulbs,
you must contact a PEUGEOT dealer or a
qualified workshop.
The following is recommended:
-
d
eactivate some driving aid functions
(Active Safety Brake, Dynamic cruise
control with Stop function, etc.), as
indicated on the label attached to the
wheel,
-
d
o not exceed the maximum
authorised speed of 50
mph (80
km/h). Halogen bulbs
To ensure good quality lighting, check
that the bulb is correctly positioned in its
housing.
In the event of a breakdown
Page 291 of 404
289
The Stop & Start system may not be
operational during the trip following the
first engine start.
In this case, the system will only be
available again after a continuous
period of immobilisation of the vehicle,
a period which depends on the exterior
temperature and the state of charge of the
battery (up to about 8 hours).
For right-hand drive vehicles, when the
total distance recorder has reached
60
miles (100 km), it is necessary to wait
approx. 15 minutes before starting the
engine.
However, if minor problems persist following
this operation, contact a PEUGEOT dealer or a
qualified workshop.
Referring to the corresponding section, you
must yourself reinitialise or reset certain
systems, such as:
-
t
he key with remote control or electronic key
(depending on version),
-
t
he sunroof and its electric blind,
-
t
he electric windows,
-
t
he date and time,
-
t
he preset radio stations.
Towing the vehicle
Procedure for having your vehicle towed or
for towing another vehicle using a removable
towing eye.
Access to the tools
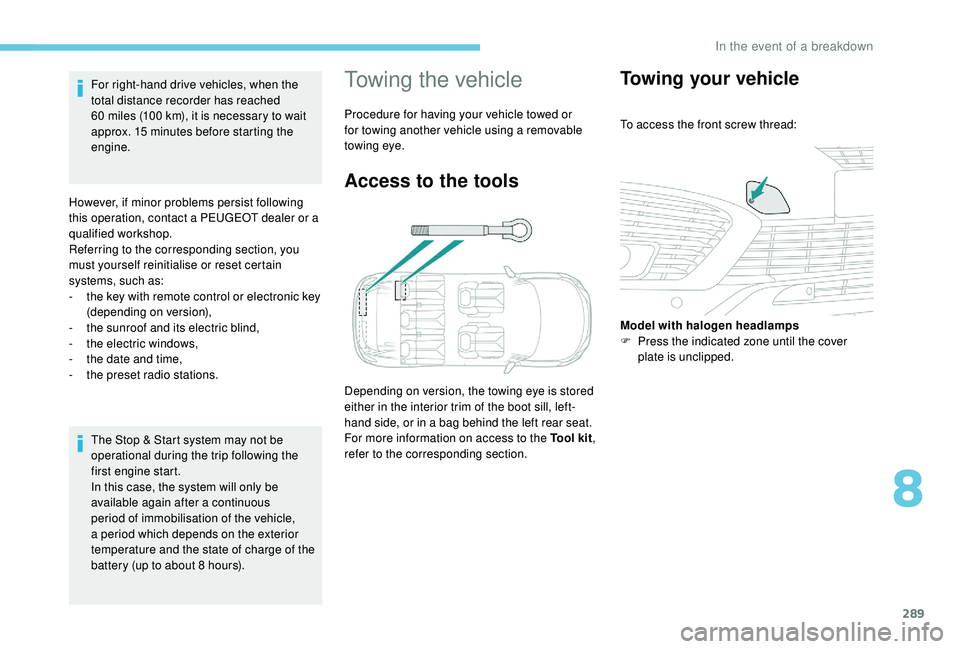
Depending on version, the towing eye is stored
either in the interior trim of the boot sill, left-
hand side, or in a bag behind the left rear seat.
For more information on access to the Tool kit
,
refer to the corresponding section.
Towing your vehicle
To access the front screw thread:
Model with halogen headlamps
F
P
ress the indicated zone until the cover
plate is unclipped.
8
In the event of a breakdown
Page 292 of 404
290
F Move the gear lever into neutral (N mode with an automatic gearbox).
Failure to follow this instruction may cause
damage to some components (braking,
transmission, etc.) and the absence of
braking assistance when the engine is
restarted. F
S
witch on the hazard warning lamps on
both vehicles.
F
S
et off gently and drive slowly for a short
distance.
Towing another vehicle
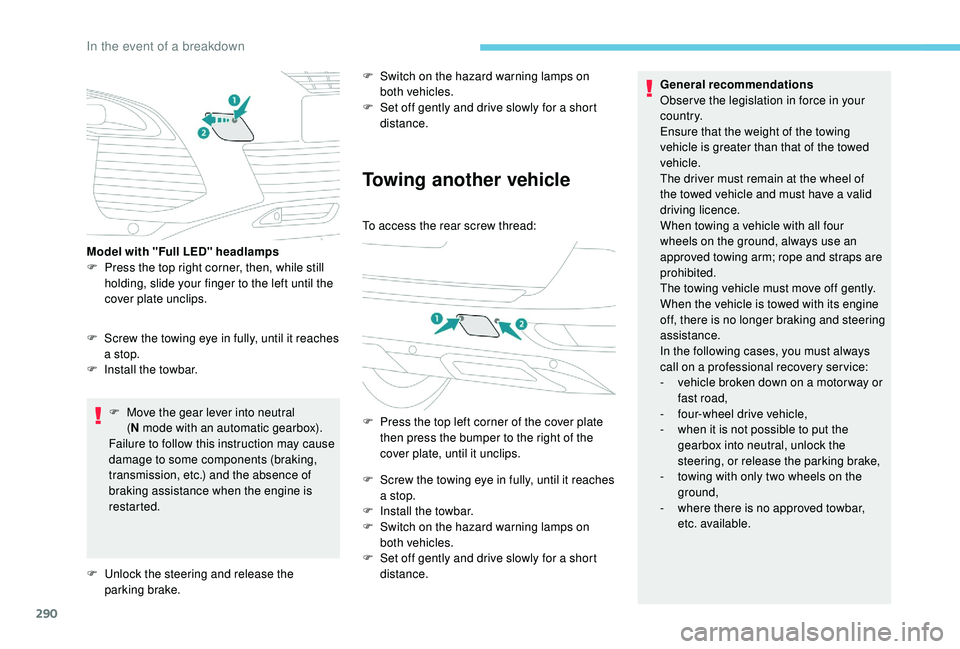
To access the rear screw thread:
F
P
ress the top left corner of the cover plate
then press the bumper to the right of the
cover plate, until it unclips.
F
S
crew the towing eye in fully, until it reaches
a stop.
F
I
nstall the towbar.
F
S
witch on the hazard warning lamps on
both vehicles.
F
S
et off gently and drive slowly for a short
distance. General recommendations
Obser ve the legislation in force in your
c o u nt r y.
Ensure that the weight of the towing
vehicle is greater than that of the towed
vehicle.
The driver must remain at the wheel of
the towed vehicle and must have a valid
driving licence.
When towing a vehicle with all four
wheels on the ground, always use an
approved towing arm; rope and straps are
prohibited.
The towing vehicle must move off gently.
When the vehicle is towed with its engine
off, there is no longer braking and steering
assistance.
In the following cases, you must always
call on a professional recovery ser vice:
-
v
ehicle broken down on a motor way or
fast road,
-
f
our-wheel drive vehicle,
-
w
hen it is not possible to put the
gearbox into neutral, unlock the
steering, or release the parking brake,
-
t
owing with only two wheels on the
ground,
-
w
here there is no approved towbar,
etc. available.
F
S
crew the towing eye in fully, until it reaches
a stop.
F
I
nstall the towbar.
Model with "Full LED" headlamps
F
P
ress the top right corner, then, while still
holding, slide your finger to the left until the
cover plate unclips.
F
U
nlock the steering and release the
parking brake.
In the event of a breakdown
Page 293 of 404
291
Characteristics of engines
and towed loads
Engines
The engine characteristics are given in the
vehicle's registration document, as well as in
sales brochures.The maximum power corresponds to the
value type-approved on a test bed, under
conditions defined in European legislation
(Directive 1999/99/EC).
For more information, contact a PEUGEOT
dealer or a qualified workshop.
Weights and towed loads
The maximum weights and towed loads for
your vehicle are given in the registration
document, as well as in sales brochures.
These values are also given on the
manufacturer's plate or label.
For more information, contact a PEUGEOT
dealer or a qualified workshop. The GTW values and the towable loads
listed are valid for a maximum altitude of
1,000
metres. The towable load must be
reduced by steps of 10% for each additional
1,000
metres.
The recommended nose weight is the vertical
load on the towbar ball (removable, with or
without tools).
GT W: Gross train weight.
High exterior temperatures may result
in a reduction in the per formance of the
vehicle to protect the engine. When the
exterior temperature is higher than 37°C,
limit the towed weight.
Towing using a lightly loaded vehicle can
adversely affect roadholding.
Braking distances are increased when
towing a trailer.
When using a vehicle to tow, never exceed
a speed of 60 mph (100 km/h) (obser ve
the local legislation in force). If the exterior temperature is high, it is
recommended that the engine be allowed
to idle for 1
to 2 minutes after the vehicle
comes to a stop, to facilitate its cooling.
9
Technical data