2017 PEUGEOT 5008 stop start
[x] Cancel search: stop startPage 206 of 404
204
Cruise control
System which automatically
maintains the cruising speed of the
vehicle at a setting programmed by
the driver, without any action on the
accelerator pedal.
The cruise control is switched on manually.
It requires a minimum vehicle speed of 25
mph
(40
km/h).
With a manual gearbox, it requires the
engagement of third gear or higher.
With an automatic gearbox, it requires the
engagement of the selector in mode D or of
second gear or higher in mode M .
Speed regulation remains active after
changing gear on vehicles fitted with a
manual gearbox and Stop & Start. The operation of the cruise control can be
interrupted (pause):
-
b y pressing control 4 or by pressing the
brake pedal,
-
a
utomatically, if operation of the dynamic
stability control system is triggered.
Switching off the ignition cancels any
programmed speed setting.
The cruise control system is a driving aid
that cannot, in any circumstances, replace
the need to obser ve speed limits, nor the
need for vigilance on the part of the driver.
As a safety measure, you are advised to
keep your feet near the pedals at all times.
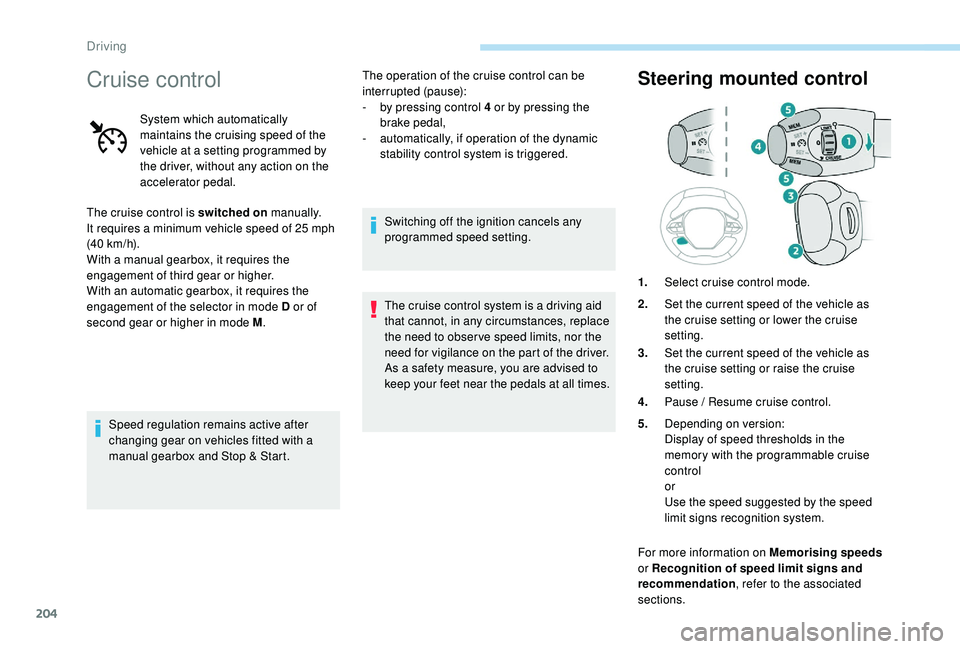
Steering mounted control
1. Select cruise control mode.
2. Set the current speed of the vehicle as
the cruise setting or lower the cruise
setting.
3. Set the current speed of the vehicle as
the cruise setting or raise the cruise
setting.
4. Pause / Resume cruise control.
5. Depending on version:
Display of speed thresholds in the
memory with the programmable cruise
control
or
Use the speed suggested by the speed
limit signs recognition system.
For more information on Memorising speeds
or Recognition of speed limit signs and
recommendation , refer to the associated
sections.
Driving
Page 211 of 404
209
Switching on
The cruise control is switched on manually.
The speed of the vehicle must be between
18
and 110 mph (30 and 180 km/h).
Automatic gearbox: in D or M mode. When the cruise control is operating, Stop
& Start is automatically deactivated.
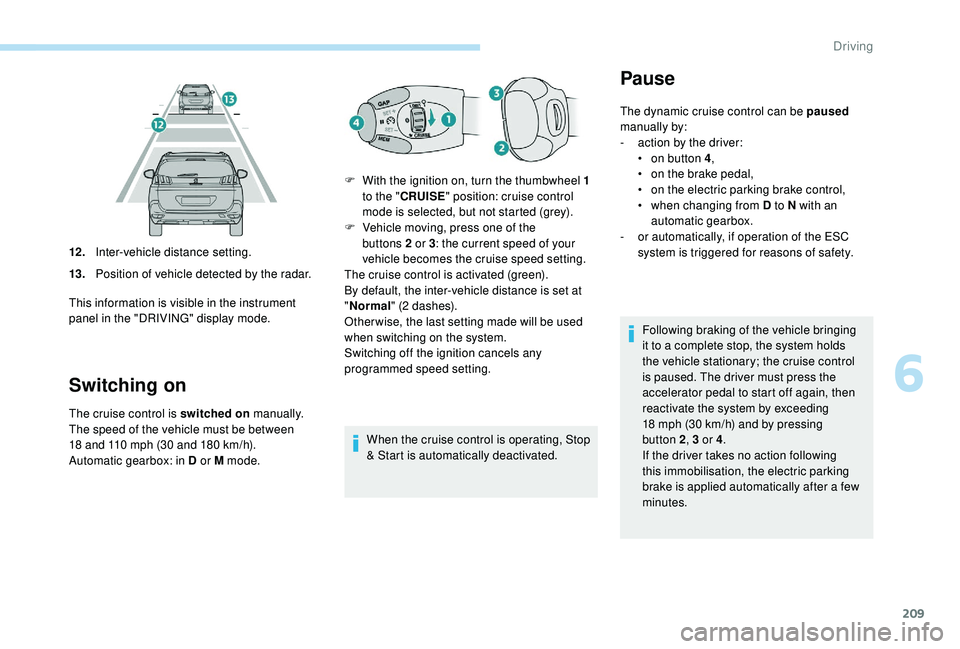
12 .
Inter-vehicle distance setting.
13. Position of vehicle detected by the radar.
This information is visible in the instrument
panel in the "DRIVING" display mode. F
W
ith the ignition on, turn the thumbwheel 1
to the " CRUISE " position: cruise control
mode is selected, but not started (grey).
F
V
ehicle moving, press one of the
buttons 2 or 3
: the current speed of your
vehicle becomes the cruise speed setting.
The cruise control is activated (green).
By default, the inter-vehicle distance is set at
" Normal " (2 dashes).
Other wise, the last setting made will be used
when switching on the system.
Switching off the ignition cancels any
programmed speed setting.
Pause
The dynamic cruise control can be paused
manually by:
-
a
ction by the driver:
•
o
n button 4 ,
•
o
n the brake pedal,
•
o
n the electric parking brake control,
•
w
hen changing from D to N with an
automatic gearbox.
-
o
r automatically, if operation of the ESC
system is triggered for reasons of safety.
Following braking of the vehicle bringing
it to a complete stop, the system holds
the vehicle stationary; the cruise control
is paused. The driver must press the
accelerator pedal to start off again, then
reactivate the system by exceeding
18
mph (30 km/h) and by pressing
button 2, 3
or 4.
If the driver takes no action following
this immobilisation, the electric parking
brake is applied automatically after a few
minutes.
6
Driving
Page 220 of 404
218
Important: if operation of the
automatic emergency braking is
triggered, you should take back
control of your vehicle and brake
with the pedal to add to or finish the
automatic braking action.
The driver can take back control of the vehicle
at any time by sharply turning the steering
wheel and/or pressing the accelerator pedal.
The point at which braking is triggered
may be adjusted depending on the driving
actions of the driver, such as movement
of the steering wheel or actions at the
accelerator pedal.
Operation of the function may be felt by
slight vibration in the brake pedal.
If the vehicle comes to a complete stop,
the automatic braking is maintained for
1
to 2
seconds. With a manual gearbox, in the event of
automatic emergency braking until the
vehicle comes to a complete stop, the
engine may stall.
With an automatic gearbox, in the event
of automatic emergency braking until the
vehicle comes to a complete stop, keep
the brake pedal pressed down to prevent
the vehicle from starting off again.
Specific conditions for operation
The vehicle's speed must be between 3 mph
a nd 53 mph (5 km/h and 85 km/h) (versions
with camera alone) or 85
mph (140 km/h)
(versions with camera and radar) when a
moving vehicle is detected.
The vehicle's speed must not exceed 50
mph
(80 km/h) when a stopped vehicle is detected.
The vehicle's speed must not exceed 37
mph
(60
km/h) when a pedestrian is detected.
The ESC system must not be defective.
The DCS system must not be deactivated.
All passenger seat belts must be fastened.
Driving at a steady speed on roads with few
bends is required. After an impact, the function automatically
stops operating. Consult a PEUGEOT
dealer or a qualified workshop to have the
system checked.
Deactivation / Activation
By default, the system is automatically
activated at every engine start.
The system can be deactivated or activated via
the vehicle settings menu.
Deactivation of the system is
signalled by the illumination of this
indicator lamp, accompanied by the
display of a message.
Malfunction
In the event of a fault with the
system, you are alerted by the
illumination of this warning lamp,
accompanied by the display of a
message and an audible signal.
Check that the sensors (camera and radar) are
not covered by dirt, mud, frost, snow, etc.
If the fault persists, contact a PEUGEOT dealer
or a qualified workshop to have the system
checked.
Driving
Page 240 of 404
238
When the Park Assist is active, it prevents
the Stop & Start going into STOP mode.
In STOP mode, activating Park Assist
restarts the engine.The Park Assist system takes control
of the assistance for a maximum of
4
manoeuvre cycles. The function is
deactivated after these 4 cycles. If you
think that your vehicle is not positioned
correctly, you should then take control of
the steering to carry out the manoeuvre.
The sequence of manoeuvres and the
driving instructions are displayed in the
instrument panel. You should always check the surroundings
of your vehicle before starting a
manoeuvre.
The parking sensors function is
not available during parking space
measurement. It intervenes later when
manoeuvring to warn you that your vehicle
is approaching an obstacle: the audible
signal becomes continuous when the
obstacle is less than thirty centimetres
away.
If you have deactivated the parking
sensors, they are automatically
reactivated during assisted parking
manoeuvres.
Activation of Park Assist deactivates the
Blind Spot Monitoring System.
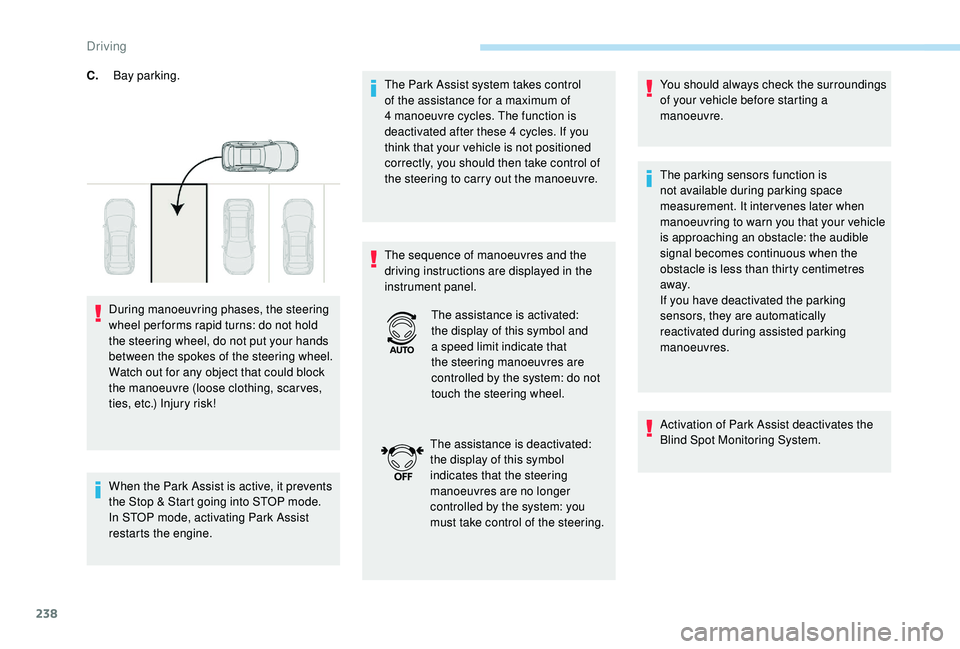
C.
Bay parking.
During manoeuvring phases, the steering
wheel per forms rapid turns: do not hold
the steering wheel, do not put your hands
between the spokes of the steering wheel.
Watch out for any object that could block
the manoeuvre (loose clothing, scar ves,
ties, etc.) Injury risk! The assistance is activated:
the display of this symbol and
a speed limit indicate that
the steering manoeuvres are
controlled by the system: do not
touch the steering wheel.
The assistance is deactivated:
the display of this symbol
indicates that the steering
manoeuvres are no longer
controlled by the system: you
must take control of the steering.
Driving
Page 247 of 404
245
Fuel
Fuel tank capacity: approximately 56 litres.
R eser ve level: 6 litres.
Low fuel level
When the low fuel level is reached
in the fuel tank, this warning lamp
comes on in the instrument panel,
accompanied by the display of a
message and an audible signal.
When it first comes on, about
6
litres of fuel is left in the tank.
Until sufficient fuel is added, this warning lamp
appears every time the ignition is switched on,
accompanied by the display of a message and
an audible signal. When driving, this message
and audible signal are repeated with increasing
frequency as the fuel level drops towards 0 .
Refuel as soon as possible to avoid running out
of fuel.
For more information on Running out of fuel
(Diesel) , refer to the corresponding section.
If your vehicle is fitted with Stop & Start,
never refuel with the engine in STOP
mode; you must switch off the ignition
using the key, or the START/STOP button
if your vehicle has
K
eyless Entry and
Starting.
Refuelling
If you have put in the wrong fuel for your
vehicle, you must have the fuel tank
drained and filled with the correct fuel
before starting the engine.
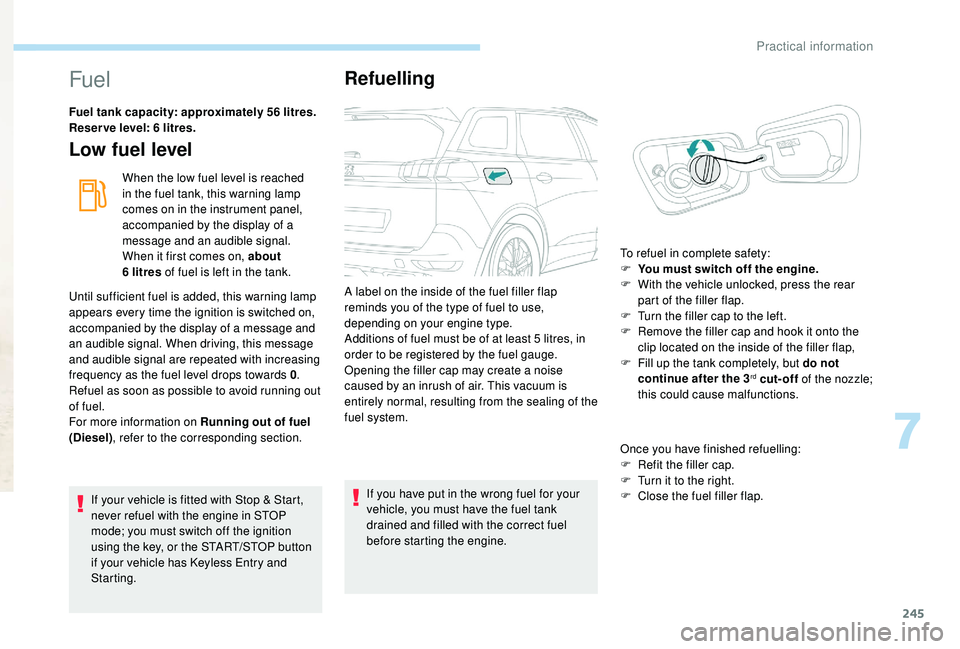
A label on the inside of the fuel filler flap
reminds you of the type of fuel to use,
depending on your engine type.
Additions of fuel must be of at least 5
litres, in
order to be registered by the fuel gauge.
Opening the filler cap may create a noise
caused by an inrush of air. This vacuum is
entirely normal, resulting from the sealing of the
fuel system.
Once you have finished refuelling:
F
R
efit the filler cap.
F T urn it to the right.
F C lose the fuel filler flap.
To refuel in complete safety:
F
Y
ou must switch off the engine.
F
W
ith the vehicle unlocked, press the rear
part of the filler flap.
F
T
urn the filler cap to the left.
F
R
emove the filler cap and hook it onto the
clip located on the inside of the filler flap,
F
F
ill up the tank completely, but do not
continue after the 3
rd cut-off of the nozzle;
this could cause malfunctions.
7
Practical information
Page 254 of 404
252
Apply the label provided to a clearly visible
area, close to the carrier or in the boot.
Go to a PEUGEOT dealer or a qualified
workshop for any work on the towbar
system.
Load reduction mode
System which manages the use of certain
functions according to the level of charge
remaining in the battery.
When the vehicle is being driven, the load
reduction function temporarily deactivates
certain functions, such as air conditioning,
heated rear screen, etc.
The deactivated functions are reactivated
automatically as soon as conditions permit.
Maintenance
Correct operation is only possible if the towball
and its carrier are kept clean.
Before cleaning the vehicle with a high-
pressure jet wash, the towball must be removed
and the protective plug fitted to the carrier.
Energy economy mode
System which manages the duration of use of
certain functions to conser ve a sufficient level
of charge in the battery.
After the engine has stopped, you can still use
functions such as the audio and telematics
system, windscreen wipers, dipped beam
headlamps, courtesy lamps, etc. for a
maximum combined duration of about forty
minutes.
Switching to this mode
A message appears in the instrument panel
screen indicating that the vehicle has switched
to economy mode and the active functions are
put on standby.If a telephone call is being made at this
time, it will be maintained for around
10
minutes with the Bluetooth hands-free
system of your audio system.
Exiting the mode
These functions will be automatically restored
the next time the vehicle is used.
In order to restore the use of these functions
immediately, start the engine and let it run:
-
f
or less than ten minutes, to use the
equipment for approximately five minutes,
-
f
or more than ten minutes, to use the
equipment for up to approximately thirty
minutes.
Let the engine run for the duration specified to
ensure that the battery charge is sufficient.
Do not repeatedly and continuously restart the
engine in order to charge the battery.
A flat battery prevents the engine from
starting.
For more information on the 12
V batter y,
refer to the corresponding section.
Practical information
Page 258 of 404
256
Bonnet
Before doing anything under the bonnet,
deactivate the Stop & Start system to
avoid any risk of injury resulting from an
automatic change to START mode.
The location of the interior bonnet release
lever prevents opening of the bonnet when
the left-hand front door is shut.
When the engine is hot, handle the
exterior safety catch and the stay with
care (risk of burns), using the protected
area.
When the bonnet is open, take care not to
damage the safety catch.
Do not open the bonnet under very windy
conditions.
The cooling fan may star t after
switching off the engine: take care
with articles and clothing that might be
caught by the fan blades.
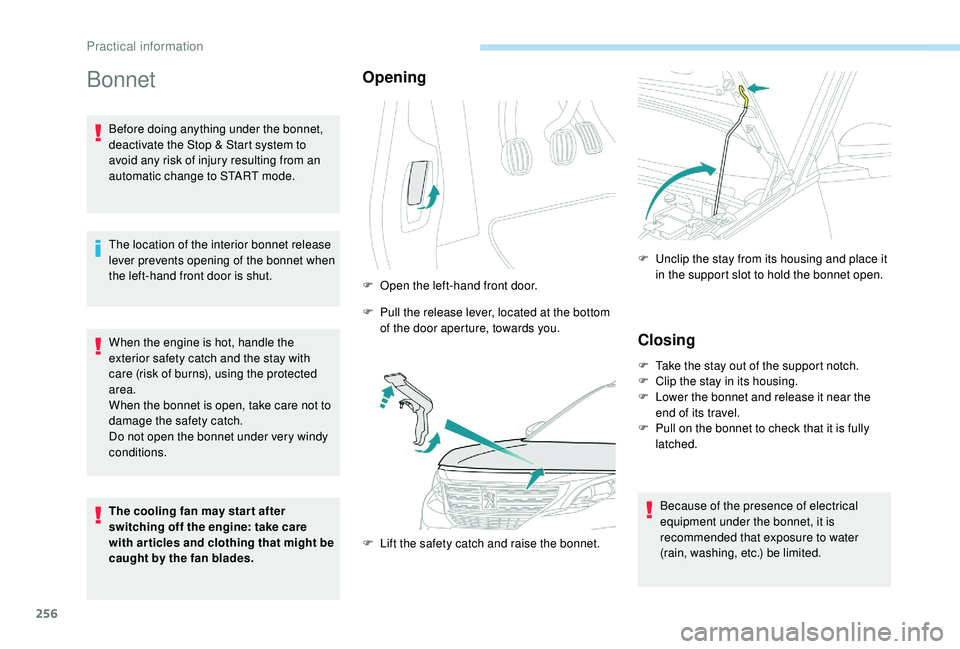
Opening
F Open the left-hand front door.
F
P
ull the release lever, located at the bottom
of the door aperture, towards you.
F
L
ift the safety catch and raise the bonnet. F
U
nclip the stay from its housing and place it
in the support slot to hold the bonnet open.
Closing
F Take the stay out of the support notch.
F C lip the stay in its housing.
F
L
ower the bonnet and release it near the
end of its travel.
F
P
ull on the bonnet to check that it is fully
latched.
Because of the presence of electrical
equipment under the bonnet, it is
recommended that exposure to water
(rain, washing, etc.) be limited.
Practical information
Page 260 of 404
258
Checking levels
Check all of these levels regularly, in line with
the manufacturer's service schedule. Top them
up if necessary, unless other wise indicated.
If a level drops significantly, have the
corresponding system checked by a PEUGEOT
dealer or a qualified workshop.Take care when working under the bonnet,
as certain areas of the engine may be
extremely hot (risk of burns) and the
cooling fan could start at any time (even
with the ignition off).
Used products
Avoid prolonged contact of used oil or
fluids with the skin.
Most of these fluids are harmful to health
or indeed very corrosive.Do not discard used oil or fluids into
sewers or onto the ground.
Take used oil to a PEUGEOT dealer
or a qualified workshop and dispose
of it in the containers reser ved for this
purpose.
Engine oil level
The check is carried out either when
the ignition is switched on using the
oil level indicator in the instrument
panel for vehicles equipped with an
electric gauge, or using the dipstick.
To ensure that the reading is correct, your
vehicle must be parked on a level sur face
with the engine stopped for more than
30
minutes.
It is normal to top up the oil level between
two ser vices (or oil changes). PEUGEOT
recommends that you check the level, and top
up if necessary, every 3,000
miles (5,000 km).
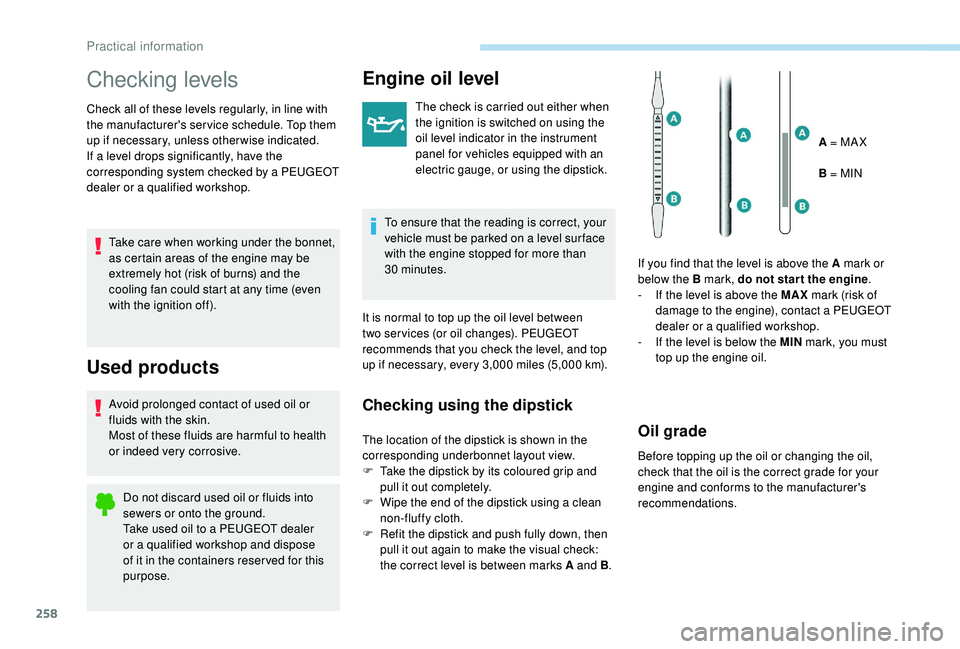
Checking using the dipstick
The location of the dipstick is shown in the
corresponding underbonnet layout view.
F
T
ake the dipstick by its coloured grip and
pull it out completely.
F
W
ipe the end of the dipstick using a clean
non-fluffy cloth.
F
R
efit the dipstick and push fully down, then
pull it out again to make the visual check:
the correct level is between marks A and B .A = MA X
B = MIN
If you find that the level is above the A mark or
below the B mark, do not star t the engine .
-
I
f the level is above the MAX
mark (risk of
damage to the engine), contact a PEUGEOT
dealer or a qualified workshop.
-
I
f the level is below the MIN
mark, you must
top up the engine oil.Oil grade
Before topping up the oil or changing the oil,
check that the oil is the correct grade for your
engine and conforms to the manufacturer's
recommendations.
Practical information