2017 PEUGEOT 5008 ignition
[x] Cancel search: ignitionPage 233 of 404
231
The sound emitted by the speaker (front or
rear) indicates whether the obstacle is in
front or behind.
Deactivation / Activation
The system is activated or deactivated via the
vehicle parameters menu in the screen.
The state of the system stays in the memory
when the ignition is switched off.The system will be deactivated
automatically if a trailer is being towed or a
bicycle carrier is fitted on a towbar (vehicle
fitted with a towbar installed in line with
the manufacturer's recommendations).
The parking sensors are deactivated while the
Park Assist system is measuring a space.
For more information on Park Assist , refer to
the corresponding section.
Operating fault
If a fault occurs when shifting
to reverse, this warning lamp
comes on in the instrument panel,
accompanied by a message and an
audible signal (short beep).
Contact a PEUGEOT dealer or a qualified
workshop to have the system checked.
High pressure jet wash
When washing your vehicle, direct the
lance at least 30
cm away from the
sensors. In bad or wintry weather, ensure that the
sensors are not covered with mud, ice or
snow. When reverse gear is engaged, an
audible signal (long beep) indicates that
the sensors may be dirty.
Certain sound sources (motorcycle,
lorry, pneumatic drill, etc.) may trigger
the audible signals of the parking sensor
system.
Visiopark 1 - Visiopark 2
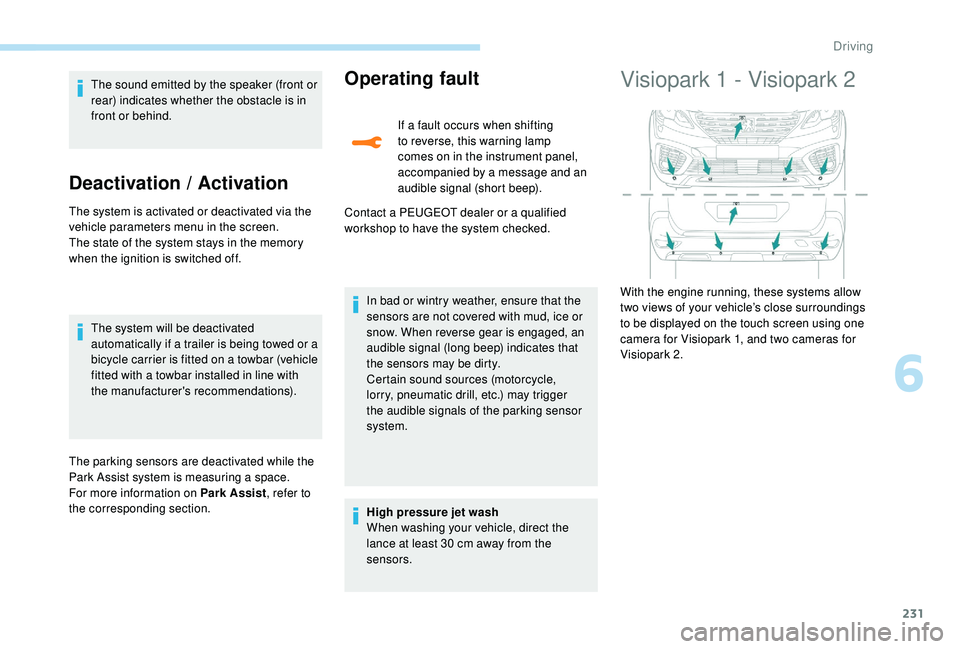
With the engine running, these systems allow
two views of your vehicle’s close surroundings
to be displayed on the touch screen using one
camera for Visiopark 1, and two cameras for
Visiopark 2.
6
Driving
Page 234 of 404
232
The state of the system is not kept in memory
when the ignition is switched off.
Principle of operation
Using one or two cameras, the near
surroundings of the vehicle are recorded whilst
manoeuvring at low speed.
An image from above your vehicle in its near
surroundings is created in real time, as the
vehicle progresses.
This representation facilitates the alignment of
your vehicle when parking and allows obstacles
close to the vehicle to be seen.
This image is automatically deleted if the
vehicle remains stationary for too long.
With Visiopark 2, the image is created using
both cameras, when going for ward and when
reversing.
When the function is activated, it is possible
that the central view is not displayed. If the
system is activated after the vehicle has
already been driven, the central view may be
completely displayed.
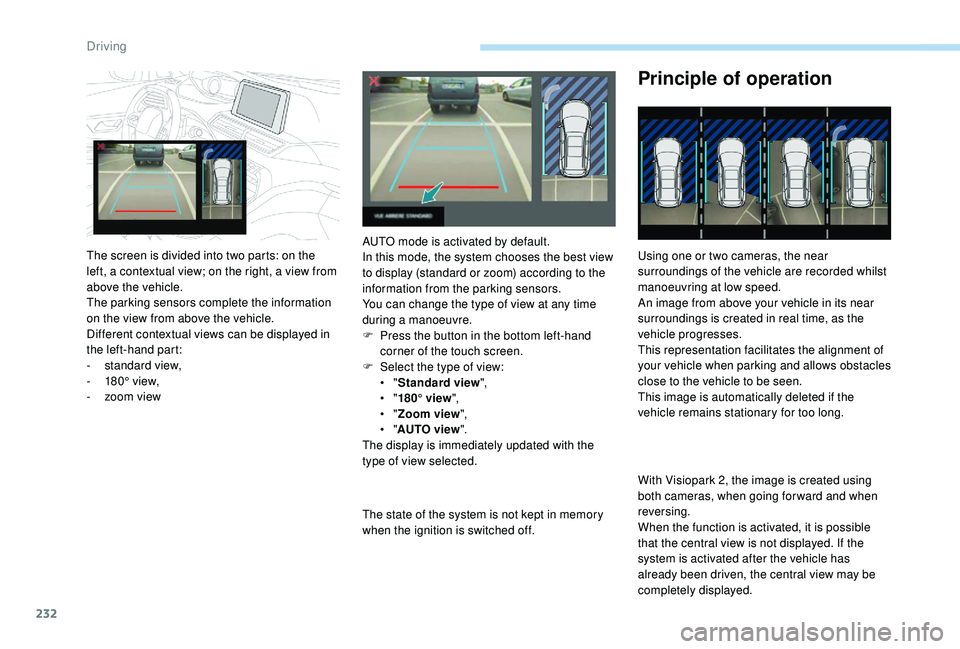
The screen is divided into two parts: on the
left, a contextual view; on the right, a view from
above the vehicle.
The parking sensors complete the information
on the view from above the vehicle.
Different contextual views can be displayed in
the left-hand part:
-
s
tandard view,
-
1
80° view,
-
z
oom view AUTO mode is activated by default.
In this mode, the system chooses the best view
to display (standard or zoom) according to the
information from the parking sensors.
You can change the type of view at any time
during a manoeuvre.
F
P
ress the button in the bottom left-hand
corner of the touch screen.
F
Sel
ect the type of view:
•
" Standard view ",
•
" 180° view ",
•
" Zoom view ",
•
" AUTO view ".
The display is immediately updated with the
type of view selected.
Driving
Page 245 of 404
243
Deactivation
The system is deactivated by pressing the
control.
The system is deactivated automatically:
-
o
n switching off the ignition,
-
i
f the engine stalls,
-
i
f no manoeuvre is per formed within
5
minutes of selecting the type of
manoeuvre
-
a
fter a prolonged stop of the vehicle during
a manoeuvre,
-
i
f the road wheel anti-slip regulation (ASR)
is triggered,
-
i
f the speed of the vehicle exceeds the
stated limit,
-
w
hen the driver interrupts movement of the
steering wheel,
-
a
fter 4 manoeuvre cycles,
-
o
n opening the driver's door,
-
i
f one of the front wheels encounters an
obstacle.
The indicator lamp in the instrument panel goes
off and a message is displayed accompanied
by an audible signal.
The driver should then take back control of the
vehicle's steering.
If the system is deactivated during a
manoeuvre, the driver should reactivate it
to repeat the measurement.
Deactivation
The system is switched off automatically:
- w hen towing a trailer, connected electrically,
-
i
f the driver's door is opened,
-
i
f the speed of the vehicle is above 45 mph
(70
km/h).
To switch the system off for a prolonged period,
contact a PEUGEOT dealer or a qualified
workshop.
Operating faults
In the event of a fault, this warning
lamp flashes for a few seconds,
accompanied by an audible signal.
If the fault occurs during the use of the system,
the warning lamp goes off.
In the event of a fault with the
power steering, this warning lamp
flashes in the instrument panel,
accompanied by a message.
Contact a PEUGEOT dealer or a qualified
workshop. If the lateral distance between your vehicle
and the space is too great, the system may
not be able to measure the space.
Any object projecting beyond the
dimensions of the vehicle (e.g. a ladder on
the roof or a towball) will not be taken into
account by the Park Assist system during a
manoeuvre.
In bad weather or in winter, ensure that
the sensors are not covered by road dirt,
ice or snow.
In the event of a fault, have the system
checked by a PEUGEOT dealer or a
qualified workshop.
High pressure jet washing
When washing your vehicle, keep the lance at
least 12
inches (30 cm) away from the sensors.
6
Driving
Page 247 of 404
245
Fuel
Fuel tank capacity: approximately 56 litres.
R eser ve level: 6 litres.
Low fuel level
When the low fuel level is reached
in the fuel tank, this warning lamp
comes on in the instrument panel,
accompanied by the display of a
message and an audible signal.
When it first comes on, about
6
litres of fuel is left in the tank.
Until sufficient fuel is added, this warning lamp
appears every time the ignition is switched on,
accompanied by the display of a message and
an audible signal. When driving, this message
and audible signal are repeated with increasing
frequency as the fuel level drops towards 0 .
Refuel as soon as possible to avoid running out
of fuel.
For more information on Running out of fuel
(Diesel) , refer to the corresponding section.
If your vehicle is fitted with Stop & Start,
never refuel with the engine in STOP
mode; you must switch off the ignition
using the key, or the START/STOP button
if your vehicle has
K
eyless Entry and
Starting.
Refuelling
If you have put in the wrong fuel for your
vehicle, you must have the fuel tank
drained and filled with the correct fuel
before starting the engine.
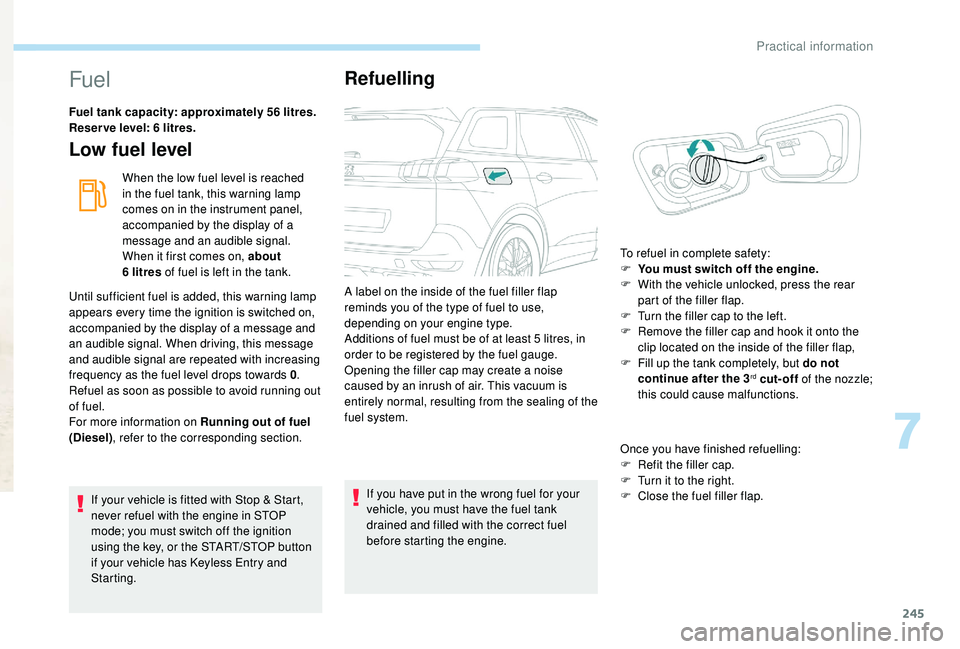
A label on the inside of the fuel filler flap
reminds you of the type of fuel to use,
depending on your engine type.
Additions of fuel must be of at least 5
litres, in
order to be registered by the fuel gauge.
Opening the filler cap may create a noise
caused by an inrush of air. This vacuum is
entirely normal, resulting from the sealing of the
fuel system.
Once you have finished refuelling:
F
R
efit the filler cap.
F T urn it to the right.
F C lose the fuel filler flap.
To refuel in complete safety:
F
Y
ou must switch off the engine.
F
W
ith the vehicle unlocked, press the rear
part of the filler flap.
F
T
urn the filler cap to the left.
F
R
emove the filler cap and hook it onto the
clip located on the inside of the filler flap,
F
F
ill up the tank completely, but do not
continue after the 3
rd cut-off of the nozzle;
this could cause malfunctions.
7
Practical information
Page 260 of 404
258
Checking levels
Check all of these levels regularly, in line with
the manufacturer's service schedule. Top them
up if necessary, unless other wise indicated.
If a level drops significantly, have the
corresponding system checked by a PEUGEOT
dealer or a qualified workshop.Take care when working under the bonnet,
as certain areas of the engine may be
extremely hot (risk of burns) and the
cooling fan could start at any time (even
with the ignition off).
Used products
Avoid prolonged contact of used oil or
fluids with the skin.
Most of these fluids are harmful to health
or indeed very corrosive.Do not discard used oil or fluids into
sewers or onto the ground.
Take used oil to a PEUGEOT dealer
or a qualified workshop and dispose
of it in the containers reser ved for this
purpose.
Engine oil level
The check is carried out either when
the ignition is switched on using the
oil level indicator in the instrument
panel for vehicles equipped with an
electric gauge, or using the dipstick.
To ensure that the reading is correct, your
vehicle must be parked on a level sur face
with the engine stopped for more than
30
minutes.
It is normal to top up the oil level between
two ser vices (or oil changes). PEUGEOT
recommends that you check the level, and top
up if necessary, every 3,000
miles (5,000 km).
Checking using the dipstick
The location of the dipstick is shown in the
corresponding underbonnet layout view.
F
T
ake the dipstick by its coloured grip and
pull it out completely.
F
W
ipe the end of the dipstick using a clean
non-fluffy cloth.
F
R
efit the dipstick and push fully down, then
pull it out again to make the visual check:
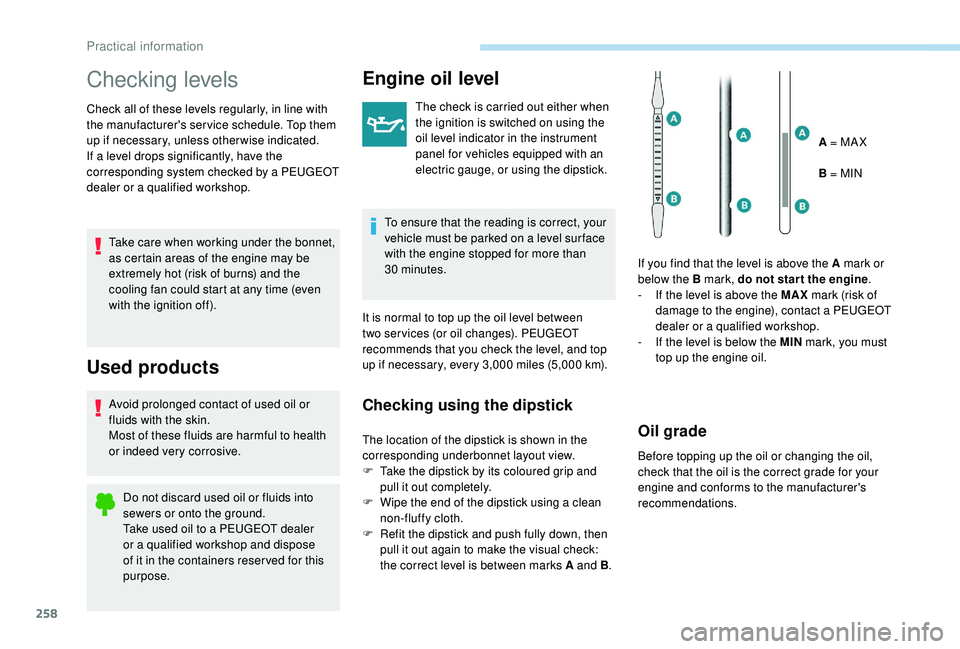
the correct level is between marks A and B .A = MA X
B = MIN
If you find that the level is above the A mark or
below the B mark, do not star t the engine .
-
I
f the level is above the MAX
mark (risk of
damage to the engine), contact a PEUGEOT
dealer or a qualified workshop.
-
I
f the level is below the MIN
mark, you must
top up the engine oil.Oil grade
Before topping up the oil or changing the oil,
check that the oil is the correct grade for your
engine and conforms to the manufacturer's
recommendations.
Practical information
Page 261 of 404
259
Topping up the engine oil level
The location of the oil filler cap is shown in the
corresponding underbonnet layout view.
F
U
nscrew the oil filler cap to access the filler
opening.
F
A
dd oil in small quantities, avoiding any
spills on engine components (risk of fire).
F
W
ait a few minutes before checking the
level again using the dipstick.
F
A
dd more oil if necessary.
F
A
fter checking the level, carefully refit the oil
filler cap and the dipstick in its tube.
After topping up the oil, the check when
switching on the ignition with the oil level
indicator in the instrument panel is not
valid during the 30
minutes after topping
up.
Engine oil change
Refer to the manufacturer's service schedule
for details of the inter val for this operation.
In order to maintain the reliability of the engine
and emissions control system, never use
additives in the engine oil.
Brake fluid level
The fluid level should be close to the
"MA X" mark. If it is not, check the
brake pad wear.
Changing the coolant
Refer to the manufacturer's service schedule
for details of the inter val for this operation.
Fluid specification
This fluid must conform to the manufacturer's
recommendations.
Coolant level
Check the coolant level regularly.
It is normal to top up the fluid
between two services.
The check and top-up must only be done with
the engine cold.
A low coolant level presents a risk of serious
damage to your engine.
The coolant level should be close to the "MA X"
mark but should never exceed it.
If the level is close to or below the "MIN" mark,
it is essential to top up. When the engine is hot, the temperature of the
coolant is regulated by the fan.
In addition, as the cooling system is
pressurised, wait at least one hour after
switching off the engine before carrying out any
work.
To avoid the risk of scalding when you need to
top up in an emergency, place a cloth around
the cap and unscrew the cap by two turns to
allow the pressure to drop.
Once the pressure has dropped, remove the
cap and top up to the required level.
The cooling fan may star t after
switching off the engine: take care
with articles and clothing that might be
caught by the fan blades.Fluid specification
This fluid must conform to the manufacturer's
recommendations.
Screenwash fluid level
Top up to the required level when
necessary.
7
Practical information
Page 266 of 404
264
Never top up from an AdBlue® dispenser
reserved for heavy goods vehicles.
Recommendations on storage
AdBlue® freezes below around -11°C and
deteriorates above 25°C. It is recommended
that bottles or containers be stored in a cool
place and protected from direct sunlight.
Under these conditions, the fluid can be kept
for at least a year.
If the additive has frozen, it can be used once it
has completely thawed out.
Never store containers or bottles of
AdBlue
® in your vehicle.
Do not dispose of AdBlue
® bottles or
containers in the household waste.
Place them in a container provided
for this purpose or take them to your
dealer.
Procedure
In cold weather, before per forming the top-up
ensure that the temperature of the vehicle is
above -11°C. Other wise the AdBlue
® may be
frozen and so cannot be poured into its tank.
Park your vehicle in a warmer area for a few
hours to allow the top-up to be carried out.
F
B
efore topping up, ensure that the vehicle is
parked on a flat and level sur face.
F
S
witch off the ignition to stop the engine
and remove the key from the switch.
or
F
W
ith
K
eyless Entry and Starting, press the
" START/STOP " button to stop the engine.
F
W
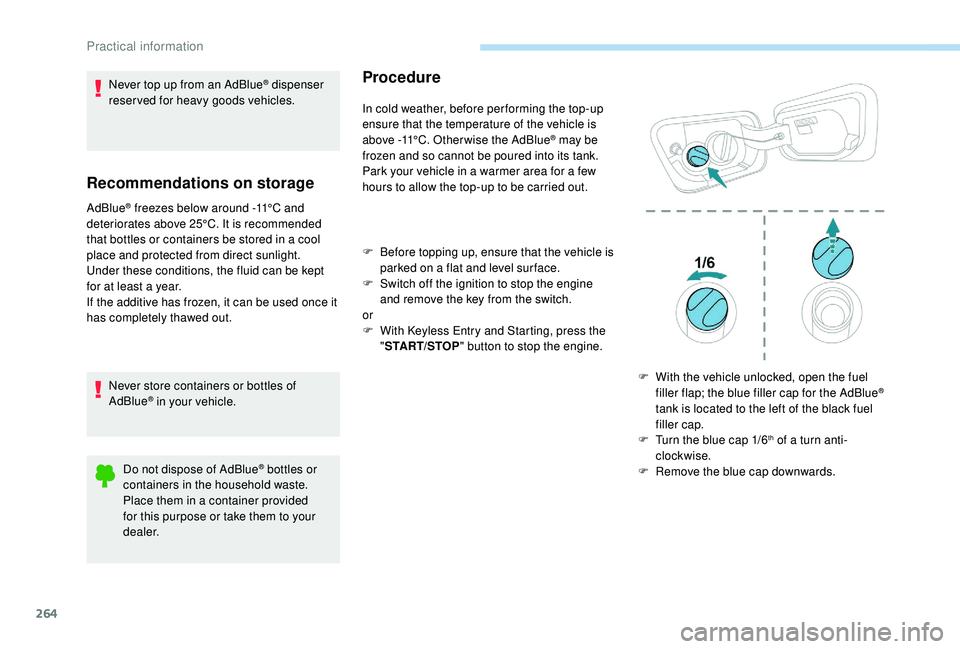
ith the vehicle unlocked, open the fuel
filler flap; the blue filler cap for the AdBlue
®
tank is located to the left of the black fuel
filler cap.
F
T
urn the blue cap 1/6
th of a turn anti-
clockwise.
F
R
emove the blue cap downwards.
Practical information
Page 268 of 404
266
Warning triangle
As a safety precaution, before leaving your
vehicle to set up and install the triangle, switch
on the hazard warning lamps and put on your
high visibility vest.
Storage compartmentAssembling the triangle
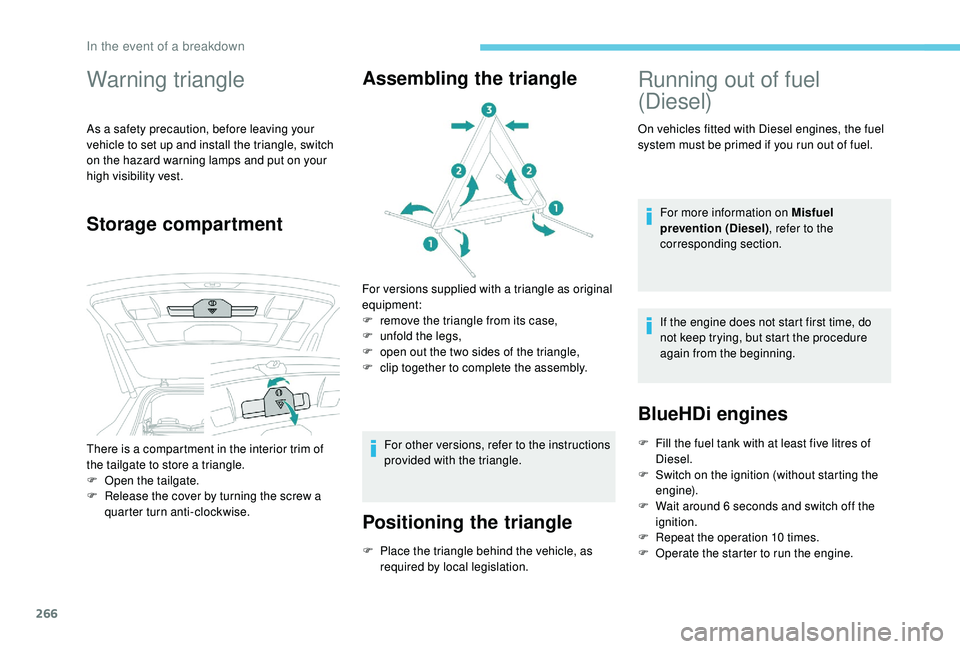
For versions supplied with a triangle as original
equipment:
F
r
emove the triangle from its case,
F
u
nfold the legs,
F
o
pen out the two sides of the triangle,
F
c
lip together to complete the assembly.
For other versions, refer to the instructions
provided with the triangle.
Positioning the triangle
F Place the triangle behind the vehicle, as required by local legislation.
There is a compartment in the interior trim of
the tailgate to store a triangle.
F
O
pen the tailgate.
F
R
elease the cover by turning the screw a
quarter turn anti-clockwise.
Running out of fuel
(Diesel)
On vehicles fitted with Diesel engines, the fuel
system must be primed if you run out of fuel.
For more information on Misfuel
prevention (Diesel) , refer to the
corresponding section.
If the engine does not start first time, do
not keep trying, but start the procedure
again from the beginning.
BlueHDi engines
F Fill the fuel tank with at least five litres of Diesel.
F
S
witch on the ignition (without starting the
engine).
F
W
ait around 6 seconds and switch off the
ignition.
F
R
epeat the operation 10
times.
F
O
perate the starter to run the engine.
In the event of a breakdown