2017 PEUGEOT 5008 ESP
[x] Cancel search: ESPPage 237 of 404
235
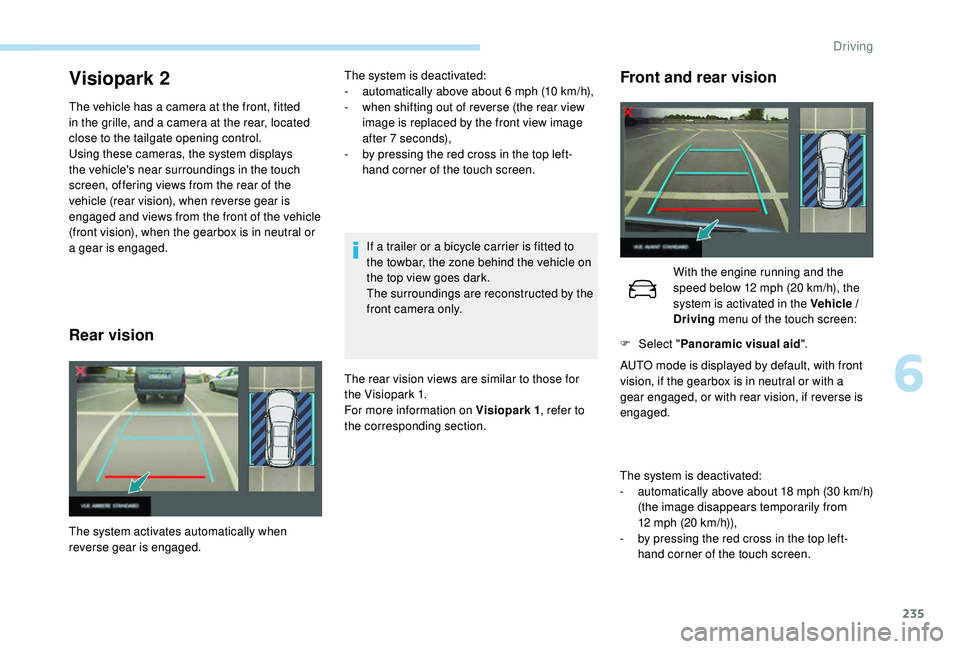
Visiopark 2
The vehicle has a camera at the front, fitted
in the grille, and a camera at the rear, located
close to the tailgate opening control.
Using these cameras, the system displays
the vehicle's near surroundings in the touch
screen, offering views from the rear of the
vehicle (rear vision), when reverse gear is
engaged and views from the front of the vehicle
(front vision), when the gearbox is in neutral or
a gear is engaged.
Rear vision
If a trailer or a bicycle carrier is fitted to
the towbar, the zone behind the vehicle on
the top view goes dark.
The surroundings are reconstructed by the
front camera only.
The rear vision views are similar to those for
the Visiopark 1.
For more information on Visiopark 1 , refer to
the corresponding section.
The system activates automatically when
reverse gear is engaged. The system is deactivated:
-
a
utomatically above about 6 mph (10 km/h),
-
w
hen shifting out of reverse (the rear view
image is replaced by the front view image
after 7
seconds),
-
b
y pressing the red cross in the top left-
hand corner of the touch screen.
Front and rear vision
The system is deactivated:
- a utomatically above about 18 mph (30 km/h)
(the image disappears temporarily from
12
mph (20 km/h)),
-
b
y pressing the red cross in the top left-
hand corner of the touch screen. With the engine running and the
speed below 12
mph (20 km/h), the
system is activated in the Vehicle /
Driving menu of the touch screen:
F
Sel
ect "
Panoramic visual aid ".
AUTO mode is displayed by default, with front
vision, if the gearbox is in neutral or with a
gear engaged, or with rear vision, if reverse is
engaged.
6
Driving
Page 238 of 404
236
AUTO modeStandard viewZoom view
Obstacles may appear further away than
they actually are in reality.
It is important to check the sides of the
vehicle during the manoeuvre, using the
mirrors.
The front and rear parking sensors also
provide information on the vehicle's
surroundings.
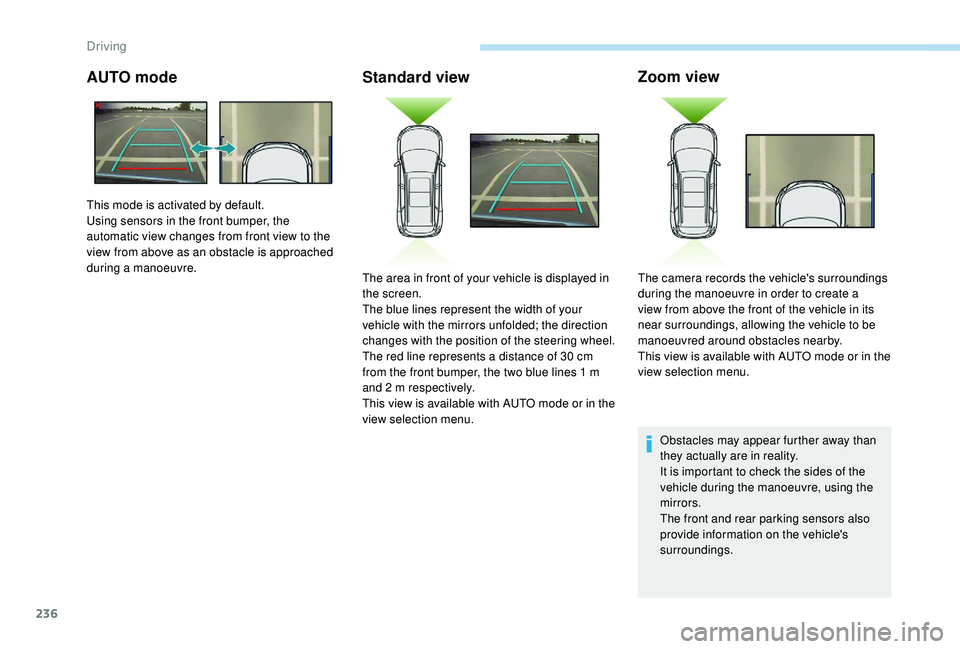
This mode is activated by default.
Using sensors in the front bumper, the
automatic view changes from front view to the
view from above as an obstacle is approached
during a manoeuvre.
The area in front of your vehicle is displayed in
the screen.
The blue lines represent the width of your
vehicle with the mirrors unfolded; the direction
changes with the position of the steering wheel.
The red line represents a distance of 30
cm
from the front bumper, the two blue lines 1
m
and 2
m respectively.
This view is available with AUTO mode or in the
view selection menu. The camera records the vehicle's surroundings
during the manoeuvre in order to create a
view from above the front of the vehicle in its
near surroundings, allowing the vehicle to be
manoeuvred around obstacles nearby.
This view is available with AUTO mode or in the
view selection menu.
Driving
Page 244 of 404
242
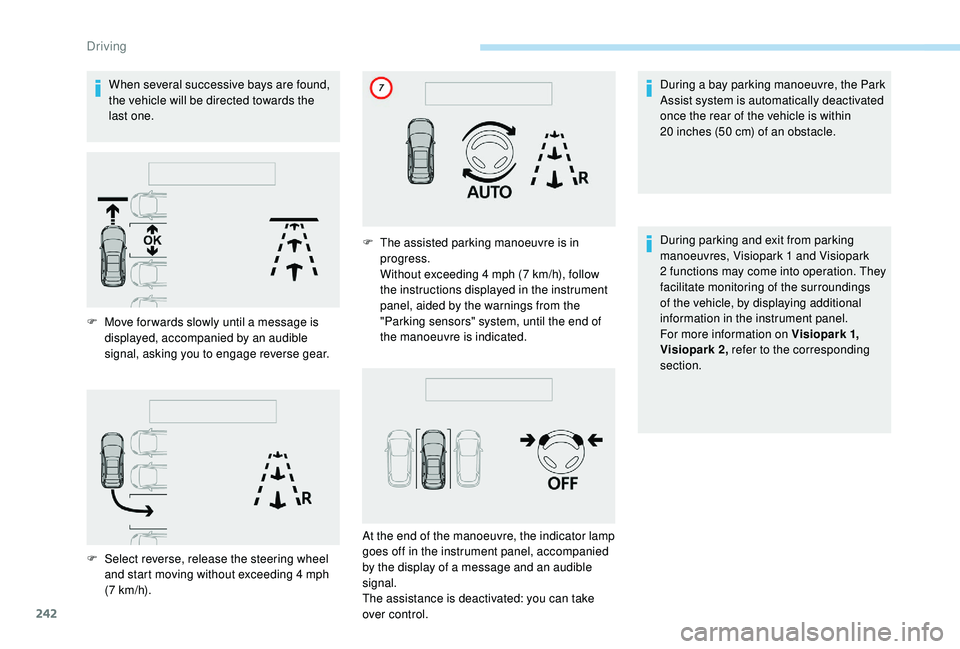
When several successive bays are found,
the vehicle will be directed towards the
last one.During a bay parking manoeuvre, the Park
Assist system is automatically deactivated
once the rear of the vehicle is within
20
inches (50 cm) of an obstacle.
During parking and exit from parking
manoeuvres, Visiopark 1
and Visiopark
2
functions may come into operation. They
facilitate monitoring of the surroundings
of the vehicle, by displaying additional
information in the instrument panel.
For more information on Visiopark 1 ,
Visiopark 2, refer to the corresponding
section.
F
M
ove for wards slowly until a message is
displayed, accompanied by an audible
signal, asking you to engage reverse gear.
F
S
elect reverse, release the steering wheel
and start moving without exceeding 4
mph
(7
km/h). F
T
he assisted parking manoeuvre is in
progress.
W
ithout exceeding 4 mph (7 km/h), follow
the instructions displayed in the instrument
panel, aided by the warnings from the
"Parking sensors" system, until the end of
the manoeuvre is indicated.
At the end of the manoeuvre, the indicator lamp
goes off in the instrument panel, accompanied
by the display of a message and an audible
signal.
The assistance is deactivated: you can take
over control.
Driving
Page 247 of 404
245
Fuel
Fuel tank capacity: approximately 56 litres.
R eser ve level: 6 litres.
Low fuel level
When the low fuel level is reached
in the fuel tank, this warning lamp
comes on in the instrument panel,
accompanied by the display of a
message and an audible signal.
When it first comes on, about
6
litres of fuel is left in the tank.
Until sufficient fuel is added, this warning lamp
appears every time the ignition is switched on,
accompanied by the display of a message and
an audible signal. When driving, this message
and audible signal are repeated with increasing
frequency as the fuel level drops towards 0 .
Refuel as soon as possible to avoid running out
of fuel.
For more information on Running out of fuel
(Diesel) , refer to the corresponding section.
If your vehicle is fitted with Stop & Start,
never refuel with the engine in STOP
mode; you must switch off the ignition
using the key, or the START/STOP button
if your vehicle has
K
eyless Entry and
Starting.
Refuelling
If you have put in the wrong fuel for your
vehicle, you must have the fuel tank
drained and filled with the correct fuel
before starting the engine.
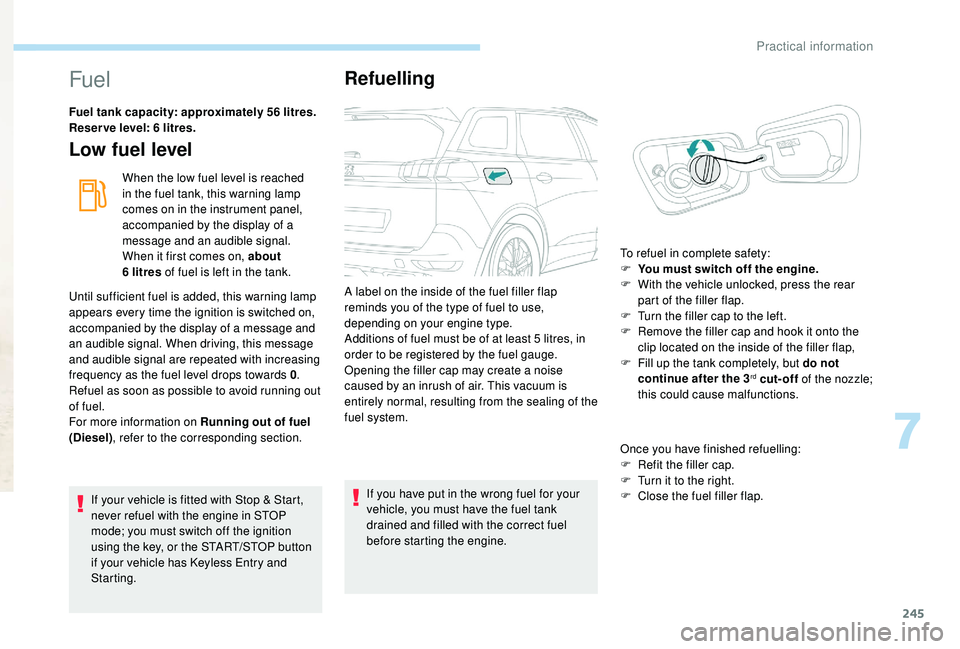
A label on the inside of the fuel filler flap
reminds you of the type of fuel to use,
depending on your engine type.
Additions of fuel must be of at least 5
litres, in
order to be registered by the fuel gauge.
Opening the filler cap may create a noise
caused by an inrush of air. This vacuum is
entirely normal, resulting from the sealing of the
fuel system.
Once you have finished refuelling:
F
R
efit the filler cap.
F T urn it to the right.
F C lose the fuel filler flap.
To refuel in complete safety:
F
Y
ou must switch off the engine.
F
W
ith the vehicle unlocked, press the rear
part of the filler flap.
F
T
urn the filler cap to the left.
F
R
emove the filler cap and hook it onto the
clip located on the inside of the filler flap,
F
F
ill up the tank completely, but do not
continue after the 3
rd cut-off of the nozzle;
this could cause malfunctions.
7
Practical information
Page 249 of 404
247
For more information, contact a PEUGEOT
dealer or a qualified workshop.The use of any other type of (bio)fuel
(vegetable or animal oils, pure or diluted,
domestic fuel, etc.) is strictly prohibited
(risk of damage to the engine and fuel
syste m).
The only Diesel additives authorised
for use are those that meet the
B715000
standard.
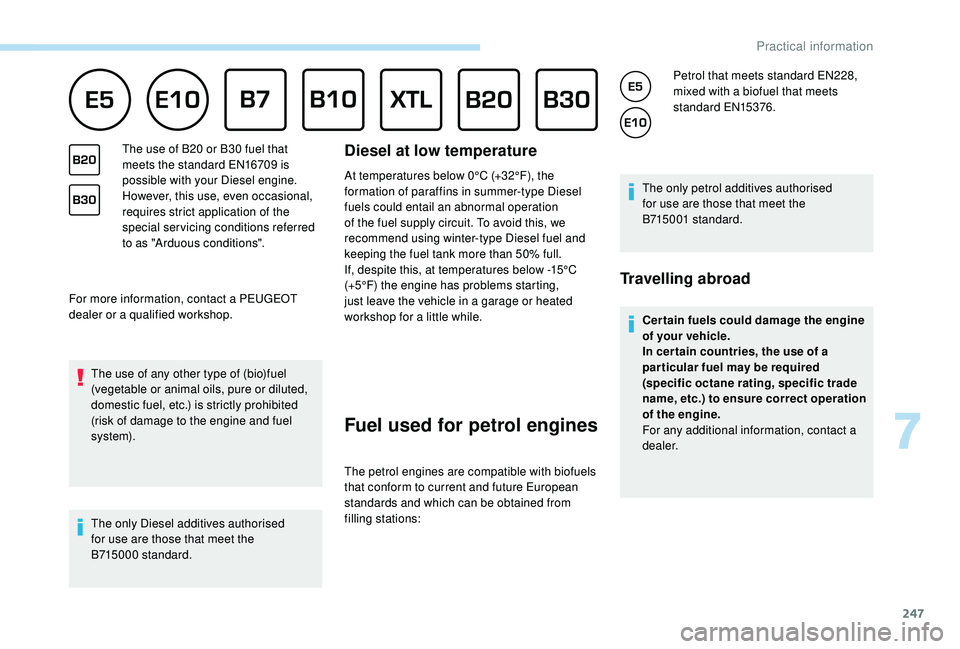
Diesel at low temperatureThe use of B20 or B30 fuel that
m eets the standard EN16709 is
possible with your Diesel engine.
However, this use, even occasional,
requires strict application of the
special servicing conditions referred
to as "Arduous conditions". At temperatures below 0°C (+32°F), the
formation of paraffins in summer-type Diesel
fuels could entail an abnormal operation
of the fuel supply circuit. To avoid this, we
recommend using winter-type Diesel fuel and
keeping the fuel tank more than 50% full.
If, despite this, at temperatures below -15°C
(+5°F) the engine has problems starting,
just leave the vehicle in a garage or heated
workshop for a little while.
Fuel used for petrol engines
The petrol engines are compatible with biofuels
that conform to current and future European
standards and which can be obtained from
filling stations: Petrol that meets standard EN228,
mixed with a biofuel that meets
standard EN15376.
The only petrol additives authorised
for use are those that meet the
B715001
standard.
Travelling abroad
Cer tain fuels could damage the engine
of your vehicle.
In cer tain countries, the use of a
par ticular fuel may be required
(specific octane rating, specific trade
name, etc.) to ensure correct operation
of the engine.
For any additional information, contact a
dealer.
7
Practical information
Page 250 of 404
248
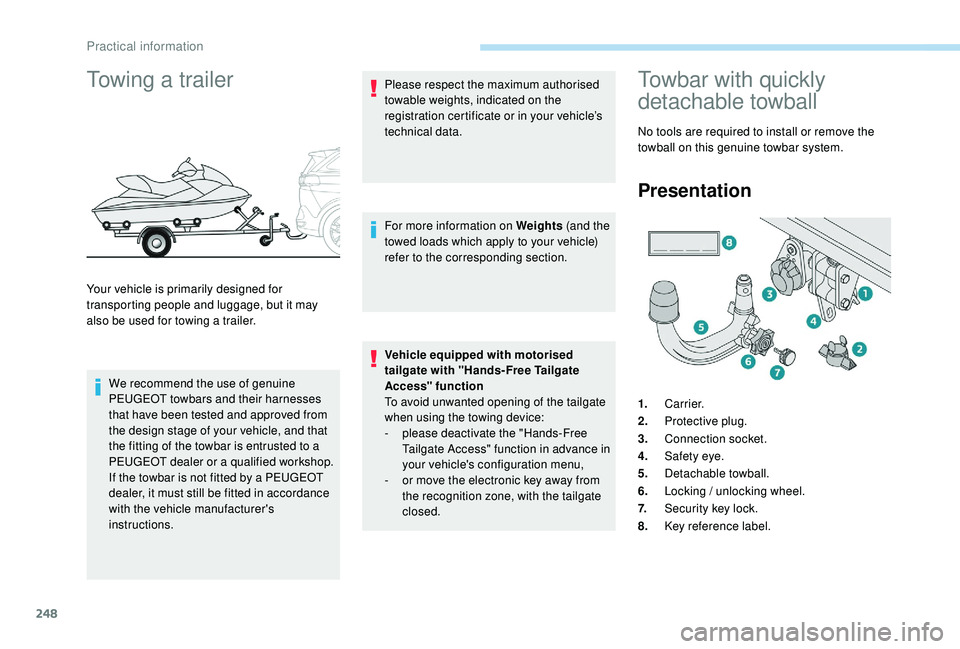
Towing a trailer
Your vehicle is primarily designed for
transporting people and luggage, but it may
also be used for towing a trailer.We recommend the use of genuine
PEUGEOT towbars and their harnesses
that have been tested and approved from
the design stage of your vehicle, and that
the fitting of the towbar is entrusted to a
PEUGEOT dealer or a qualified workshop.
If the towbar is not fitted by a PEUGEOT
dealer, it must still be fitted in accordance
with the vehicle manufacturer's
instructions. Please respect the maximum authorised
towable weights, indicated on the
registration certificate or in your vehicle’s
technical data.
For more information on Weights
(and the
towed loads which apply to your vehicle)
refer to the corresponding section.
Vehicle equipped with motorised
tailgate with "Hands-Free Tailgate
Access" function
To avoid unwanted opening of the tailgate
when using the towing device:
-
p
lease deactivate the "Hands-Free
Tailgate Access" function in advance in
your vehicle's configuration menu,
-
o
r move the electronic key away from
the recognition zone, with the tailgate
closed.
Towbar with quickly
detachable towball
No tools are required to install or remove the
towball on this genuine towbar system.
Presentation
1. Carrier.
2. Protective plug.
3. Connection socket.
4. Safety eye.
5. Detachable towball.
6. Locking / unlocking wheel.
7. Security key lock.
8. Key reference label.
Practical information
Page 251 of 404
249
Trailers with LED lamps are not
compatible with the wiring harness of this
device.
To know the technical features, and in
particular the towable weights for your
vehicle, refer to the corresponding section.
For advice on driving safely when To w i n g
a trailer , refer to the corresponding
section.
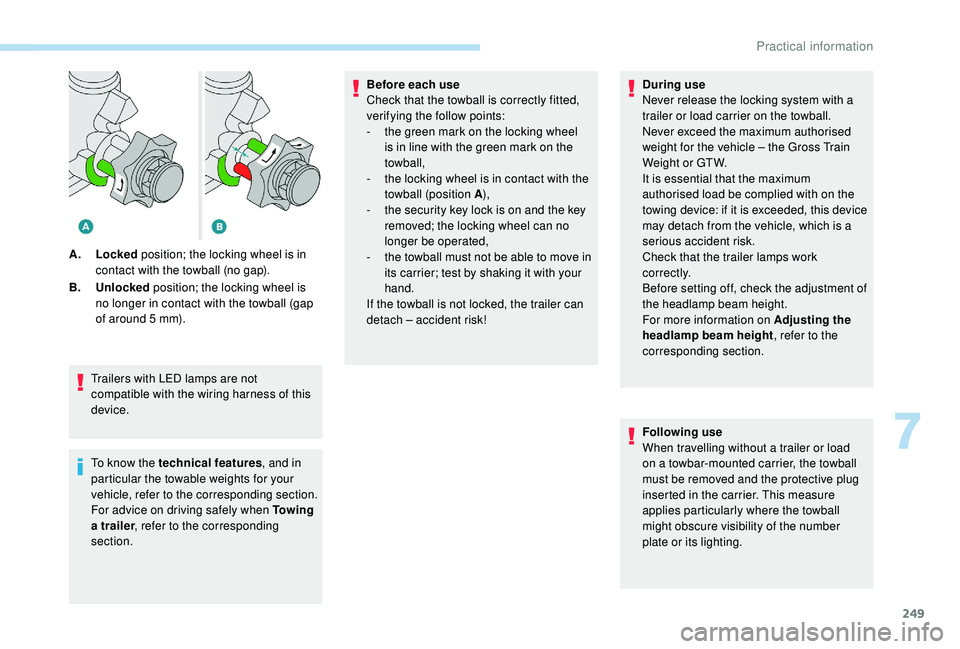
A.
Locked position; the locking wheel is in
contact with the towball (no gap).
B. Unlocked position; the locking wheel is
no longer in contact with the towball (gap
of around 5 mm). Before each use
Check that the towball is correctly fitted,
verifying the follow points:
-
t
he green mark on the locking wheel
is in line with the green mark on the
towball,
-
t
he locking wheel is in contact with the
towball (position A ),
-
t
he security key lock is on and the key
removed; the locking wheel can no
longer be operated,
-
t
he towball must not be able to move in
its carrier; test by shaking it with your
hand.
If the towball is not locked, the trailer can
detach – accident risk! During use
Never release the locking system with a
trailer or load carrier on the towball.
Never exceed the maximum authorised
weight for the vehicle – the Gross Train
Weight or GTW.
It is essential that the maximum
authorised load be complied with on the
towing device: if it is exceeded, this device
may detach from the vehicle, which is a
serious accident risk.
Check that the trailer lamps work
c o r r e c t l y.
Before setting off, check the adjustment of
the headlamp beam height.
For more information on Adjusting the
headlamp beam height
, refer to the
corresponding section.
Following use
When travelling without a trailer or load
on a towbar-mounted carrier, the towball
must be removed and the protective plug
inserted in the carrier. This measure
applies particularly where the towball
might obscure visibility of the number
plate or its lighting.
7
Practical information
Page 254 of 404
252
Apply the label provided to a clearly visible
area, close to the carrier or in the boot.
Go to a PEUGEOT dealer or a qualified
workshop for any work on the towbar
system.
Load reduction mode
System which manages the use of certain
functions according to the level of charge
remaining in the battery.
When the vehicle is being driven, the load
reduction function temporarily deactivates
certain functions, such as air conditioning,
heated rear screen, etc.
The deactivated functions are reactivated
automatically as soon as conditions permit.
Maintenance
Correct operation is only possible if the towball
and its carrier are kept clean.
Before cleaning the vehicle with a high-
pressure jet wash, the towball must be removed
and the protective plug fitted to the carrier.
Energy economy mode
System which manages the duration of use of
certain functions to conser ve a sufficient level
of charge in the battery.
After the engine has stopped, you can still use
functions such as the audio and telematics
system, windscreen wipers, dipped beam
headlamps, courtesy lamps, etc. for a
maximum combined duration of about forty
minutes.
Switching to this mode
A message appears in the instrument panel
screen indicating that the vehicle has switched
to economy mode and the active functions are
put on standby.If a telephone call is being made at this
time, it will be maintained for around
10
minutes with the Bluetooth hands-free
system of your audio system.
Exiting the mode
These functions will be automatically restored
the next time the vehicle is used.
In order to restore the use of these functions
immediately, start the engine and let it run:
-
f
or less than ten minutes, to use the
equipment for approximately five minutes,
-
f
or more than ten minutes, to use the
equipment for up to approximately thirty
minutes.
Let the engine run for the duration specified to
ensure that the battery charge is sufficient.
Do not repeatedly and continuously restart the
engine in order to charge the battery.
A flat battery prevents the engine from
starting.
For more information on the 12
V batter y,
refer to the corresponding section.
Practical information