Page 305 of 368

04
303
4008_en_Chap10c_Mitsu5_ed01-2016
RADIO
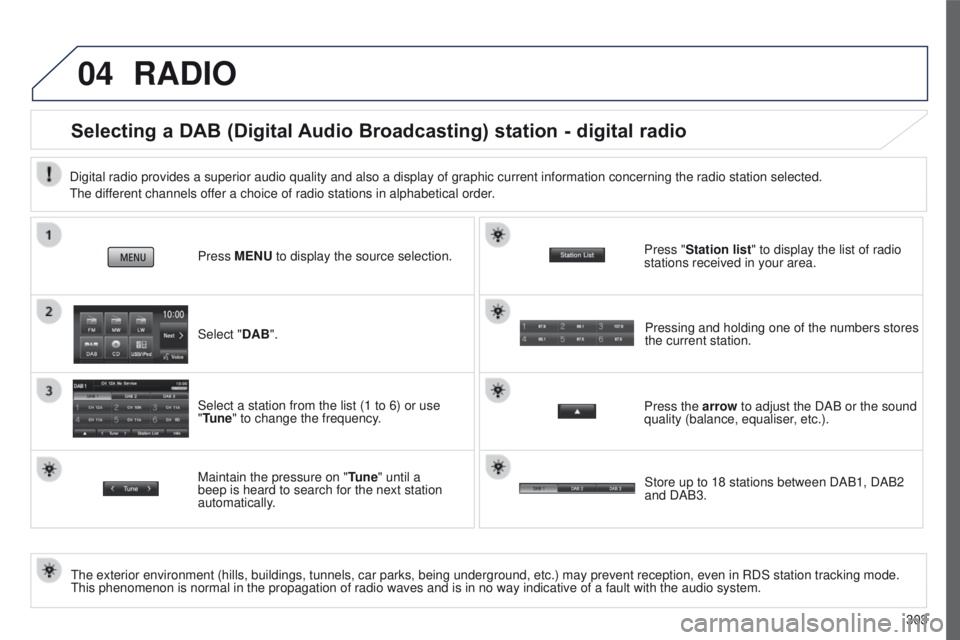
Selecting a DAB (Digital Audio Broadcasting) station - digital radio
the exterior environment (hills, buildings, tunnels, car parks, being un\
derground, etc.) may prevent reception, even in RDS station tracking mo\
de. this phenomenon is normal in the propagation of radio waves and is in no \
way indicative of a fault with the audio system. Select "DAB". Press MENU to display the source selection.
Select a station from the list (1 to 6) or use
"Tune" to change the frequency.
Maintain the pressure on "
Tune" until a
beep is heard to search for the next station
automatically. Press the arrow to adjust the DAB or the sound
quality (balance, equaliser, etc.). Press "Station list
" to display the list of radio
stations received in your area.
Pressing and holding one of the numbers stores
the current station.
Digital radio provides a superior audio quality and also a display of gr\
aphic current information concerning the radio station selected.
t
he different channels offer a choice of radio stations in alphabetical order.
Store up to 18 stations between DAB1, DAB2
and DAB3.
Page 308 of 368
05
306
MUSIC
Using the USB port
With the vehicle stationary, ignition
switch in the LOCK position, connect
a suitable cable to the portable player.
t
he
u
SB port is used to connect
a portable device (MP3 player,
Apple® player, etc.). The files are sent
from the player to your audio system
and heard through the vehicle's
speakers.
t
hen connect the cable to the
vehicle's
u SB port.
u
se only u SB memory sticks in the format FA
t
32 (File Allocation
table).
File formats: MP3, WMA,
AAC, WAV.
-
Maximum number of levels (including root): 8.
-
Number of folders: 100.
-
Number of files: 255.
to protect the system, do not use a
u SB hub.
to disconnect the cable, the ignition switch must be in
the
LOCK position.
take care not to trap the cable when closing the armrest.
Page 309 of 368
05
307
4008_en_Chap10c_Mitsu5_ed01-2016
MUSIC
Using the auxiliary input (AUX)
the auxiliary input allows the
connection of a portable device
(MP3 player
...).
Connect the portable device (MP3 player…) to the RCA sockets
(red and white) using a suitable cable, not supplied.
First adjust the volume of your portable device (to a high level).
t
hen adjust the volume of your audio system.
t
he operation and play is controlled on the portable device. Press the MENU button, then the
"Next" button for access to the
secondary screen, then on " AUX".
Page 310 of 368
05
308
Playing tracks on an iPod®
Connect the iPod® then select "iPod".
Press the MENU button to display the choice of
source.
u
se the "Track" button to select the previous /
next track.
MUSIC
Press and hold " Track" for rewind or fast
forward. Press the arrow to modify the track play mode:
"Repeat": plays the current track repeatedly in
a loop.
"Random/Shuffle
": plays all of the tracks in the
current folder in random order.
"Playback Speed": adjustment of the play
speed (slow, normal, fast).
"Sound control ": settings for balance,
equaliser, etc.
Press "Chapter List" to display the complete
list of audio book chapters.
Press "iPod Menu " to display the list of
categories, then sort.
t
he choice of tracks will then be from the
category chosen.
Page 312 of 368

06
310
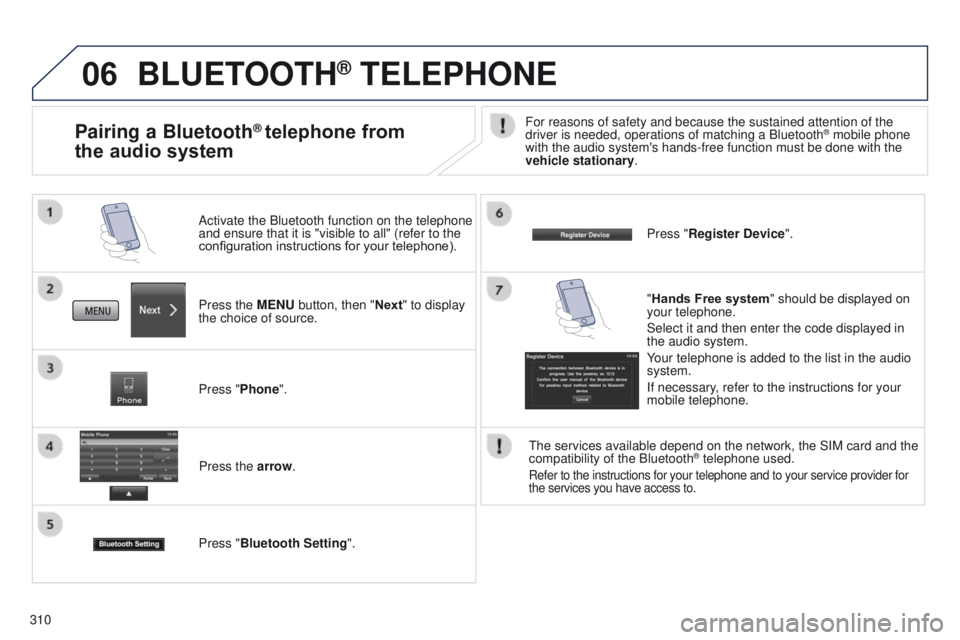
BLUETOOTH® TELEPHONE
Press the MENU button, then "Next" to display
the choice of source. Activate the Bluetooth function on the telephone
and ensure that it is "visible to all" (refer to the
configuration instructions for your telephone).
Press "Phone".Press the arrow.
Press "Bluetooth Setting ". Press "Register Device
".
Pairing a Bluetooth® telephone from
the audio systemFor reasons of safety and because the sustained attention of the
driver is needed, operations of matching a Bluetooth® mobile phone
with the audio system's hands-free function must be done with the
vehicle stationary.
"Hands Free system " should be displayed on
your telephone.
Select it and then enter the code displayed in
the audio system.
Your telephone is added to the list in the audio
system.
If necessary, refer to the instructions for your
mobile telephone.
t
he services available depend on the network, the SIM card and the
compatibility of the Bluetooth
® telephone used.
Refer to the instructions for your telephone and to your service provide\
r for
the services you have access to.
Page 315 of 368
313
4008_en_Chap10d_Mitsu4_ed01-2016
AUDIO-CD system
the system is protected in such a way that it will only
operate in your vehicle.01 First steps - Control panel
For safety reasons, the driver must carry out operations
which require prolonged attention while the vehicle is
stationary.
When the engine is switched off and to prevent
discharging of the battery, the system switches off
following the activation of the energy economy mode.
CONTENTS
02
Steering
mounted controls
03
General
operation
04
Radio
05
Music
media players
06
USB
player
07
BLUETOOTH
® streaming
Error messages p.
p.
p.
p.
p.
p.
p.
p. 314
316
317
319
326
331
333
335
Page 316 of 368
01
314
4008_en_Chap10d_Mitsu4_ed01-2016
Display the track.
Scroll through tracks.
Symbols:
i: iPod
®.
u
:
u
SB.
B: Bluetooth
®.
Random play in the current
folder.
Switch from audio CD
mode to
u
SB / iPod
® and
Bluetooth modes*.
Press and hold to change to
A
u
X mode.
Repeat the current track.
FIRST STEPS
Audio system on / off.
Volume adjustment.
Select radio source.
Select waveband (FW,
MW,
LW).
*
Available according to version.
eject CD. Preset stations, buttons 1 to 6.
Short press: select preset radio
station.
Long press: preset a radio station.
Page 317 of 368
01
315
4008_en_Chap10d_Mitsu4_ed01-2016
FIRST STEPS
Fast back / forwards.P t Y On / Off.
Play the first 10 seconds
of each track in the current
folder.
Selection:
-
automatically of the next
radio frequency down / up.
-
of the previous / next
track. Select previous / next folder (or track).
Adjust audio settings.
Manual search up and down for a radio station / P
t Y.
Function setting mode (AF, R
eg ,
t
P, SCV, ...).
Press: select folder (or track). Search for TP traffic
information.
Play / pause the current track.
Abandon the current
operation, up one level.
Change to
MENU mode.