2017 PEUGEOT 4008 ESP
[x] Cancel search: ESPPage 179 of 368

177
4008_en_Chap07_info-pratiques_ed01-2016
towing a trailer, a caravan, etc.
We recommend the use of genuine
PeugeOt towbars and their harnesses
that have been tested and approved
from the design stage of your vehicle
and that the fitting of the towbar is
entrusted to a P
e
uge
Ot
dealer or a
qualified workshop.
If the towbar is not fitted by a
P
e
uge
Ot
dealer, it is imperative that
it is fitted following the manufacturer's
instructions.
Your vehicle is primarily designed for
transporting people and luggage, but it may
also be used for towing a trailer.
Driving with a trailer subjects the towing vehicle
to more significant stress and its driver must be
particularly careful.
For more advice on driving when towing, refer
to the corresponding section.
For more information on Petrol weights
or
Diesel weights and in particular the towed
loads which apply to your vehicle, refer to the
corresponding section.
ta
ke care to comply with the gross train
weights indicated on the registration certificate
or in the technical data for your vehicle.
7
Practical information
Page 180 of 368

178
4008_en_Chap07_info-pratiques_ed01-2016
Advice on driving when towing
Distribution of loads
F Distribute the load in the trailer so that the heaviest items are as close as possible to
the axle and the nose weight approaches
the maximum permitted without exceeding
it.
Air density decreases with altitude, thus
reducing engine performance. Above
1
000 metres, the maximum towing load must
be reduced by 10
% of the gt
W a
nd so on for
every 1
000 metres of altitude.
For more information on Petrol weights or
Diesel weights and in particular the towed
loads which apply to your vehicle, refer to the
corresponding section.
Side wind
F take into account the increased sensitivity to side wind.
Cooling
towing a trailer on a slope increases the
temperature of the coolant.
As the fan is electrically controlled, its cooling
capacity is not dependent on the engine speed.
F
t
o l
ower the engine speed, reduce your
speed.
th
e maximum towed load on a long slope
depends on the gradient and the exterior
temperature.
In all cases, pay attention to the coolant
temperature.
F
I
f this message is displayed, stop your
vehicle as soon as it is safe to do so .
Braking
towing a trailer increases the braking distance.to l
imit heat build-up in the brakes, use of the
engine brake is recommended.
Ty r e s
F Check the tyre pressures of the towing vehicle and of the trailer, observing the
recommended pressures.
Lighting
F Check the lighting and signalling on the trailer and the adjustment of the vehicle's
headlamps.
For more information on Headlamp
adjustment , refer to the corresponding
section.
If the message flashes slowly, wait for the
engine to cool before topping up the level, if
necessary.
If the message flashes rapidly, contact a
P
e
uge
Ot
dealer or a qualified workshop
without delay.
the rear parking sensors will be
deactivated automatically when a
genuine P
e
uge
Ot
towbar is used.
Practical information
Page 185 of 368
183
4008_en_Chap07_info-pratiques_ed01-2016
Checking levels
take care when working under the bonnet, as certain areas of the engine may be extremely hot (risk of burns) and the cooling fan could start at
any time (even with the ignition off).
Oil level
the check of the level is done with
the dipstick, located under the
bonnet. Refer to the description of
your engine compartment for the
position of the dipstick.Engine oil change
Refer to the warranty and maintenance record
for details of the interval for this operation.
In order to maintain the reliability of the engine
and emission control system, never use
additives in the engine oil.
Oil specification
the oil must be the correct grade for your
engine and conform to the manufacturer's
recommendations.
Check all of these levels regularly, in line with the warranty and maintenance record.
t
o
p them up if necessary, unless other wise indicated.
If a level drops significantly, have the corresponding system checked by a P
e
uge
Ot
dealer or a qualified workshop.
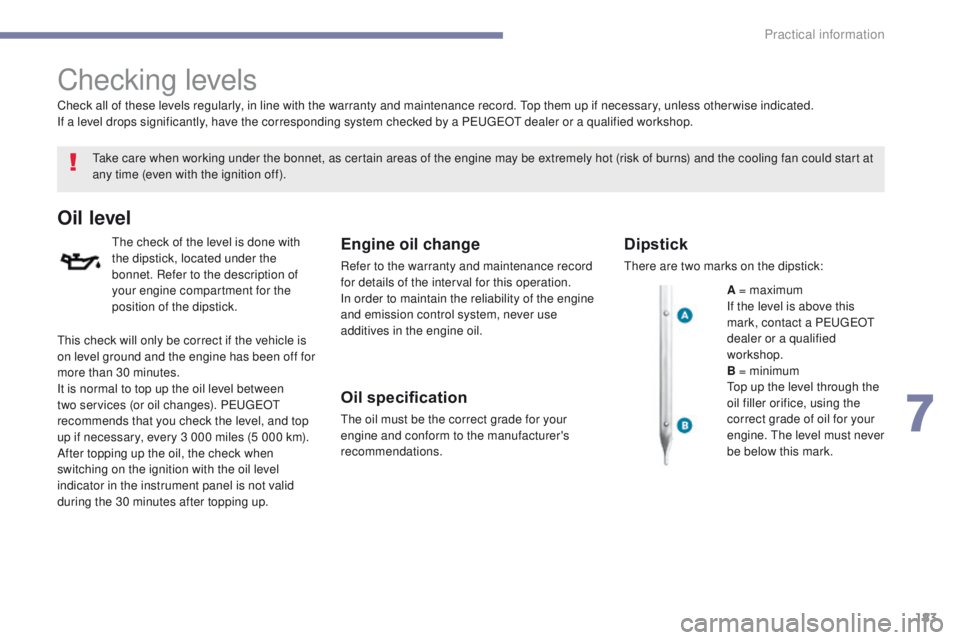
Dipstick
there are two marks on the dipstick:
A = maximum
If the level is above this
mark, contact a P
e
uge
Ot
dealer or a qualified
workshop.
B = minimum
to
p up the level through the
oil filler orifice, using the
correct grade of oil for your
engine.
t
h
e level must never
be below this mark.
th
is check will only be correct if the vehicle is
on level ground and the engine has been off for
more than 30 minutes.
It is normal to top up the oil level between
two services (or oil changes). P
e
uge
Ot
recommends that you check the level, and top
up if necessary, every 3 000 miles (5 000 km).
After topping up the oil, the check when
switching on the ignition with the oil level
indicator in the instrument panel is not valid
during the 30 minutes after topping up.
7
Practical information
Page 188 of 368
186
4008_en_Chap07_info-pratiques_ed01-2016
Checking components
12 V battery
Electrolyte level
For access to the 12 V Battery, refer
to the corresponding section. Refer to the warranty and
maintenance record for details of
the replacement intervals for these
components.
Air filter and passenger compartment filter
Replace the oil filter each time the
engine oil is changed.
Refer to the warranty and
maintenance record for details of
the replacement interval for this
component.
Oil filter
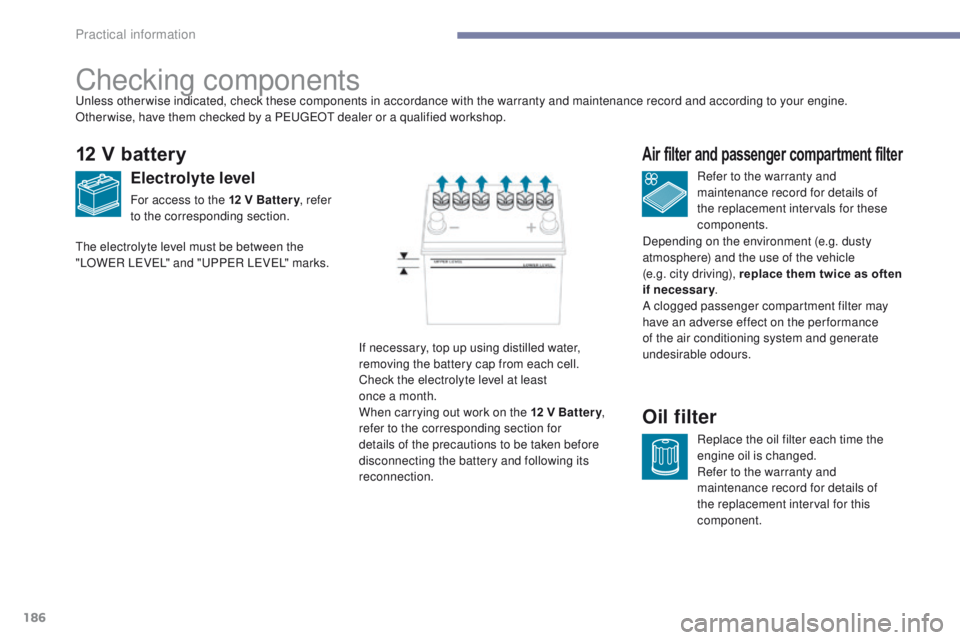
If necessary, top up using distilled water,
removing the battery cap from each cell.
Check the electrolyte level at least
once a month.
When carrying out work on the 12 V Battery
,
refer to the corresponding section for
details of the precautions to be taken before
disconnecting the battery and following its
reconnection.
un
less other wise indicated, check these components in accordance with the warranty and maintenance record and according to your engine.
Other wise, have them checked by a P
e
uge
Ot
dealer or a qualified workshop.
th
e electrolyte level must be between the
"LOW
eR LeVeL
" and "
uP
P
eR LeVeL
" marks.
Depending on the environment (e.g. dusty
atmosphere) and the use of the vehicle
(e.g. city driving), replace them twice as often
if necessary
.
A clogged passenger compartment filter may
have an adverse effect on the per formance
of the air conditioning system and generate
undesirable odours.
Practical information
Page 189 of 368
187
4008_en_Chap07_info-pratiques_ed01-2016
Manual gearbox
Refer to the warranty and
maintenance record for servicing of
the gearbox.
"CVT" gearbox
For servicing of the "CVt" gearbox,
refer to the manufacturer's service
schedule for details of the interval for
checking this component.
Particle filter (Diesel)
the start of saturation of the particle filter is
indicated by the temporary illumination of this
warning lamp, accompanied by a message in
the instrument panel screen. As soon as the traffic conditions permit,
regenerate the filter by driving at a
speed of at least 25 mph (40 km/h) for
about 20 minutes (with the 1.6 litre HDi
engine, the minimum speed is 37 mph
(60 km/h)).
If the warning lamp stays on, this
indicates a low additive level.
For more information on Checking
levels
and the Diesel additive level in
particular, refer to the corresponding
section.
On a new vehicle, the first particle
filter regeneration operations may be
accompanied by a "burning" smell,
which is per fectly normal.
Following prolonged operation of the
vehicle at very low speed or at idle,
you may, in exceptional circumstances,
notice the emission of water vapour at
the exhaust on acceleration.
t
h
is does
not affect the behaviour of the vehicle
or the environment.
7
Practical information
Page 193 of 368
191
4008_en_Chap08_en-cas-de panne_ed01-2016
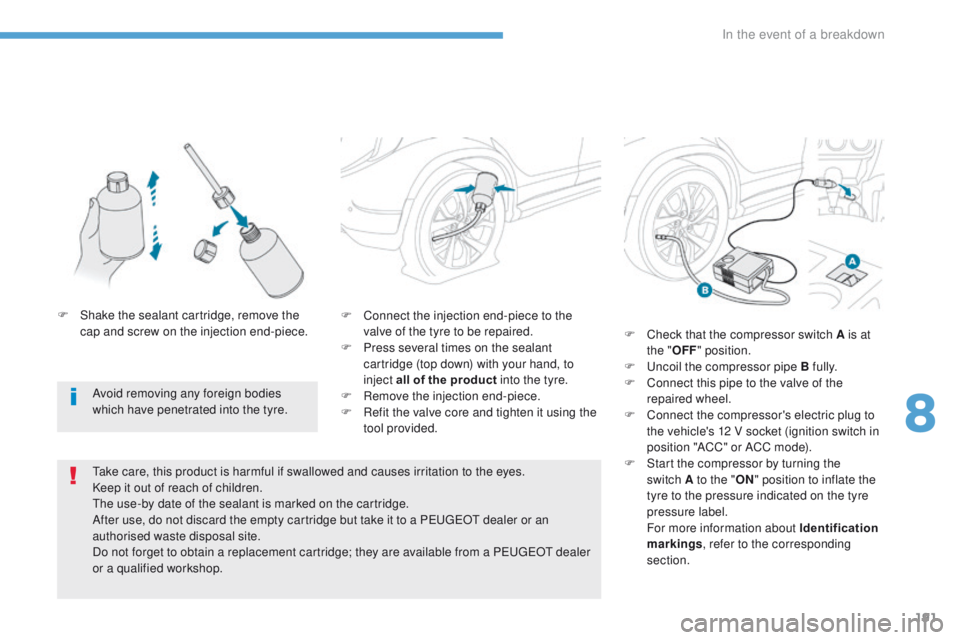
F Connect the injection end-piece to the
valve of the tyre to be repaired.
F
P
ress several times on the sealant
cartridge (top down) with your hand, to
inject all of the product into the tyre.
F
R
emove the injection end-piece.
F
R
efit the valve core and tighten it using the
tool provided.
ta
ke care, this product is harmful if swallowed and causes irritation to the eyes.
Keep it out of reach of children.
th
e use-by date of the sealant is marked on the cartridge.
After use, do not discard the empty cartridge but take it to a P
e
uge
Ot
dealer or an
authorised waste disposal site.
Do not forget to obtain a replacement cartridge; they are available from a P
e
uge
Ot
dealer
or a qualified workshop. F
C
heck that the compressor switch A is at
the " OFF" position.
F
u
n
coil the compressor pipe B fully.
F
C
onnect this pipe to the valve of the
repaired wheel.
F
C
onnect the compressor's electric plug to
the vehicle's 12 V socket (ignition switch in
position "ACC" or ACC mode).
F
S
tart the compressor by turning the
switch
A to the "ON" position to inflate the
tyre to the pressure indicated on the tyre
pressure label.
F
or more information about Identification
markings , refer to the corresponding
section.
Avoid removing any foreign bodies
which have penetrated into the tyre.
F
S
hake the sealant cartridge, remove the
cap and screw on the injection end-piece.
8
In the event of a breakdown
Page 194 of 368
192
4008_en_Chap08_en-cas-de panne_ed01-2016
F If the specified pressure has not been
reached after about 10 minutes, this means
that the tyre is not repairable; contact a
P
e
uge
Ot
dealer or a qualified workshop
for roadside assistance.
F
R
emove the compressor and stow the kit.Do not operate the compressor for more
than 10 minutes continuously.
If the compressor seems extremely
hot, switch it off and disconnect it
immediately. Leave it to cool for at least
30 minutes.
As soon as possible after a repair using
the kit, go to a P
e
uge
Ot
dealer or a
qualified workshop.
Make sure that you tell the technician
that you have used the kit. After
checking, the technician will advise you
whether the tyre can be repaired or if it
must be replaced.
If the vehicle is fitted with under-
inflation detection, the under-inflation
warning lamp remains on until the
system has been reinitialised.
For more information on Under-
inflation detection
, refer to the
corresponding section. F
A
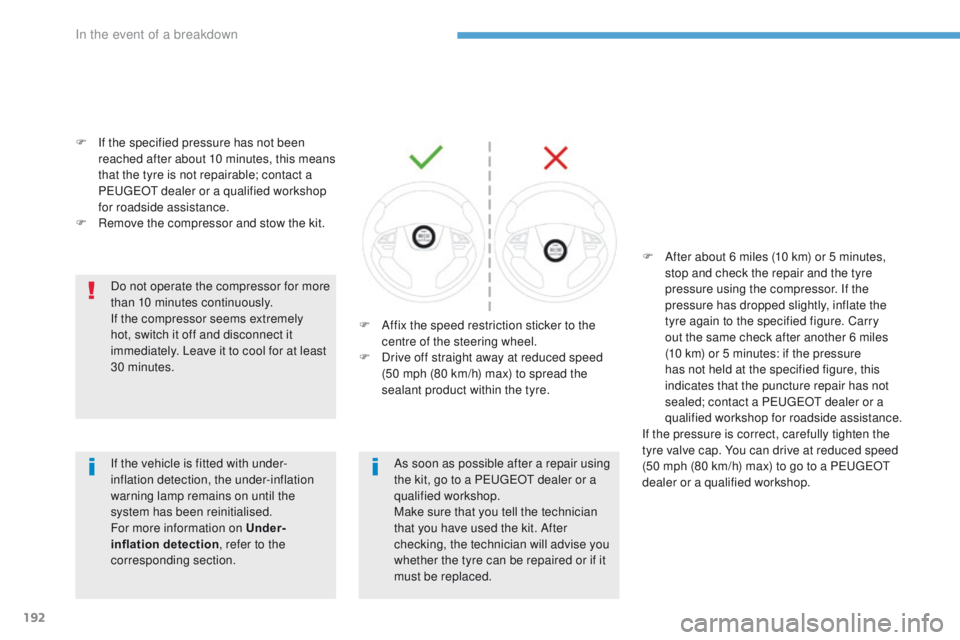
ffix the speed restriction sticker to the
centre of the steering wheel.
F
D
rive off straight away at reduced speed
(50 mph (80 km/h) max) to spread the
sealant product within the tyre. F
A
fter about 6 miles (10 km) or 5 minutes,
stop and check the repair and the tyre
pressure using the compressor. If the
pressure has dropped slightly, inflate the
tyre again to the specified figure. Carry
out the same check after another 6 miles
(10
km) or 5 minutes: if the pressure
has not held at the specified figure, this
indicates that the puncture repair has not
sealed; contact a P
e
uge
Ot
dealer or a
qualified workshop for roadside assistance.
If the pressure is correct, carefully tighten the
tyre valve cap. You can drive at reduced speed
(50 mph (80 km/h) max) to go to a P
e
uge
Ot
dealer or a qualified workshop.
In the event of a breakdown
Page 195 of 368
193
4008_en_Chap08_en-cas-de panne_ed01-2016
Changing a wheel
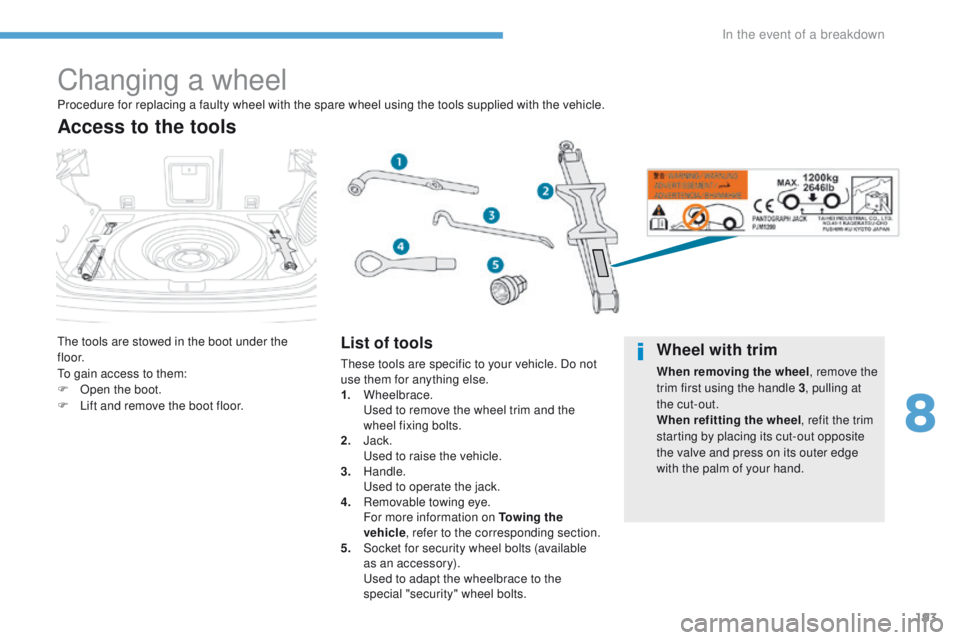
the tools are stowed in the boot under the
f l o o r.
to g
ain access to them:
F
O
pen the boot.
F
L
ift and remove the boot floor.
Access to the tools
List of tools
these tools are specific to your vehicle. Do not
use them for anything else.
1.
Wheelbrace.
u
s
ed to remove the wheel trim and the
wheel fixing bolts.
2.
J
ack.
u
se
d to raise the vehicle.
3.
Handle.
u
s
ed to operate the jack.
4.
R
emovable towing eye.
F
or more information on To w i n g the
vehicle , refer to the corresponding section.
5.
S
ocket for security wheel bolts (available
as an accessory).
u
s
ed to adapt the wheelbrace to the
special "security" wheel bolts.
Procedure for replacing a faulty wheel with the spare wheel using the tools supplied with the vehicle.Wheel with trim
When removing the wheel
, remove the
trim first using the handle 3 , pulling at
the cut-out.
When refitting the wheel , refit the trim
starting by placing its cut-out opposite
the valve and press on its outer edge
with the palm of your hand.
8
In the event of a breakdown