Page 48 of 368
46
Audio-CD system touch screen
Associated with the touch screen Audio- CD
system, this screen can display:
-
t
he time,
-
i
nformation related to the audio system.
For more information on the Audio equipment
and telematics , refer to the corresponding
section.
For safety reasons, the driver should
only carry out operations that require
close attention with the vehicle
stationary. Do not use pointed objects on the touch
screen.
Do not touch the screen with wet hands.
us
e a clean soft cloth to clean the
screen.
us
e the buttons arranged on the screen to
operate the system.
F
P
ress the MENU button to display the main
menu.
F
P
ress "Setting ".
F
P
ress "System Setting ".
F
P
ress "Time Setting ".Setting the time
General operation
1. CD eject.
2. S
ystem On / Off.
V
olume adjustment.
3.
A
ccess to the different menus in the
system.
Instruments
Page 50 of 368
48
Audio-telematic system touch screen
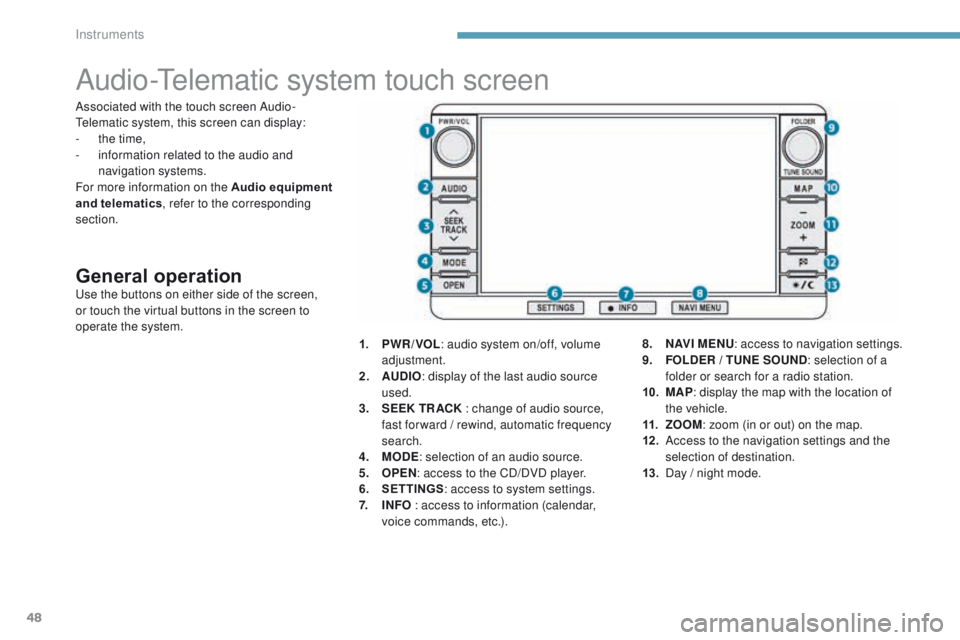
General operationuse the buttons on either side of the screen,
or touch the virtual buttons in the screen to
operate the system.1.
P
WR / VOL: audio system on/off, volume
adjustment.
2.
AU
DIO: display of the last audio source
used.
3.
S
EEK TR ACK : change of audio source,
fast for ward / rewind, automatic frequency
search.
4.
M
ODE: selection of an audio source.
5.
O
PEN: access to the CD/DVD player.
6.
S
ETTINGS: access to system settings.
7.
I
NFO : access to information (calendar,
voice commands, etc.). 8.
N
AV I M E NU: access to navigation settings.
9.
F
OLDER / TUNE SOUND: selection of a
folder or search for a radio station.
10.
M
AP: display the map with the location of
the vehicle.
11.
Z
OOM: zoom (in or out) on the map.
12 .
A
ccess to the navigation settings and the
selection of destination.
13.
D
ay / night mode.
Associated with the touch screen Audio-
te
lematic system, this screen can display:
-
t
he time,
-
i
nformation related to the audio and
navigation systems.
For more information on the Audio equipment
and telematics , refer to the corresponding
section.
Instruments
Page 51 of 368
49
4008_en_Chap01_Instruments-de-bord_ed01-2016
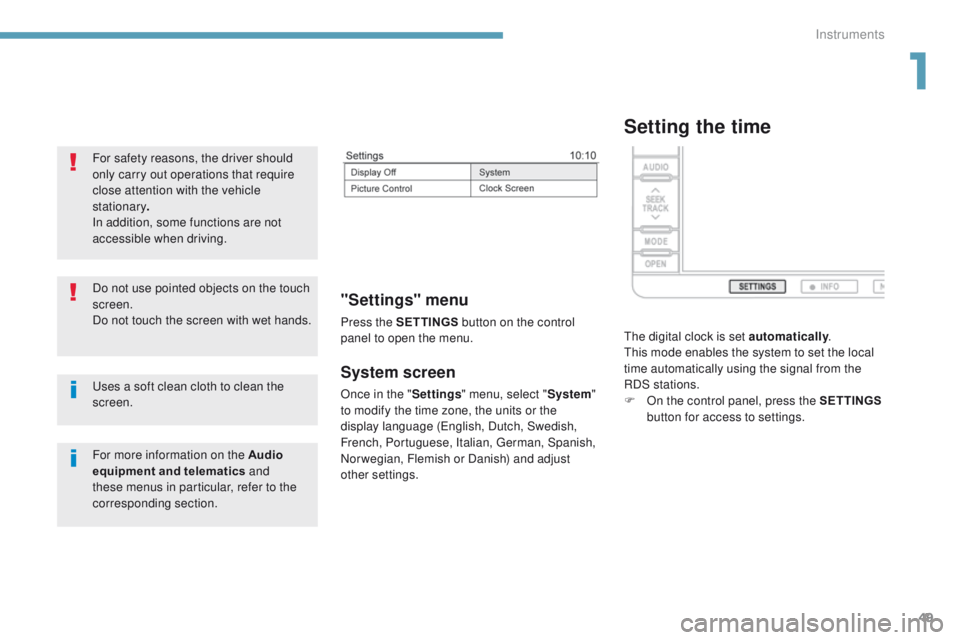
System screen
Once in the "Settings" menu, select " System"
to modify the time zone, the units or the
display language (
en
glish, Dutch, Swedish,
French, Portuguese, Italian,
g
e
rman, Spanish,
Norwegian, Flemish or Danish) and adjust
other settings.
"Settings" menu
Press the S ETTINGS button on the control
panel to open the menu.
uses a soft clean cloth to clean the
screen. Do not use pointed objects on the touch
screen.
Do not touch the screen with wet hands. For safety reasons, the driver should
only carry out operations that require
close attention with the vehicle
stationary .
In addition, some functions are not
accessible when driving.
For more information on the Audio
equipment and telematics and
these menus in particular, refer to the
corresponding section.
Setting the time
the digital clock is set automatically .th
is mode enables the system to set the local
time automatically using the signal from the
RDS stations.
F
O
n the control panel, press the SETTINGS
button for access to settings.
1
Instruments
Page 58 of 368
56
4008_en_Chap02_ouvertures_ed01-2016
"Keyless entry and Starting" system
Selective unlocking
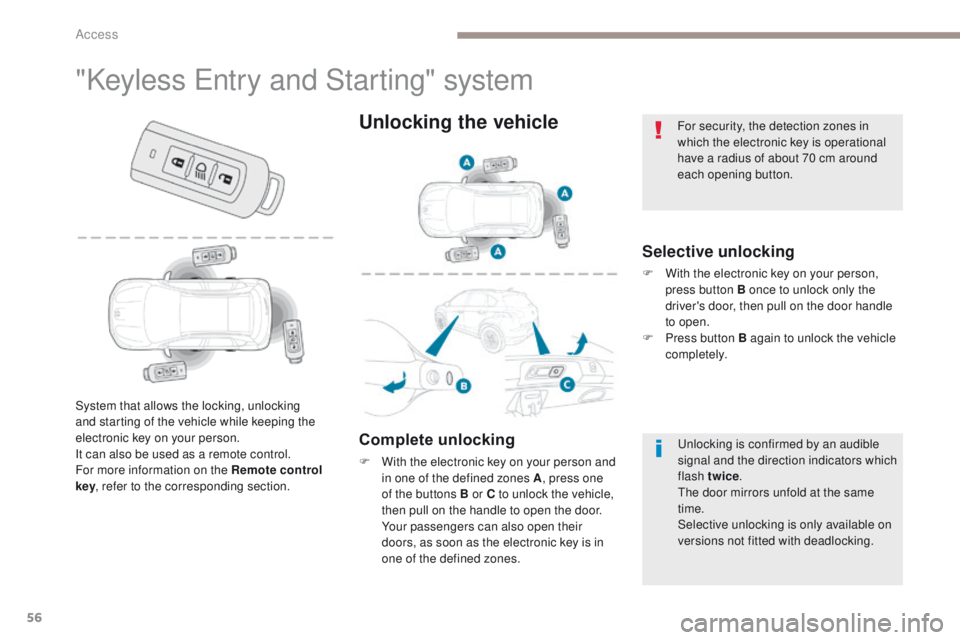
F With the electronic key on your person,
press button B once to unlock only the
driver's door, then pull on the door handle
to open.
F
P
ress button B again to unlock the vehicle
completely.
System that allows the locking, unlocking
and starting of the vehicle while keeping the
electronic key on your person.
It can also be used as a remote control.
For more information on the Remote control
key , refer to the corresponding section.
Unlocking the vehicle
Complete unlocking
F With the electronic key on your person and
in one of the defined zones A , press one
of the buttons B or C to unlock the vehicle,
then pull on the handle to open the door.
Y
our passengers can also open their
doors, as soon as the electronic key is in
one of the defined zones.
un
locking is confirmed by an audible
signal and the direction indicators which
flash twice .
th
e door mirrors unfold at the same
time.
Selective unlocking is only available on
versions not fitted with deadlocking.
For security, the detection zones in
which the electronic key is operational
have a radius of about 70 cm around
each opening button.
Access
Page 61 of 368
59
4008_en_Chap02_ouvertures_ed01-2016
emergency procedure with the Keyless en try and
Star ting system
Unlocking
F turn the key towards the front in the
driver's door lock to unlock it.
Emergency unlocking/locking
using the integral key
the integral key is used to lock and unlock the
vehicle when the electronic key cannot operate:
-
c
ell battery flat, vehicle battery discharged
or disconnected, etc.
-
v
ehicle located in an area with strong
electro-magnetic signals.
F
P
ull and hold button 1 , to extract the
integral key 2 .Locking
F turn the key towards the rear in the driver's
door lock to lock it.
th
e emergency key allows you to lock
or unlock the driver's door only.
to l
ock or unlock the other doors, use
the interior controls.
For more information on Locking /
unlocking from inside , refer to the
corresponding section.
2
Access
Page 64 of 368
62
4008_en_Chap02_ouvertures_ed01-2016
Opening
Doors
From outside
F After unlocking the vehicle using the remote control or the key, pull the door
handle.
Closing
From inside
F Pull the front or rear door lever to open the door. If a door is not closed correctly, this symbol
comes on in the instrument panel screen until
the door concerned is closed.
On the driver's side, this action on the door
lever unlocks the door if it was locked.
On the passenger's side or for the rear doors,
the door must first be unlocked manually if it
was locked.
For more information on Locking / unlocking
from inside and in particular the individual
controls, refer to the corresponding section.
Access
Page 71 of 368
69
4008_en_Chap02_ouvertures_ed01-2016
Deactivating the passenger
and rear electric window
switches
Reinitialising the electric
windows
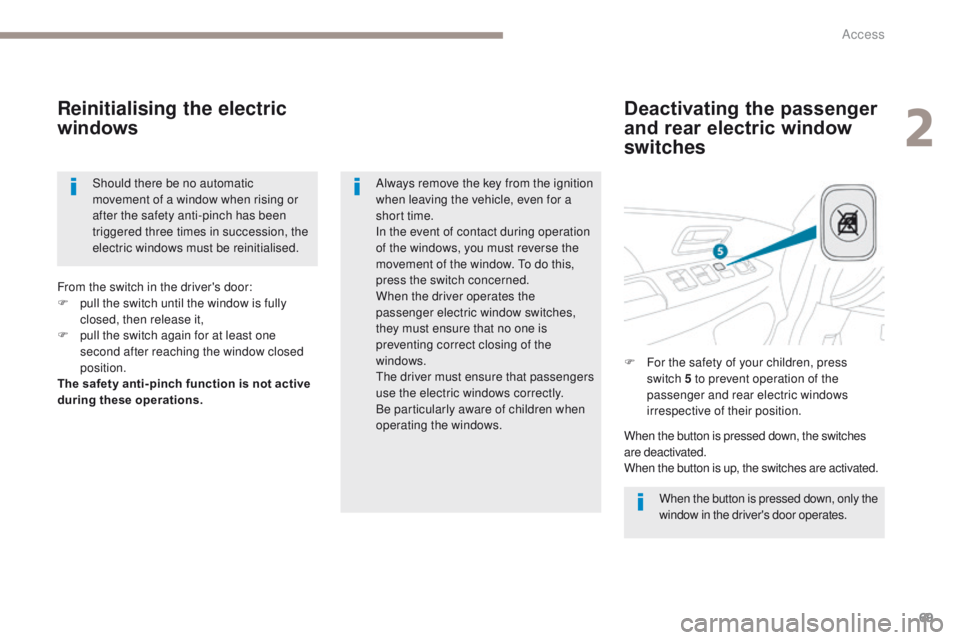
When the button is pressed down, only the
window in the driver's door operates.
Always remove the key from the ignition
when leaving the vehicle, even for a
short time.
In the event of contact during operation
of the windows, you must reverse the
movement of the window.
t
o d
o this,
press the switch concerned.
When the driver operates the
passenger electric window switches,
they must ensure that no one is
preventing correct closing of the
windows.
the
driver must ensure that passengers
use the electric windows correctly.
Be particularly aware of children when
operating the windows. F
F
or the safety of your children, press
switch 5 to prevent operation of the
passenger and rear electric windows
irrespective of their position.
From the switch in the driver's door:
F
p
ull the switch until the window is fully
closed, then release it,
F
p
ull the switch again for at least one
second after reaching the window closed
position.
The safety anti-pinch function is not active
during these operations.
When the button is pressed down, the switches
are deactivated.
When the button is up, the switches are activated.
Should there be no automatic
movement of a window when rising or
after the safety anti-pinch has been
triggered three times in succession, the
electric windows must be reinitialised.
2
Access
Page 76 of 368
74
4008_en_Chap03_Ergonomie-et-confort_ed01-2016
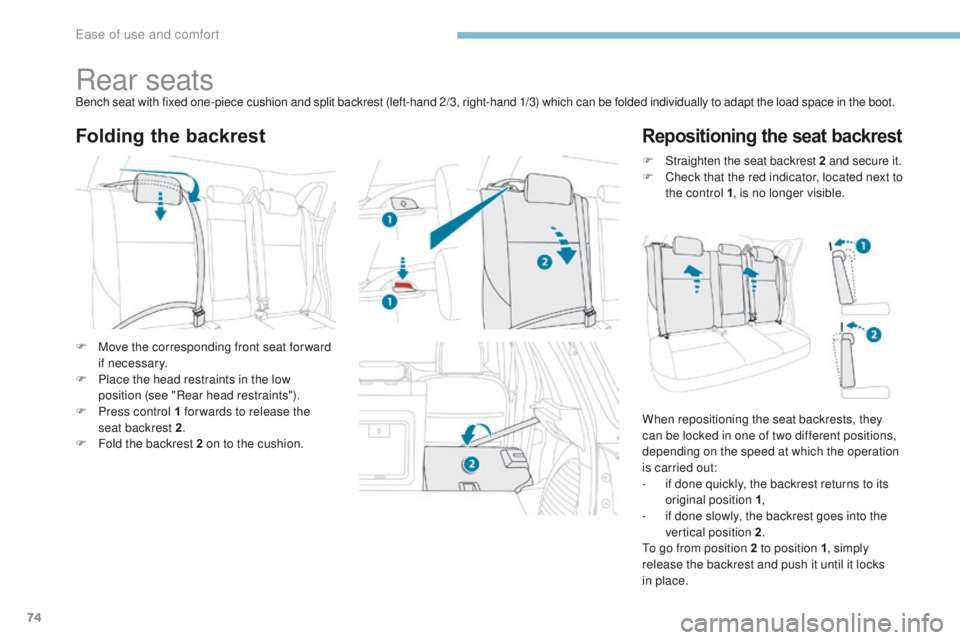
Rear seatsBench seat with fixed one-piece cushion and split backrest (left-hand 2/3, right-hand 1/3) which can be folded individually to adapt the load space in the boot.
Folding the backrestRepositioning the seat backrest
F Move the corresponding front seat for ward if necessary.
F
P
lace the head restraints in the low
position (see "Rear head restraints").
F
P
ress control 1 for wards to release the
seat backrest 2 .
F
F
old the backrest 2 on to the cushion. F
S
traighten the seat backrest 2
and secure it.
F
C
heck that the red indicator, located next to
the control 1 , is no longer visible.
When repositioning the seat backrests, they
can be locked in one of two different positions,
depending on the speed at which the operation
is carried out:
-
i
f done quickly, the backrest returns to its
original position 1 ,
-
i
f done slowly, the backrest goes into the
vertical position 2 .
to g
o from position 2 to position 1, simply
release the backrest and push it until it locks
in place.
ease of use and comfort