Page 30 of 578
28
3008-2_en_Chap01_instruments-de-bord_ed01-2016
Airbagson temporarily. This warning lamp comes on for a
few seconds when you turn on the
ignition, then goes off.This warning lamp should go off when the engine is started.
If it does not go off, contact a PEUGEOT dealer or a
qualified workshop.
fixed.One of the airbag or seat belt
pretensioner systems has a fault. Have them checked by a PEUGEOT dealer or a
qualified workshop.
Warning / indicator lamp
StateCause Action / Observations
Under-inflation fixed. The pressure in one or more wheels
is too low. Check the pressure of the tyres as soon as possible.
This check should preferably be carried out when the
tyres are cold.
+ flashing then fixed,
accompanied by the
Service warning lamp.The tyre pressure monitoring system
has a fault or no sensor is detected
on one of the wheels. Under-inflation detection is not assured.
Have the system checked by a PEUGEOT dealer or a
qualified workshop.
Instruments
Page 53 of 578
51
3008-2_en_Chap01_instruments-de-bord_ed01-2016
"Driving assistance" tab
Corresponding function"Comments"
"Speed settings" Memorisation of speed settings for the speed limiter or cruise control.
"Under-inflation initialization "Reinitialization of the under-inflation detection system.
"Lane departure detection assistance. "Activation/deactivation of the function.
"Help staying in lane" Activation/deactivation of the function.
Parking sensors Activation/deactivation of the function.
"Park Assist" Activation/deactivation of the function.
"Automatic headlamp dip "Activation/deactivation of the function.
"Stop & Star t" Activation/deactivation of the function.
" Blind spot monitoring " Activation/deactivation of the function.
"Panoramic visual aid" Activation of the Visiopark 2 function.
"Wheel anti-slip regulation" Activation/deactivation of the function
For more information on one of these functions, refer to the corresponding section.
1
Instruments
Page 74 of 578

72
3008-2_en_Chap02_ouvertures_ed01-2016
Locking the vehicle
with exterior perimeter
monitoring only
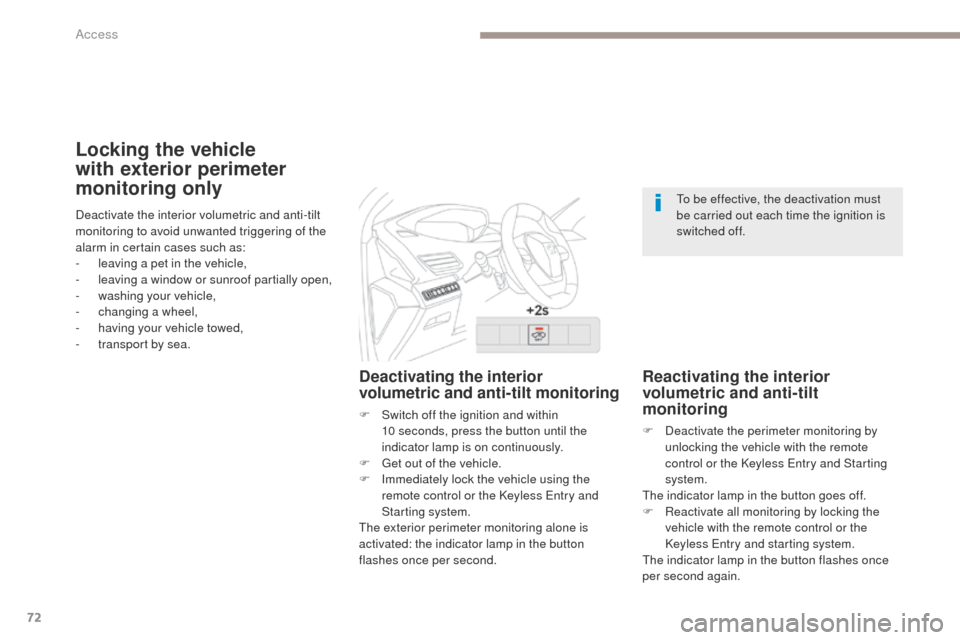
Deactivating the interior
volumetric and anti-tilt monitoring
F Switch off the ignition and within 10 seconds, press the button until the
indicator lamp is on continuously.
F
G
et out of the vehicle.
F
I
mmediately lock the vehicle using the
remote control or the Keyless Entry and
Starting system.
The exterior perimeter monitoring alone is
activated: the indicator lamp in the button
flashes once per second.
Reactivating the interior
volumetric and anti-tilt
monitoring
F Deactivate the perimeter monitoring by unlocking the vehicle with the remote
control or the Keyless Entry and Starting
system.
The indicator lamp in the button goes off.
F
R
eactivate all monitoring by locking the
vehicle with the remote control or the
Keyless Entry and starting system.
The indicator lamp in the button flashes once
per second again.
Deactivate the interior volumetric and anti-tilt
monitoring to avoid unwanted triggering of the
alarm in certain cases such as:
-
l
eaving a pet in the vehicle,
-
l
eaving a window or sunroof partially open,
-
w
ashing your vehicle,
-
c
hanging a wheel,
-
h
aving your vehicle towed,
-
t
ransport by sea. To be effective, the deactivation must
be carried out each time the ignition is
switched off.
Access
Page 83 of 578

81
3008-2_en_Chap02_ouvertures_ed01-2016
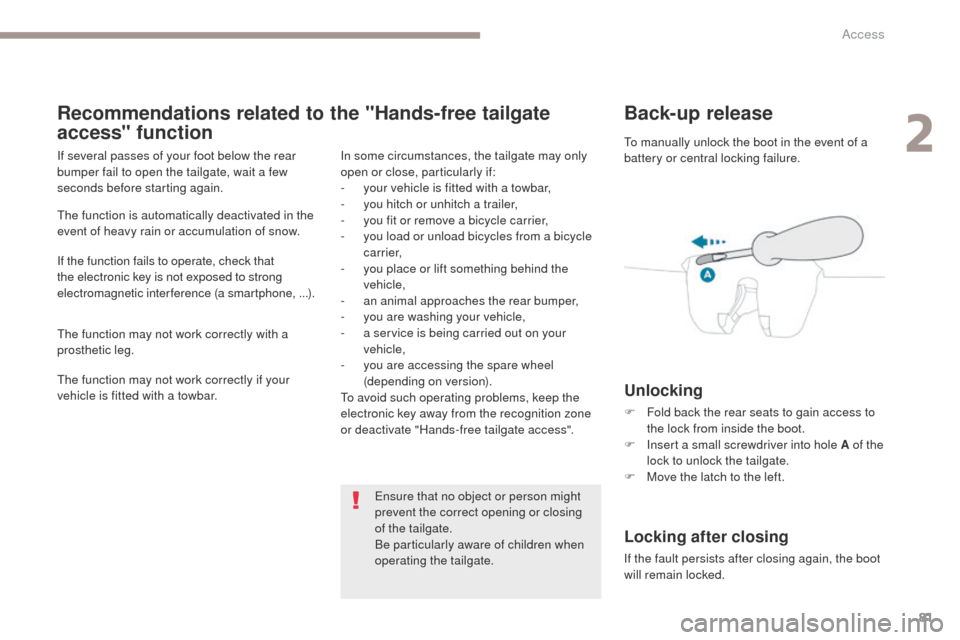
Back-up release
Unlocking
F Fold back the rear seats to gain access to the lock from inside the boot.
F
I
nsert a small screwdriver into hole A of the
lock to unlock the tailgate.
F
M
ove the latch to the left.
Locking after closing
If the fault persists after closing again, the boot
will remain locked. To manually unlock the boot in the event of a
battery or central locking failure.
Recommendations related to the "Hands-free tailgate
access" function
If several passes of your foot below the rear
bumper fail to open the tailgate, wait a few
seconds before starting again.
The function is automatically deactivated in the
event of heavy rain or accumulation of snow.
If the function fails to operate, check that
the electronic key is not exposed to strong
electromagnetic interference (a smartphone, ...).
The function may not work correctly with a
prosthetic leg.
The function may not work correctly if your
vehicle is fitted with a towbar. In some circumstances, the tailgate may only
open or close, particularly if:
-
y
our vehicle is fitted with a towbar,
-
y
ou hitch or unhitch a trailer,
-
y
ou fit or remove a bicycle carrier,
-
y
ou load or unload bicycles from a bicycle
c a r r i e r,
-
y
ou place or lift something behind the
vehicle,
-
an
animal approaches the rear bumper,
-
y
ou are washing your vehicle,
-
a s
ervice is being carried out on your
vehicle,
-
y
ou are accessing the spare wheel
(depending on version).
To avoid such operating problems, keep the
electronic key away from the recognition zone
or deactivate "Hands-free tailgate access".
Ensure that no object or person might
prevent the correct opening or closing
of the tailgate.
Be particularly aware of children when
operating the tailgate.
2
Access
Page 90 of 578

88
3008-2_en_Chap03_ergonomie-et-confort_ed01-2016
Driving position
Adopting a good driving position helps improve your comfort and protection.
It also optimises interior and exterior visibility as well as access to controls.
Sitting comfortably
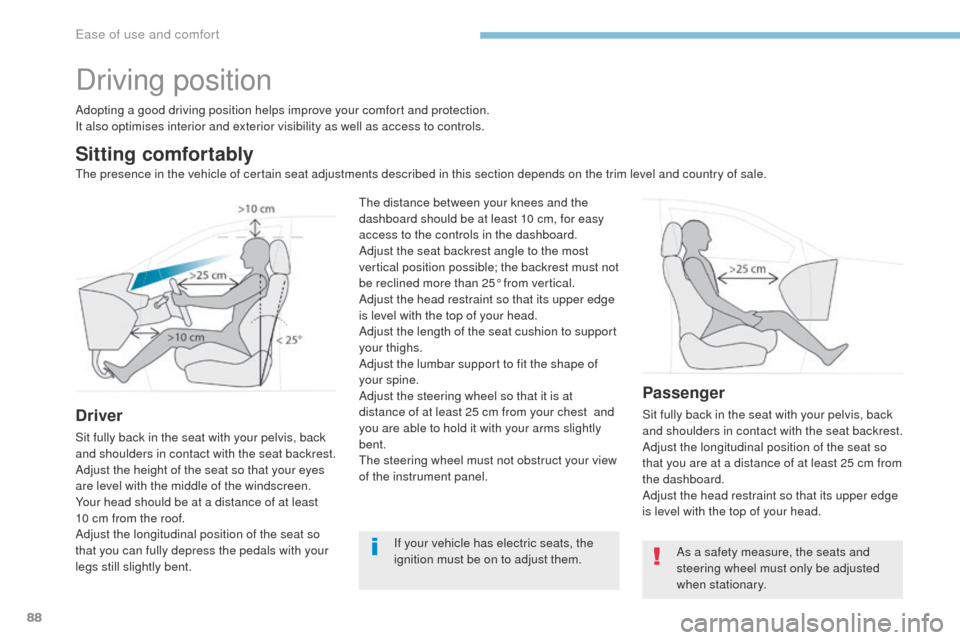
Driver
Sit fully back in the seat with your pelvis, back
and shoulders in contact with the seat backrest.
Adjust the height of the seat so that your eyes
are level with the middle of the windscreen.
Your head should be at a distance of at least
10 cm from the roof.
Adjust the longitudinal position of the seat so
that you can fully depress the pedals with your
legs still slightly bent.
Passenger
Sit fully back in the seat with your pelvis, back
and shoulders in contact with the seat backrest.
Adjust the longitudinal position of the seat so
that you are at a distance of at least 25 cm from
the dashboard.
Adjust the head restraint so that its upper edge
is level with the top of your head.
If your vehicle has electric seats, the
ignition must be on to adjust them.
The distance between your knees and the
dashboard should be at least 10 cm, for easy
access to the controls in the dashboard.
Adjust the seat backrest angle to the most
vertical position possible; the backrest must not
be reclined more than 25° from vertical.
Adjust the head restraint so that its upper edge
is level with the top of your head.
Adjust the length of the seat cushion to support
your thighs.
Adjust the lumbar support to fit the shape of
your spine.
Adjust the steering wheel so that it is at
distance of at least 25 cm from your chest
and
you are able to hold it with your arms slightly
bent.
The steering wheel must not obstruct your view
of the instrument panel.
As a safety measure, the seats and
steering wheel must only be adjusted
when stationary.
The presence in the vehicle of certain seat adjustments described in this section depends on the trim level and country of sale.
Ease of use and comfort
Page 91 of 578
89
3008-2_en_Chap03_ergonomie-et-confort_ed01-2016
Before moving off
If your vehicle has electric door mirrors,
the ignition must be on to adjust them.
When driving
Adjust the interior and exterior door mirrors so
as to reduce blind spots.Maintain a good driving position and hold the
steering wheel with both hands at the quarter
to three position, so that you can easily and
quickly reach the controls behind and near the
steering wheel.
Fasten your seat belt: place the diagonal belt in
the middle of your shoulder and adjust the lap
belt so that is tightened over your pelvis.
Ensure that all passengers have fastened their
seat belts correctly. Never adjust the seats or steering
wheel when driving.
Always keep your feet on the floor.
3
Ease of use and comfort
Page 101 of 578

99
3008-2_en_Chap03_ergonomie-et-confort_ed01-2016
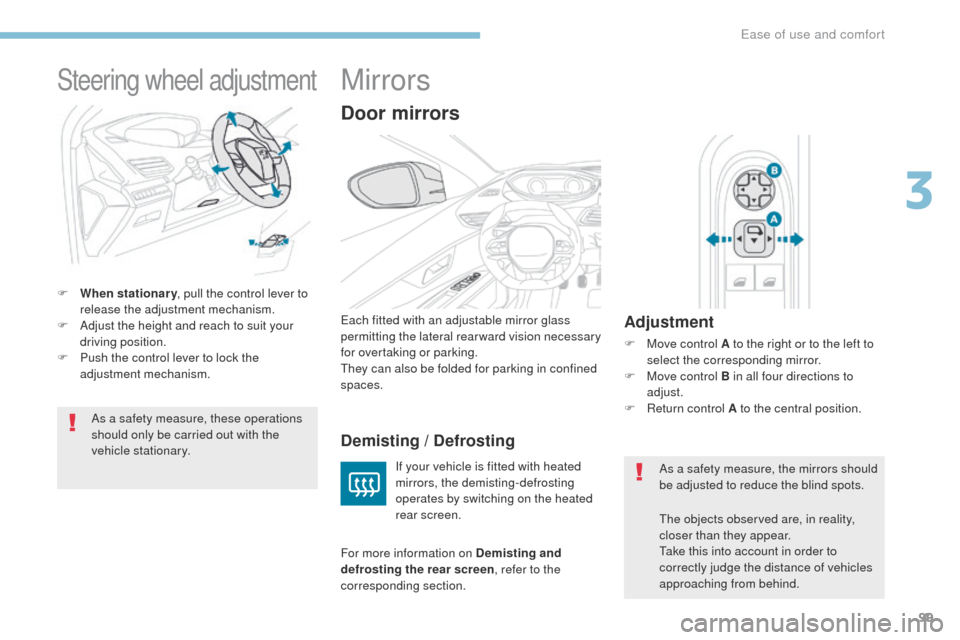
Steering wheel adjustment
F When stationary, pull the control lever to
release the adjustment mechanism.
F
A
djust the height and reach to suit your
driving position.
F
P
ush the control lever to lock the
adjustment mechanism.
As a safety measure, these operations
should only be carried out with the
vehicle stationary.
Mirrors
Each fitted with an adjustable mirror glass
permitting the lateral rearward vision necessary
for overtaking or parking.
They can also be folded for parking in confined
spaces.
Door mirrors
Demisting / Defrosting
If your vehicle is fitted with heated
mirrors, the demisting-defrosting
operates by switching on the heated
rear screen.
For more information on Demisting and
defrosting the rear screen , refer to the
corresponding section.
Adjustment
F Move control A to the right or to the left to select the corresponding mirror.
F
M
ove control B in all four directions to
adjust.
F
R
eturn control A to the central position.
The objects observed are, in reality,
closer than they appear.
Take this into account in order to
correctly judge the distance of vehicles
approaching from behind. As a safety measure, the mirrors should
be adjusted to reduce the blind spots.
3
Ease of use and comfort
Page 121 of 578
119
3008-2_en_Chap03_ergonomie-et-confort_ed01-2016
Front fittings
1. Grab handle
2. Sun visor
3.
C
ard holder
4.
S
torage compar tment below the
steering wheel
5.
I
lluminated glove box
6.
Doo
r pockets
7.
S
cented air freshener
8.
U
SB por t
9.
F
ront 12 V accessor y socket (120 W)
10.
S
torage compartment
or
C
D player
or
W
ireless charger
11.
S
torage compartment
12 .
C
up holder
13.
F
ront armrest with storage
compartment
14 .
R
ear 12 V accessor y socket (120 W)
15.
S
torage compartment
16.
2
30 V socket
3
Ease of use and comfort