2017 Peugeot 3008 Hybrid 4 seats
[x] Cancel search: seatsPage 4 of 578

.
.
3008-2_en_Chap00a_sommaire_ed01-2016
Digital instrument panel 12
Indicator and warning lamps 1 6
Indicators
32
Manual test
4
0
Distance recorders
4
1
Lighting dimmer
4
2
Trip computer
4
3
Monochrome screen C
4
5
Touch screen
4
8
Remote control
5
4
Keyless Entry and Starting
5
8
Back-up procedures
6
4
Central locking
6
8
Alarm
70
D o o r s
74
Boot
7
5
Hands-free tailgate
7
6
Electric windows
8
2
Panoramic opening sunroof
8
4Driving position
8
8
Front seats
9
0
Steering wheel adjustment
9
9
Mirrors 99
i- Cockpit Amplify function
1
02
Heating and Ventilation
1
04
Manual air conditioning
1
06
Semi-automatic mono-zone air conditioning
1
08
Dual-zone automatic air conditioning 1 11
Front demist - defrost 1 16
Heated windscreen
1
17
Rear screen demist - defrost
1
18
Front fittings
1
19
Courtesy lamps
1
28
Interior mood lighting
1
29
Rear seats
1
30
Rear fittings
1
33
Boot fittings
1
35
Boot lamp
1
40Exterior lighting control stalk
1
41
Direction indicators
1
44
Headlamp beam height adjustment
1
45
Automatic illumination of headlamps
1
46
Automatic headlamp dipping
1
49
Cornering lighting
1
51
Wiper control stalk
1
52
Automatic rain sensitive wipers
1
55
General safety recommendations
1
56
Hazard warning lamps
1
57
Hor n
15
7
Emergency or assistance
1
58
Electronic stability programme (ESC)
1
60
Advanced Grip Control
1
64
Hill Assist Descent Control
1
66
Seat belts
1
68
Airbags
1
72
Child seats
1
77
Deactivating the passenger's front airbag
1
79
ISOFIX child seats
1
86
i-Size child seats
1
90
Child lock
1
93
Over view
Eco-driving
Instruments
Access Ease of use and comfort
Lighting and visibility
Safety
Contents
Page 8 of 578

6
3008-2_en_Chap00b_vue-ensemble_ed01-2016
Interior
Boot fittings 135 -140
- l oad space cover
-
1
2 V socket
-
b
oot lamp
-
a
djustable boot floor
-
l
ashing eyes
-
h
igh load retaining net
Warning triangle
3
07
Tools
309-311
Temporary puncture repair kit
3
12-316
Spare wheel
3
17-322
Child seats
1
77-192
ISOFIX mountings
1
86-189
i-Size child seats
1
90 -191A i r b a g s
172-176
Front seats
9
0 -97
Multipoint massage 9 8
Seat belts 1 68-171
Rear seats
1
30-132
Rear fittings
1
33-134
-
1
2 V socket
-
2
30 V / 50 Hz socket
-
r
ear armrest
-
sk
i flap Front fittings
1
19 -127
-
U
SB port
-
1
2 V socket
-
f
ront armrest
-
mats
Wireless charger
1
22-123
Scented air freshener
1
25-126
Glove box
1
20
Deactivating the passenger's front a i r b a g
17
4, 178 -181
Over view
Page 9 of 578
7
3008-2_en_Chap00b_vue-ensemble_ed01-2016
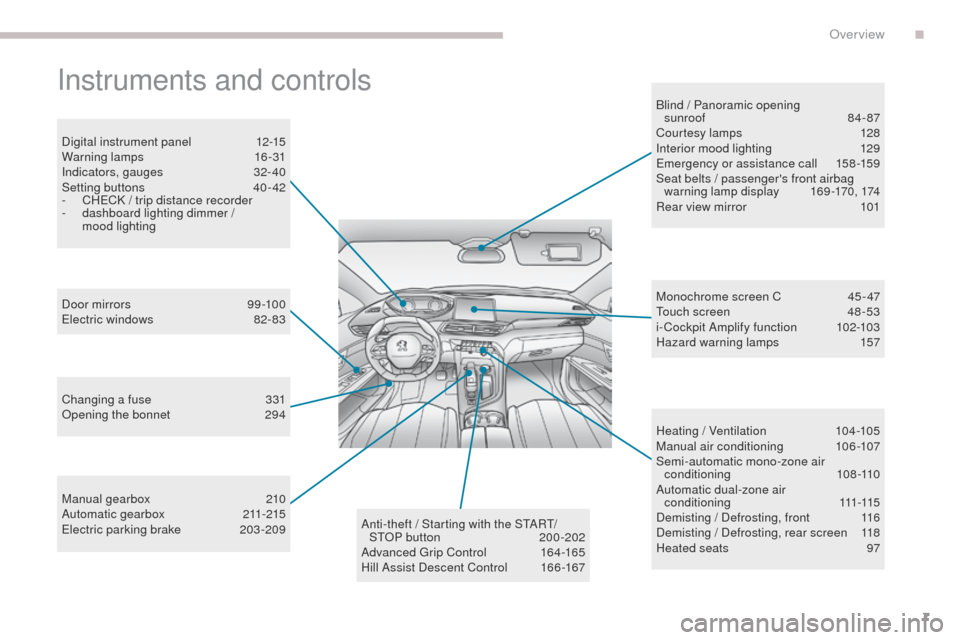
Instruments and controls
Digital instrument panel 12-15
Warning lamps 1 6-31
Indicators, gauges
3
2- 40
Setting buttons
4
0 - 42
-
C
HECK / trip distance recorder
-
d
ashboard lighting dimmer /
mood lighting
Door mirrors
9
9 -100
Electric windows
8
2- 83
Changing a fuse
3
31
Opening the bonnet
2
94
Manual gearbox
2
10
Automatic gearbox
21
1-215
Electric parking brake
20
3-209 Blind / Panoramic opening
sunroof 84- 87
Courtesy lamps 1 28
Interior mood lighting 1 29
Emergency or assistance call
1
58 -159
Seat belts / passenger's front airbag warning lamp display
1
69-170, 174
Rear view mirror
1
01
Heating / Ventilation
1
04-105
Manual air conditioning
1
06-107
Semi-automatic mono-zone air conditioning
108 -110
Automatic dual-zone air c o n d i t i o n i n g
111
-115
Demisting / Defrosting, front
1
16
Demisting / Defrosting, rear screen
1
18
Heated seats
9
7
Monochrome screen C
4
5-47
Touch screen
4
8 -53
i- Cockpit Amplify function
1
02-103
Hazard warning lamps
1
57
Anti-theft / Starting with the START/ STOP button
20
0-202
Advanced Grip Control
1
64-165
Hill Assist Descent Control
1
66 -167
.
Over view
Page 13 of 578
3008-2_en_Chap00c_eco-conduite_ed01-2016
11
Limit the causes of excess consumption
Spread loads throughout the vehicle; place the heaviest items in the
bottom of the boot, as close as possible to the rear seats.
Limit the loads carried in the vehicle and reduce wind resistance (roof
bars, roof rack, bicycle carrier, trailer...). Use a roof box in preference.
Remove roof bars and roof racks after use.
At the end of winter, remove snow tyres and refit your summer tyres.
Observe the recommendations on
maintenance
Check the tyre pressures regularly, when cold, referring to the label in
the door aperture, driver's side.
Carry out this check in particular:
-
b
efore a long journey,
-
a
t each change of season,
-
a
fter a long period out of use.
Don't forget the spare wheel and the tyres on any trailer or caravan.
Have your vehicle serviced regularly (engine oil, oil filter, air filter,
passenger compartment filter...) and observe the schedule of
operations recommended in the manufacturer's service schedule.
With a BlueHDi Diesel engine, if the SCR system is faulty your vehicle
becomes polluting; go to a PEUGEOT dealer or a qualified workshop
without delay to have the emissions of nitrogen oxides brought back to
the legal level.
When refuelling, do not continue after the third cut-off of the nozzle to
avoid any over flow.
At the wheel of your new vehicle, it is only after the first 1 800 miles
(3 000 kilometres) that you will see the fuel consumption settle down to
a consistent average.
.
Eco-driving
Page 83 of 578
81
3008-2_en_Chap02_ouvertures_ed01-2016
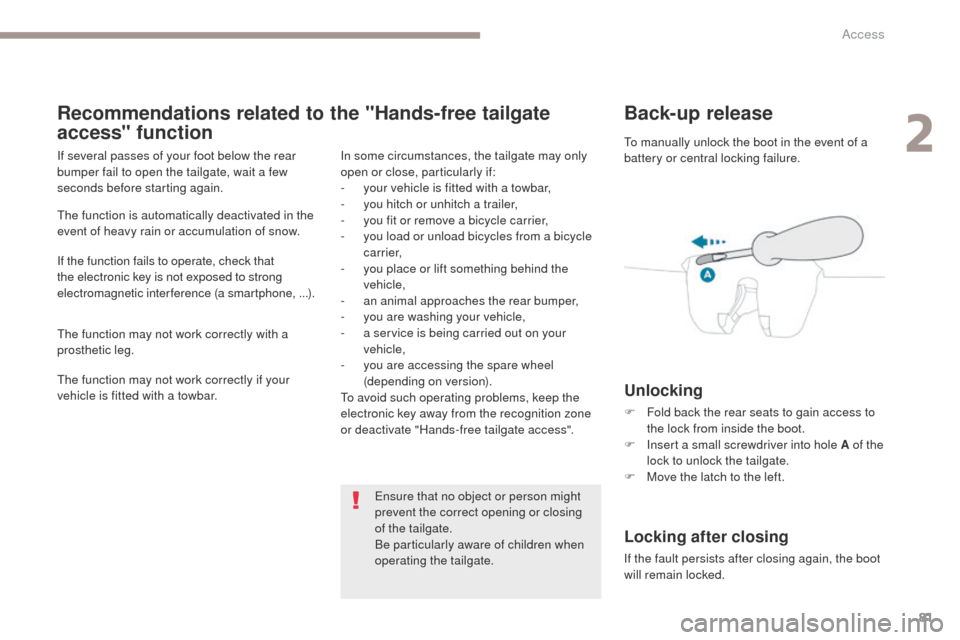
Back-up release
Unlocking
F Fold back the rear seats to gain access to the lock from inside the boot.
F
I
nsert a small screwdriver into hole A of the
lock to unlock the tailgate.
F
M
ove the latch to the left.
Locking after closing
If the fault persists after closing again, the boot
will remain locked. To manually unlock the boot in the event of a
battery or central locking failure.
Recommendations related to the "Hands-free tailgate
access" function
If several passes of your foot below the rear
bumper fail to open the tailgate, wait a few
seconds before starting again.
The function is automatically deactivated in the
event of heavy rain or accumulation of snow.
If the function fails to operate, check that
the electronic key is not exposed to strong
electromagnetic interference (a smartphone, ...).
The function may not work correctly with a
prosthetic leg.
The function may not work correctly if your
vehicle is fitted with a towbar. In some circumstances, the tailgate may only
open or close, particularly if:
-
y
our vehicle is fitted with a towbar,
-
y
ou hitch or unhitch a trailer,
-
y
ou fit or remove a bicycle carrier,
-
y
ou load or unload bicycles from a bicycle
c a r r i e r,
-
y
ou place or lift something behind the
vehicle,
-
an
animal approaches the rear bumper,
-
y
ou are washing your vehicle,
-
a s
ervice is being carried out on your
vehicle,
-
y
ou are accessing the spare wheel
(depending on version).
To avoid such operating problems, keep the
electronic key away from the recognition zone
or deactivate "Hands-free tailgate access".
Ensure that no object or person might
prevent the correct opening or closing
of the tailgate.
Be particularly aware of children when
operating the tailgate.
2
Access
Page 84 of 578
82
3008-2_en_Chap02_ouvertures_ed01-2016
Electric windows
Manual operation
To open or close the window, press or pull the
switch gently. The window stops as soon as the
switch is released.
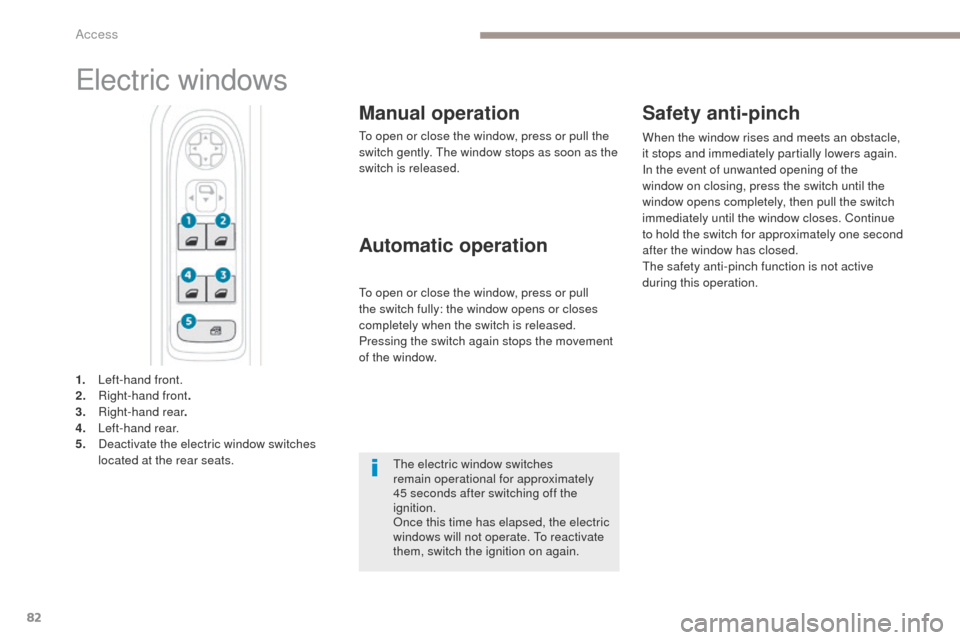
1.
L
eft-hand front.
2.
R
ight-hand front .
3.
R
ight-hand rear .
4.
L
eft-hand rear.
5.
D
eactivate the electric window switches
located at the rear seats.
Automatic operation Safety anti-pinch
To open or close the window, press or pull
the switch fully: the window opens or closes
completely when the switch is released.
Pressing the switch again stops the movement
of the window. When the window rises and meets an obstacle,
it stops and immediately partially lowers again.
In the event of unwanted opening of the
window on closing, press the switch until the
window opens completely, then pull the switch
immediately until the window closes. Continue
to hold the switch for approximately one second
after the window has closed.
The safety anti-pinch function is not active
during this operation.
The electric window switches
remain operational for approximately
45
seconds after switching off the
ignition.
Once this time has elapsed, the electric
windows will not operate. To reactivate
them, switch the ignition on again.
Access
Page 90 of 578
88
3008-2_en_Chap03_ergonomie-et-confort_ed01-2016
Driving position
Adopting a good driving position helps improve your comfort and protection.
It also optimises interior and exterior visibility as well as access to controls.
Sitting comfortably
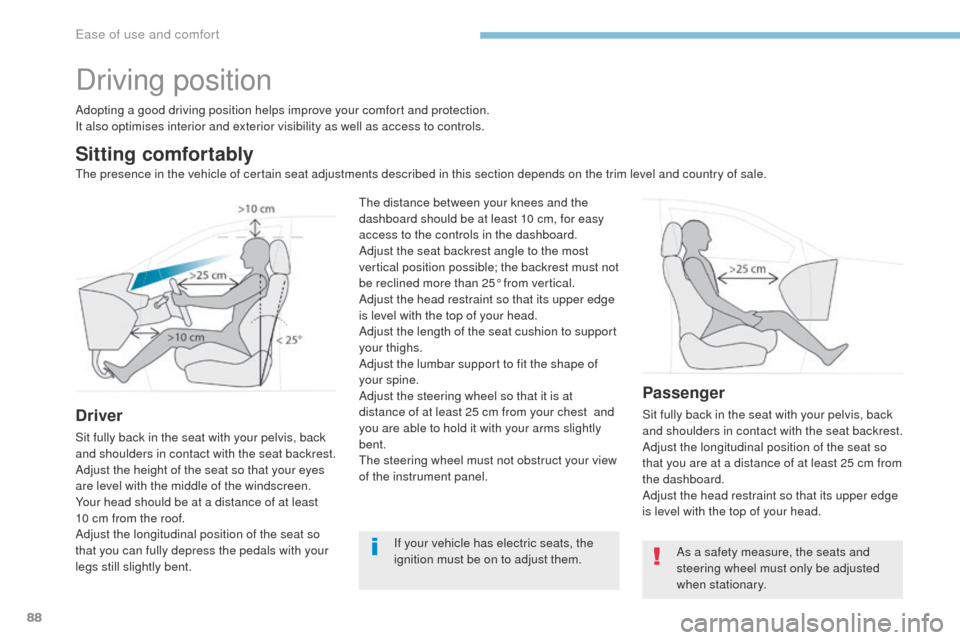
Driver
Sit fully back in the seat with your pelvis, back
and shoulders in contact with the seat backrest.
Adjust the height of the seat so that your eyes
are level with the middle of the windscreen.
Your head should be at a distance of at least
10 cm from the roof.
Adjust the longitudinal position of the seat so
that you can fully depress the pedals with your
legs still slightly bent.
Passenger
Sit fully back in the seat with your pelvis, back
and shoulders in contact with the seat backrest.
Adjust the longitudinal position of the seat so
that you are at a distance of at least 25 cm from
the dashboard.
Adjust the head restraint so that its upper edge
is level with the top of your head.
If your vehicle has electric seats, the
ignition must be on to adjust them.
The distance between your knees and the
dashboard should be at least 10 cm, for easy
access to the controls in the dashboard.
Adjust the seat backrest angle to the most
vertical position possible; the backrest must not
be reclined more than 25° from vertical.
Adjust the head restraint so that its upper edge
is level with the top of your head.
Adjust the length of the seat cushion to support
your thighs.
Adjust the lumbar support to fit the shape of
your spine.
Adjust the steering wheel so that it is at
distance of at least 25 cm from your chest
and
you are able to hold it with your arms slightly
bent.
The steering wheel must not obstruct your view
of the instrument panel.
As a safety measure, the seats and
steering wheel must only be adjusted
when stationary.
The presence in the vehicle of certain seat adjustments described in this section depends on the trim level and country of sale.
Ease of use and comfort
Page 91 of 578
89
3008-2_en_Chap03_ergonomie-et-confort_ed01-2016
Before moving off
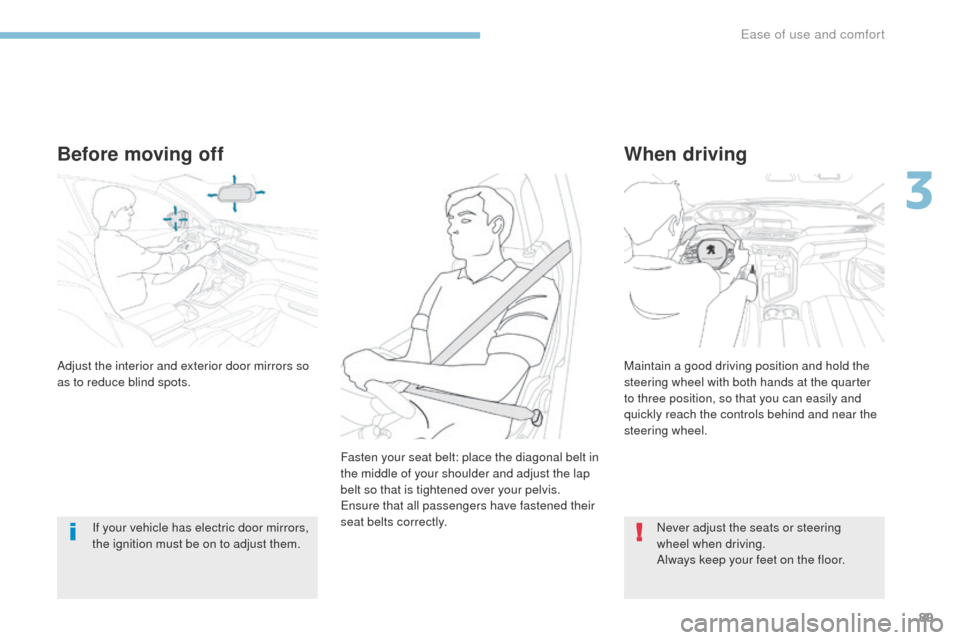
If your vehicle has electric door mirrors,
the ignition must be on to adjust them.
When driving
Adjust the interior and exterior door mirrors so
as to reduce blind spots.Maintain a good driving position and hold the
steering wheel with both hands at the quarter
to three position, so that you can easily and
quickly reach the controls behind and near the
steering wheel.
Fasten your seat belt: place the diagonal belt in
the middle of your shoulder and adjust the lap
belt so that is tightened over your pelvis.
Ensure that all passengers have fastened their
seat belts correctly. Never adjust the seats or steering
wheel when driving.
Always keep your feet on the floor.
3
Ease of use and comfort