Page 9 of 30
7
10
· Time Zone: Touch the “Time Zone” key
10
to choose from the applicable time zone
list and/or touch the “Daylight Savings
Time” key to switch between ON and OFF.
·
A
uto: Automatically sets the clock to the
vehicle’s current location.
Press the B ACK button
11 to return to the
previous screen.
Please see your Owner’s Manual for important safety information, system limitations, and additional
operating and feature information.
For more information, refer to the “Monitor, climate, audio, phone and voice recognition systems
(section 4)” of your Owner’s Manual.
To view detailed instructional videos regarding these and other features, please go to www.nissanownersinfo.mobi.
Page 10 of 30

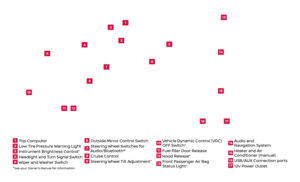
The Nissan Intelligent Key® system allows you to lock or
unlock your vehicle, open your trunk and
start the engine.
It is impor tant to")
8
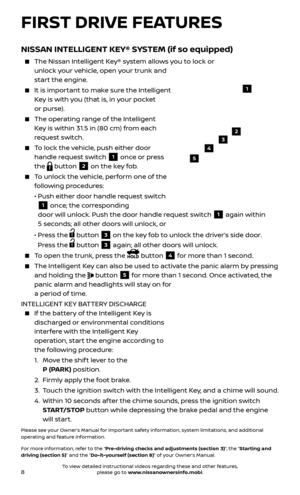
NISSAN INTELLIGENT KEY® SYSTEM (if so equipped)
The Nissan Intelligent Key® system allows you to lock or
unlock your vehicle, open your trunk and
start the engine.
It is impor tant to make sure the Intelligent
Key is with you (that is, in your pocket
or purse).
The oper ating range of the Intelligent
Key is within 31.5 in (80 cm) from each
request switch.
To lock the vehicle, push either door handle request switch
1 once or press
the
button 2 on the key fob.
To unlock the vehicle, perform one of the following procedures:
•
Push either door hand
le request switch
1 once; the corresponding
door will unlock. Push the door handle request switch
1 again within
5 seconds; all other doors will unlock, or
•
Pr
ess the
button 3 on the key fob to unlock the driver’s side door.
Press the
button 3 again; all other doors will unlock.
To open the trunk, press the button 4 for more than 1 second.
The Intel ligent Key can also be used to activate the panic alarm by pressing
and holding the
button 5 for more than 1 second. Once activated, the
panic alarm and headlights will stay on for
a period of time.
INTELLIGENT KEY BATTERY DISCHARGE
If the bat tery of the Intelligent Key is
discharged or environmental conditions
interfere with the Intelligent Key
operation, start the engine according to
the following procedure:
1.
Mo
ve the shif t lever to the
P (PARK) position.
2.
Firml
y apply the foot brake.
3.
T
ouch the ignition switch with the Intelligent Key, and a chime will sound.
4.
Within 10 sec
onds af ter the chime sounds, press the ignition switch
START/STOP button while depressing the brake pedal and the engine
will start.
Please see your Owner’s Manual for important safety information, system limitations, and additional
operating and feature information.
For more information, refer to the “Pre-driving checks and adjustments (section 3)”, the “Starting and
driving (section 5)” and the “Do-it-yourself (section 8)” of your Owner’s Manual.
23
4
5
1
FIRST DRIVE FEATURES
To view detailed instructional videos regarding these and other features, please go to www.nissanownersinfo.mobi.
Page 11 of 30

9
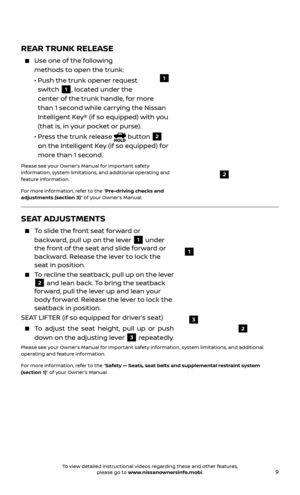
REAR TRUNK RELEASE
Use one of the following
methods to open the trunk:
•
Push the trunk opener r
equest
switch
1, located under the
center of the trunk handle, for more
than 1 second while carrying the Nissan
Intelligent Key® (if so equipped) with you
(that is, in your pocket or purse).
•
Pr
ess the trunk release
button 2
on the Intelligent Key (if so equipped) for
more than 1 second.
Please see your Owner’s Manual for important safety
information, system limitations, and additional operating and
feature information.
For more information, refer to the “Pre-driving checks and
adjustments (section 3)” of your Owner’s Manual.
2
1
SEAT ADJUSTMENTS
To slide the front seat forward or backward, pull up on the lever
1 under
the front of the seat and slide forward or
backward. Release the lever to lock the
seat in position.
To recline the seatback, pull up on the lever 2 and lean back. To bring the seatback
forward, pull the lever up and lean your
body forward. Release the lever to lock the
seatback in position.
SEAT LIFTER (if so equipped for driver’s seat)
To adjust the seat height, pull up or push down on the adjusting lever
3 repeatedly.
Please see your Owner’s Manual for important safety information, system limitations, and additional
operating and feature information.
For more information, refer to the “Safety — Seats, seat belts and supplemental restraint system
(section 1)” of your Owner’s Manual.
1
2
3
To view detailed instructional videos regarding these and other features, please go to www.nissanownersinfo.mobi.
Page 12 of 30
.
CONTINUOUSLY VARIABLE TRANSMISSION
(Nissan")
10
STARTING/STOPPING THE ENGINE
STARTING THE ENGINE
It is important to make sure the Intelligent
Key is with you (that is, in your pocket
or purse).
CONTINUOUSLY VARIABLE TRANSMISSION
(Nissan Intelligent Key® models only –
if so equipped)
Depress the brake pedal.
•
If the br
ake pedal is not depressed,
pushing the ignition switch once enters the ACC mode.
•
If the ignition switch is pushed a sec
ond time, the vehicle will enter the
ON mode.
Move the shif t lever to the P (PARK) position.
Press the ignition switch START/STOP button to start or stop the engine.
CONTINUOUSLY VARIABLE
TRANSMISSION/AUTOMATIC/MANUAL
TRANSMISSION (if so equipped)
Depress the brake pedal.
Move the shif t lever to the N (NEUTRAL) position (automatic transmission only).
Depress the clutch pedal to the floor (manual transmission only).
Turn the ignition switch to the S TA R T position.
TURNING THE ENGINE OFF
For a Continuously Variable Transmission (Nissan Intelligent Key® models only – if so equipped), apply the brake pedal, move the shif t lever to the
P (PARK) position, apply the parking brake and press the ignition switch
START/STOP button to turn the engine off.
For a manual transmission, apply the brake pedal, place the vehicle in 1 (FIRST) gear, apply the parking brake and turn the ignition switch to the
LOCK position.
For the automatic transmission and Continuously Variable Transmission, apply the brake pedal, move the shif t lever to the P (PARK) position, apply
the parking brake and turn the ignition switch to the LOCK position.
Please see your Owner’s Manual for important safety information, system limitations, and additional
operating and feature information.
For more information, refer to the “Starting and driving (section 5)” of your Owner’s Manual.
FIRST DRIVE FEATURES
To view detailed instructional videos regarding these and other features, please go to www.nissanownersinfo.mobi.
Page 13 of 30

11
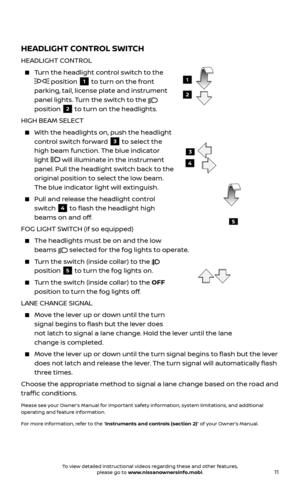
HEADLIGHT CONTROL SWITCH
HEADLIGHT CONTROL
Turn the headlight control switch to the
position 1 to turn on the front
parking, tail, license plate and instrument
panel lights. Turn the switch to the
position
2 to turn on the headlights.
HIGH BEAM SELECT
With the he adlights on, push the headlight
control switch forward
3 to select the
high beam function. The blue indicator
light
will illuminate in the instrument
panel. Pull the headlight switch back to the
original position to select the low beam.
The blue indicator light will extinguish.
Pull and release the headlight control switch
4 to flash the headlight high
beams on and off.
FOG LIGHT SWITCH (if so equipped)
The headlights must be on and the low beams
selected for the fog lights to operate.
Turn the switch (inside collar) to the
position
5 to turn the fog lights on.
Turn the switch (inside collar) to the OFF position to turn the fog lights off.
LANE CHANGE SIGNAL
Move the lever up or down until the turn signal begins to flash but the lever does
not latch to signal a lane change. Hold the lever until the lane
change is completed.
Move the lever up or down until the turn signal begins to flash but the lever does not latch and release the lever. The turn signal will automatically flash
three times.
Choose the appropriate method to signal a lane change based on the road and
traffic conditions.
Please see your Owner’s Manual for important safety information, system limitations, and additional
operating and feature information.
For more information, refer to the “Instruments and controls (section 2)” of your Owner’s Manual.
3
4
5
1
2
To view detailed instructional videos regarding these and other features, please go to www.nissanownersinfo.mobi.
Page 14 of 30
 – One sweep operation of
the wiper s.
2 Intermittent (INT)")
12
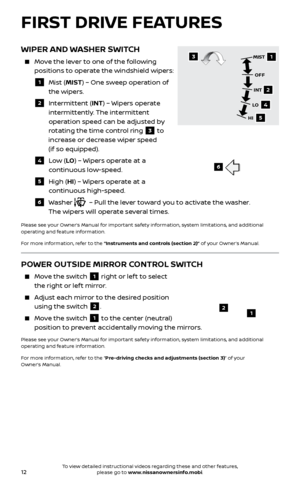
WIPER AND WASHER SWITCH
Move the lever to one of the following positions to operate the windshield wipers:
1 Mist (MIST) – One sweep operation of
the wiper s.
2 Intermittent (INT) – Wipers operate
intermit tently. The intermittent
operation speed can be adjusted by
rotating the time control ring
3 to
increase or decrease wiper speed
(if so equipped).
4 Low ( LO) – Wipers operate at a
continuous low-speed.
5 High (HI) – Wipers operate at a
c ontinuous high-speed.
6 Washer – Pull the lever toward you to activate the washer.
The wipers will operate several times.
Please see your Owner’s Manual for important safety information, system limitations, and additional
operating and feature information.
For more information, refer to the “Instruments and controls (section 2)” of your Owner’s Manual.
31
2
4
5
MIST
OFF
INT
LO
HI
6
POWER OUTSIDE MIRROR CONTROL SWITCH
Move the switch 1 right or lef t to select
the right or lef t mirror.
Adjust each mirror to the desired position using the switch
2.
Move the switch 1 to the center (neutral)
position to prevent accidentally moving the mirrors.
Please see your Owner’s Manual for important safety information, system limitations, and additional
operating and feature information.
For more information, refer to the “Pre-driving checks and adjustments (section 3)” of your
Owner’s Manual.
12
FIRST DRIVE FEATURES
To view detailed instructional videos regarding these and other features, please go to www.nissanownersinfo.mobi.
Page 15 of 30

1 FAN SPEED CONTROL DIAL
Turn the dial to the lef t to decrease fan speed or to the right to increase fan speed.
2 AIR FLOW CONTROL DIAL
Turn the dia")
13
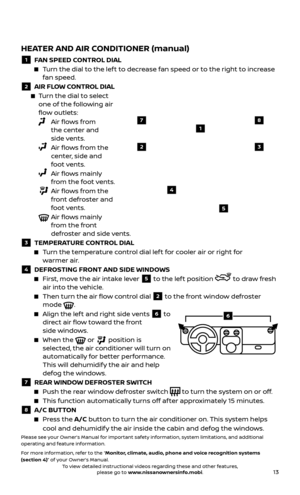
HEATER AND AIR CONDITIONER (manual)
1 FAN SPEED CONTROL DIAL
Turn the dial to the lef t to decrease fan speed or to the right to increase fan speed.
2 AIR FLOW CONTROL DIAL
Turn the dial to select one of the following air
flow outlets:
Air flows from the center and
side vents.
Air flows from the center, side and
foot vents.
Air flows mainly from the foot vents.
Air flows from the front defroster and
foot vents.
Air flows mainly from the front
defroster and side vents.
3 TEMPERA TURE CONTROL DIAL
Turn the temperature control dial lef t for cooler air or right for
warmer air.
4 DEFROSTING FRONT AND SIDE WINDOWS
First, move the air intake lever 5 to the lef t position to draw fresh
air into the vehicle.
Then turn the air flo w control dial 2 to the front window defroster
mode .
Align the lef t and right side vents 6 to
direct air flow toward the front
side windows.
When the or position is
selected, the air conditioner will turn on
automatically for better performance.
This will dehumidify the air and help
defog the windows.
7 REAR WINDOW DEFROSTER SWITCH
Push the r ear window defroster switch to turn the system on or off.
This function automatically turns off af ter approximately 15 minutes.
8 A/C BUTTON
Press the A/C button to turn the air conditioner on. This system helps
cool and dehumidify the air inside the cabin and defog the windows.
Please see your Owner’s Manual for important safety information, system limitations, and additional
operating and feature information.
For more information, refer to the “Monitor, climate, audio, phone and voice recognition systems
(section 4)” of your Owner’s Manual.
1
23
4
5
78
6
To view detailed instructional videos regarding these and other features, please go to www.nissanownersinfo.mobi.
Page 16 of 30

1 ON•OFF BUTTON/VOL (volume) CONTROL KNOB Press the ON•OFF button to turn the system on or off.
Turn the
VO L (volume")
14
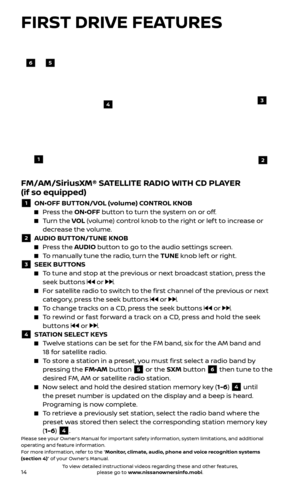
FM/AM/SiriusXM® SATELLITE RADIO WITH CD PLAYER
(if so equipped)
1 ON•OFF BUTTON/VOL (volume) CONTROL KNOB Press the ON•OFF button to turn the system on or off.
Turn the
VO L (volume) control knob to the right or lef t to increase or
decrease the volume.
2 A UDIO BUTTON/TUNE KNOB Press the AUDIO button to go to the audio settings screen.
To manually tune the radio, turn the TUNE knob lef t or right. 3 SEEK BUT
TONS
To tune and stop at the previous or next broadcast station, press the
seek buttons
or .
For satellite radio to switch to the first channel of the previous or next category, press the seek buttons
or .
To change tracks on a CD, press the seek buttons or .
To rewind or fast forward a track on a CD, press and hold the seek buttons
or .4 S TATION SELECT KEYS Twelve stations can be set for the FM band, six for the AM band and
18 for satellite radio.
To store a station in a preset, you must first select a radio band by pressing the FM•AM button 5 or the SXM button 6 then tune to the
desired FM, AM or satellite radio station.
Now select and hold the desired station memory key (1-6) 4 until
the preset number is updated on the display and a beep is heard.
Programing is now complete.
To retrieve a previously set station, select the radio band where the preset was stored then select the corresponding station memory key
(1-6)
4.Please see your Owner’s Manual for important safety information, system limitations, and additional
operating and feature information.
For more information, refer to the “Monitor, climate, audio, phone and voice recognition systems
(section 4)” of your Owner’s Manual.
56
3
1
4
2
FIRST DRIVE FEATURES
To view detailed instructional videos regarding these and other features, please go to www.nissanownersinfo.mobi.