Page 223 of 671
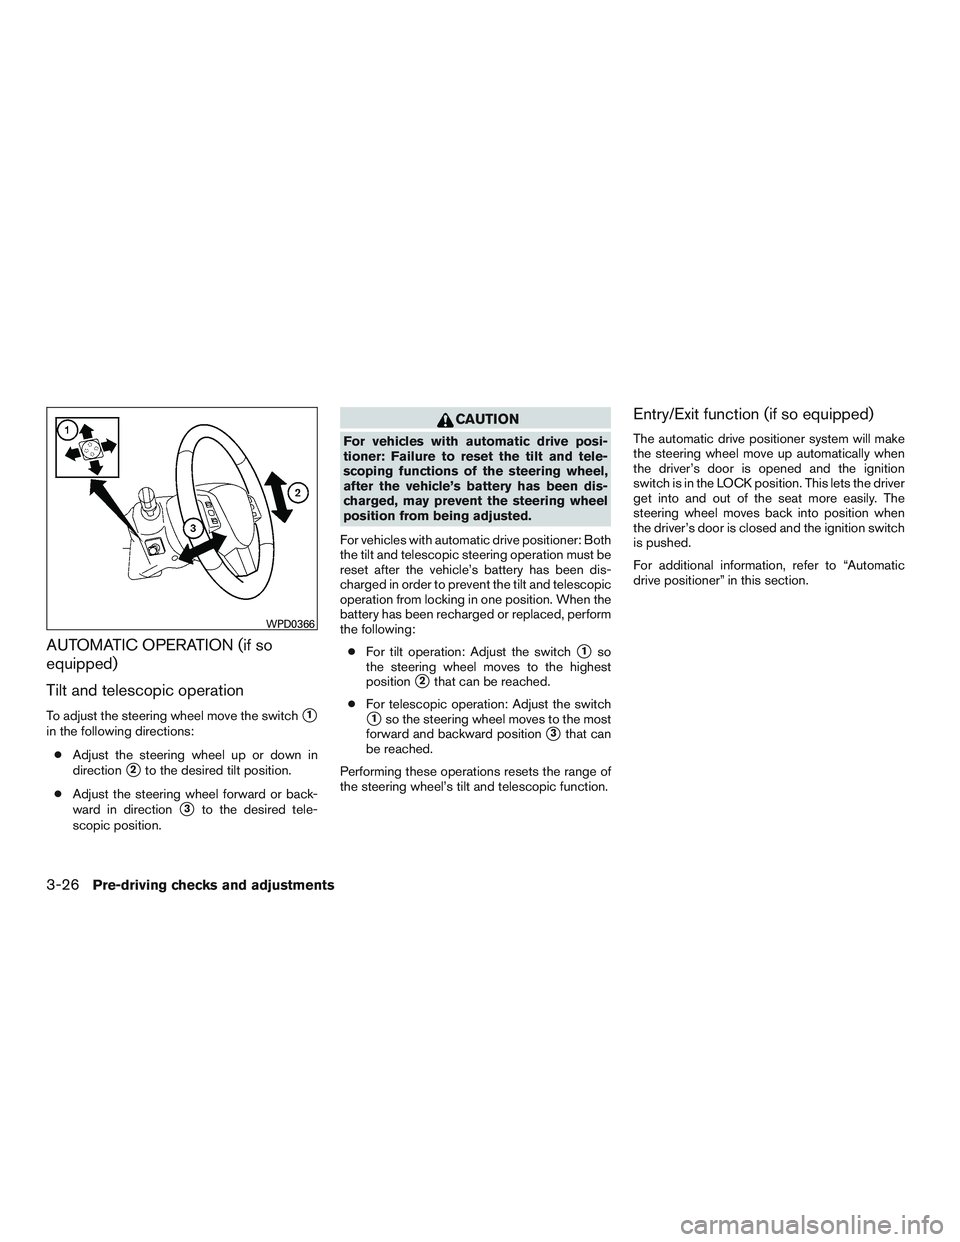
AUTOMATIC OPERATION (if so
equipped)
Tilt and telescopic operation
To adjust the steering wheel move the switch�1
in the following directions:● Adjust the steering wheel up or down in
direction
�2to the desired tilt position.
● Adjust the steering wheel forward or back-
ward in direction
�3to the desired tele-
scopic position.
Page 385 of 671

WARNING
The following actions can increase the
chance of losing control of the vehicle if
there is a sudden loss of tire air pressure.
Losing control of the vehicle may cause a
collision and result in personal injury.
●The vehicle generally moves or pulls in
the direction of the flat tire.
● Do not rapidly apply the brakes.
● Do not rapidly release the accelerator
pedal.
● Do not rapidly turn the steering wheel.
1. Remain calm and do not overreact.
2. Maintain a firm grip on the steering wheel with both hands and try to hold a straight
course.
3. When appropriate, slowly release the accel- erator pedal to gradually slow the vehicle.
4. Gradually steer the vehicle to a safe location off the road and away from traffic if possible.
5. Lightly apply the brake pedal to gradually stop the vehicle.
6. Turn on the hazard warning flashers and contact a roadside emergency service to
change the tire. For additional information, refer to “Changing a flat tire” in the “In case
of emergency” section of this manual.DRINKING ALCOHOL/DRUGS AND
DRIVING
Page 386 of 671

●Many hills are too steep for any vehicle.
If you drive up them, you may stall. If
you drive down them, you may not be
able to control your speed. If you drive
across them, you may roll over.
● Do not shift gears while driving on
downhill grades as this could cause
loss of control of the vehicle.
● Stay alert when driving to the top of a
hill. At the top there could be a drop-off
or other hazard that could cause an
accident.
● If your engine stalls or you cannot make
it to the top of a steep hill, never at-
tempt to turn around. Your vehicle could
tip or roll over. Always back straight
down in R (Reverse) gear and apply
brakes to control your speed.
● Heavy braking going down a hill could
cause your brakes to overheat and fade,
resulting in loss of control and an acci-
dent. Apply brakes lightly and use a low
gear to control your speed.
● Unsecured cargo can be thrown around
when driving over rough terrain. Prop-
erly secure all cargo so it will not be
thrown forward and cause injury to you
or your passengers. ●
Secure heavy loads in the cargo area as
far forward and as low as possible. Do
not equip the vehicle with tires larger
than specified in this manual. This could
cause your vehicle to roll over.
● Do not grip the inside or spokes of the
steering wheel when driving off-road.
The steering wheel could move sud-
denly and injure your hands. Instead
drive with your fingers and thumbs on
the outside of the rim.
● Before operating the vehicle, ensure
that the driver and all passengers have
their seat belts fastened.
● Lower your speed when encountering
strong crosswinds. With a higher center
of gravity, your NISSAN is more affected
by strong side winds. Slower speeds
ensure better vehicle control.
● Do not drive beyond the performance
capability of the tires, even with 4WD
engaged. ●
For 4WD equipped vehicles, do not at-
tempt to raise two wheels off the
ground and shift the transmission to
any drive or reverse position with the
engine running. Doing so may result in
drivetrain damage or unexpected ve-
hicle movement which could result in
serious vehicle damage or personal
injury.
● Do not attempt to test a 4WD equipped
vehicle on a 2-wheel dynamometer
(such as the dynamometers used by
some states for emissions testing) , or
similar equipment even if the other two
wheels are raised off the ground. Make
sure you inform test facility personnel
that your vehicle is equipped with 4WD
before it is placed on a dynamometer.
Using the wrong test equipment may
result in drivetrain damage or unex-
pected vehicle movement which could
result in serious vehicle damage or per-
sonal injury.
● Accelerating quickly, sharp steering
maneuvers or sudden braking may
cause loss of control.
Starting and driving5-9
Page 398 of 671
 position even with the
brake pedal depressed.
To move the shift lever, release the shift lock. The
s")
Shift lock release
If the battery is discharged, the shift lever may not
be moved from the P (Park) position even with the
brake pedal depressed.
To move the shift lever, release the shift lock. The
shift lever can be moved to N (Neutral) . However,
for models without the NISSAN Vehicle Immobi-
lizer System, the steering wheel will be locked
unless the ignition switch is turned to the ON
position. This allows the vehicle to be moved if
the battery is discharged.To push the shift lock release, complete the fol-
lowing procedure:
1.
Place the ignition switch to the LOCK position.
2. Apply the parking brake.
3. Remove the shift lock release cover. If a screwdriver is used to remove the cover, it
should be wrapped in a protective cloth to
prevent damage to the cover and surround-
ing plastic.
4. Insert a small object or finger in the shift lock release slot and push.
5. Move the shift lever to the N (Neutral) posi- tion while holding the shift lock release.
6. Now the vehicle may be moved to the de- sired location.
If the shift lever cannot be moved out of P (Park) ,
have the automatic transmission system checked
as soon as possible. It is recommended that you
visit a NISSAN dealer for this service.
Page 429 of 671

CAUTION
●After using the E-lock system, or during
normal driving, turn the switch off to
prevent possible damage to drivetrain
components from extended use.
● Avoid quick starts while the E-lock sys-
tem is in operation. Otherwise, the
drivetrain components could be
damaged.
● When the E-lock system is in operation,
turning the vehicle becomes difficult.
This can be dangerous, especially at
high speeds. Doing so could damage
drivetrain components.
● Do not operate the E-lock system when
the vehicle is turning or when one side
wheel is rotating. Otherwise, the drive-
train components could be damaged.
● The E-lock system operates only when
the engine is running.
● In 4H mode, the E-lock system does not
operate when the E-lock system switch
is turned to the ON position. (The E-lock
system indicator light will flash.)
● Observe the above cautions. Otherwise,
loss of normal steering control may
result. When the ignition switch is in the OFF position,
ECO management display appears.
�1Previous 5 times (History)
�2Current fuel economy
�3Best fuel economy
The result of ECO evaluation is displayed 30 sec-
onds after the ignition switch is placed in the ON
position and the vehicle is driven at least
1/3 miles (500 meters) .
�1The average fuel economy for the previous 5
times will be displayed.
�2The average fuel economy since the last
reset will be displayed.
�3The best fuel economy of the past history will
be displayed.
The ECO drive report can be set to be ON or
OFF.
Page 431 of 671
The power assisted steering uses a hydraulic
pump, driven by the engine, to assist steering.
If the engine stops or the drive belt breaks, you
will still have control of the vehicle. However,
much greater steering effort is needed, especially
in sharp turns and at low speeds.
Page 436 of 671

WARNING
●Never rely solely on the hill descent
control system to control vehicle speed
when driving on steep downhill grades.
Always drive carefully and attentively
when using the hill descent control sys-
tem and decelerate the vehicle speed by
depressing the brake pedal if neces-
sary. Be especially careful when driving
on frozen, muddy or extremely steep
downhill roads. Failure to control ve-
hicle speed may result in a loss of con-
trol of the vehicle and possible serious
injury or death.
● The hill descent control may not control
the vehicle speed on a hill under all load
or road conditions. Always be prepared
to depress the brake pedal to control
vehicle speed. Failure to do so may re-
sult in a collision or serious personal
injury. The hill descent control system can only be acti-
vated when the 4H or 4LO switch is engaged.
The hill descent control system helps maintain
vehicle speed when driving under 15 mph
(25 km/h) on steeper downhill grades. Hill de-
scent control is useful when engine braking alone
cannot control vehicle speed. Hill descent con-
trol applies the vehicle brakes to control vehicle
speed allowing the driver to concentrate on
steering while reducing the burden of brake and
accelerator operation.
If the hill descent control light is blinking, the hill
descent control is engaged; however, the hill
descent control will not control the vehicle
speed.
● Once the system is activated, the indicator
light will remain on in the instrument panel.
For additional information, refer to “Hill de-
scent control system ON indicator light” in
the “Instruments and controls” section of this
manual.
● You may hear a noise from under the hood or
feel a vibration from the actuator when it is
operating. This indicates that the HDC sys-
tem is working properly. If the accelerator or brake pedal is depressed
while the hill descent control system is on, the
system will stop operating temporarily. As soon
as the accelerator or brake pedal is released, the
hill descent control system begins to function
again if the hill descent control operating condi-
tions are fulfilled.
For the best results, when descending steep
downhill grades, the hill descent control switch
should be ON and the shift lever in M1 (First) for
engine braking.
HILL DESCENT CONTROL SYSTEM (if
so equipped)
Starting and driving5-59
Page 488 of 671
1. Power steering fluid pump pulley
2. Automatic belt tensioner pulley
3. Water pump pulley
4. Cooling fan pulley
5. Air conditioner compressor pulley
6. Crankshaft pulley
7. Generator pulley