Page 41 of 671

SEAT BELT WARNING LIGHT
Both the driver’s and passenger’s front seats are
equipped with a seat belt warning light. The
warning light, located on the instrument panel,
will show the status of the driver and passenger
seat belt.NOTE:
The front passenger seat belt warning light
will illuminate for a period of time. If the
seat is occupied and seat belt is latched
within that period of time, the light will go
out.
For additional information, refer to “Warning
lights, indicator lights and audible reminders” in
the “Instruments and controls” section of this
manual.
PREGNANT WOMEN
NISSAN recommends that pregnant women use
seat belts. The seat belt should be worn snug and
always position the lap belt as low as possible
around the hips, not the waist. Place the shoulder
belt over your shoulder and across your chest.
Never run the lap/shoulder belt over your ab-
dominal area. Contact your doctor for specific
recommendations.
INJURED PERSONS
NISSAN recommends that injured persons use
seat belts. Check with your doctor for specific
recommendations.
THREE-POINT TYPE SEAT BELT
WITH RETRACTOR
Page 158 of 671
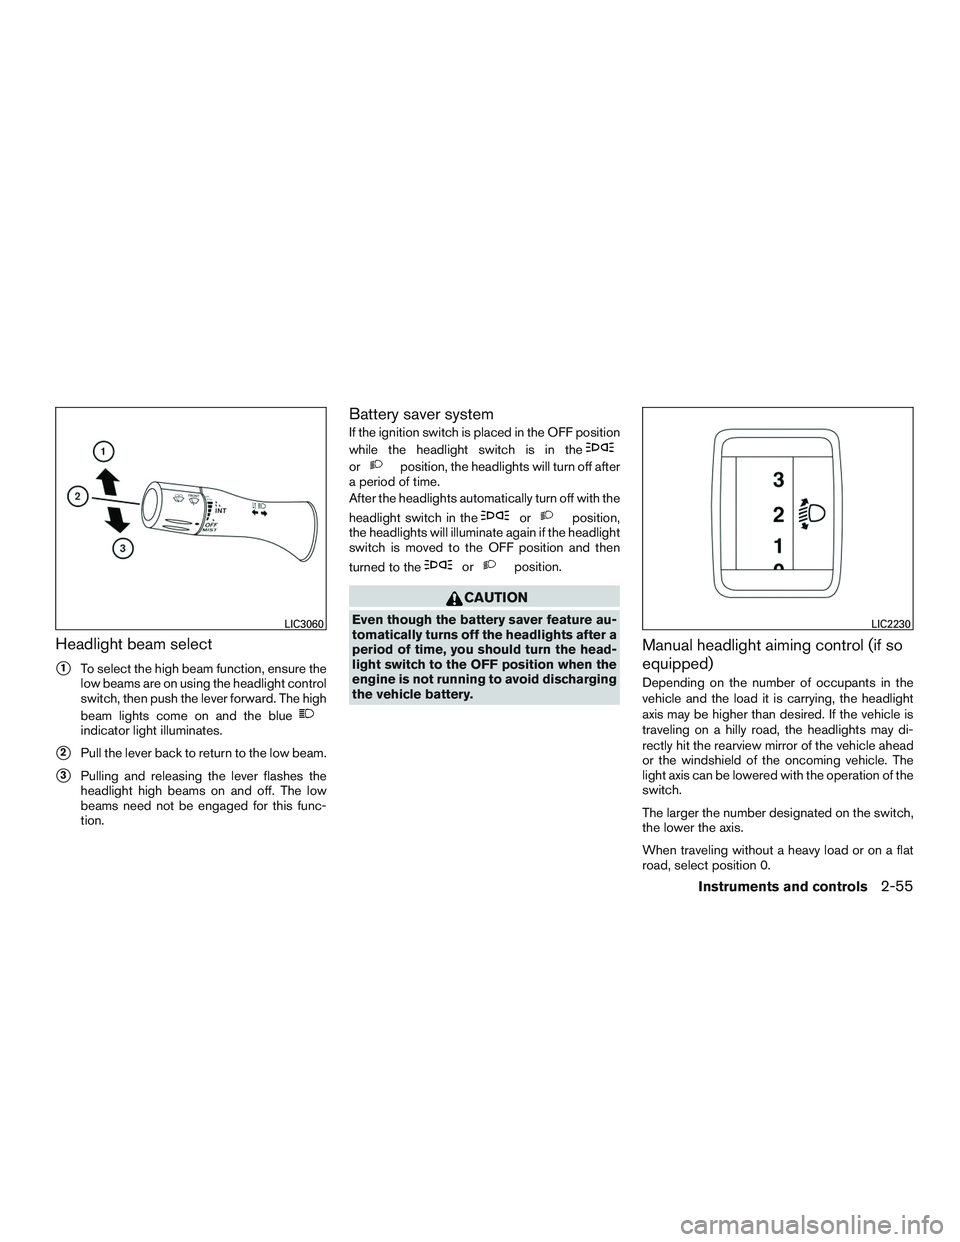
Headlight beam select
�1To select the high beam function, ensure the
low beams are on using the headlight control
switch, then push the lever forward. The high
beam lights come on and the blue
Page 173 of 671
●Only certain power outlets are designed
for use with a cigarette lighter unit. Do
not use any other power outlet for an
accessory lighter. It is recommended
that you visit a NISSAN dealer for addi-
tional information.
● Do not use with accessories that exceed
a 12 volt, 120W (10A) power draw.
● Do not use double adapters or more
than one electrical accessory.
● Use power outlets with the engine run-
ning to avoid discharging the vehicle
battery.
● Avoid using power outlets when the air
conditioner, headlights, or rear window
defroster (if so equipped) is on. ●
Before inserting or disconnecting a
plug, be sure the electrical accessory
being used is turned OFF.
● Push the plug in as far as it will go. If
good contact is not made, the plug may
overheat or the internal temperature
fuse may open.
● When not in use, be sure to close the
cap. Do not allow water or any other
liquid to contact the outlet.
Page 190 of 671

●Do not place objects through the
opened rear window. Do not use the
rear window as a cargo area pass-
through. This may result in damage to
the rear window system, or personal
injury.
Squeeze the handles of the lever
�1, then slide
the window open
�2.
The interior light has a three-position switch and
operates regardless of ignition switch position.
When the switch is in the ON position
�1, the
interior lights illuminate, regardless of door posi-
tion. The lights will go off after a period of time
unless the ignition switch is placed in the ON
position.
When the switch is in the DOOR or normal
operation position
�2, the interior lights, puddle
lights (if so equipped) , and cargo light will stay on
for a period of time when: ●
The doors are unlocked by the key fob, a key
or the power door lock switch while all doors
are closed and the ignition switch is in the
OFF position.
● The driver’s door is opened and then closed
while the key is removed from the ignition
switch.
● The key is removed from the ignition switch
while all doors are closed.
The lights will turn off while the timer is activated
when: ● The driver’s door is locked by the key fob, a
key, or the power door lock switch.
● The ignition switch is turned ON.
When the switch is in the OFF position
�3, the
interior lights do not illuminate, regardless of door
position. The puddle lights (if so equipped) and
cargo light come on when any front or rear pas-
senger door is opened.
The lights will turn off automatically after a period
of time while doors are open to prevent the bat-
tery from becoming discharged.
Page 191 of 671
CAUTION
Do not use for extended periods of time
with the engine stopped. This could result
in a discharged battery.
CONSOLE LIGHT (if so equipped)
The console light will turn on whenever the park-
ing lights or headlights are illuminated.
The console light brightness can be adjusted
with the illumination brightness control.
MAP LIGHTS (if so equipped)
To turn the map lights on, push the switches. To
turn them off, push the switches again.
Page 192 of 671

To turn the rear personal lights on, push the
switch. To turn them off, push the switch again.The HomeLink® Universal Transceiver provides
a convenient way to consoli")
PERSONAL LIGHTS (if so equipped)
To turn the rear personal lights on, push the
switch. To turn them off, push the switch again.The HomeLink® Universal Transceiver provides
a convenient way to consolidate the functions of
up to three individual hand-held transmitters into
one built-in device.
HomeLink® Universal Transceiver:
● Will operate most radio frequency devices
such as garage doors, gates, home and of-
fice lighting, entry door locks and security
systems.
● Is powered by your vehicle’s battery. No
separate batteries are required. If the vehi-
cle’s battery is discharged or is discon-
nected, HomeLink® will retain all program-
ming.
When the HomeLink® Universal Trans-
ceiver is programmed, retain the original
transmitter for future programming proce-
dures (Example: new vehicle purchases) .
Upon sale of the vehicle, the programmed
HomeLink® Universal Transceiver buttons
should be erased for security purposes. For
additional information, refer to “Program-
ming HomeLink®” in this section.
Page 225 of 671
CARD HOLDER (driver’s side only)
To access the card holder, slide card in the card
holder. Do not view information while operating
the vehicle.
MANUAL ANTI-GLARE REARVIEW
MIRROR (if so equipped)
Use the night position�1to reduce glare from
the headlights of vehicles behind you at night.
Use the day position
�2when driving in daylight
hours.
Page 326 of 671
1. Status lights
2. Disc Compartment Slot
3. IR Sensor/Transmitter
4. Monitor Adjustment
5. TFT LCD Panel
6. USB Port7. Audio Video Output Jack
8. Headphone Output Jack
9. Audio Video Input Jacks
10. I/O Port Covers
11. Lever Lock and Release Latch
FRONT PANEL BUTTONS


The console light will turn on whenever the park-
ing")

To access the card holder, slide card in the card
holder. Do not view information while operating
the vehicle.
MANUAL ANTI-GLARE REARVIEW
MIRROR (if so equipped)
Use")
