2017 NISSAN TITAN steering
[x] Cancel search: steeringPage 2 of 40

Beneath the
instrument panel
2
3
5
4
1617
7
8
18
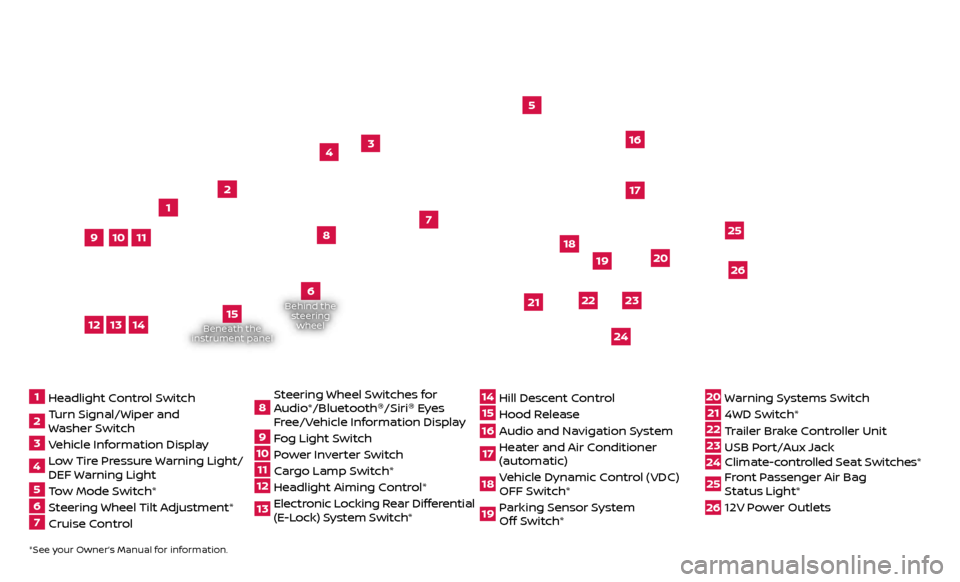
*See your Owner’s Manual for information.1 Headlight Control Switch2 Turn Signal/Wiper and
Washer Switch3 Vehicle Information Display4 L ow Tire Pressure Warning Light/
DEF Warning Light5 Tow Mode Switch*6 Steering Wheel Tilt Adjustment*7 Cruise Control
8 S teering Wheel Switches for
Audio*/Bluetooth ®
/Siri ®
Eyes
Free/Vehicle Information Display9 Fog Light Switch10 P ower Inverter Switch11 C argo Lamp Switch*12 He adlight Aiming Control*13 Elec tronic Locking Rear Differential
(E-Lock) System Switch*
14 Hil l Descent Control15 Hood Release16 Audio and Navigation System 17 He ater and Air Conditioner
(automatic)18 Vehicle Dynamic Control (VDC) OFF Switch*19 P arking Sensor System
Off Switch*
20 Warning Systems Switch21 4WD Switch*22 T railer Brake Controller Unit23 USB Port/Aux Jack24 Climate-c ontrolled Seat Switches* 25 Front Passenger Air Bag
Status Light*26 12V Power Outlets
23
1
24
15
21
6
Behind the
steering wheel
2219
2526
11
9
1013
12
14
20
Page 11 of 40

9
SiriusXM TRAVEL LINK1 AND SiriusXM TRAFFIC1
(if so equipped)
Your vehicle’s Navigation System is equipped
with SiriusXM Travel Link and SiriusXM
Traffic capabilities.
SiriusXM Travel Link provides access to
real-time weather information and forecasts,
nearby fuel prices, movie listings, sports
scores and stock quotes.
SiriusXM Traffic provides information that
may help to avoid delays due to traffic
incidents. Traffic jams, roadwork, road
closures around the current location, etc., are
represented graphically on the map by icons
depicting the nature of the event. Incidents
on the route are automatically displayed as they are approached.
1 Required monthly subscriptions sold separately for each available SiriusXM feature af ter trial period, and are continuous until you call SiriusXM to cancel. Installation costs, one-time activation fee, other fees and
taxes will apply. Each SiriusXM feature availability is dependent upon vehicle model, trim level, packaging,
and/or options, and may only be available in select markets. Satellite Radio U.S. service, NavWeather
service, and SiriusXM TravelLink services (if any of the foregoing features are equipped on vehicle)
available only to those 18 or older in the 48 contiguous states and D.C. Fees and programming subject
to change. Subscriptions governed by Customer Agreement available at siriusxm.com. ©2016 Sirius XM
Radio Inc. Sirius, XM and all related marks and logos are trademarks of Sirius XM Radio Inc.
For more information, refer to the “Navigation (section 4)” and the “General system information
(section 6)” of your Navigation System Owner’s Manual.
SIRI ®
EYES FREE1 (if so equipped)
If you have a compatible iPhone ®,2 with
Siri ®
, you can link your iPhone ®
to the
Siri ®
Eyes Free function in your vehicle’s
Bluetooth ®
,1 system.
If you have a compatible iPhone ®
connected
to the system, press and hold the
button
1 on the steering wheel for a few seconds
and Siri will be activated in Eyes Free mode.
1 Driving is serious business and r equires your full attention. Only use feature when safe to do so.
Compatible smartphone required. Availability of specific feature is dependent upon the phone’s
Bluetooth® support. Please refer to your phone owner’s manual for details. Bluetooth word mark and
logos are owned by Bluetooth SIG, Inc., and any use of such marks by Nissan is under license. See
http://www.NissanUSA.com/bluetooth for details. Text rates and/or data usage may apply. Certain
services, including Siri, are provided by independent companies not within Nissan’s control. Should
service provider terminate/restrict service, service may be suspended or terminated without notice or
liability to Nissan and/or its agents. Nissan not responsible for any equipment replacement or upgrades,
or associated costs, that may be required for continued operation due to service changes. Siri Eyes Free
is a registered trademark of Apple, Inc.
2 iPhone is a registered trademark of Apple, Inc. All rights reserved. iPhone not included.
For more information, refer to the “Monitor, climate, audio, phone and voice recognition systems
(section 4)” of your Owner’s Manual and visit www.NissanUSA.com/bluetooth.
1
To view detailed instructional videos regarding these and other features, please go to www.nissanownersinfo.mobi.
Page 18 of 40

16
FIRST DRIVE FEATURES
AUTOMATIC DRIVE POSITIONER (if so equipped)
Two positions for the driver’s seat, steering column and outside mirrors (if so equipped)
can be stored in the automatic drive
positioner memory.
Follow this procedure to set the memory positions:
•
C
onfirm that the shif t lever is in the
P (PARK) position.
• Plac
e the ignition switch in the ON or ACC position.
•
A
djust the driver’s seat, steering column and outside mirrors (if so equipped) to
the desired positions using the adjusting switches for each feature.
•
Push the SET switch, and within 5 seconds, push the memory switch (1 or 2) for
at least 1 second.
• The indic
ator light on the memory switch you select will illuminate for
approximately 5 seconds.
• The driv
er’s seat, steering column and outside mirror positions (if so equipped)
are now set to your preferences.
These memoriz ed positions can also be linked to your Nissan Intelligent Key ®
.
To link a memorized position to your Nissan Intelligent Key ®
, press the unlock
button on the key fob af ter completing the previous step.
For more information, refer to the “Pre-driving checks and adjustments (section 3)” of your
Owner’s Manual.
3. Move the shif t lever to the R (REVERSE) position.
4.
Both outside mirr
or surfaces will turn downward. (The mirror control switch
1 must be out of the center [neutral] position.)
The outside mirr or surfaces will return to their original positions when one of
the following conditions occurs:
• The shif
t lever is moved to any position other than
R (REVERSE).
•
The outside mirror control switch
1 is set to the center (neutral) position.
•
The ignition switch is placed in the
OFF position.
POWER FOLDING OUTSIDE MIRRORS (if so equipped)
To open or close the mirrors, push the switch 2.
For more information, refer to the “Pre-driving checks and adjustments (section 3)” of your
Owner’s Manual.
To view detailed instructional videos regarding these and other features, please go to www.nissanownersinfo.mobi.
Page 24 of 40

22
CRUISE CONTROL
The cruise control system enables you to set
a constant cruising speed once the vehicle
has reached 25 mph (40 km/h).
The system wil l automatically maintain the
set speed until you tap the brake pedal,
accelerate, cancel or turn the system off.
To activate the cruise control, push the
ON/OFF switch 1 on the steering wheel.
The
CRUISE indicator light in the vehicle
information display will illuminate.
To set a cruising speed, accelerate the vehicle to the desired speed, push the
COAST/SET switch 2 on the steering wheel and release. The SET indicator
light in the vehicle information display will illuminate. Take your foot off the
accelerator pedal. Your vehicle will maintain the set speed.
To reset at a faster cruising speed, push up and hold the ACCEL/RES switch 3
on the steering wheel. When the vehicle attains the desired speed, release
the switch.
To reset at a slower cruising speed, push down and hold the COAST/SET switch
2 on the steering wheel. Release the switch when the vehicle slows to the
desired speed.
To cancel the preset speed, tap the brake pedal or push the CANCEL switch 4
on the steering wheel.
To turn off cruise control, push the ON/OFF switch 1 on the steering
wheel. Both the CRUISE indicator light and SET indicator light in the vehicle
information display will extinguish.
For more information, refer to the “Starting and driving (section 5)” of your Owner’s Manual.
4
3
2
1
FIRST DRIVE FEATURES
To view detailed instructional videos regarding these and other features, please go to www.nissanownersinfo.mobi.
Page 26 of 40

24
VEHICLE INFORMATION DISPLAY
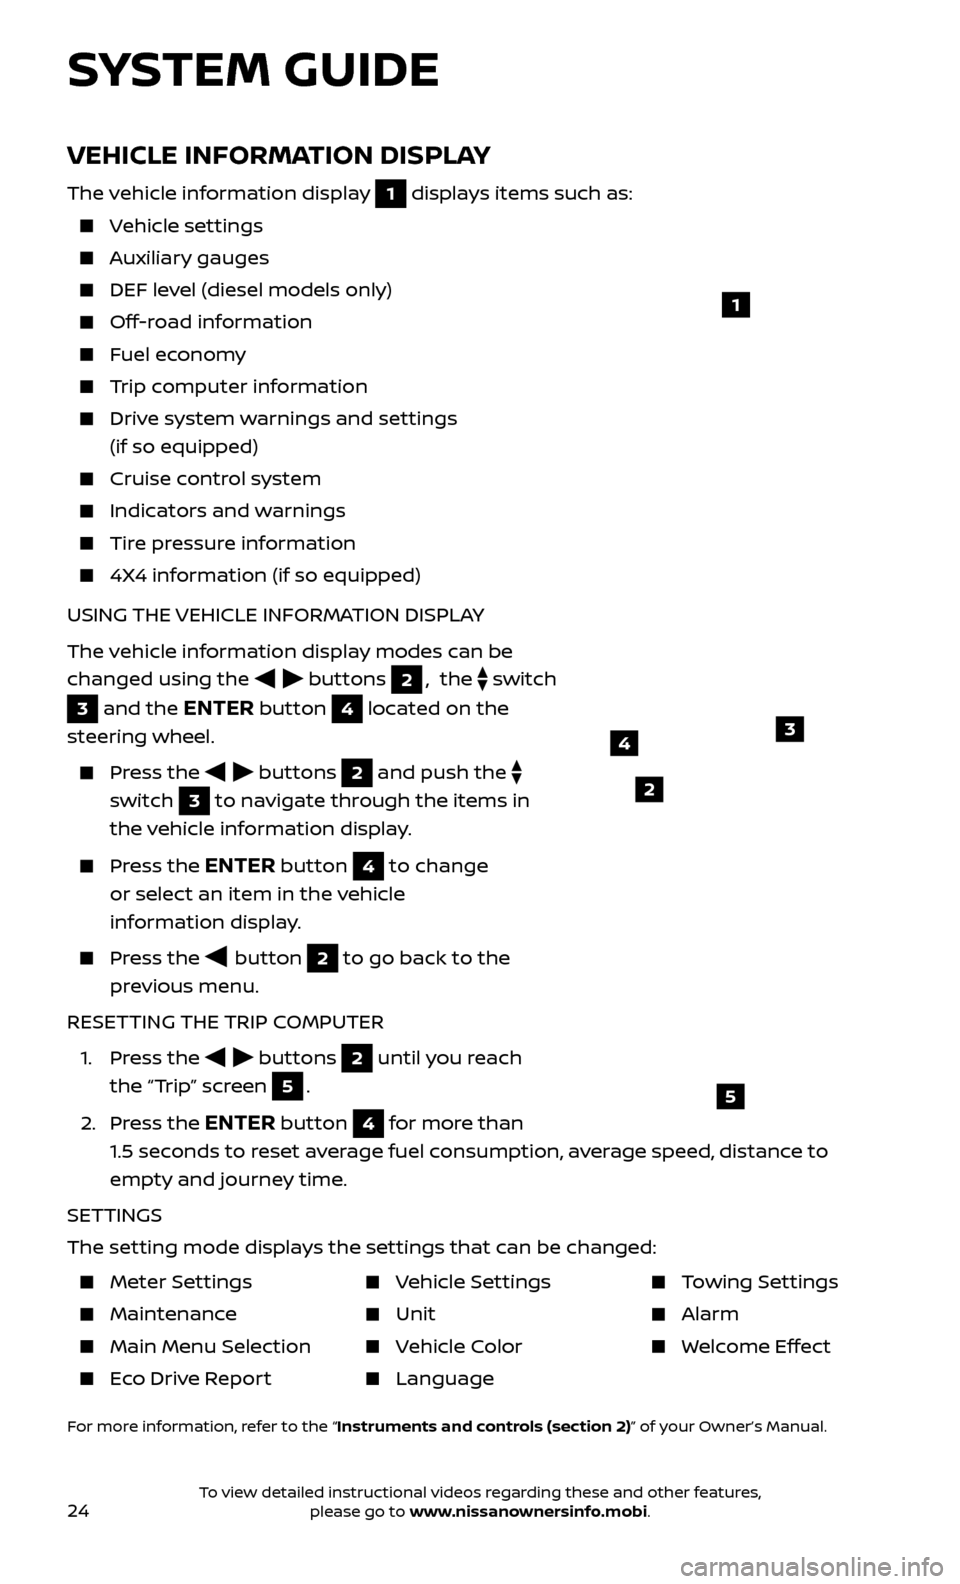
The vehicle information display 1 displays items such as:
Vehicle settings
Auxiliary gauges
DEF level (diesel models only)
Off-road information
Fuel economy
Trip computer information
Drive system warnings and settings (if so equipped)
Cruise control system
Indicators and warnings
Tire pressure information
4X4 information (if so equipped)
USING THE VEHICLE INFORMATION DISPLAY
The vehicle information display modes can be
changed using the
buttons 2, the switch
3 and the ENTER button 4 located on the
steering wheel.
Press the buttons 2 and push the
switch
3 to navigate through the items in
the vehicle information display.
Press the ENTER button 4 to change
or select an item in the vehicle
information display.
Press the button 2 to go back to the
previous menu.
RESETTING THE TRIP COMPUTER
1.
Press the
buttons 2 until you reach
the “Trip” screen
5.
2.
Press the
ENTER button 4 for more than
1.5 seconds to reset average fuel consumption, average speed, distance to
empty and journey time.
SETTINGS
The setting mode displays the settings that can be changed:
1
34
5
2
SYSTEM GUIDE
Meter Settings
Maintenance
Main Menu Selec tion
Eco Drive Report
Vehicle Settings
Unit
Vehicle Color
Language
Towing Settings
Alarm
Welcome Effect
For more information, refer to the “Instruments and controls (section 2)” of your Owner’s Manual.
To view detailed instructional videos regarding these and other features, please go to www.nissanownersinfo.mobi.
Page 29 of 40

27
BLUETOOTH®
HANDS-FREE PHONE SYSTEM1
A cellular telephone should not be used while driving so full attention may be
given to vehicle operation2.
SYSTEM OPERATING TIPS
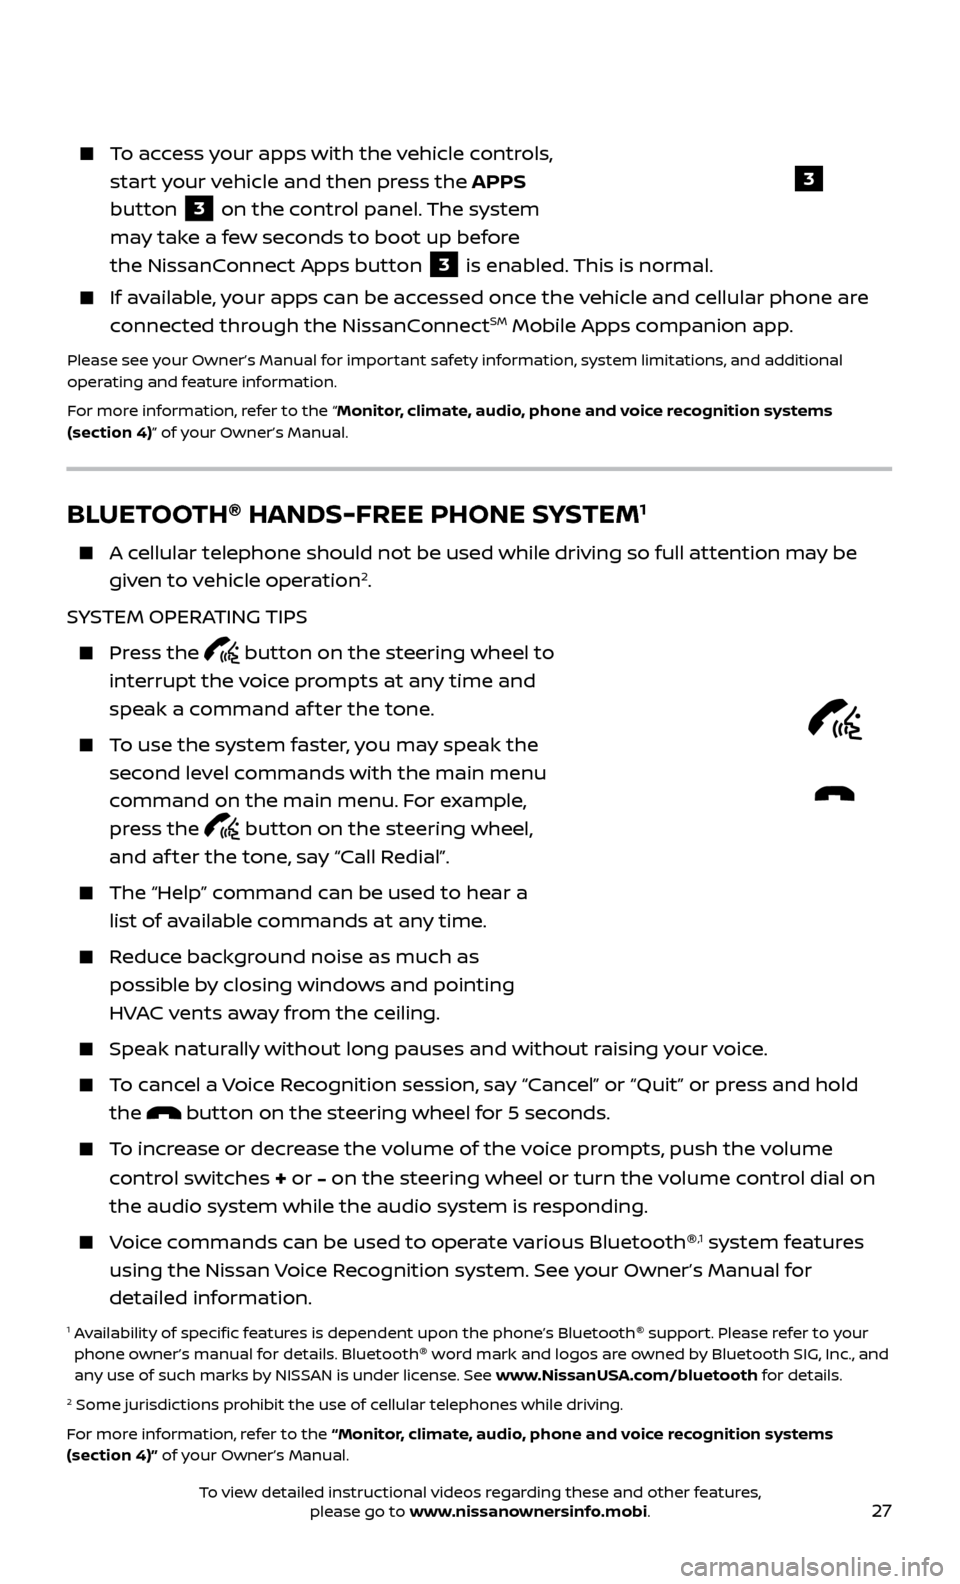
Press the button on the steering wheel to
interrupt the voice prompts at any time and
speak a command af ter the tone.
To use the system faster, you may speak the second level commands with the main menu
command on the main menu. For example,
press the
button on the steering wheel,
and af ter the tone, say “Call Redial”.
The “Help” c ommand can be used to hear a
list of available commands at any time.
Reduce background noise as much as possible by closing windows and pointing
HVAC vents away from the ceiling.
Speak naturally without long pauses and without raising your voice.
To cancel a Voice Recognition session, say “Cancel” or “Quit” or press and hold the
button on the steering wheel for 5 seconds.
To increase or decrease the volume of the voice prompts, push the volume
control switches
+ or – on the steering wheel or turn the volume control dial on
the audio system while the audio system is responding.
Voice commands can be used to operate various Bluetooth ®,1 system features
using the Nissan Voice Recognition system. See your Owner’s Manual for
detailed information.
1 Availability of specific features is dependent upon the phone’s Bluetooth ®
support. Please refer to your
phone owner’s manual for details. Bluetooth ®
word mark and logos are owned by Bluetooth SIG, Inc., and
any use of such marks by NISSAN is under license. See www.NissanUSA.com/bluetooth for details.
2 Some jurisdictions prohibit the use of cellular telephones while driving.
For more information, refer to the “Monitor, climate, audio, phone and voice recognition systems
(section 4)” of your Owner’s Manual.
Microphone
To access your apps with the vehicle controls,
start your vehicle and then press the APPS
button
3 on the control panel. The system
may take a few seconds to boot up before
the NissanConnect Apps button
3 is enabled. This is normal.
If available, your apps can be accessed once the vehicle and cellular phone are
connected through the NissanConnectSM Mobile Apps companion app.
Please see your Owner’s Manual for important safety information, system limitations, and additional
operating and feature information.
For more information, refer to the “Monitor, climate, audio, phone and voice recognition systems
(section 4)” of your Owner’s Manual.
3
To view detailed instructional videos regarding these and other features, please go to www.nissanownersinfo.mobi.
Page 30 of 40

28
BLUETOOTH®
SYSTEM WITHOUT NAVIGATION1, 2
(if so equipped)
CONNECTING PROCEDURE3
The vehicle must be stationary when connecting the cellular phone.
1.
Press the
button on the steering wheel. The system announces the
available commands.
2.
Sa
y: “Add Phone”. The system acknowledges the command and asks you to
initiate connecting from the cellular phone handset.
3.
Initiate c
onnecting from the cellular phone:
The connecting procedure varies according to each cellular phone model. For detailed connecting instructions and a list of compatible cellular phones,
please visit
www.NissanUSA.com/bluetooth.
When prompted, confirm that the PIN on the display matches the PIN shown on the handset. If your handset does not support Secure Simple Pairing and
requests you to input a PIN, enter “1234” from the handset.
PHONEBOOK SETUP
The phonebook stor es up to 1,000 entries for each cellular phone paired with
the system.
Depending on y our cellular phone, the system may automatically download
your cellular phone’s entire phonebook to the vehicle’s Bluetooth ®,2 system.
MAKING A CALL FROM THE PHONEBOOK
1. Pr
ess the
button on the steering wheel.
2.
A
f ter waiting for the tone, say “Call” followed by the name of a phonebook entry.
For example, “Call Michael Smith”.
3. C
onfirm the correct name is recognized by saying “Dial” af ter the tone.
MAKING A CALL BY PHONE NUMBER
1. Pr
ess the
button on the steering wheel. A tone will sound.
2.
Sa
y: “Phone”. The system acknowledges the command and announces the next
set of available commands.
3.
Sa
y: “Dial Number”. The system acknowledges the command and announces the
next set of available commands.
4.
Sa
y the number you wish to call starting with the area code in single
digit format.
5
.
When y
ou have finished speaking the phone number, the system repeats it back
and announces the available commands.
6
.
Sa
y: “Dial”. The system acknowledges the command and makes the call.
SYSTEM GUIDE
To view detailed instructional videos regarding these and other features, please go to www.nissanownersinfo.mobi.
Page 31 of 40

29
RECEIVING/ENDING A CALL
When you receive a cellular phone call, a ring tone sounds through the audio system.
To accept the call, press the button on the steering wheel.
To reject the call, press the button on the steering wheel.
To hang up the cellular phone at the end of a call or to disconnect during call placement, press the
button on the steering wheel.
1 Some jurisdictions prohibit the use of cellular telephones while driving.2 Availability of specific features is dependent upon the phone’s Bluetooth ®
support. Please refer to your
phone owner’s manual for details. Bluetooth ®
word mark and logos are owned by Bluetooth SIG, Inc., and
any use of such marks by NISSAN is under license. See www.NissanUSA.com/bluetooth for details.
3 Laws in some jurisdictions may restrict the use of “Text-to-Speech”. Some applications and features, such as social networking and texting, may also be restricted. Check local regulations for any requirements
before using these features.
Compatible smartphone required. Text rates and/or data usage may apply.
To view detailed instructional videos regarding these and other features, please go to
www.nissanownersinfo.mobi.
For more information, refer to the “Monitor, climate, audio, phone and voice recognition systems
(section 4)” of your Owner’s Manual.
BLUETOOTH ®
SYSTEM WITH NAVIGATION1, 2, 3 (if so equipped)
Send predefined or custom text messages4
through your vehicle’s Bluetooth ®,2 system.
Receive texts through your vehicle’s
Bluetooth ®,2 system that can be read to you.
Bluetooth®,2 Streaming Audio allows you to
use a compatible Bluetooth ®,2 device to play
audio files on your device. Your compatible
device can be connected to the vehicle’s
audio system, allowing audio files to play
through the vehicle’s speakers.
CONNECTING PROCEDURE
1.
Press the
button on the
control panel.
2.
T
ouch the “Settings” key
1.
3.
T
ouch the “Phone & Bluetooth” key
2.
4.
T
ouch the “Connect New Device” key
3.
5
.
Initiate the c
onnecting process from the
handset. The system will display the message:
“C
onfirm on your Bluetooth device that the
PIN xxxxxx is displayed.”
If the PIN is displa
yed on your Bluetooth ®
,2
device, select “ Yes/Pair” to complete the
connecting process.
1
2
3
To view detailed instructional videos regarding these and other features, please go to www.nissanownersinfo.mobi.