2017 NISSAN TITAN light
[x] Cancel search: lightPage 2 of 40
Beneath the
instrument panel
2
3
5
4
1617
7
8
18
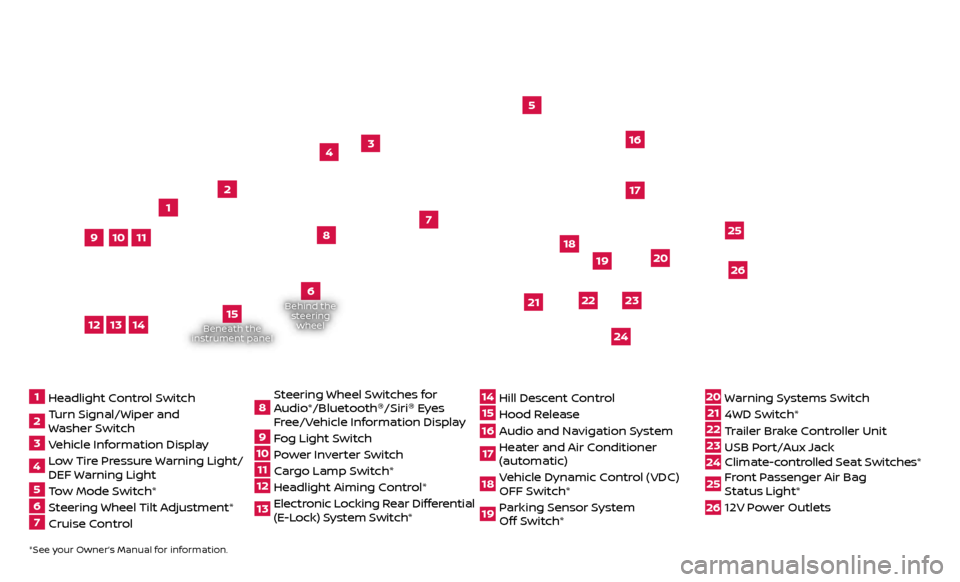
*See your Owner’s Manual for information.1 Headlight Control Switch2 Turn Signal/Wiper and
Washer Switch3 Vehicle Information Display4 L ow Tire Pressure Warning Light/
DEF Warning Light5 Tow Mode Switch*6 Steering Wheel Tilt Adjustment*7 Cruise Control
8 S teering Wheel Switches for
Audio*/Bluetooth ®
/Siri ®
Eyes
Free/Vehicle Information Display9 Fog Light Switch10 P ower Inverter Switch11 C argo Lamp Switch*12 He adlight Aiming Control*13 Elec tronic Locking Rear Differential
(E-Lock) System Switch*
14 Hil l Descent Control15 Hood Release16 Audio and Navigation System 17 He ater and Air Conditioner
(automatic)18 Vehicle Dynamic Control (VDC) OFF Switch*19 P arking Sensor System
Off Switch*
20 Warning Systems Switch21 4WD Switch*22 T railer Brake Controller Unit23 USB Port/Aux Jack24 Climate-c ontrolled Seat Switches* 25 Front Passenger Air Bag
Status Light*26 12V Power Outlets
23
1
24
15
21
6
Behind the
steering wheel
2219
2526
11
9
1013
12
14
20
Page 3 of 40
v
NEW SYSTEM FEATURESNissanConnectSM Services Powered by SiriusXM® (if so equipped) . . . . . . . . . . . . . . . . . . . . 2
Around View ®
Monitor (AVM) with Moving Object Detection (MOD) (if so equipped)...4
Hil
l Start Assist (HSA) and Hill Descent Control (HDC) (if so equipped)
.................5
Blind Spot
Warning (BSW) with Rear Cross Traffic Alert (RCTA) (if so equipped)
.......6
T
owing
.......................................................................\
..........
7
Diesel Exhaust Fluid (DEF) (diesel models onl
y)
........................................8
Diesel P
articulate Filter (DPF) (diesel models only)
.....................................8
Siri ®
E
yes Free (if so equipped)
.........................................................9
SiriusXM
Travel Link and SiriusXM Traffic (if so equipped) .............................
9
ESSENTIAL INFORMATIONTire Pressure Monitoring System (TPMS) with Easy-Fill Tire Alert ....................10
L oose Fuel Cap (gas engine models only) .............................................11
F
uel-filler Door and Diesel Exhaust Fluid (DEF) Cap
....................................11
Wide Open Door (King C
ab models only) ..............................................
11
Clock Set/A
djustment ................................................................
12
FIRST DRIVE FEATURESNissan Intelligent Key®
System .......................................................13
Opening the Tailgate..................................................................14
P
ower Seat Adjustments (if so equipped)
............................................14
R
ear Seats (if so equipped)
............................................................15
Outside Mirr
or Control Switch (if so equipped) . . . . . . . . . . . . . . . . . . . . . . . . . . . . . . . . . . . .\
. . . 15
Automatic Drive Positioner (if so equipped)
..........................................
16
He
adlight Control Switch .............................................................
17
Wiper and
Washer Switch
.............................................................18
S
tarting/Stopping the Engine ........................................................
18
He
ater and Air Conditioner (automatic) (if so equipped) .............................
19
USB (Univ
ersal Serial Bus) Connection Port/Aux Jack and iPod ®
Interface
..........
20
FM/AM/SiriusXM ®
Satel
lite Radio with CD Player (if so equipped)
....................21
Cruise C
ontrol
........................................................................\
.22
P
ower Outlets
........................................................................\
.23
SYSTEM GUIDEVehicle Information Display...........................................................24
Hands-fr ee Text Messaging Assistant ................................................25
NissanC
onnect
SM Mobile Apps . . . . . . . . . . . . . . . . . . . . . . . . . . . . . . . . . . . .\
. . . . . . . . . . . . . . . . . . . . 26
Bluetooth ®
Hands-free Phone System
...............................................27 • S
ystem Operating Tips ...........................................................
27
Bluetooth ®
S
ystem without Navigation (if so equipped) .............................
28
Bluetooth ®
S
ystem with Navigation (if so equipped)
.................................29
Nissan Mobile Enter
tainment System (MES) (if so equipped)
.........................31
Na
vigation System (if so equipped)
...................................................32
HomeLink ®
Univ
ersal Transceiver (if so equipped)
....................................34
TABLE OF CONTENTS
Please see your Owner’s Manual for important safety information and system operation limitations.
• A c ellular telephone should not be used for any purpose while driving
so full attention may be given to vehicle operation.
• Always wear your seat belt.
• Supplemental air bags do not replace proper seat belt usage.
•
Childr
en 12 and under should always ride in the rear seat properly secured
in child restraints or seat belts according to their age and weight.
• Do not drink and drive.
For more information, refer to the “Safety — Seats, seat belts and supplemental restraint system (section 1)” ,
the “Monitor, climate, audio, phone and voice recognition systems (section 4)” and the “Starting and driving
(section 5)” of your Owner’s Manual.
Additional information about your vehicle is also available in your Owner’s Manual,
Navigation System Owner’s Manual and at www.NissanUSA.com.
To view detailed instructional videos regarding these and other features, please go to www.nissanownersinfo.mobi.
Page 8 of 40
6
BLIND SPOT WARNING (BSW)1 WITH REAR CROSS TRAFFIC
ALERT (RCTA) (if so equipped)
The BSW helps to alert the driver when
another vehicle moves into the vehicle’s
detection zone.
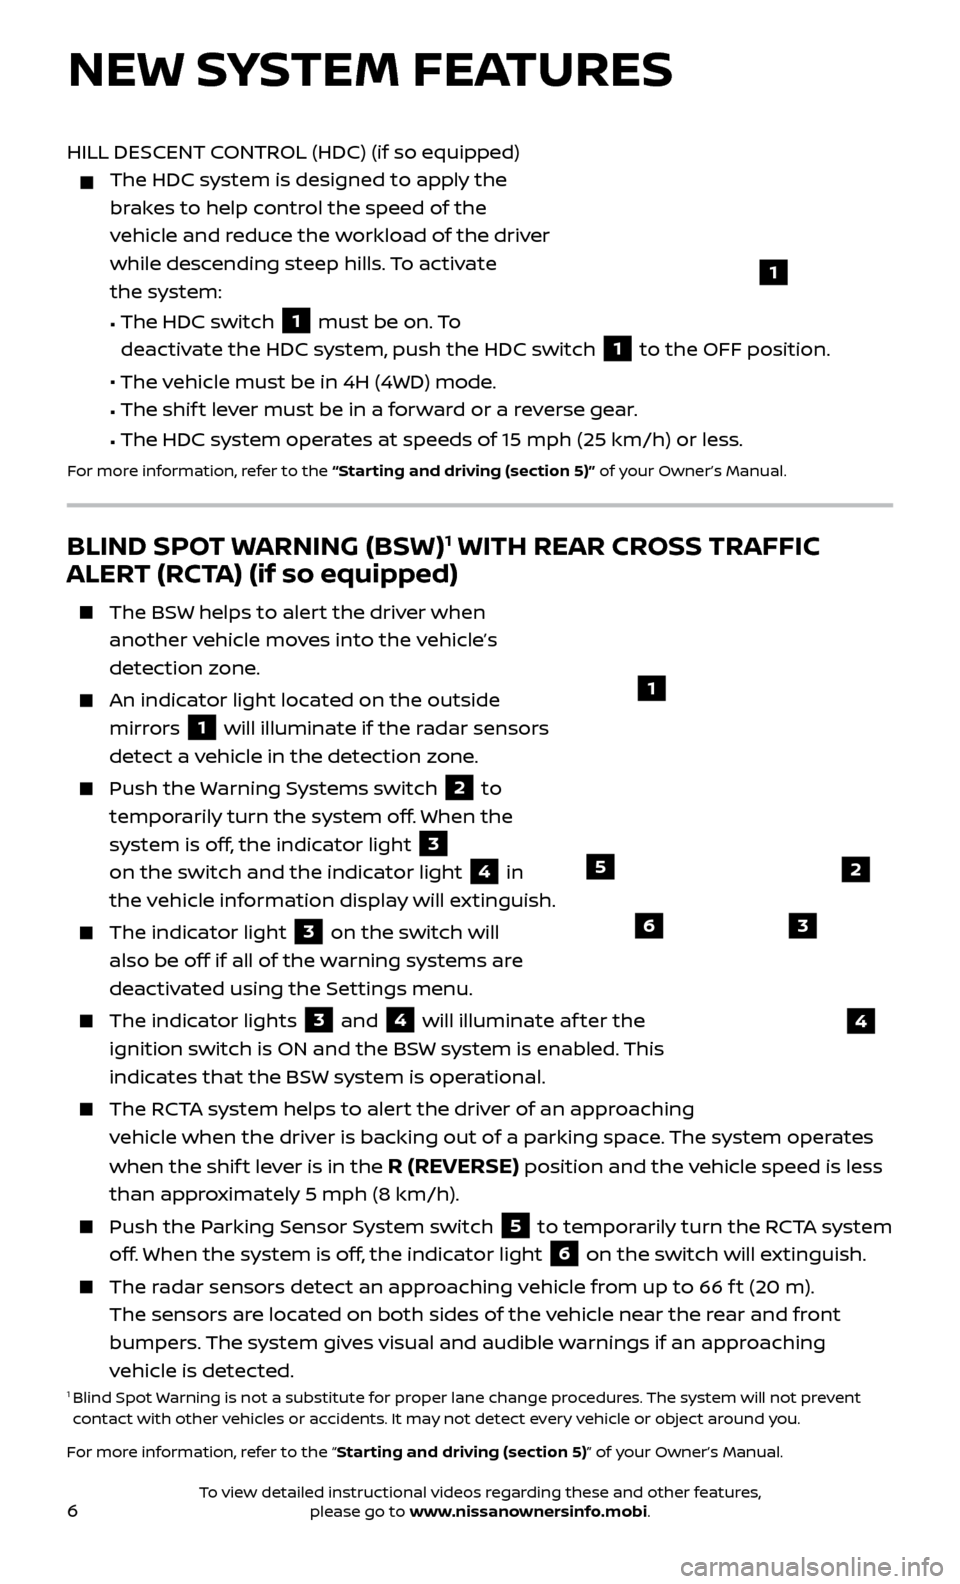
An indicator light located on the outside mirrors
1 will illuminate if the radar sensors
detect a vehicle in the detection zone.
Push the Warning Systems switch 2 to
temporarily turn the system off. When the
system is off, the indicator light
3
on the switch and the indicator light
4 in
the vehicle information display will extinguish.
The indic ator light 3 on the switch will
also be off if all of the warning systems are
deactivated using the Settings menu.
The indic ator lights 3 and 4 will illuminate af ter the
ignition switch is ON and the BSW system is enabled. This
indicates that the BSW system is operational.
The RCTA system helps to alert the driver of an approaching vehicle when the driver is backing out of a parking space. The system operates
when the shif t lever is in the
R (REVERSE) position and the vehicle speed is less
than approximately 5 mph (8 km/h).
Push the P arking Sensor System switch 5 to temporarily turn the RCTA system
off. When the system is off, the indicator light
6 on the switch will extinguish.
The radar sensors detect an approaching vehicle from up to 66 f t (20 m). The sensors are located on both sides of the vehicle near the rear and front
bumpers. The system gives visual and audible warnings if an approaching
vehicle is detected.
1 Blind Spot Warning is not a substitute for proper lane change procedures. The system will not prevent
contact with other vehicles or accidents. It may not detect every vehicle or object around you.
For more information, refer to the “Starting and driving (section 5)” of your Owner’s Manual.
1
NEW SYSTEM FEATURES
HILL DESCENT CONTROL (HDC) (if so equipped)
The HDC system is designed to appl y the
brakes to help control the speed of the
vehicle and reduce the workload of the driver
while descending steep hills. To activate
the system:
•
The HDC switch 1 must be on. To
deactivate the HDC system, push the HDC switch
1 to the OFF position.
•
The vehicle must be in 4H (4WD) mode.
•
The shif
t lever must be in a forward or a reverse gear.
•
The HDC system oper
ates at speeds of 15 mph (25 km/h) or less.
For more information, refer to the “Starting and driving (section 5)” of your Owner’s Manual.
1
4
5
6
2
3
To view detailed instructional videos regarding these and other features, please go to www.nissanownersinfo.mobi.
Page 9 of 40
7
TOWING1
TRAILER BRAKE CONTROLLER UNIT (if so equipped)
The
Trailer Brake Controller Unit will assist with effective and smooth braking while
towing a trailer.
Operating Modes
•
A
utomatic: Automatic operation of trailer brake pressure based on gain and
boost settings.
•
Manual
: Manually applies trailer brake pressure without pressing the vehicle’s
brake pedal.
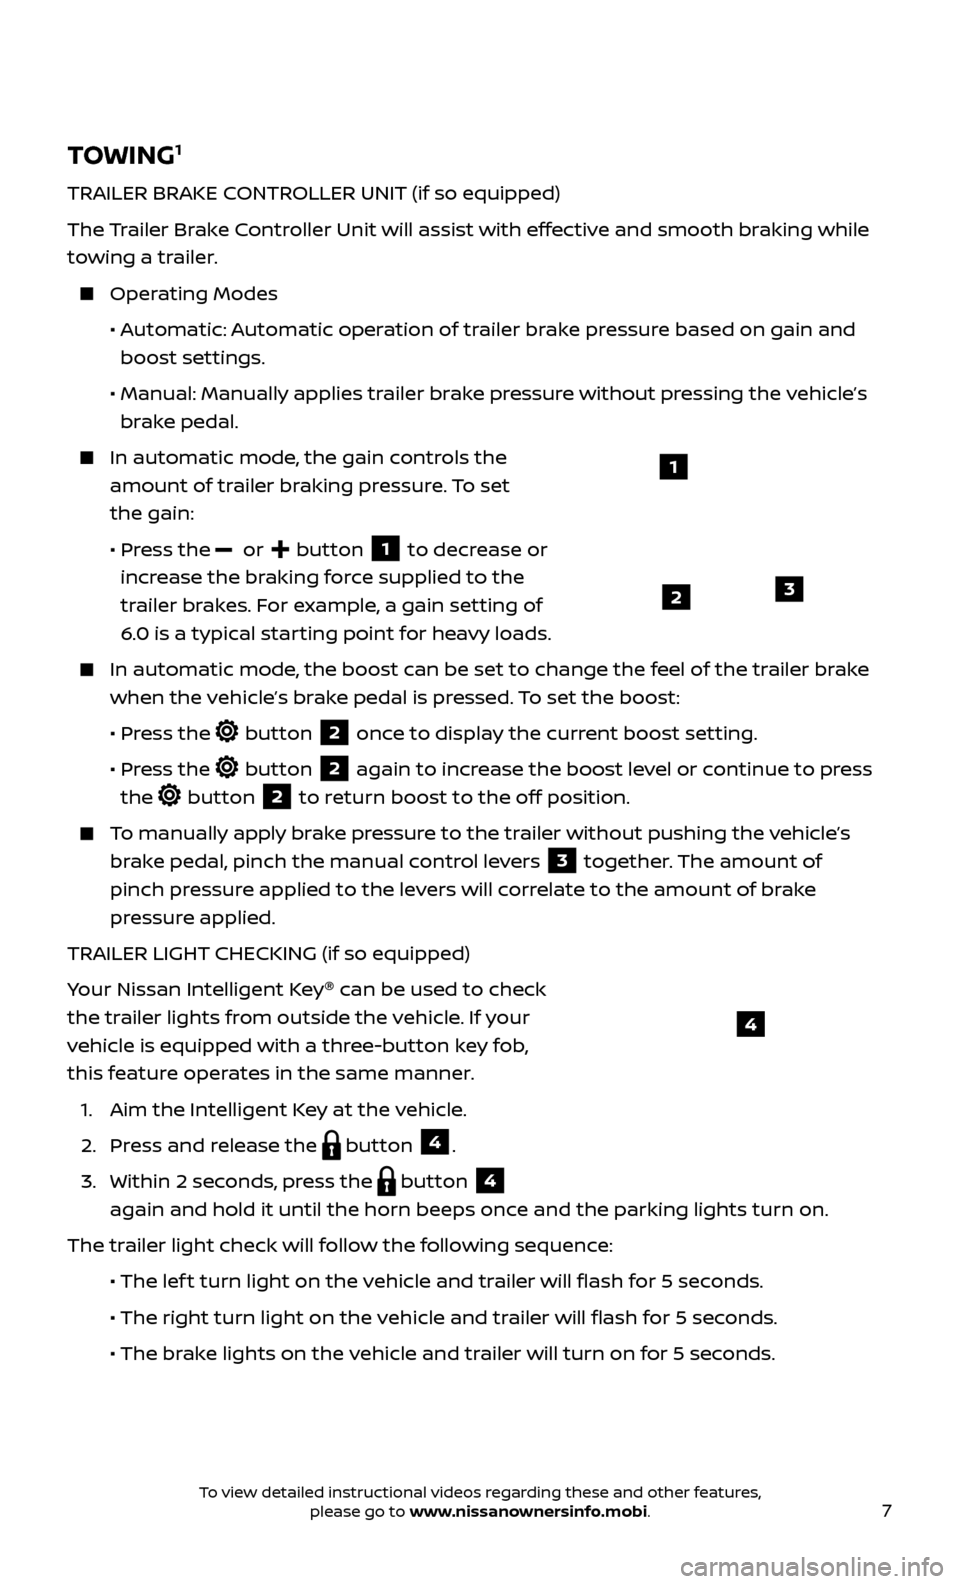
In automatic mode, the gain controls the
amount of trailer braking pressure. To set
the gain:
•
Pr
ess the
or button 1 to decrease or
increase the braking force supplied to the
trailer brakes. For example, a gain setting of
6.0 is a typical starting point for heavy loads.
In automatic mode, the boost can be set to change the feel of the trailer brake
when the vehicle’s brake pedal is pressed. To set the boost:
•
Pr
ess the
button 2 once to display the current boost setting.
•
Pr
ess the
button 2 again to increase the boost level or continue to press
the
button 2 to return boost to the off position.
To manually apply brake pressure to the trailer without pushing the vehicle’s brake pedal, pinch the manual control levers
3 together. The amount of
pinch pressure applied to the levers will correlate to the amount of brake
pressure applied.
TRAILER LIGHT CHECKING (if so equipped)
Your Nissan Intelligent Key ®
can be used to check
the trailer lights from outside the vehicle. If your
vehicle is equipped with a three-button key fob,
this feature operates in the same manner.
1. Aim the Intel
ligent Key at the vehicle.
2. Pr
ess and release the
button 4.
3.
Within 2 sec
onds, press the
button 4
again and hold it until the horn beeps once and the parking lights turn on.
The trailer light check will follow the following sequence:
• The lef
t turn light on the vehicle and trailer will flash for 5 seconds.
• The right turn light on the v
ehicle and trailer will flash for 5 seconds.
• The br
ake lights on the vehicle and trailer will turn on for 5 seconds.
1
23
4
To view detailed instructional videos regarding these and other features, please go to www.nissanownersinfo.mobi.
Page 10 of 40
8
NEW SYSTEM FEATURES
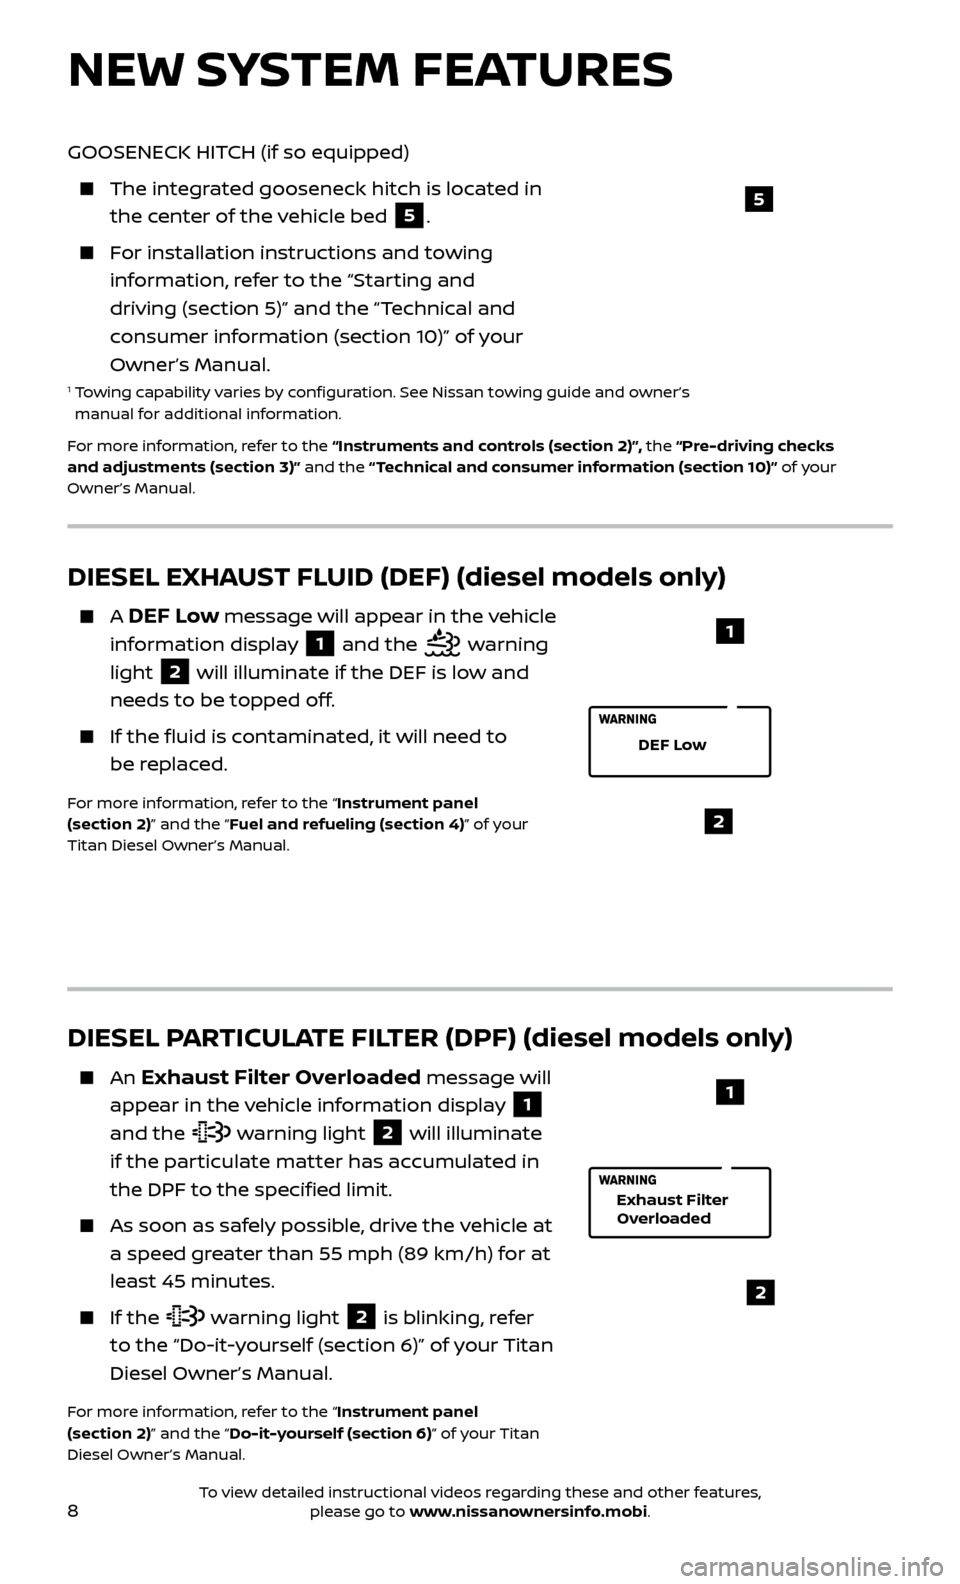
DIESEL PARTICULATE FILTER (DPF) (diesel models only)
An Exhaust Filter Overloaded message will
appear in the vehicle information display
1
and the warning light 2 will illuminate
if the particulate matter has accumulated in
the DPF to the specified limit.
As soon as saf ely possible, drive the vehicle at
a speed greater than 55 mph (89 km/h) for at
least 45 minutes.
If the warning light 2 is blinking, refer
to the “Do-it-yourself (section 6)” of your Titan
Diesel Owner’s Manual.
For more information, refer to the “Instrument panel
(section 2)” and the “Do-it-yourself (section 6)” of your Titan
Diesel Owner’s Manual.
2
1
Exhaust Filter
Overloaded
DIESEL EXHAUST FLUID (DEF) (diesel models only)
A DEF Low message will appear in the vehicle
information display
1 and the warning
light
2 will illuminate if the DEF is low and
needs to be topped off.
If the fluid is c ontaminated, it will need to
be replaced.
For more information, refer to the “Instrument panel
(section 2)” and the “Fuel and refueling (section 4)” of your
Titan Diesel Owner’s Manual.2
DEF Low
1
GOOSENECK HITCH (if so equipped)
The integr ated gooseneck hitch is located in
the center of the vehicle bed
5.
For installation instructions and towing information, refer to the “Starting and
driving (section 5)” and the “Technical and
consumer information (section 10)” of your
Owner’s Manual.
1 Towing capability varies by configuration. See Nissan towing guide and owner’s manual for additional information.
For more information, refer to the “Instruments and controls (section 2)”, the “Pre-driving checks
and adjustments (section 3)” and the “ Technical and consumer information (section 10)” of your
Owner’s Manual.
5
To view detailed instructional videos regarding these and other features, please go to www.nissanownersinfo.mobi.
Page 12 of 40
10
TIRE PRESSURE MONITORING SYSTEM1 (TPMS) WITH EASY-FILL
TIRE ALERT2
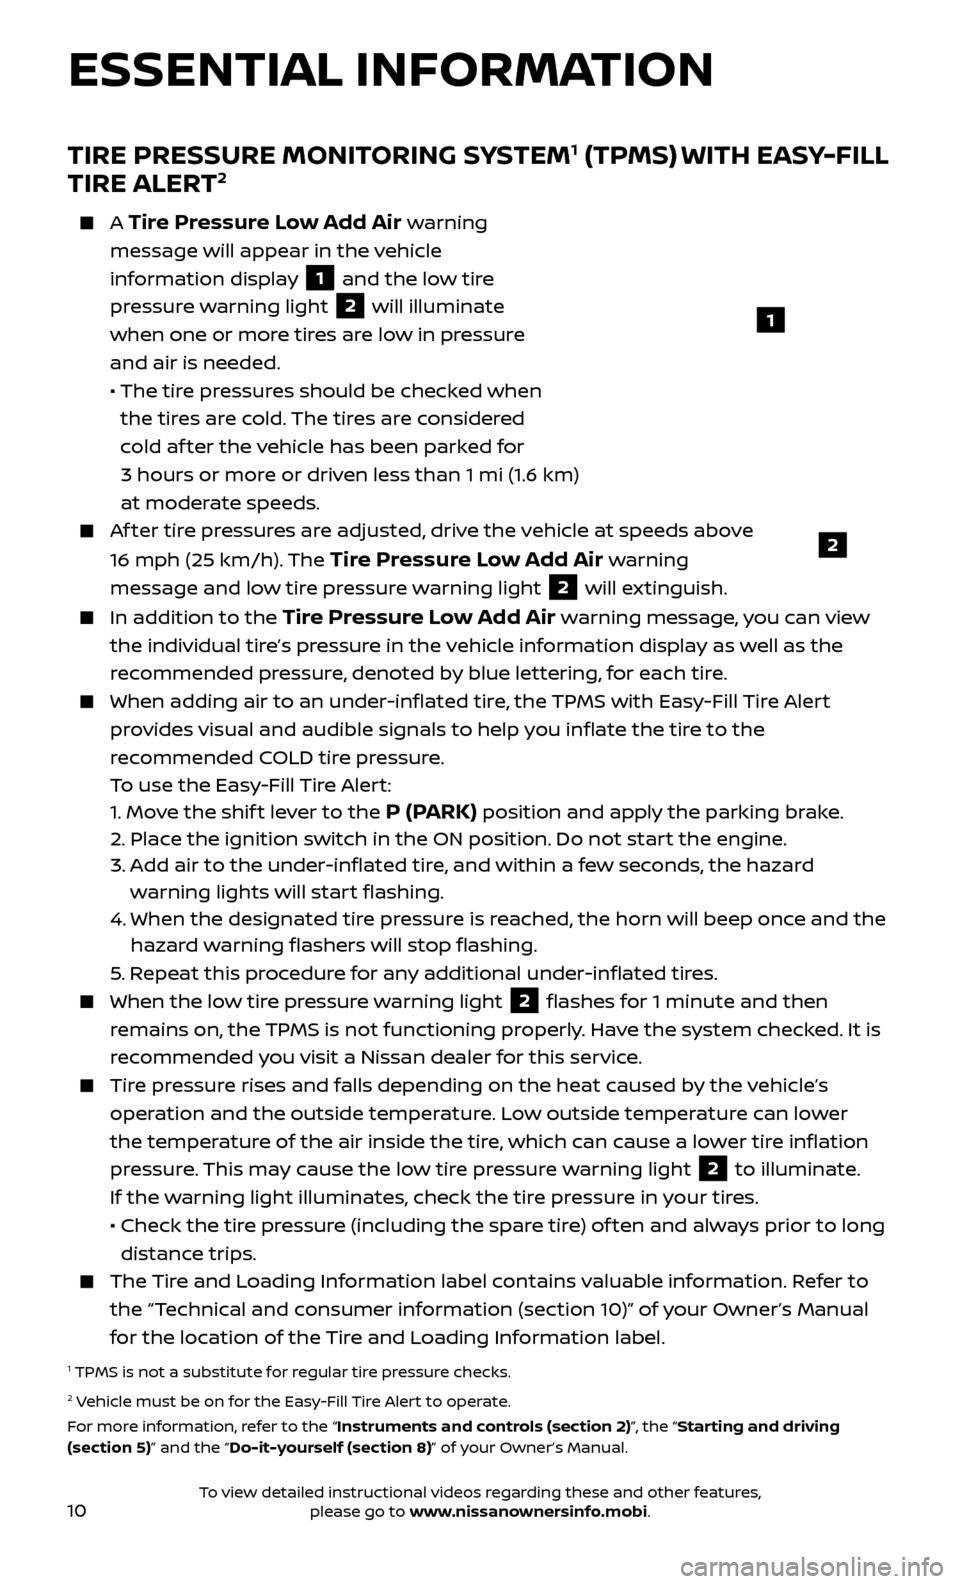
A Tire Pressure Low Add Air warning
message will appear in the vehicle
information display
1 and the low tire
pressure warning light
2 will illuminate
when one or more tires are low in pressure
and air is needed.
• The tir
e pressures should be checked when
the tires are cold. The tires are considered
cold af ter the vehicle has been parked for
3 hours or more or driven less than 1 mi (1.6 km)
at moderate speeds.
Af ter tire pressures are adjusted, drive the vehicle at speeds above
16 mph (25 km/h). The
Tire Pressure Low Add Air warning
message and low tire pressure warning light
2 will extinguish.
In addition to the Tire Pressure Low Add Air warning message, you can view
the individual tire’s pressure in the vehicle information display as well as the
recommended pressure, denoted by blue lettering, for each tire.
When adding air to an under -inflated tire, the TPMS with Easy-Fill Tire Alert
provides visual and audible signals to help you inflate the tire to the
recommended COLD tire pressure.
T
o use the Easy-Fill Tire Alert:
1.
Move the shif t lever to the
P (PARK) position and apply the parking brake.
2.
Plac
e the ignition switch in the ON position. Do not start the engine.
3.
A
dd air to the under-inflated tire, and within a few seconds, the hazard
warning lights will start flashing.
4.
When the designated tir
e pressure is reached, the horn will beep once and the
hazard warning flashers will stop flashing.
5
. Repeat this procedure for any additional under-inflated tires.
When the lo w tire pressure warning light 2 flashes for 1 minute and then
remains on, the TPMS is not functioning properly. Have the system checked. It is
recommended you visit a Nissan dealer for this service.
Tire pressure rises and falls depending on the heat caused by the vehicle’s operation and the outside temperature. Low outside temperature can lower
the temperature of the air inside the tire, which can cause a lower tire inflation
pressure. This may cause the low tire pressure warning light
2 to illuminate.
If the warning light illuminates, check the tire pressure in your tires.
•
Check the tir
e pressure (including the spare tire) of ten and always prior to long
distance trips.
The Tire and Loading Information label contains valuable information. Refer to the “Technical and consumer information (section 10)” of your Owner’s Manual
for the location of the Tire and Loading Information label.
1 TPMS is not a substitute for regular tire pressure checks. 2 Vehicle must be on for the Easy-Fill Tire Alert to operate.
For more information, refer to the “Instruments and controls (section 2)”, the “Starting and driving
(section 5)” and the “Do-it-yourself (section 8)” of your Owner’s Manual.
2
1
ESSENTIAL INFORMATION
To view detailed instructional videos regarding these and other features, please go to www.nissanownersinfo.mobi.
Page 13 of 40
11
LOOSE FUEL CAP (gas engine models only)
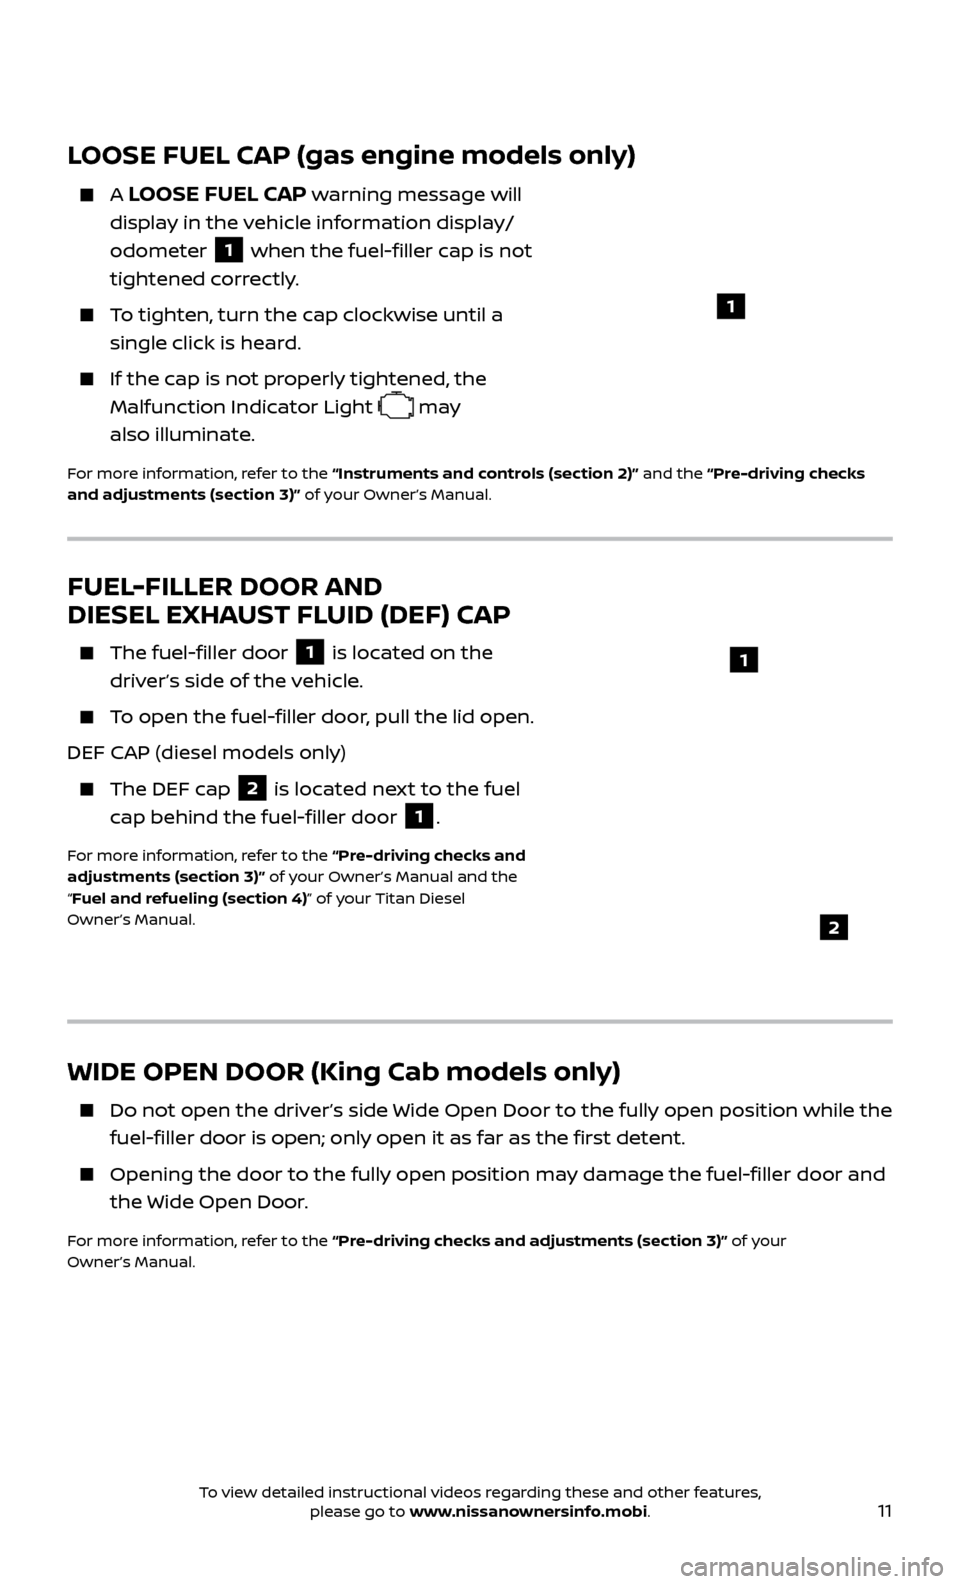
A LOOSE FUEL CAP warning message will
display in the vehicle information display/
odometer
1 when the fuel-filler cap is not
tightened correctly.
To tighten, turn the cap clockwise until a single click is heard.
If the cap is not properly tightened, the Malfunction Indicator Light
may
also illuminate.
For more information, refer to the “Instruments and controls (section 2)” and the “Pre-driving checks
and adjustments (section 3)” of your Owner’s Manual.
WIDE OPEN DOOR (King Cab models only)
Do not open the driv er’s side Wide Open Door to the fully open position while the
fuel-filler door is open; only open it as far as the first detent.
Opening the door to the ful ly open position may damage the fuel-filler door and
the Wide Open Door.
For more information, refer to the “Pre-driving checks and adjustments (section 3)” of your
Owner’s Manual.
FUEL-FILLER DOOR AND
DIESEL EXHAUST FLUID (DEF) CAP
The fuel-filler door 1 is located on the
driver’s side of the vehicle.
To open the fuel-filler door, pull the lid open.
DEF CAP (diesel models only)
The DEF c ap 2 is located next to the fuel
cap behind the fuel-filler door 1.
For more information, refer to the “Pre-driving checks and
adjustments (section 3)” of your Owner’s Manual and the
“Fuel and refueling (section 4)” of your Titan Diesel
Owner’s Manual.
2
1
1
To view detailed instructional videos regarding these and other features, please go to www.nissanownersinfo.mobi.
Page 14 of 40
12
CLOCK SET/ADJUSTMENT
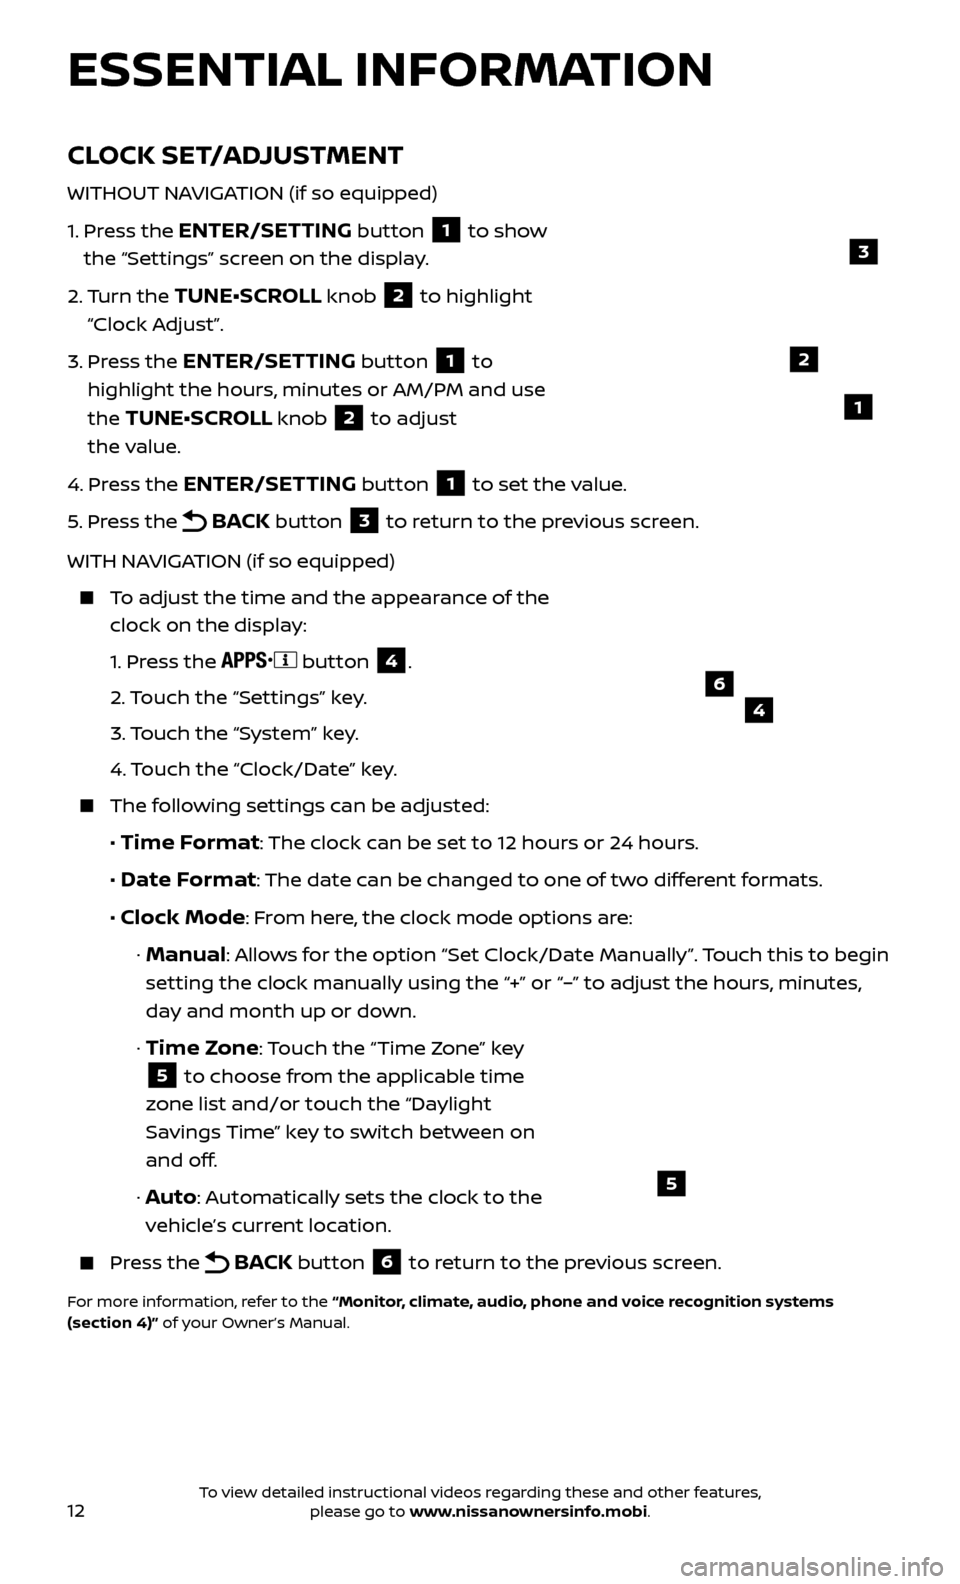
WITHOUT NAVIGATION (if so equipped)
1.
Pr
ess the
ENTER/SETTING button 1 to show
the “Settings” screen on the display.
2.
Turn the
TUNE•SCROLL knob 2 to highlight
“Clock Adjust”.
3.
Pr
ess the
ENTER/SETTING button 1 to
highlight the hours, minutes or AM/PM and use
the
TUNE•SCROLL knob 2 to adjust
the value.
4.
Pr
ess the
ENTER/SETTING button 1 to set the value.
5.
Pr
ess the
BACK button 3 to return to the previous screen.
WITH NAVIGATION (if so equipped)
To adjust the time and the appearance of the clock on the display:
1.
Press the
button 4.
2.
Touch the “Settings” key.
3.
Touch the “System” key.
4.
Touch the “Clock/Date” key.
The following settings can be adjusted:
•
Time Format: The clock can be set to 12 hours or 24 hours.
•
Date Format: The date can be changed to one of two different formats.
• Clock Mode: From here, the clock mode options are:
· Manual: Allows for the option “Set Clock/Date Manually”. Touch this to begin
setting the clock manually using the “+” or “–” to adjust the hours, minutes,
day and month up or down.
·
Time Zone: Touch the “Time Zone” key
5 to choose from the applicable time
zone list and/or touch the “Daylight
Savings Time” key to switch between on
and off.
· Auto: Automatically sets the clock to the
vehicle’s current location.
Press the BACK button 6 to return to the previous screen.
For more information, refer to the “Monitor, climate, audio, phone and voice recognition systems
(section 4)” of your Owner’s Manual.
5
2
ESSENTIAL INFORMATION
1
46
3
To view detailed instructional videos regarding these and other features, please go to www.nissanownersinfo.mobi.