Page 9 of 36

7
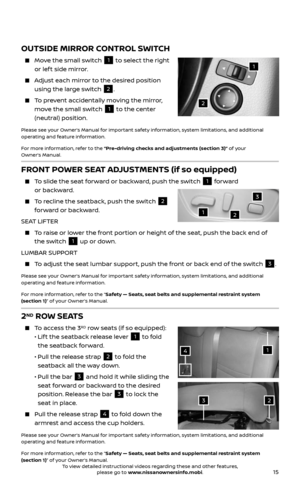
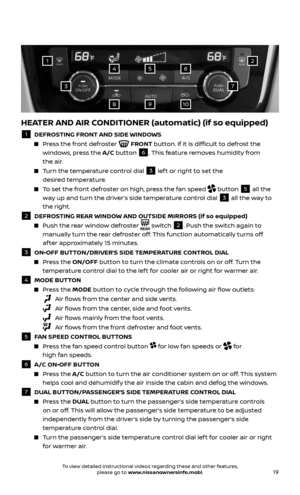
HILL START ASSIST
The Hill Start Assist system allows time for the driver to release the brake pedal and
apply the accelerator when the vehicle is parked on a hill. The brakes are applied
automatically for 2 seconds af ter the driver releases the brake pedal.
The Hill Start Assist system will operate automatically under these conditions:
• The shift lever is shif ted into a forward or a reverse gear.
• The vehicle is stopped completely on a hill by applying the brake.
The Hill Start Assist system will not operate when the shif t lever is in the
N (NEUTRAL) or P (PARK) position or on a flat and level road.
Please see your Owner’s Manual for important safety information, system limitations, and additional
operating and feature information.
For more information, refer to the “Starting and driving (section 5)” of your Owner’s Manual.
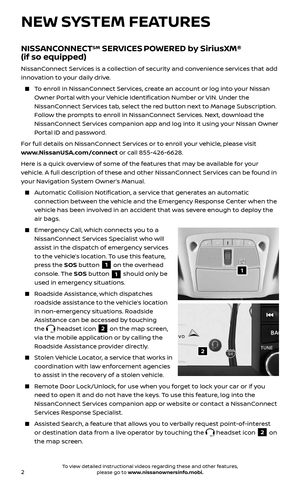
FORWARD EMERGENCY BRAKING (FEB) (if so equipped)
The FEB system c an assist the driver when there is a risk of a forward collision
with a vehicle ahead in the traveling lane.
The FEB system oper ates at speeds greater than 3 mph (5 km/h).
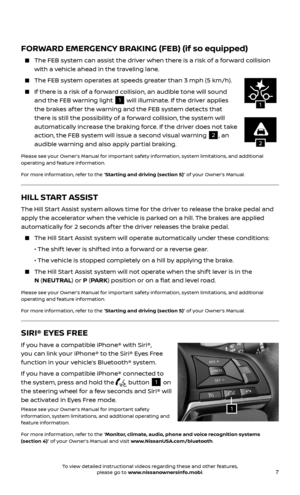
If there is a risk of a forward collision, an audible tone will sound
and the FEB warning light 1 will illuminate. If the driver applies
the brakes af ter the warning and the FEB system detects that
there is still the possibility of a forward collision, the system will
automatically increase the braking force. If the driver does not take
action, the FEB system will issue a second visual warning
2, an
audible warning and also apply partial braking.
Please see your Owner’s Manual for important safety information, system limitations, and additional
operating and feature information.
For more information, refer to the “Starting and driving (section 5)” of your Owner’s Manual.
2
1
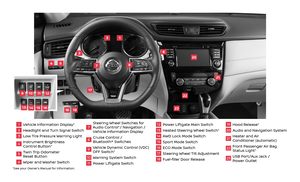
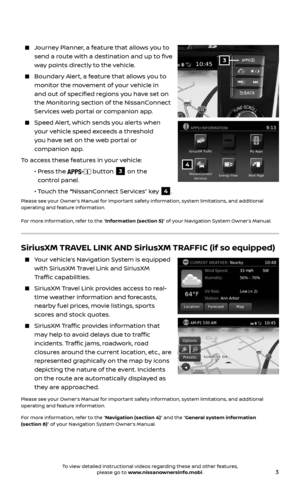
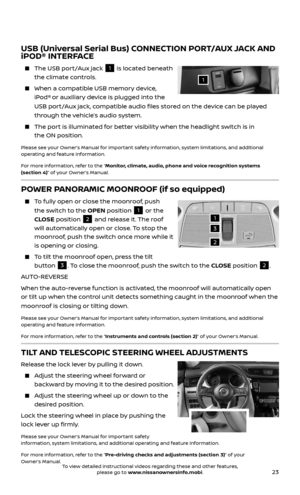
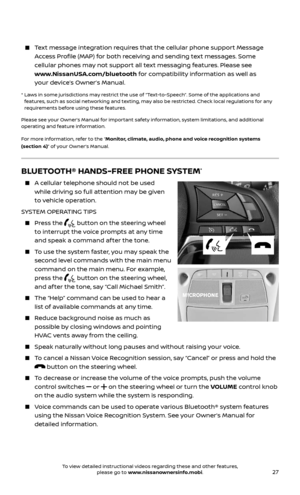
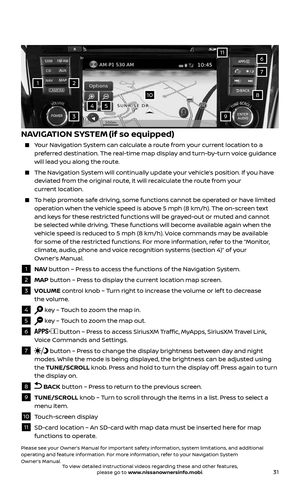
SIRI® EYES FREE
If you have a compatible iPhone® with Siri®,
you can link your iPhone® to the Siri® Eyes Free
function in your vehicle’s Bluetooth® system.
If you have a compatible iPhone® connected to
the system, press and hold the
button 1 on
the steering wheel for a few seconds and Siri® will
be activated in Eyes Free mode.
Please see your Owner’s Manual for important safety
information, system limitations, and additional operating and
feature information.
For more information, refer to the “Monitor, climate, audio, phone and voice recognition systems
(section 4)” of your Owner’s Manual and visit www.NissanUSA.com/bluetooth.1
To view detailed instructional videos regarding these and other features, please go to www.nissanownersinfo.mobi.
Page 10 of 36

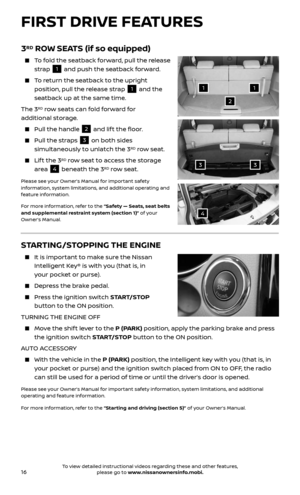
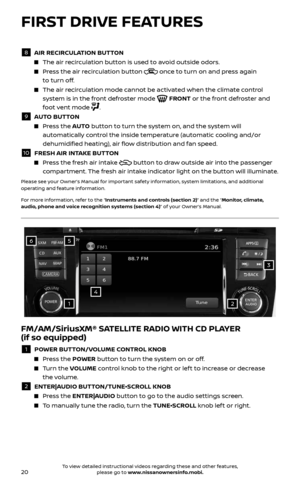
WITH EASY-FILL TIRE ALERT
A Tire Pressure Low - Add Air warning
message will appear in the vehicle
information display
1 and the")
8
ESSENTIAL INFORMATION
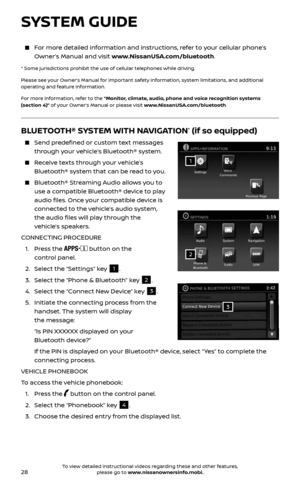
TIRE PRESSURE MONITORING SYSTEM (TPMS)
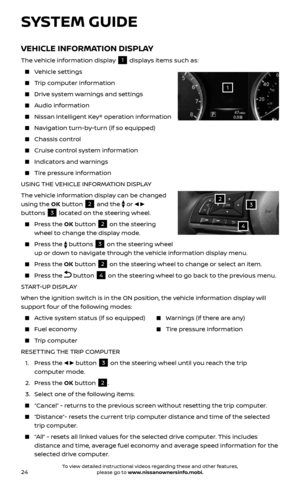
WITH EASY-FILL TIRE ALERT
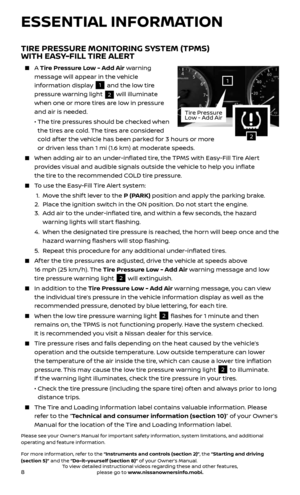
A Tire Pressure Low - Add Air warning
message will appear in the vehicle
information display
1 and the low tire
pressure warning light
2 will illuminate
when one or more tires are low in pressure
and air is needed.
• The tir e pressures should be checked when
the tires are cold. The tires are considered
cold af ter the vehicle has been parked for 3 hours or more
or driven less than 1 mi (1.6 km) at moderate speeds.
When adding air to an under -inflated tire, the TPMS with Easy-Fill Tire Alert
provides visual and audible signals outside the vehicle to help you inflate
the tire to the recommended COLD tire pressure.
To use the Easy-Fill Tire Alert system:
1. Move the shif t lever to the P (PARK) position and apply the parking brake.
2. Place the ignition switch in the ON position. Do not start the engine.
3. Add air to the under-inflated tire, and within a few seconds, the hazard
warning lights will start flashing.
4. When the designated tir e pressure is reached, the horn will beep once and the
hazard warning flashers will stop flashing.
5. Repeat this procedure for any additional under-inflated tires.
Af ter the tire pressures are adjusted, drive the vehicle at speeds above
16 mph (25 km/h). The Tire Pressure Low - Add Air warning message and low
tire pressure warning light
2 will extinguish.
In addition to the Tire Pressure Low - Add Air warning message, you can view
the individual tire’s pressure in the vehicle information display as well as the
recommended pressure, denoted by blue lettering, for each tire.
When the lo w tire pressure warning light 2 flashes for 1 minute and then
remains on, the TPMS is not functioning properly. Have the system checked.
It is recommended you visit a Nissan dealer for this service.
Tire pressure rises and falls depending on the heat caused by the vehicle’s
operation and the outside temperature. Low outside temperature can lower
the temperature of the air inside the tire, which can cause a lower tire inflation
pressure. This may cause the low tire pressure warning light
2 to illuminate.
If the warning light illuminates, check the tire pressure in your tires.
• Check the tir e pressure (including the spare tire) of ten and always prior to long
distance trips.
The Tire and Loading Information label contains valuable information. Please
refer to the “Technical and consumer information (section 10)” of your Owner’s
Manual for the location of the Tire and Loading Information label.
Please see your Owner’s Manual for important safety information, system limitations, and additional
operating and feature information.
For more information, refer to the “Instruments and controls (section 2)”, the “Starting and driving
(section 5)” and the “Do-it-yourself (section 8)” of your Owner’s Manual.
2
1
Tire Pressure
Low - Add Air
To view detailed instructional videos regarding these and other features, please go to www.nissanownersinfo.mobi.
Page 11 of 36

9
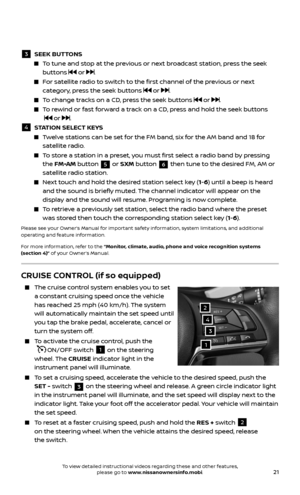
LOOSE FUEL CAP AND FUEL-FILLER DOOR
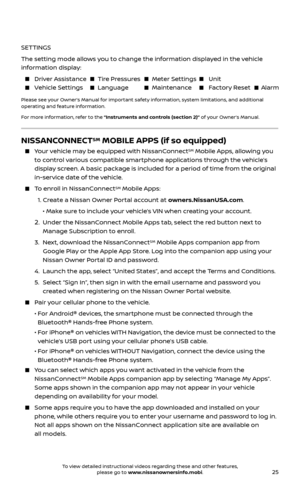
LOOSE FUEL CAP
A Loose Fuel Cap warning message will
appear in the vehicle information display
1 when the fuel-filler cap is not
tightened correctly.
To tighten, turn the cap clockwise until a
single click is heard.
The warning message will extinguish when the vehicle detects the fuel-filler cap
is properly tightened and the button, located on the steering wheel,
is pressed.
If the cap is not properly tightened, the Malfunction Indicator Light
may illuminate.
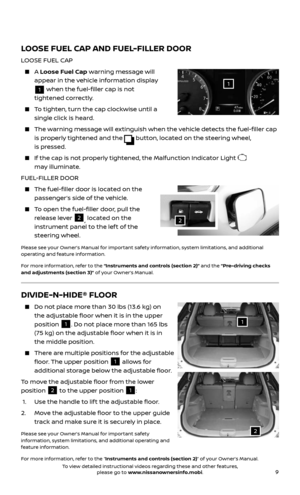
FUEL-FILLER DOOR
The fuel-filler door is located on the
passenger’s side of the vehicle.
To open the fuel-filler door, pull the
release lever 2, located on the
instrument panel to the lef t of the
steering wheel.
Please see your Owner’s Manual for important safety information, system limitations, and additional
operating and feature information.
For more information, refer to the “Instruments and controls (section 2)” and the “Pre-driving checks
and adjustments (section 3)” of your Owner’s Manual.
1
2
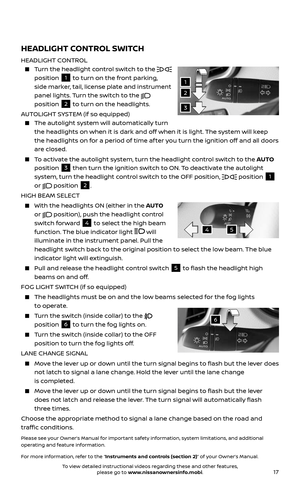
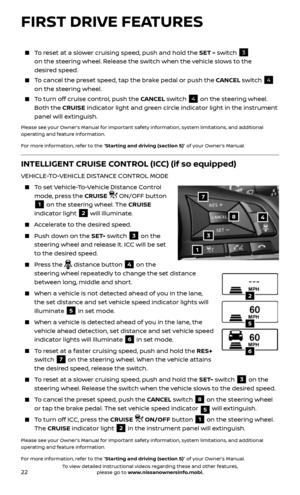
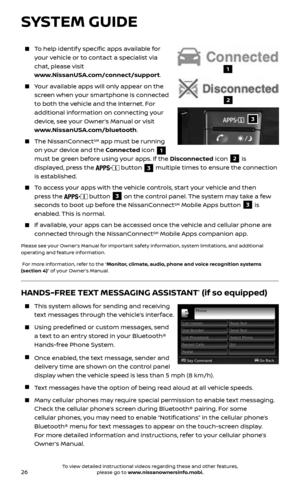
DIVIDE-N-HIDE® FLOOR
Do not plac e more than 30 lbs (13.6 kg) on
the adjustable floor when it is in the upper
position
1. Do not place more than 165 lbs
(75 kg) on the adjustable floor when it is in
the middle position.
There are multiple positions for the adjustable
floor. The upper position 1 allows for
additional storage below the adjustable floor.
To move the adjustable floor from the lower
position
2 to the upper position 1:
1. Use the hand le to lif t the adjustable floor.
2. Move the adjustable floor to the upper guide
track and make sure it is securely in place.
Please see your Owner’s Manual for important safety
information, system limitations, and additional operating and
feature information.
For more information, refer to the “Instruments and controls (section 2)” of your Owner’s Manual.
1
2
To view detailed instructional videos regarding these and other features, please go to www.nissanownersinfo.mobi.
Page 12 of 36
 VEHICLE (if so equipped)
An all-wheel drive vehicle must be towed with all wheels off the ground.
For proper towing and to avoid accidental damage to")
10
TOWING YOUR VEHICLE
ALL-WHEEL DRIVE (AWD) VEHICLE (if so equipped)
An all-wheel drive vehicle must be towed with all wheels off the ground.
For proper towing and to avoid accidental damage to your vehicle, Nissan
recommends that a service operator tow your vehicle af ter carefully reading the
Owner’s Manual precautions.
Please see your Owner’s Manual for important safety information, system limitations, and additional
operating and feature information.
For more information, refer to the “In case of emergency (section 6)” and the “ Technical and consumer
information (section 10)” of your Owner’s Manual.
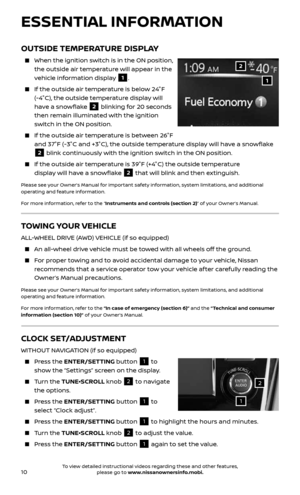
OUTSIDE TEMPERATURE DISPLAY
When the ignition switch is in the ON position,
the outside air temperature will appear in the
vehicle information display
1.
If the outside air temper ature is below 24°F
(-4°C), the outside temperature display will
have a snowflake
2 blinking for 20 seconds
then remain illuminated with the ignition
switch in the ON position.
If the outside air temper ature is between 26°F
and 37°F (-3°C and +3°C), the outside temperature display will have a snowflake
2 blink continuously with the ignition switch in the ON position.
If the outside air temperature is 39°F (+4°C) the outside temperature
display will have a snowflake 2 that will blink and then extinguish.
Please see your Owner’s Manual for important safety information, system limitations, and additional
operating and feature information.
For more information, refer to the “Instruments and controls (section 2)” of your Owner’s Manual.
1
2
CLOCK SET/ADJUSTMENT
WITHOUT NAVIGATION (if so equipped)
Press the ENTER/SETTING button 1 to
show the “Settings” screen on the display.
Turn the TUNE•SCROLL knob 2 to navigate
the options.
Press the ENTER/SETTING button 1 to
select “Clock adjust”.
Press the ENTER/SETTING button 1 to highlight the hours and minutes.
Turn the TUNE•SCROLL knob 2 to adjust the value.
Press the ENTER/SETTING button 1 again to set the value.
ESSENTIAL INFORMATION
1
2
To view detailed instructional videos regarding these and other features, please go to www.nissanownersinfo.mobi.
Page 13 of 36

To adjust the time and the appearance of the
clock on the display:
1. Press the button 3.
2. Select the “Settings” key.
3. Select the “System�")
11
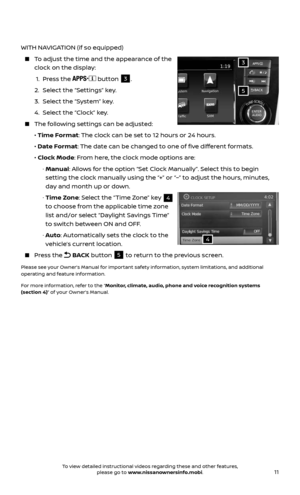
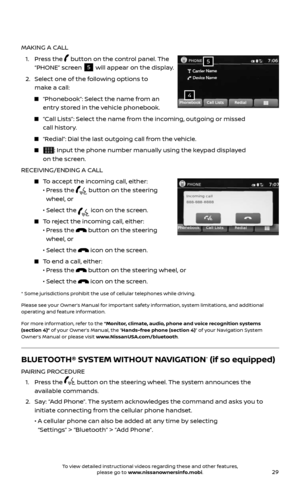
WITH NAVIGATION (if so equipped)
To adjust the time and the appearance of the
clock on the display:
1. Press the button 3.
2. Select the “Settings” key.
3. Select the “System” key.
4. Select the “Clock” key.
The following settings can be adjusted:
• Time Format: The clock can be set to 12 hours or 24 hours.
• Date Format: The date can be changed to one of five different formats.
• Clock Mode: From here, the clock mode options are:
· Manual: Allows for the option “Set Clock Manually”. Select this to begin
setting the clock manually using the “+” or “–” to adjust the hours, minutes,
day and month up or down.
· Time Zone: Select the “Time Zone” key 4
to choose from the applicable time zone
list and/or select “Daylight Savings Time”
to switch between ON and OFF.
· Auto: Automatically sets the clock to the
vehicle’s current location.
Press the BACK button 5 to return to the previous screen.
Please see your Owner’s Manual for important safety information, system limitations, and additional
operating and feature information.
For more information, refer to the “Monitor, climate, audio, phone and voice recognition systems
(section 4)” of your Owner’s Manual.
5
3
4
To view detailed instructional videos regarding these and other features, please go to www.nissanownersinfo.mobi.
Page 14 of 36

The Nissan Intelligent Key® System allows you to
lock or unlock the vehicle and open your lif tgate.
It is important to make sure the Intelligent")
12
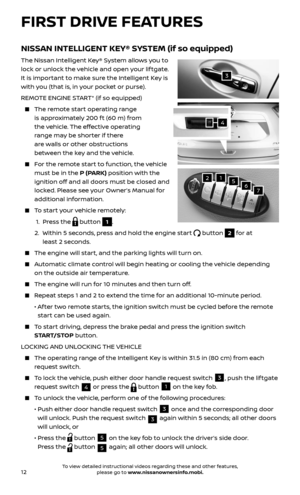
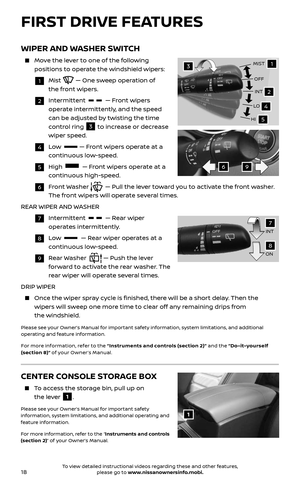
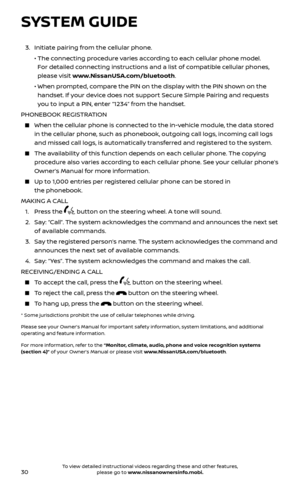
NISSAN INTELLIGENT KEY® SYSTEM (if so equipped)
The Nissan Intelligent Key® System allows you to
lock or unlock the vehicle and open your lif tgate.
It is important to make sure the Intelligent Key is
with you (that is, in your pocket or purse).
REMOTE ENGINE START* (if so equipped)
The remote start operating range
is approximately 200 f t (60 m) from
the vehicle. The effective operating
range may be shorter if there
are walls or other obstructions
between the key and the vehicle.
For the remote start to function, the vehicle
must be in the P (PARK) position with the
ignition off and all doors must be closed and
locked. Please see your Owner’s Manual for
additional information.
To start your vehicle remotely:
1. Press the button 1.
2. Within 5 seconds, press and hold the engine start button 2 for at
least 2 seconds.
The engine wil l start, and the parking lights will turn on.
Automatic climate control will begin heating or cooling the vehicle depending
on the outside air temperature.
The engine will run for 10 minutes and then turn off.
Repeat steps 1 and 2 to extend the time for an additional 10-minute period.
• Af ter two remote starts, the ignition switch must be cycled before the remote
start can be used again.
To start driving, depress the brake pedal and press the ignition switch
START/STOP button.
LOCKING AND UNLOCKING THE VEHICLE
The oper ating range of the Intelligent Key is within 31.5 in (80 cm) from each
request switch.
To lock the vehicle, push either door handle request switch 3, push the lif tgate
request switch
4 or press the button 1 on the key fob.
To unlock the vehicle, perform one of the following procedures:
• Push either door hand le request switch 3 once and the corresponding door
will unlock. Push the request switch 3 again within 5 seconds; all other doors
will unlock, or
• Press the button 5 on the key fob to unlock the driver’s side door.
Press the
button 5 again; all other doors will unlock.
FIRST DRIVE FEATURES
3
4
21567
To view detailed instructional videos regarding these and other features, please go to www.nissanownersinfo.mobi.
Page 15 of 36
 LOCK SWITCH (if so equipped)
Rogue uses an intuitive AWD system.
The AWD Lock mode is intended only for low-speed such
as during take off.
LOCK MODE
AWD Lock mode")
13
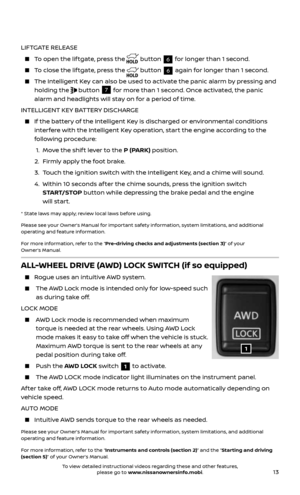
ALL-WHEEL DRIVE (AWD) LOCK SWITCH (if so equipped)
Rogue uses an intuitive AWD system.
The AWD Lock mode is intended only for low-speed such
as during take off.
LOCK MODE
AWD Lock mode is recommended when maximum
torque is needed at the rear wheels. Using AWD Lock
mode makes it easy to take off when the vehicle is stuck.
Maximum AWD torque is sent to the rear wheels at any
pedal position during take off.
Push the AWD LOCK switch 1 to activate.
The AWD LOCK mode indicator light illuminates on the instrument panel.
Af ter take off, AWD LOCK mode returns to Auto mode automatically depending on
vehicle speed.
AUTO MODE
Intuitive AWD sends torque to the rear wheels as needed.
Please see your Owner’s Manual for important safety information, system limitations, and additional
operating and feature information.
For more information, refer to the “Instruments and controls (section 2)” and the “Starting and driving
(section 5)” of your Owner’s Manual.
LIFTGATE RELEASE
To open the lif tgate, press the button 6 for longer than 1 second.
To close the lif tgate, press the button 6 again for longer than 1 second.
The Intel ligent Key can also be used to activate the panic alarm by pressing and
holding the
button 7 for more than 1 second. Once activated, the panic
alarm and headlights will stay on for a period of time.
INTELLIGENT KEY BATTERY DISCHARGE
If the bat tery of the Intelligent Key is discharged or environmental conditions
interfere with the Intelligent Key operation, start the engine according to the
following procedure:
1. Move the shif t lever to the P (PARK) position.
2. Firml y apply the foot brake.
3. Touch the ignition switch with the Intelligent Key, and a chime will sound.
4. Within 10 sec onds af ter the chime sounds, press the ignition switch
START/STOP button while depressing the brake pedal and the engine
will start.
* State laws may apply; review local laws before using.
Please see your Owner’s Manual for important safety information, system limitations, and additional
operating and feature information.
For more information, refer to the “Pre-driving checks and adjustments (section 3)” of your
Owner’s Manual.
1
To view detailed instructional videos regarding these and other features, please go to www.nissanownersinfo.mobi.
Page 16 of 36

When the liftgate is closed and locked, the
lif tgate will open automatically by:
• Pushing and holding the po wer lif tgate
switch 1 on the instrument")
14
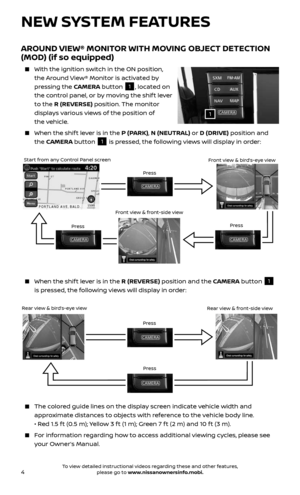
POWER LIFTGATE (if so equipped)
When the liftgate is closed and locked, the
lif tgate will open automatically by:
• Pushing and holding the po wer lif tgate
switch 1 on the instrument panel.
• Pushing the lif tgate opener switch 2.
The lif tgate must be unlocked, or you
must have the Intelligent Key with you
(that is, in your pocket or purse).
• Pressing the button 3 on the Nissan
Intelligent Key® for more than 1 second.
The power lif tgate operation can be turned on
or off by the power lif tgate on/off
switch
4 on the instrument panel.
• When the po wer lif tgate on/off switch 4 is
pushed to the OFF position, power operation
is not available using the power lif tgate
switch
5 on the lif tgate or the lif tgate
opener switch
2.
Motion-Activated Lif tgate will not function when the power lif tgate
on/off switch
4 is pushed in the OFF position.
LIFTGATE POSITION SETTING (if so equipped)
The liftgate can be set to open to a specific height (Garage Mode) by performing
the following:
1. Open the lif tgate using the request switch or the Intelligent Key.
2. Pull the lif tgate down and move it to the desired height position (the lif tgate
will have some resistance when being manually adjusted).
3. Push and hold the po wer lif tgate switch 5 located on the lif tgate for more
than 3 seconds or until two beeps are heard.
The liftgate will open to the selected position setting. To change the position of
the lif tgate, repeat steps 1 through 3 for setting the position of the lif tgate.
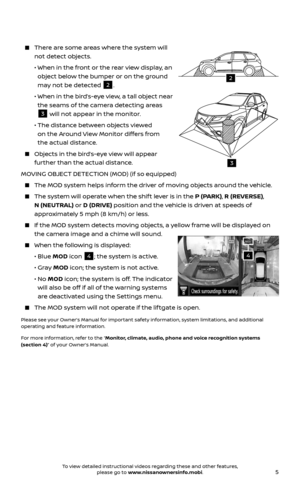
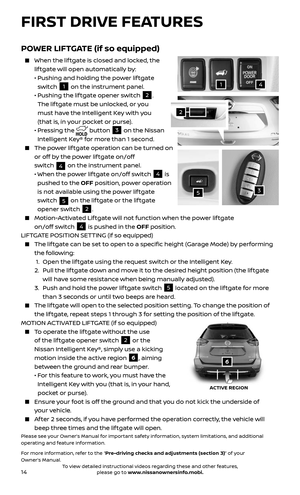
MOTION ACTIVATED LIFTGATE (if so equipped)
To operate the lif tgate without the use
of the lif tgate opener switch 2 or the
Nissan Intelligent Key®, simply use a kicking
motion inside the active region
6, aiming
between the ground and rear bumper.
• For this feature to work, you must have the
Intelligent Key with you (that is, in your hand,
pocket or purse).
Ensure your foot is off the ground and that you do not kick the underside of
your vehicle.
Af ter 2 seconds, if you have performed the operation correctly, the vehicle will
beep three times and the lif tgate will open.Please see your Owner’s Manual for important safety information, system limitations, and additional
operating and feature information.
For more information, refer to the “Pre-driving checks and adjustments (section 3)” of your
Owner’s Manual.
3
41
5
2
ACTIVE REGION
6
FIRST DRIVE FEATURES
To view detailed instructional videos regarding these and other features, please go to www.nissanownersinfo.mobi.