2017 NISSAN ROGUE climate settings
[x] Cancel search: climate settingsPage 7 of 36
5
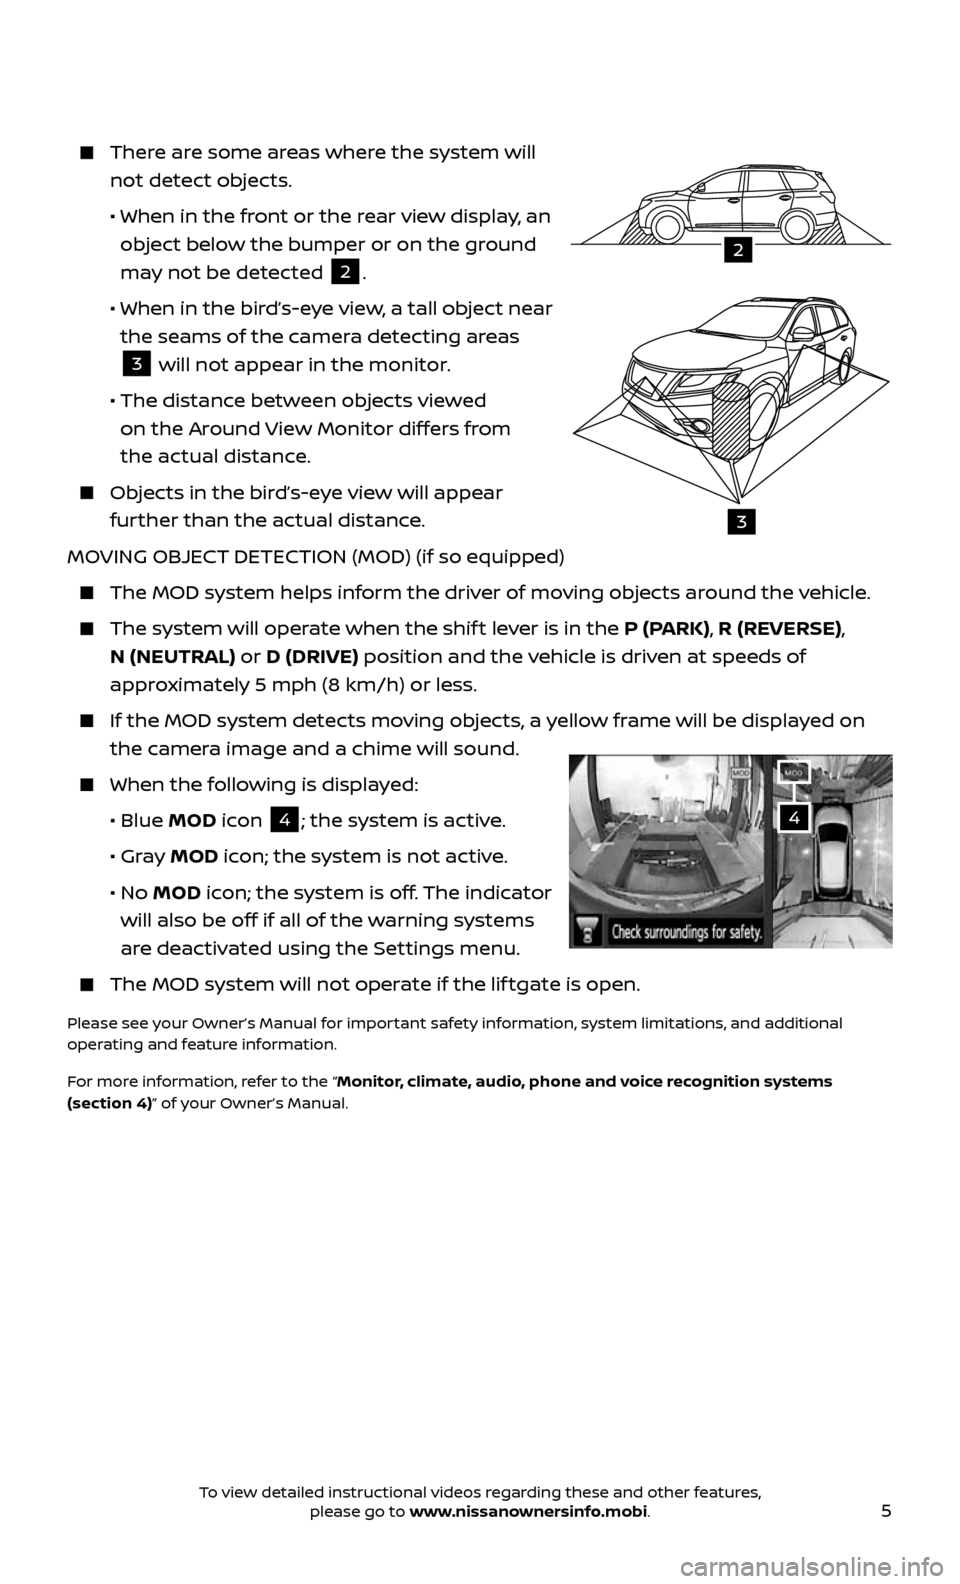
There are some areas where the system will
not detect objects.
• When in the front or the rear view display, an
object below the bumper or on the ground
may not be detected
2.
• When in the bir d’s-eye view, a tall object near
the seams of the camera detecting areas
3 will not appear in the monitor.
• The distance between objects viewed
on the Around View Monitor differs from
the actual distance.
Objects in the bird’s-eye view will appear
further than the actual distance.
MOVING OBJECT DETECTION (MOD) (if so equipped)
The MOD system helps inf orm the driver of moving objects around the vehicle.
The system will operate when the shif t lever is in the P (PARK), R (REVERSE),
N (NEUTRAL) or D (DRIVE) position and the vehicle is driven at speeds of
approximately 5 mph (8 km/h) or less.
If the MOD system detec ts moving objects, a yellow frame will be displayed on
the camera image and a chime will sound.
When the following is displayed:
• Blue MOD icon 4; the system is active.
• Gray MOD icon; the system is not active.
• No MOD icon; the system is off. The indicator
will also be off if all of the warning systems
are deactivated using the Settings menu.
The MOD system wil l not operate if the lif tgate is open.
Please see your Owner’s Manual for important safety information, system limitations, and additional
operating and feature information.
For more information, refer to the “Monitor, climate, audio, phone and voice recognition systems
(section 4)” of your Owner’s Manual.
4
2
3
To view detailed instructional videos regarding these and other features, please go to www.nissanownersinfo.mobi.
Page 13 of 36
11
WITH NAVIGATION (if so equipped)
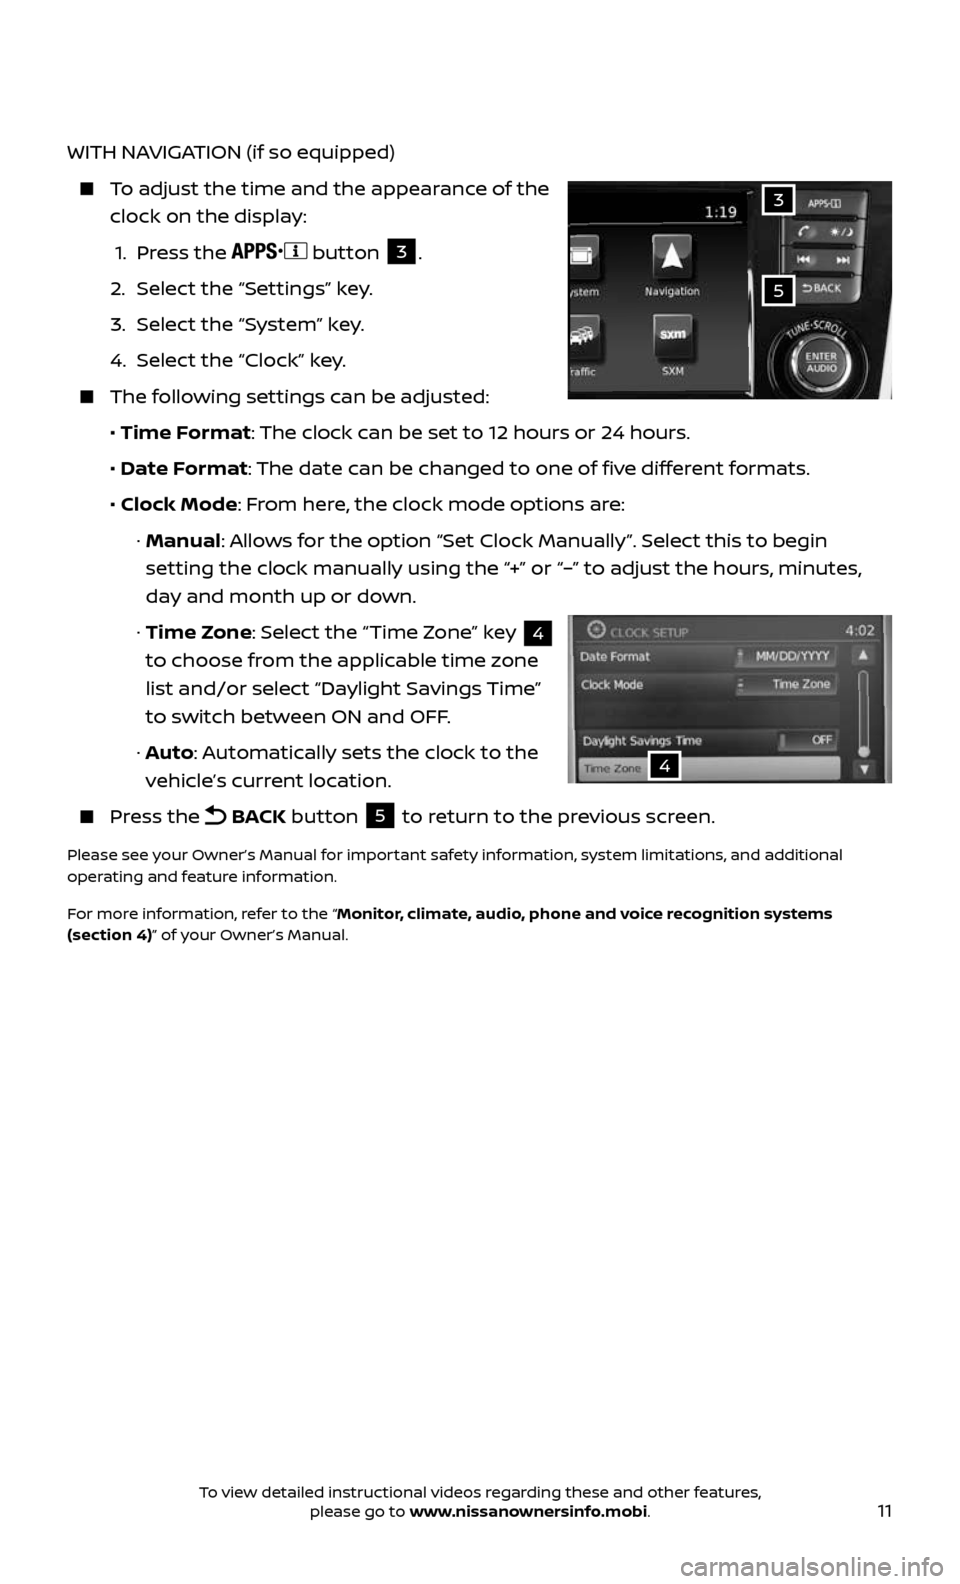
To adjust the time and the appearance of the
clock on the display:
1. Press the button 3.
2. Select the “Settings” key.
3. Select the “System” key.
4. Select the “Clock” key.
The following settings can be adjusted:
• Time Format: The clock can be set to 12 hours or 24 hours.
• Date Format: The date can be changed to one of five different formats.
• Clock Mode: From here, the clock mode options are:
· Manual: Allows for the option “Set Clock Manually”. Select this to begin
setting the clock manually using the “+” or “–” to adjust the hours, minutes,
day and month up or down.
· Time Zone: Select the “Time Zone” key 4
to choose from the applicable time zone
list and/or select “Daylight Savings Time”
to switch between ON and OFF.
· Auto: Automatically sets the clock to the
vehicle’s current location.
Press the BACK button 5 to return to the previous screen.
Please see your Owner’s Manual for important safety information, system limitations, and additional
operating and feature information.
For more information, refer to the “Monitor, climate, audio, phone and voice recognition systems
(section 4)” of your Owner’s Manual.
5
3
4
To view detailed instructional videos regarding these and other features, please go to www.nissanownersinfo.mobi.
Page 22 of 36
20
FM/AM/SiriusXM® SATELLITE RADIO WITH CD PLAYER
(if so equipped)
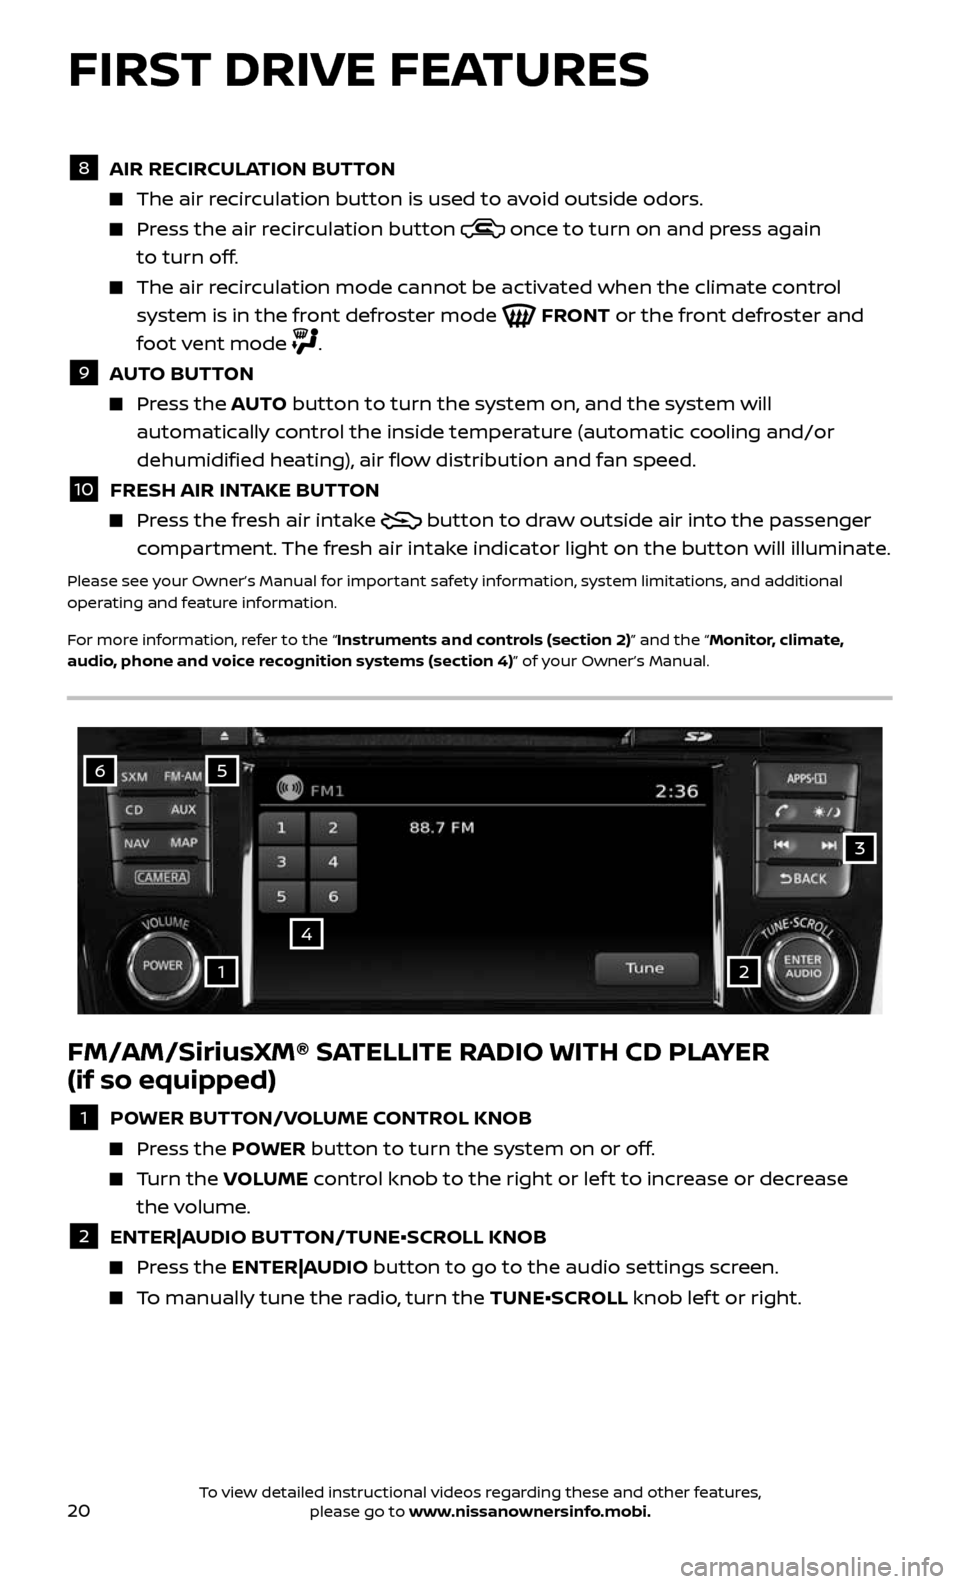
1 POWER BUTTON/VOLUME CONTROL KNOB
Press the POWER button to turn the system on or off.
Turn the VOLUME control knob to the right or lef t to increase or decrease
the volume.
2 ENTER|AUDIO BUTTON/TUNE•SCROLL KNOB
Press the ENTER|AUDIO button to go to the audio settings screen.
To manually tune the radio, turn the TUNE•SCROLL knob lef t or right.
6
4
3
5
12
8 AIR RECIRCULATION BUTTON
The air recirculation button is used to avoid outside odors.
Press the air recirculation button once to turn on and press again
to turn off.
The air recirculation mode cannot be activated when the climate control
system is in the front defroster mode FRONT or the front defroster and
foot vent mode
.
9 AUTO BUTTON
Press the AUTO button to turn the system on, and the system will
automatically control the inside temperature (automatic cooling and/or
dehumidified heating), air flow distribution and fan speed.
10 FRESH AIR INTAKE BUTTON
Press the fresh air intake button to draw outside air into the passenger
compartment. The fresh air intake indicator light on the button will illuminate.
Please see your Owner’s Manual for important safety information, system limitations, and additional
operating and feature information.
For more information, refer to the “Instruments and controls (section 2)” and the “Monitor, climate,
audio, phone and voice recognition systems (section 4)” of your Owner’s Manual.
FIRST DRIVE FEATURES
To view detailed instructional videos regarding these and other features, please go to www.nissanownersinfo.mobi.
Page 30 of 36
28
BLUETOOTH® SYSTEM WITH NAVIGATION* (if so equipped)
Send predefined or custom text messages
through your vehicle’s Bluetooth® system.
Receive texts through your vehicle’s
Bluetooth® system that can be read to you.
Bluetooth® S treaming Audio allows you to
use a compatible Bluetooth® device to play
audio files. Once your compatible device is
connected to the vehicle’s audio system,
the audio files will play through the
vehicle’s speakers.
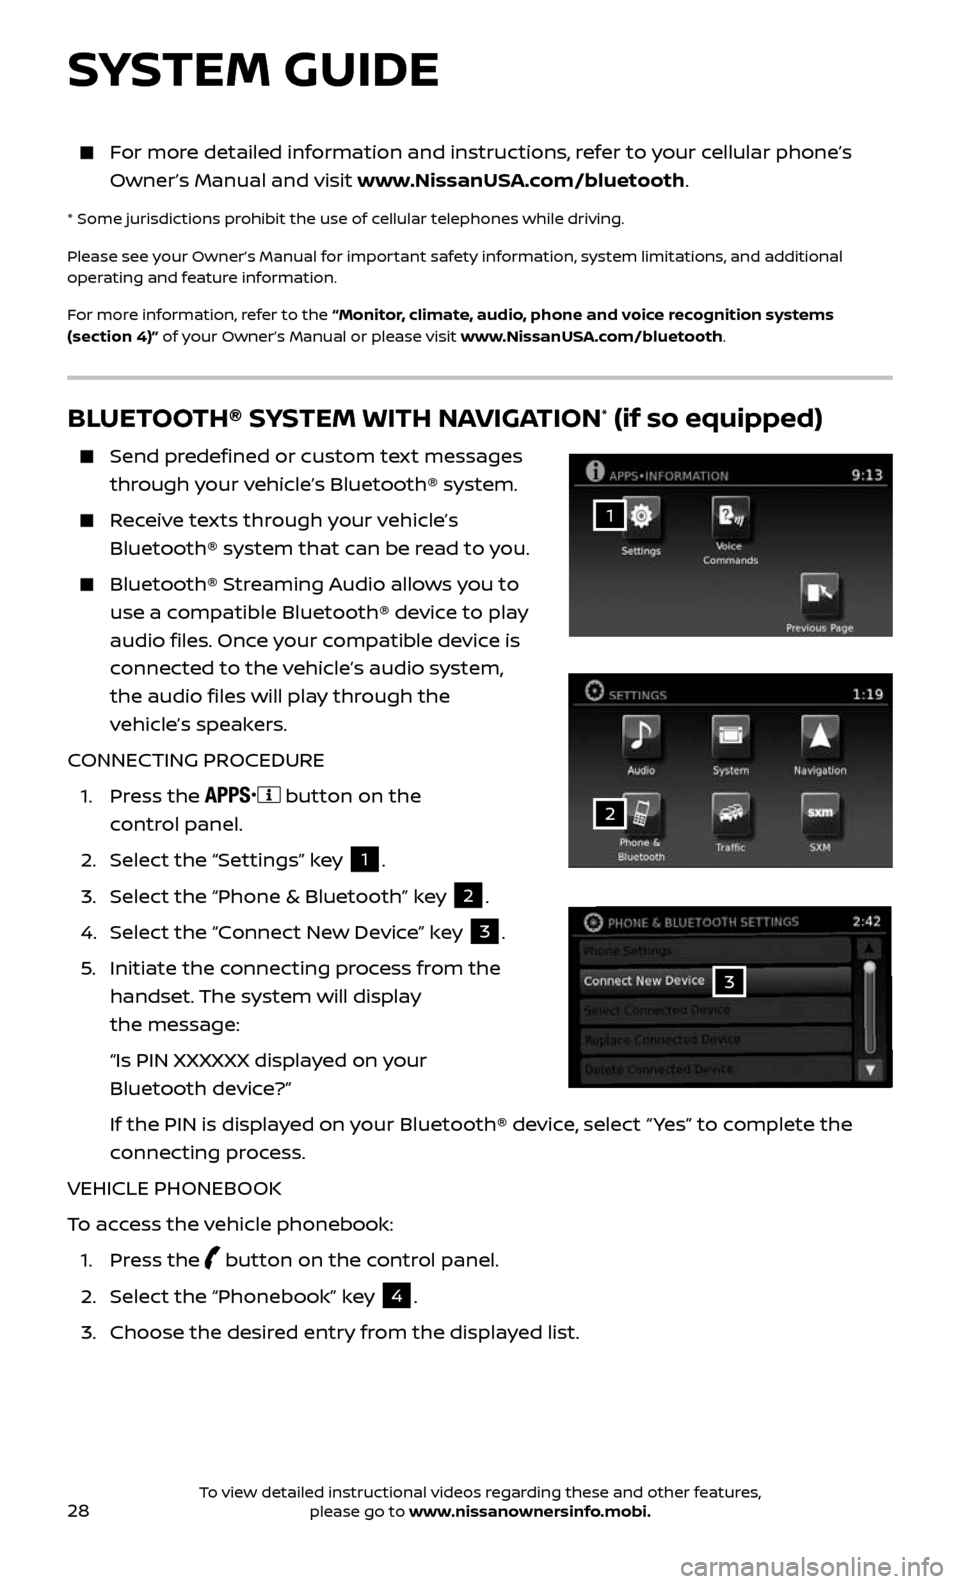
CONNECTING PROCEDURE
1. Press the button on the
control panel.
2. Select the “Settings” key 1.
3. Select the “Phone & Bluetooth” key 2.
4. Select the “Connect New Device” key 3.
5. Initiate the c onnecting process from the
handset. The system will display
the message:
“Is PIN XXXXXX displa yed on your
Bluetooth device?”
If the PIN is displa yed on your Bluetooth® device, select “ Yes” to complete the
connecting process.
VEHICLE PHONEBOOK
To access the vehicle phonebook:
1. Press the button on the control panel.
2. Select the “Phonebook” key 4.
3. Choose the desir ed entry from the displayed list.
1
3
2
SYSTEM GUIDE
For more detailed information and instructions, refer to your cellular phone’s
Owner’s Manual and visit www.NissanUSA.com/bluetooth.
* Some jurisdictions prohibit the use of cellular telephones while driving.
Please see your Owner’s Manual for important safety information, system limitations, and additional
operating and feature information.
For more information, refer to the “Monitor, climate, audio, phone and voice recognition systems
(section 4)” of your Owner’s Manual or please visit www.NissanUSA.com/bluetooth.
To view detailed instructional videos regarding these and other features, please go to www.nissanownersinfo.mobi.
Page 31 of 36
29
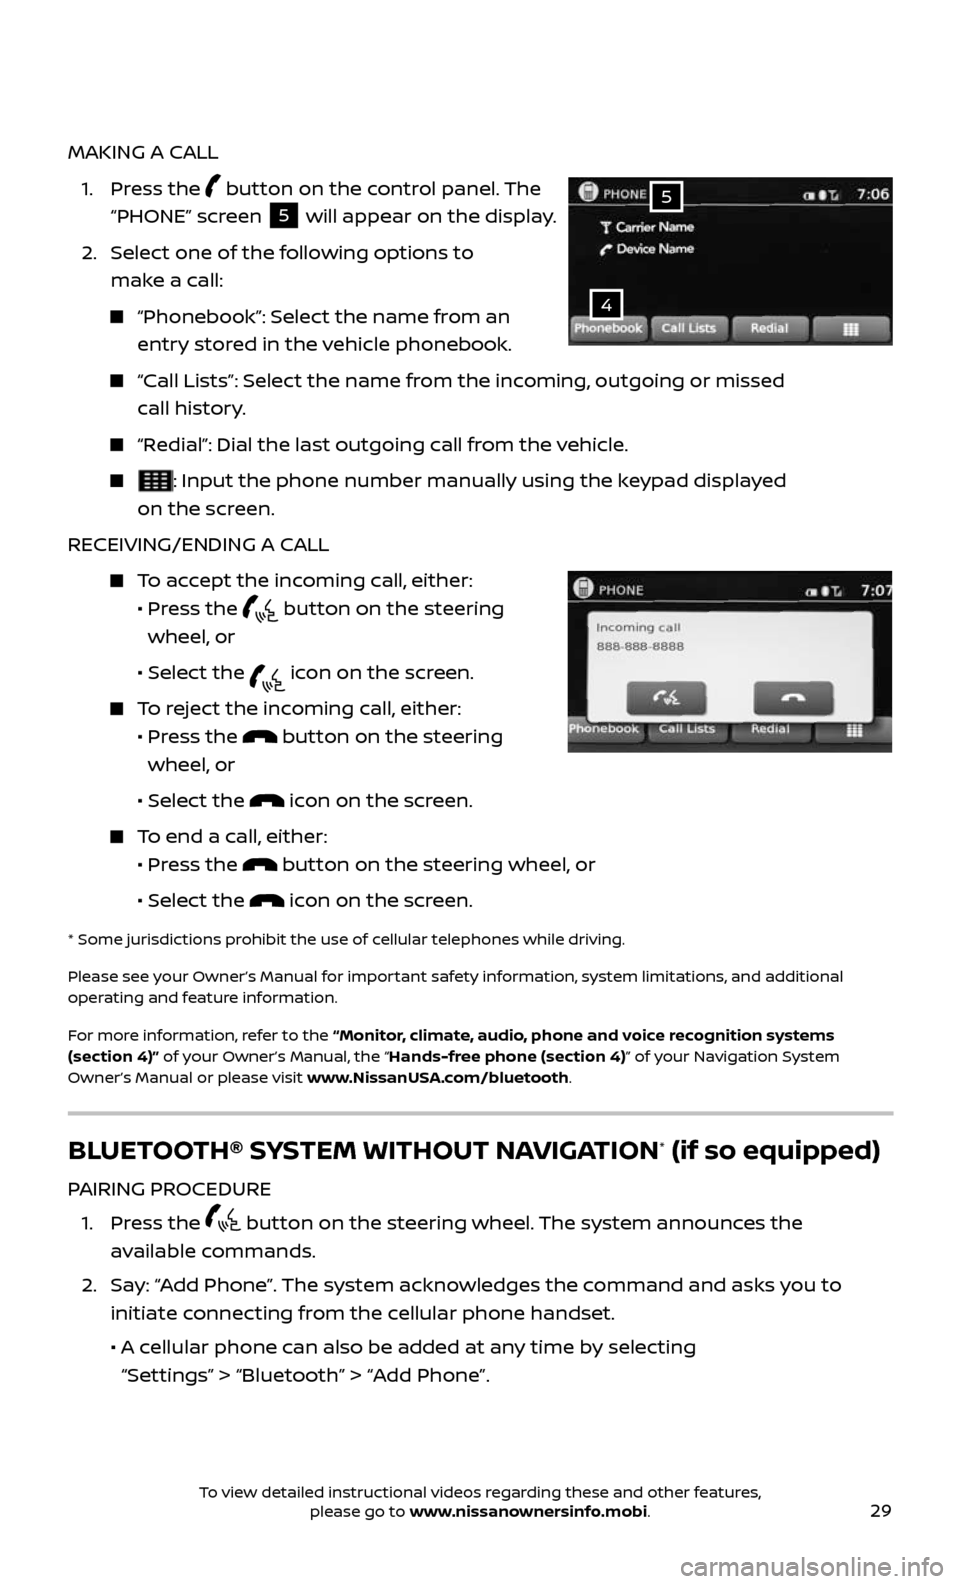
MAKING A CALL
1. Press the button on the control panel. The
“PHONE” screen
5 will appear on the display.
2. Select one of the following options to
make a call:
“Phonebook”: Select the name from an
entry stored in the vehicle phonebook.
“Call Lists”: Select the name from the incoming, outgoing or missed
call history.
“Redial”: Dial the last outgoing call from the vehicle.
: Input the phone number manually using the keypad displayed
on the screen.
RECEIVING/ENDING A CALL
To accept the incoming call, either:
• Pr ess the button on the steering
wheel, or
• Selec t the icon on the screen.
To reject the incoming call, either:
• Pr ess the button on the steering
wheel, or
• Selec t the icon on the screen.
To end a call, either:
• Pr ess the button on the steering wheel, or
• Selec t the icon on the screen.
* Some jurisdic tions prohibit the use of cellular telephones while driving.
Please see your Owner’s Manual for important safety information, system limitations, and additional
operating and feature information.
For more information, refer to the “Monitor, climate, audio, phone and voice recognition systems
(section 4)” of your Owner’s Manual, the “Hands-free phone (section 4)” of your Navigation System
Owner’s Manual or please visit www.NissanUSA.com/bluetooth.
4
5
BLUETOOTH® SYSTEM WITHOUT NAVIGATION* (if so equipped)
PAIRING PROCEDURE
1. Press the button on the steering wheel. The system announces the
available commands.
2. Say: “Add Phone”. The system acknowledges the command and asks you to
initiate connecting from the cellular phone handset.
• A cellular phone can also be added at any time by selecting
“Settings” > “Bluetooth” > “Add Phone”.
To view detailed instructional videos regarding these and other features, please go to www.nissanownersinfo.mobi.
Page 33 of 36
31
1
11
4
7
108
2
39
5
6
NAVIGATION SYSTEM (if so equipped)
Your Navigation System can calculate a route from your current location to a preferred destination. The real-time map display and turn-by-turn voice guidance
will lead you along the route.
The Navigation System will continually update your vehicle’s position. If you have deviated from the original route, it will recalculate the route from your
current location.
To help promote safe driving, some functions cannot be operated or have limited operation when the vehicle speed is above 5 mph (8 km/h). The on-screen text
and keys for these restricted functions will be grayed-out or muted and cannot
be selected while driving. These functions will become available again when the
vehicle speed is reduced to 5 mph (8 km/h). Voice commands may be available
for some of the restricted functions. For more information, refer to the “Monitor,
climate, audio, phone and voice recognition systems (section 4)” of your
Owner’s Manual.
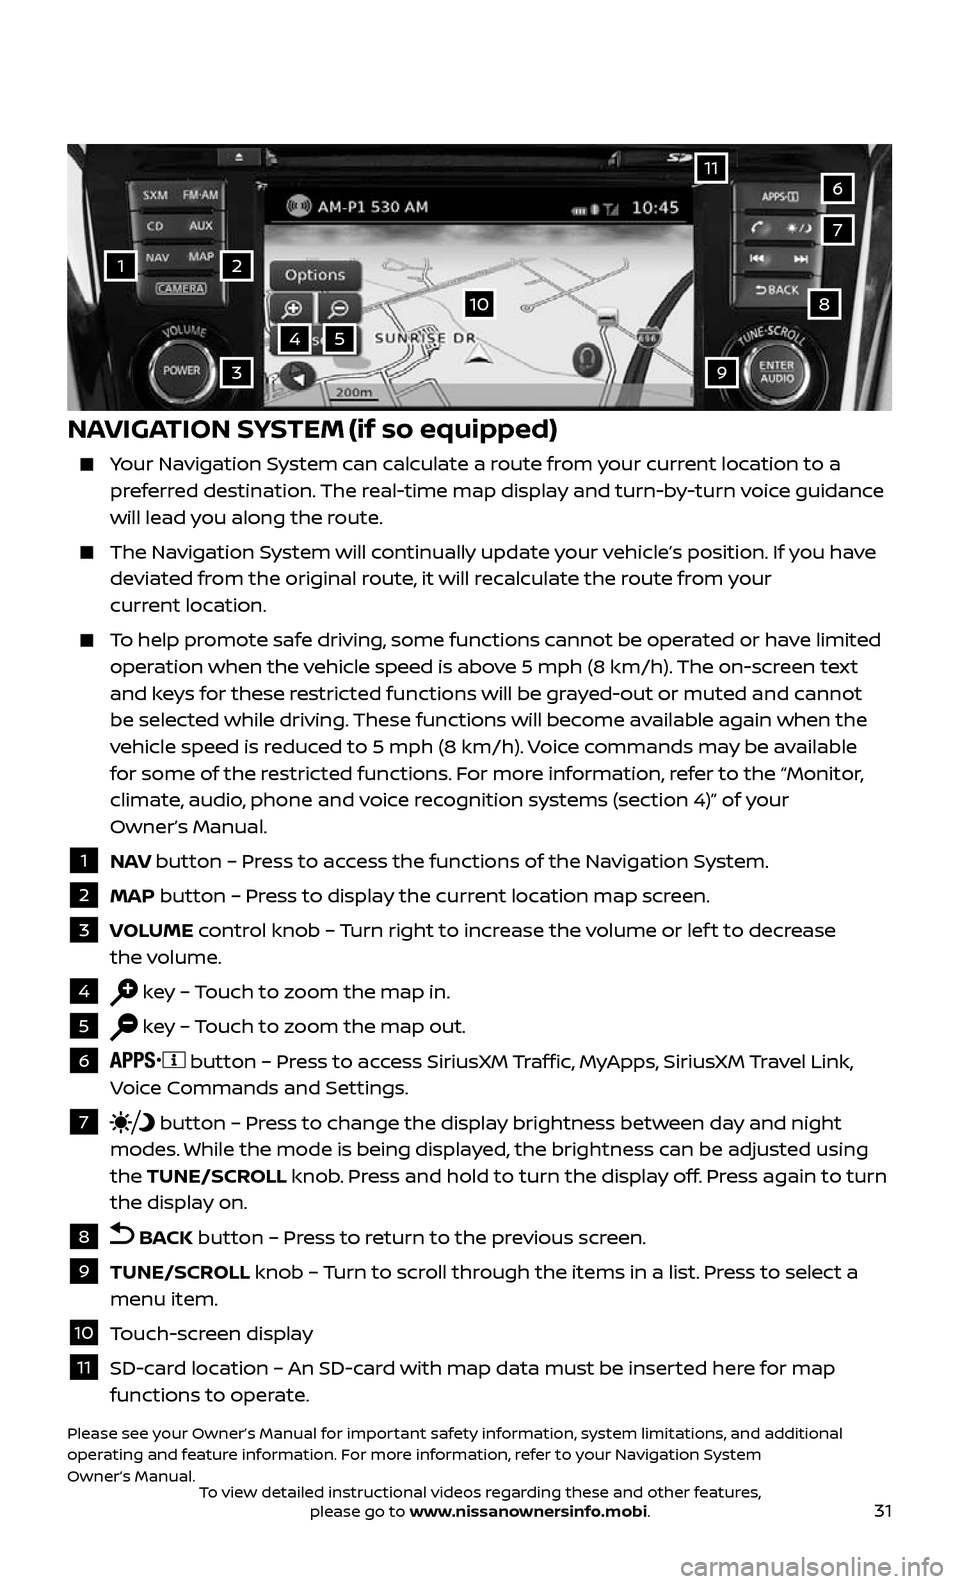
1 NAV button – Press to access the functions of the Navigation System.
2 MAP button – Press to display the current location map screen.
3 VOLUME control knob – Turn right to increase the volume or lef t to decrease
the volume.
4 key – Touch to zoom the map in.
5 key – Touch to zoom the map out.
6 button – Press to access SiriusXM Traffic, MyApps, SiriusXM Travel Link,
Voice Commands and Settings.
7 button – Press to change the display brightness between day and night
modes. While the mode is being displayed, the brightness can be adjusted using
the TUNE/SCROLL knob. Press and hold to turn the display off. Press again to turn
the display on.
8 BACK button – Press to return to the previous screen.
9 TUNE/SCROLL knob – Turn to scroll through the items in a list. Press to select a
menu item.
10 Touch-screen display
11 SD-card location – An SD-card with map data must be inserted here for map functions to operate.
Please see your Owner’s Manual for important safety information, system limitations, and additional
operating and feature information. For more information, refer to your Navigation System
Owner’s Manual.
To view detailed instructional videos regarding these and other features, please go to www.nissanownersinfo.mobi.