2017 NISSAN QUEST ignition
[x] Cancel search: ignitionPage 388 of 520
BSW SYSTEM OPERATION
The BSW system operates above approximately
20 MPH (32 km/h) .
If the radar sensors detect a vehicle in the
detection zone, the side indicator light illumi-
nates.
If the turn signal is then activated, the system
chimes (twice) and the side indicator light
flashes. The side indicator light continues to
flash until the detected vehicle leaves the
detection zone.
NOTE:
.The side indicator light illuminates for
a few seconds when the ignition switch
is placed in the ON position.
. The brightness of the side indicator
light is adjusted automatically depend-
ing on the brightness of the ambient
light.
. If a vehicle comes into the detection
zone after the driver activates the turn
signal, then only the side indicator light
flashes and no chime sounds. For
additional information, refer to “BSW
driving situations” (P.5-21) .
JVS0725X
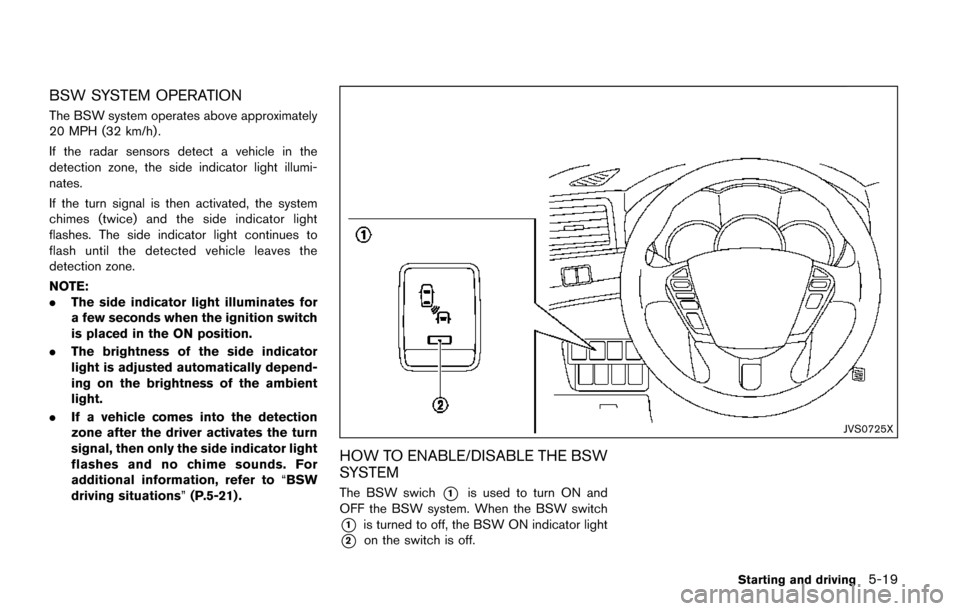
HOW TO ENABLE/DISABLE THE BSW
SYSTEM
The BSW swich*1is used to turn ON and
OFF the BSW system. When the BSW switch
*1is turned to off, the BSW ON indicator light
*2on the switch is off.
Starting and driving5-19
Page 398 of 520
SSD0488
WARNING
.Do not stop or park the vehicle over
flammable materials such as dry
grass, waste paper or rags. They
may ignite and cause a fire.
. Safe parking procedures require
that both the parking brake be set
and the transmission placed into P
(Park) . Failure to do so could cause
the vehicle to move unexpectedly or
roll away and result in an accident.
Make sure the shift lever has been
pushed as far forward as it can go and cannot be moved without de-
pressing the foot brake pedal.
. Never leave the engine running
while the vehicle is unattended.
. Do not leave children unattended
inside the vehicle. They could un-
knowingly activate switches or con-
trols. Unattended children could
become involved in serious acci-
dents.
. To help avoid risk of injury or death
through unintended operation of
the vehicle and/or its systems, do
not leave children, people who re- quire the assistance of others or
pets unattended in your vehicle.
Additionally, the temperature inside
a closed vehicle on a warm day can
quickly become high enough to
cause a significant risk of injury or
death to people and pets.
1. Firmly apply the parking brake.
2. Move the shift lever to the P (Park) position.
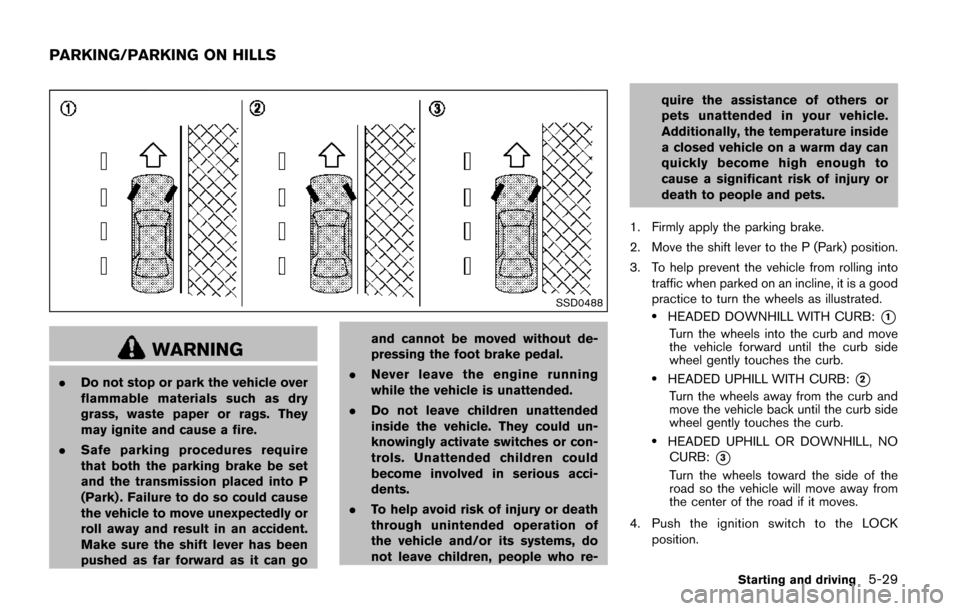
3. To help prevent the vehicle from rolling into traffic when parked on an incline, it is a good
practice to turn the wheels as illustrated.
.HEADED DOWNHILL WITH CURB:*1
Turn the wheels into the curb and move
the vehicle forward until the curb side
wheel gently touches the curb.
.HEADED UPHILL WITH CURB:*2
Turn the wheels away from the curb and
move the vehicle back until the curb side
wheel gently touches the curb.
.HEADED UPHILL OR DOWNHILL, NO
CURB:
*3
Turn the wheels toward the side of the
road so the vehicle will move away from
the center of the road if it moves.
4. Push the ignition switch to the LOCK position.
Starting and driving5-29
PARKING/PARKING ON HILLS
Page 402 of 520
keep the vehicle on the steered path.
. You may feel a pulsation in the brake pedal
and hear a noise or vibration from under the
hood. This is normal and indicates that the
VDC system is working properly.
. Adjust your speed and driving to the road
conditions.
See “Vehicle Dynamic Control (VDC) warning
light” (P.2-16).
If a malfunction occurs in the system, the VDC
warning light
illuminates in the instrument
panel. The VDC system automatically turns off.
The VDC OFF switch is used to turn off the VDC
system. The VDC off indicator light
illuminates to indicate the VDC system is off.
When the VDC switch is used to turn off the
system, the VDC system still operates to prevent
one drive wheel from slipping by transferring
power to a non slipping drive wheel. The VDC
warning light
flashes if this occurs. All other
VDC functions are off, and the VDC warning
light
will not flash. The VDC system is
automatically reset to on when the ignition
switch is placed in the off position then back
to the on position.
See “Vehicle Dynamic Control (VDC) warning
light” (P.2-16) and “Vehicle Dynamic Control
(VDC) off indicator light” (P.2-18).
The computer has a built-in diagnostic feature that tests the system each time you start the
engine and move the vehicle forward or in
reverse at a slow speed. When the self-test
occurs, you may hear a “clunk” noise and/or feel
a pulsation in the brake pedal. This is normal and
is not an indication of a malfunction.
WARNING
.
The VDC system is designed to help
the driver maintain stability but
does not prevent accidents due to
abrupt steering operation at high
speeds or by careless or dangerous
driving techniques. Reduce vehicle
speed and be especially careful
when driving and cornering on slip-
pery surfaces and always drive care-
fully.
. Do not modify the vehicle’s suspen-
sion. If suspension parts such as
shock absorbers, struts, springs,
stabilizer bars, bushings and
wheels are not NISSAN recom-
mended for your vehicle or are
extremely deteriorated, the VDC
system may not operate properly.
This could adversely affect vehicle
handling performance, and the VDC warning light
may illuminate.
. If brake related parts such as brake
pads, rotors and calipers are not
NISSAN recommended or are extre-
mely deteriorated, the VDC system
may not operate properly and the
VDC warning light
may illumi-
nate.
. If engine control related parts are
not NISSAN recommended or are
extremely deteriorated, the VDC
warning light
may illuminate.
. When driving on extremely inclined
surfaces such as higher banked
corners, the VDC system may not
operate properly and the VDC warn-
ing light
may illuminate. Do not
drive on these types of roads.
. When driving on an unstable sur-
face such as a turntable, ferry,
elevator or ramp, the VDC warning
light
may illuminate. This is not
a malfunction. Restart the engine
after driving onto a stable surface.
. If wheels or tires other than the
NISSAN recommended ones are
used, the VDC system may not
operate properly and the VDC warn-
Starting and driving5-33
Page 407 of 520
6-2In case of emergency
SIC2574
Push the switch on to warn other drivers when
you must stop or park under emergency condi-
tions. All turn signal lights will flash.
WARNING
.If stopping for an emergency, be
sure to move the vehicle well off the
road.
. Do not use the hazard warning
flashers while moving on the high-
way unless unusual circumstances
force you to drive so slowly that
your vehicle might become a hazard to other traffic.
. Turn signals do not work when the
hazard warning flasher lights are
on.
The flasher can be actuated with the ignition
switch in any position.
Some state laws may prohibit the use of
the hazard warning flasher switch while
driving.
When an impact that could activate the supple-
mental air bags is detected, the hazard warning
flasher lights blink automatically. If the hazard
warning flasher switch is pushed, the hazard
warning flashers will turn off.
WARNING
Do not turn the hazard warning flasher
switch to off until you can make sure
that it is safe to do so. Also, the hazard
flasher warning may not blink automa-
tically depending on the force of im-
pact. In the event of a roadside emergency, Roadside
Assistance Service is available to you. Please
refer to your Warranty Information Booklet (U.S.)
or Warranty & Roadside Assistance Information
Booklet (Canada) for details.
HAZARD WARNING FLASHER
SWITCH
ROADSIDE ASSISTANCE
PROGRAM
Page 408 of 520
To shut off the engine in an emergency situation
while driving perform the following procedure:
.Rapidly push the push-button ignition switch
3 consecutive times in less than 1.5
seconds, or
. Push and hold the push-button ignition
switch for more than 2 seconds.TIRE PRESSURE MONITORING SYS-
TEM (TPMS)
This vehicle is equipped with the Tire Pressure
Monitoring System (TPMS) . It monitors tire
pressure of all tires except the spare. When
the low tire pressure warning light is lit and the
CHECK TIRE PRESSURE warning appears on
the vehicle information display, one or more of
your tires is significantly under-inflated. If the
vehicle is being driven with low tire pressure, the
TPMS will activate and warn you of it by the low
tire pressure warning light. This system will
activate only when the vehicle is driven at
speeds above 16 MPH (25 km/h) . For more
details, see “Warning lights, indicator lights and
audible reminders” (P.2-11) and “Tire Pressure
Monitoring System (TPMS)” (P.5-3) .
WARNING
.If the low tire pressure warning light
illuminates while driving, avoid sud-
den steering maneuvers or abrupt
braking, reduce vehicle speed, pull
off the road to a safe location and
stop the vehicle as soon as possi-
ble. Driving with under-inflated tires
may permanently damage the tires
and increase the likelihood of tire failure. Serious vehicle damage
could occur and may lead to an
accident and could result in serious
personal injury. Check the tire pres-
sure for all four tires. Adjust the tire
pressure to the recommended COLD
tire pressure shown on the Tire and
Loading Information label to turn
the low tire pressure warning light
OFF. If the light still illuminates
while driving after adjusting the tire
pressure, a tire may be flat. If you
have a flat tire, replace it with a
spare tire as soon as possible.
. Since the spare tire is not equipped
with the TPMS, when a spare tire is
mounted or a wheel is replaced, the
TPMS will not function and the low
tire pressure warning light will flash
for approximately 1 minute. The
light will remain on after 1 minute.
Have your tires replaced and/or
TPMS system reset as soon as
possible. It is recommended you
visit a NISSAN dealer for these
services.
. Replacing tires with those not ori-
ginally specified by NISSAN could
affect the proper operation of the
In case of emergency6-3
EMERGENCY ENGINE SHUT OFF FLAT TIRE
Page 416 of 520

.Whenever working on or near a
battery, always wear suitable eye
protectors (for example, goggles or
industrial safety spectacles) and
remove rings, metal bands, or any
other jewelry. Do not lean over the
battery when jump starting.
. Do not attempt to jump start a
frozen battery. It could explode
and cause serious injury.
. Your vehicle has an automatic en-
gine cooling fan. It could come on at
any time. Keep hands and other
objects away from it.
SCE0969
WARNING
Always follow the instructions below.
Failure to do so could result in damage
to the charging system and cause
personal injury.
1. If the booster battery is in another vehicle
*B, position the two vehicles (*Aand*B)
to bring their batteries into close proximity to
each other.
Do not allow the two vehicles to touch. 2. Apply the parking brake. Move the shift lever
to the P (Park) position. Switch off all
unnecessary electrical systems (lights, hea-
ter, air conditioner, etc.) .
3. Remove vent caps on the battery (if so equipped) . Cover the battery with a firmly
wrung out moist cloth to reduce explosion
hazard.
4. Connect jumper cables in the sequence as illustrated (
*1?*2?*3?*4).
If the battery is discharged, the ignition
switch cannot be moved from the OFF
position. Connect the jumper cables to
the booster vehicle
*Bbefore pushing
the ignition switch.
CAUTION
. Always connect positive (+) to posi-
tive (+) and negative (�í) to body
ground (for example, as illustrated) ,
not to the battery.
. Make sure the jumper cables do not
touch moving parts in the engine
compartment and that the cable
clamps do not contact any other
metal.
In case of emergency6-11
Page 417 of 520

6-12In case of emergency
5. Start the engine of the booster vehicle*B
and let it run for a few minutes.
6. Keep the engine speed of the booster vehicle
*Bat about 2,000 rpm, and start
the engine of the vehicle
*Abeing jump
started.
CAUTION
Do not keep the starter motor engaged
for more than 10 seconds. If the engine
does not start right away, place the
ignition switch in the OFF position and
wait 10 seconds before trying again.
7. After starting your engine, carefully discon- nect the negative cable and then the positive
cable (
*4?*3?*2?*1).
8. Replace the vent caps (if so equipped) . Be sure to dispose of the cloth used to cover
the vent holes as it may be contaminated
with corrosive acid. Do not attempt to start the engine by pushing.
CAUTION
Continuously Variable Transmission
(CVT) models cannot be push-started
or tow-started. Attempting to do so may
cause transmission damage.
CAUTION
.
Do not continue to drive if your
vehicle overheats. Doing so could
cause engine damage or a vehicle
fire.
. To avoid the danger of being
scalded, never remove the radiator
cap while the engine is still hot.
When the radiator cap is removed,
pressurized hot water will spurt out,
possibly causing serious injury.
. Do not open the hood if steam is
coming out.
If your vehicle is overheating (indicated by an
extremely high temperature gauge reading) , or if
you feel a lack of engine power, detect abnormal
noise, etc., take the following steps:
1. Move the vehicle safely off the road, apply the parking brake and move the shift lever to
the P (Park) position.
Do not stop the engine.
2. Turn off the air conditioner. Open all the windows, move the heater or air conditioner
temperature control to maximum hot and fan
control to high speed.
PUSH STARTING IF YOUR VEHICLE OVERHEATS
Page 420 of 520
SCE0976
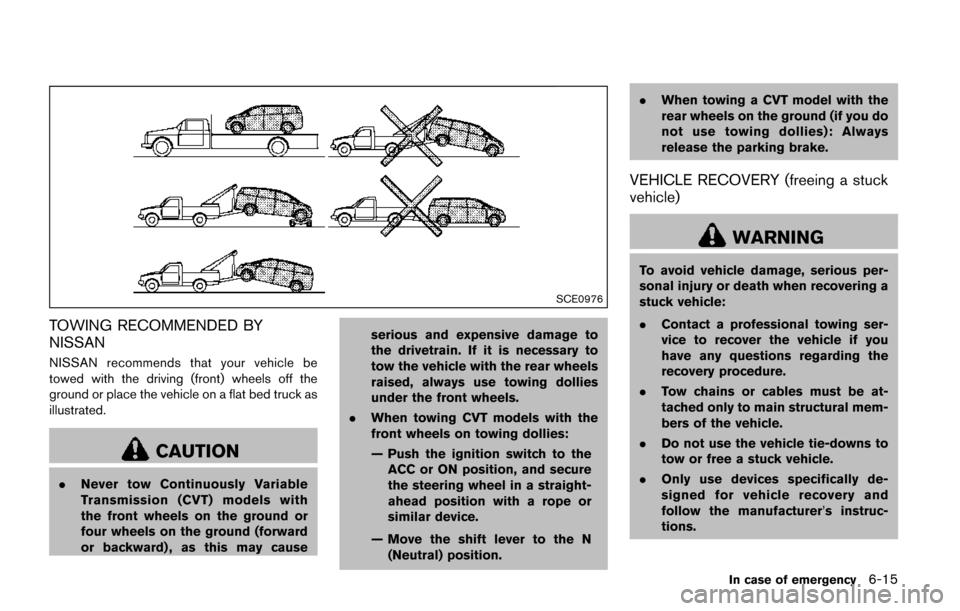
TOWING RECOMMENDED BY
NISSAN
NISSAN recommends that your vehicle be
towed with the driving (front) wheels off the
ground or place the vehicle on a flat bed truck as
illustrated.
CAUTION
.Never tow Continuously Variable
Transmission (CVT) models with
the front wheels on the ground or
four wheels on the ground (forward
or backward) , as this may cause serious and expensive damage to
the drivetrain. If it is necessary to
tow the vehicle with the rear wheels
raised, always use towing dollies
under the front wheels.
. When towing CVT models with the
front wheels on towing dollies:
— Push the ignition switch to the
ACC or ON position, and secure
the steering wheel in a straight-
ahead position with a rope or
similar device.
— Move the shift lever to the N (Neutral) position. .
When towing a CVT model with the
rear wheels on the ground (if you do
not use towing dollies): Always
release the parking brake.
VEHICLE RECOVERY (freeing a stuck
vehicle)
WARNING
To avoid vehicle damage, serious per-
sonal injury or death when recovering a
stuck vehicle:
.Contact a professional towing ser-
vice to recover the vehicle if you
have any questions regarding the
recovery procedure.
. Tow chains or cables must be at-
tached only to main structural mem-
bers of the vehicle.
. Do not use the vehicle tie-downs to
tow or free a stuck vehicle.
. Only use devices specifically de-
signed for vehicle recovery and
follow the manufacturer’s instruc-
tions.
In case of emergency6-15