2017 NISSAN QUEST climate control
[x] Cancel search: climate controlPage 199 of 520
4-10Monitor, heater, air conditioner, audio, phone and voice recognition systems
HOW TO SELECT MENUS ON THE
SCREEN
Vehicle functions are viewed on the display
screen in menus. To select each key item,
highlight the preferred item using the multi-
function controller and push the ENTER button.
Whenever a menu selection is made or menu
item is highlighted, different areas on the screen
provide you with important information. See the
following for details.
1. Header:Shows the path used to get to the current
screen. (for example, push SETTING button
> choose “Comfort” menu item.)
2. Menu Selections: Shows the options to choose within that
menu screen.
3. UP/DOWN Movement indicator: Shows that the multi-function controller may
be used to move UP/DOWN on the screen
and select more options.
4. Menu Items Counter: Shows the total number of items listed
across all pages for the current menu (for
example, 3/7) .
5. Footer/Information Line: Provides more information (if available) about the menu selection currently high-
lighted. (for example, Adjust head lamp on
time after shut-off.)
HOW TO USE STATUS BUTTON
You can check information related to the audio,
climate control system, fuel consumption and
navigation system (if so equipped) by pressing
the STATUS button repeatedly.
HOW TO USE BRIGHTNESS CON-
TROL AND DISPLAY ON/OFF BUTTON
Push the “OFF” button to switch the display
brightness to the daytime mode or the nighttime
mode, and to adjust the display brightness using
the multi-function controller while the indicator is
displayed at the bottom of the screen.
Push and hold the “
OFF” button for more
than 2 seconds to turn the display off. Push the
button again to turn the display on.
Models without navigation system:
. The display brightness can also be adjusted
using the brightness UP button (
)or
brightness DOWN button ().
HOW TO USE DISP BUTTON (models
without navigation system)
Push the DISP button to show the display
setting screen. (See “Display settings (models
without navigation system)” (P.4-18).)
VEHICLE INFORMATION AND
SETTINGS (models with center
multi-function control panel)
Page 243 of 520
4-54Monitor, heater, air conditioner, audio, phone and voice recognition systems
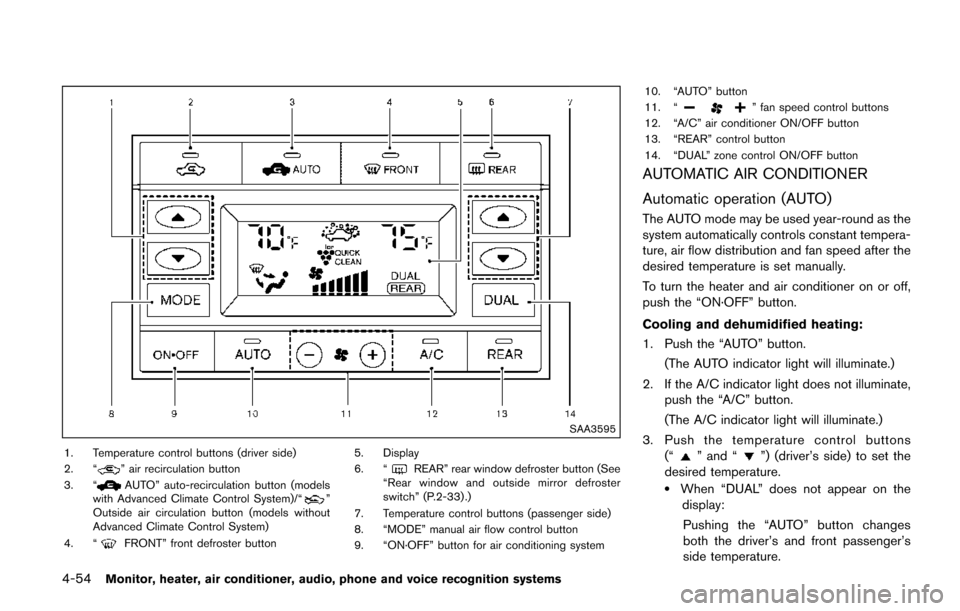
SAA3595
1. Temperature control buttons (driver side)
2. “” air recirculation button
3. “AUTO” auto-recirculation button (models
with Advanced Climate Control System)/“”
Outside air circulation button (models without
Advanced Climate Control System)
4. “
FRONT” front defroster button 5. Display
6. “
REAR” rear window defroster button (See
“Rear window and outside mirror defroster
switch” (P.2-33) .)
7. Temperature control buttons (passenger side)
8. “MODE” manual air flow control button
9. “ON·OFF” button for air conditioning system 10. “AUTO” button
11. “
” fan speed control buttons
12. “A/C” air conditioner ON/OFF button
13. “REAR” control button
14. “DUAL” zone control ON/OFF button
AUTOMATIC AIR CONDITIONER
Automatic operation (AUTO)
The AUTO mode may be used year-round as the
system automatically controls constant tempera-
ture, air flow distribution and fan speed after the
desired temperature is set manually.
To turn the heater and air conditioner on or off,
push the “ON·OFF” button.
Cooling and dehumidified heating:
1. Push the “AUTO” button.
(The AUTO indicator light will illuminate.)
2. If the A/C indicator light does not illuminate, push the “A/C” button.
(The A/C indicator light will illuminate.)
3. Push the temperature control buttons (“
” and “”) (driver’s side) to set the
desired temperature.
.When “DUAL” does not appear on the display:
Pushing the “AUTO” button changes
both the driver’s and front passenger’s
side temperature.
Page 244 of 520
— Pushing the “DUAL” button allows theuser to independently change the front
passenger’s side temperature with the
passenger side temperature control but-
tons (“
” and “”) . (“DUAL” will
appear on the display.)
To cancel the separate temperature
setting, push the “DUAL” button (“DUAL”
will disappear from the display) and the
driver’s side temperature setting will be
applied to both the driver’s and front
passenger’s sides.
4. Models with Advanced Climate Control System:
.Push the “AUTO” auto-recirculation
button. The indicator light on the “
AUTO” auto-recirculation button will illu-
minate. In this mode, the sensor detects
odors and gas to automatically switch
between the air recirculation mode and
the outside air circulation mode. (See
“Advanced climate control system” (P.4-
57) for details.)
Models without Advanced Climate Control
System:
.Push and hold the air recirculation “”
button or outside air circulation “”
button (the one with the indicator light
on) for more than 2 seconds to set the
automatic control between the air recir- culation and outside air circulation
modes. (The “
” and “” indicator
lights will blink twice.)
The following conditions need to be met for the
automatic air intake control mode to function
properly.
. The air flow control is not in the front
defroster mode (the indicator light on the
front defroster “
FRONT” button is
turned off).
. The outside temperature is approximately
328F(0 8C) or above.
A visible mist may be seen coming from the
ventilators in hot, humid conditions as the air is
cooled rapidly. This does not indicate a mal-
function.
Heating (A/C off):
1. Push the “AUTO” button.
(The AUTO indicator light will illuminate.)
2. If the A/C indicator light illuminates, push the “A/C” button.
(The A/C indicator light will turn off.)
3. Push the temperature control buttons (“
” and “”) (driver’s side) to set the
desired temperature.
When the DUAL mode is turned off (“DUAL”
does not appear on the display):
.Pushing the “AUTO” button changes both the driver’s and front passenger’s
side temperature.
.Pushing the “DUAL” button allows the user to independently change the front
passenger’s side temperature with the
passenger side temperature control but-
tons (“
”or“”) . (“DUAL” will
appear on the display.)
To cancel the separate temperature
setting, push the “DUAL” button (“DUAL”
will disappear from the display) and the
driver’s side temperature setting will be
applied to both the driver’s and front
passenger’s sides.
4. Models with Advanced Climate Control System:
.Push the “AUTO” auto-recirculation
button. The indicator light on the “
AUTO” auto-recirculation button will illu-
minate. In this mode, the sensor detects
odors and gas to automatically switch
between the air recirculation mode and
the outside air circulation mode. (See
“Advanced climate control system” (P.4-
57) for details.)
Models without Advanced Climate Control
System:
.Push and hold the air recirculation “”
button or outside air circulation “”
Monitor, heater, air conditioner, audio, phone and voice recognition systems4-55
Page 246 of 520
button will illuminate.
The air recirculation mode cannot be activated
when the air conditioner is in the front defrosting
mode.
Outside air circulation:
.Models with Advanced Climate Control
System:
Push the air recirculation “
” button twice
to draw outside air into the passenger
compartment. The indicator light on the air
recirculation “
” button will turn off.
. Models without Advanced Climate Control
System:
Push the outside air circulation “
” button
to draw outside air into the passenger
compartment. The indicator light on the
outside air circulation “
” button will turn
on.
Automatic air intake control:
. Models with Advanced Climate Control
System:
Push the “
AUTO” auto-recirculation”
button to switch to the automatic air intake
control mode. The indicator light on the
“
AUTO” auto-recirculation button will
illuminate. In this mode, the sensor detects
odors and gas to automatically switch
between the air recirculation mode and the outside air circulation mode. (See “Ad-
vanced climate control system” (P.4-57) for
details.)
. Models without Advanced Climate Control
System:
To switch to the automatic control mode,
push the air recirculation “
” button to
recirculate interior air inside the vehicle. The
indicator light on the air recirculation “
”
button for about 2 seconds. The indicator
lights (both air recirculation “
” and
outside air circulation “” buttons) will
flash twice, and then the intake air will be
controlled automatically.
The following conditions need to be met for the
automatic air intake control mode to function
properly.
. The air flow control is not in the front
defroster mode (the indicator light on the
front defroster “
FRONT” button is
turned off).
. The outside temperature is approximately
328F(0 8C) or above.
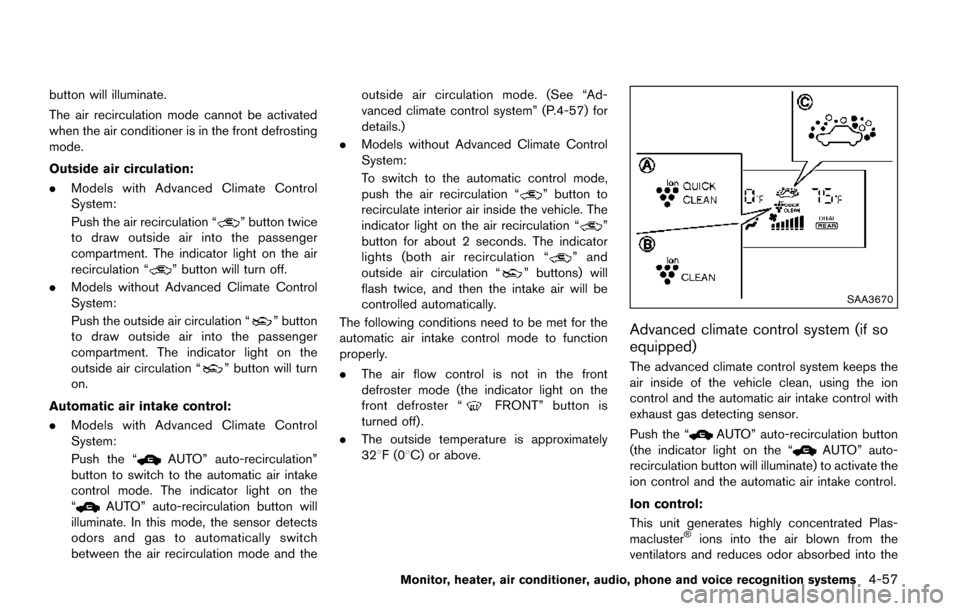
SAA3670
Advanced climate control system (if so
equipped)
The advanced climate control system keeps the
air inside of the vehicle clean, using the ion
control and the automatic air intake control with
exhaust gas detecting sensor.
Push the “
AUTO” auto-recirculation button
(the indicator light on the “AUTO” auto-
recirculation button will illuminate) to activate the
ion control and the automatic air intake control.
Ion control:
This unit generates highly concentrated Plas-
macluster
�Šions into the air blown from the
ventilators and reduces odor absorbed into the
Monitor, heater, air conditioner, audio, phone and voice recognition systems4-57
Page 249 of 520
4-60Monitor, heater, air conditioner, audio, phone and voice recognition systems
Rear control buttons:
The rear seat passengers can adjust the rear
automatic air conditioning system using the
control switches located on the ceiling above
the rear seats (models with NISSAN Mobile
Entertainment System) or on the upper left side
of the second row seat (models without
NISSAN Mobile Entertainment System) .
The rear control buttons do not function when
“
” is shown on the front display. To activate
the rear control buttons, push the “REAR”
button on the front air conditioner control panel
and cancel the rear air conditioner control mode
(“
” will disappear from the front display) .
“OFF” button: Turns off the rear air conditioning
system.
“
” Fan speed control buttons: Adjust rear
fan speed
“AUTO” button: Turns on/off the automatic
operation mode when rear air conditioning
system is on
“MODE” button: Changes the rear air flow
“TEMP” buttons: Adjust the rear temperature
SERVICING AIR CONDITIONER
WARNING
The air conditioner contains refrigerant
under high pressure. To avoid personal
injury, any air conditioner service
should be done only by an experienced
technician with the proper equipment.
The air conditioner system in your vehicle is
charged with a refrigerant designed with the
environment in mind.
This refrigerant will not harm the earth’s
ozone layer. However, it may contribute in a
small part to global warming.
Special charging equipment and lubricant are
required when servicing your vehicle’s air con-
ditioner. Using improper refrigerants or lubri-
cants will cause severe damage to the air
conditioner system. (See “Air conditioning sys-
tem refrigerant and lubricant recommendations”
(P.10-6) .)
A NISSAN dealer will be able to service your
environmentally friendly air conditioner system.
IN-CABIN MICROFILTER
The climate control system is equipped with an
in-cabin microfilter which collects dirt, pollen,
dust, etc. To make sure the air conditioner heats,
defogs, and ventilates efficiently, replace the
filter in accordance with the specified main-
tenance intervals listed in the “9. Maintenance
and schedules” section. It is recommended to
visit a NISSAN dealer to replace the filter. A
natural grape seed polyphenol filter (if so
equipped) collects and neutralizes dirt, pollen,
dust, etc.
The filter should be replaced if air flow is
extremely decreased or when windows fog
up easily when operating heater or air
conditioning system.
Page 507 of 520
10-24Technical and consumer information
damage.
. Whenever flat towing your vehicle,
always tow forward, never back-
ward.
. DO NOT tow any continuously vari-
able transmission vehicle with all
four wheels on the ground (flat
towing) . Doing so WILL DAMAGE
internal transmission parts due to
lack of transmission lubrication.
. For emergency towing procedures
refer to “Towing recommended by
NISSAN” (P.6-15) of this manual.
Continuously Variable Transmission
(CVT)
To tow a vehicle equipped with a Continuously
Variable Transmission (CVT) , an appropriate
vehicle dolly MUSTbe placed under the towed
vehicle’s driving wheels. Alwaysfollow the dolly
manufacturer’s recommendations when using
their product. DOT (Department Of Transportation) Quality
Grades: All passenger car tires must conform to
federal safety requirements in addition to these
grades.
Quality grades can be found where applicable
on the tire sidewall between tread shoulder and
maximum section width. For example:
Treadwear 200 Traction AA Temperature A
TREADWEAR
The treadwear grade is a comparative rating
based on the wear rate of the tire when tested
under controlled conditions on a specified
government test course. For example, a tire
graded 150 would wear one and one-half
(1 1/2) times as well on the government course
as a tire graded 100. The relative performance
of tires depends upon actual conditions of their
use, however, and may depart significantly from
the norm due to variations in driving habits,
service practices and differences in road char-
acteristics and climate.
TRACTION AA, A, B AND C
The traction grades, from highest to lowest, are
AA, A, B and C. Those grades represent the
tire’s ability to stop on wet pavement as
measured under controlled conditions on spe-
cified government test surfaces of asphalt and
concrete. A tire marked C may have poortraction performance.
WARNING
The traction grade assigned to this tire
is based on straight-ahead braking
traction tests, and does not include
acceleration, cornering, hydroplaning,
or peak traction characteristics.
TEMPERATURE A, B AND C
The temperature grades A (the highest) , B, and
C, representing the tire’s resistance to the
generation of heat and its ability to dissipate
heat when tested under controlled conditions on
a specified indoor laboratory test wheel. Sus-
tained high temperature can cause the material
of the tire to degenerate and reduce tire life, and
excessive temperature can lead to sudden tire
failure. The grade C corresponds to a level of
performance which all passenger car tires must
meet under the Federal Motor Vehicle Safety
Standard No. 109. Grades B and A represent
higher levels of performance on the laboratory
test wheel than the minimum required by law.
UNIFORM TIRE QUALITY GRADING