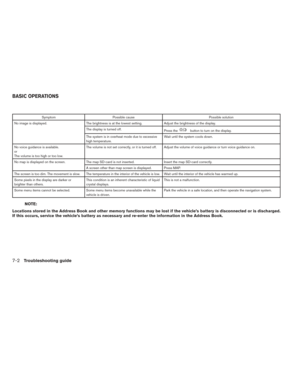
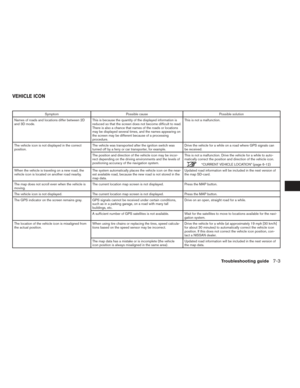
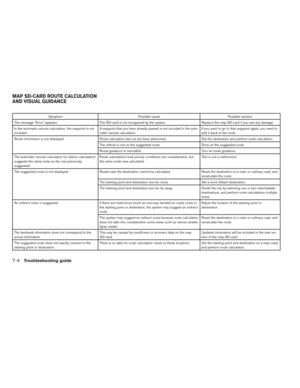
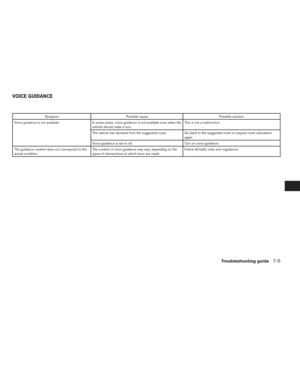
Page 49 of 94

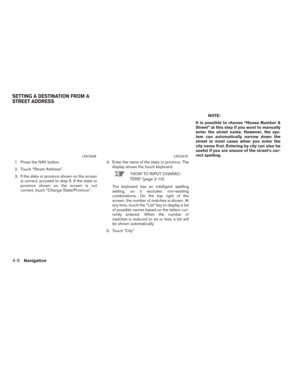
Touch the desired destination from the list.
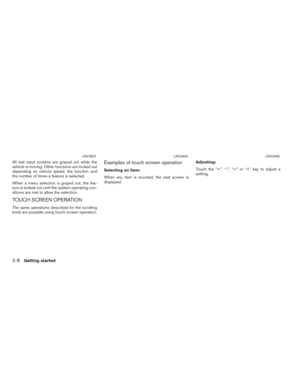
11. A detailed description of the destination isprovided.
Press the BACK or
BACK button to
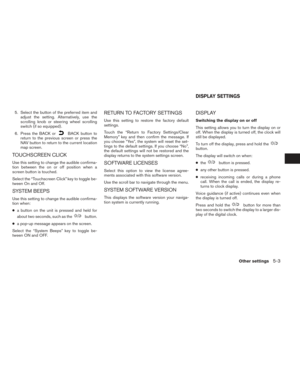
go back and pick another destination or
touch “Start” to have the system calculate
the route to the destination.
SEARCHING FOR PLACES USING
VOICE RECOGNITION (if so
equipped)
Places can be set as destinations using the
NISSAN Voice Recognition System:
1. Press the
orbutton on the
steering wheel. The system provides
prompts and waits for voice commands.
2. Say “Navigation”.
3. Say “Points of Interest” followed by a brand name.
4. Say number of the point of interest from the available list on the screen.
5. There are up to four options to search for a point of interest:
● Say “Along Route” to search for the de-
sired places along the current route. ●
Say “Nearby” to search for the desired
places close to the vehicle’s current
location.
● Say “Near Destination” to search for the
desired places near the route’s
destination.
● Say “In another city” so search for the de-
sired places in another city. Selecting
this option will lead to a series of other
steps.
6. The system displays a list of results fitting the search criteria. Say the number of the
desired entry on the list.
If a route is active, say “Replace Destination” to
replace the current destination with the new
street address or say “Set as Waypoint” to set
the new street address as a waypoint on the cur-
rent route.
If a route is not set, say “Set as Destination” to
set the new street address as the destination
and begin route guidance.
Say “Show on Map” to display the new street ad-
dress on the map.
For more information about the NISSAN Voice
Recognition System, see the vehicle Owner’s
Manual.
MY POINTS OF INTEREST/USER-
DEFINED POINTS OF INTEREST
(POIs)
A point of interest (POI) in the My Points of Inter-
est database is a specific location of interest
such as a gas station or bank. The POI consists
of a longitude value, a latitude value and a name.
Additional POIs can be added to the system us-
ing the vehicle’s USB port. For more information
about using the USB port, see your vehicle’s
owner’s manual.
The POIs can be set as a destination or be setup
to activate POI warnings that display a pop-up
message when the vehicle approaches certain
areas such as hazard spot warnings.
NOTE:
● In order to save the user-defined points of in-
terest data, a USB mass storage device is
required. The user-defined points of interest
data cannot be saved on the SD-card which
contains the navigation data.
● User-defined points of interest are not shown
in the map representation.
Navigation4-13
Page 50 of 94
 data and then asks the
user via a pop-up message if the data needs
to be downloaded into the system.
● If you confirm the download,")
●The system recognizes the user-defined
points of interest (POI) data and then asks the
user via a pop-up message if the data needs
to be downloaded into the system.
● If you confirm the download, the available user
Points of Interest in the system internal
memory will be deleted and the new ones in
the USB mass storage device will be down-
loaded into the internal memory of the system.
● The progress of the download is shown by a
progress-bar. When the download is finished,
the user is notified that the USB mass storage
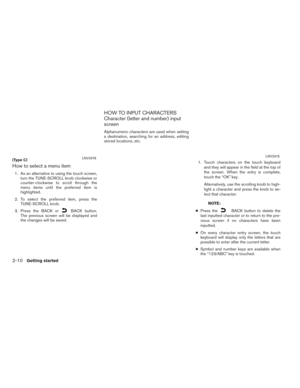
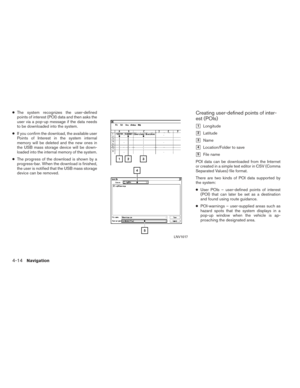
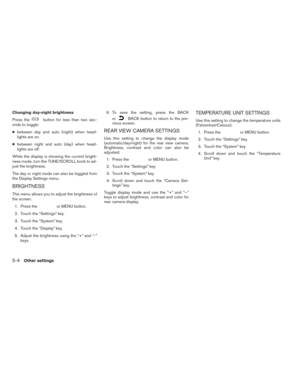
device can be removed.Creating user-defined points of inter-
est (POIs)
�1Longitude
�2Latitude
�3Name
�4Location/Folder to save
�5File name
POI data can be downloaded from the Internet
or created in a simple text editor in CSV (Comma
Separated Values) file format.
There are two kinds of POI data supported by
the system:
● User POIs – user-defined points of interest
(POI) that can later be set as a destination
and found using route guidance.
● POI-warnings – user-supplied areas such as
hazard spots that the system displays in a
pop-up window when the vehicle is ap-
proaching the designated area.
LNV1017
4-14Navigation
Page 51 of 94

Perform the following procedure to create your
own User POIs:1. Connect a USB mass storage device to your personal computer.
2. Use a standard software program to create a list of POIs. Make sure the software can
support the CSV file format.
3. In the first column, enter the longitude value of the position of the POI.
4. In the second column, enter the latitude value of the position of the POI.
5. In the third column, enter the name of the POI. Information entered in the fourth
column, such as address or phone number,
will be appended to the name of the POI.
6. Add more rows if necessary.
7. Save the file with the extension .csv (for example, myplacesfile.csv) .
NOTE:
The name of the .CSV file will be used to
create a My Points of Interest category in
the system. Create separate .CSV files with
different names to create other My Points
of Interest categories. 8. Make sure to select the USB mass storage
device as the location to save, using the ex-
act folder name “/myPOIs” for User POIs or
“/myPOIs/myPOIwarnings”
for POI-warnings. For example, if the USB
mass storage device’s root folder is repre-
sented by f:/, save the file to the folder
“f:/myPOIs” for User POIs or to the folder
“f:/myPOIs/myPOIwarnings”
for POI-warnings.
9. Connect the USB mass storage device to the vehicle’s USB port. For more informa-
tion about the USB port, see your vehicle’s
Owner’s Manual.
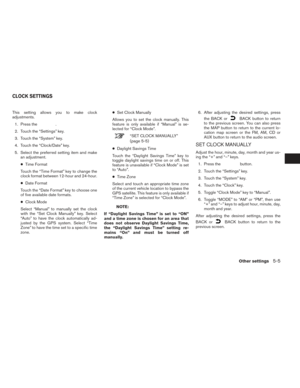
Adding user-defined points of interest
(POIs)
Perform the following procedure to add your
User POIs to the system:
1. Press the NAV button.
2. Touch “Next Page”.
3. Touch “My Points of Interest”.
4. If a USB mass storage device with the new POI data is connected, the system will auto-
matically ask if you want to transfer the POI
data. Touch “Download” to begin the trans-
fer or “Cancel” to cancel the procedure.
NOTE:
New POI data will overwrite POI data al-
ready in the internal memory.
LNV2703
Navigation4-15
Page 52 of 94

5. The POI data on the USB mass storage de-vice is transferred to the vehicle.
NOTE:
A maximum of 8 MB of POI data can be
added to the system. 6. Once the download process is complete, the available POIs are displayed in a list on
the screen.
7. Touch the name of a POI on the list to set it as the destination.
8. Touch “Start” to calculate the route.
A user-defined POI in the My Points of Interest
database can also be set as the destination by
following the procedure below: 1. Press the NAV button.
2. Touch “Next Page”.
3. Touch “My Points of Interest”
4. Touch the name of the user-defined Point of Interest to set that entry as a destination.
Deleting user-defined points of inter-
est (POIs)
Perform the following procedure to delete the
user-defined POIs stored in the My Points of In-
terest memory:
1. Press the
or MENU button.
2. Touch “Settings”. 3. Touch “Navigation”.
4. Touch “My Points of Interest Settings”
5. Touch “Remove My Points of Interest From
System”.
6. A pop-up is displayed to confirm that you want to delete all User POIs (My Points of
Interest) from the system. Touch “Yes” to
delete the User POIs or “No” to cancel.
Other options are available on the “My Points of
Interest Settings” screen:
● My Points of Interest Alert
Select to adjust how alerts are provided when
approaching a destination set by My Points of
Interest. Choose “OFF” to disable the alert.
Choose “Show Only” to display the alert on
the screen. Choose “Show & Beep” to display
the alert on the screen and play an audible
sound.
LNV2704LNV2701
4-16Navigation
Page 53 of 94
●Points of Interest Alert Distance
Select to choose from the available list a dis-
tance away from the My Points of Interest
destination at which to activate the alert. This option allows you to set and store the des-
tination in the address book and use the stored
destinations to calculate a route.
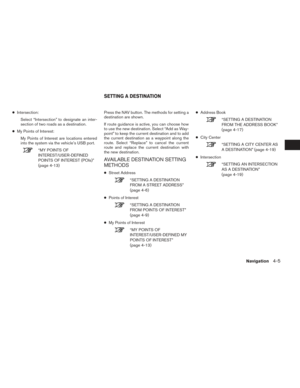
SETTING A NEW ENTRY TO THE
ADDRESS BOOK
1. Press the NAV button.
2. Touch “Next Page”.
3. Touch “Address Book”.
4. Touch “Add New Entry”.
There are four possibilities shown:
NOTE:
Up to 50 address book entries can be
stored. If the number of address book en-
tries exceeds 50, one must be deleted be-
fore the new one can be added.
“SETTING AN ENTRY AS A DESTI-
NATION” (page 4-18)
LNV2703
SETTING A DESTINATION FROM THE
ADDRESS BOOK
Navigation4-17
Page 54 of 94

● Previous Destination
This option allows you to s")
●Street Address
This option allows you to save a new entry
by selecting the address.
“SETTING A DESTINATION
FROM A STREET ADDRESS”
(page 4-6)
● Previous Destination
This option allows you to save a destination
in the address book from a location stored
in the previous destination memory.
Touch the destination you would like to save
into the address book.
The touch keyboard gives the option to change
the name of the selected destination.
Touch “OK”. The system confirms the entry and
adds it to the address book.
● Current Destination
This option allows you to store the currently
set destination in the address book when a
route is active. This option is only available
when a route is active.
Touch “Current Destination”.
The touch keyboard gives the option to change
the name of the destination. Touch “OK”. The system confirms the entry and
adds it to the address book.
●
Current Position
This option allows you to set the current po-
sition as a destination in the address book.
Touch “Current Position”.
The touch keyboard gives the option to change
the name of the destination.
Touch “OK”. The system confirms the entry and
adds it to the address book.
SETTING AN ENTRY AS A DESTINA-
TION
Instead of touching “Add New Entry”, you can
touch any previously saved address.
The detailed description of the entry is shown. If
information for the destination is not available,
latitude and longitude coordinates will be shown.
You can rename or delete the entry. Touch “OK”
to set the entry as a destination.
The system will calculate the route to the ad-
dress chosen.
SETTING A DESTINATION FROM
THE ADDRESS BOOK USING
VOICE RECOGNITION (if so
equipped)
Entries in the address book can be set as desti-
nations using the NISSAN Voice Recognition
System: 1. Press the
orbutton on the
steering wheel. The system provides
prompts and waits for voice commands.
2. Say “Navigation”.
3. Say “Address Book”.
4. Say the number of the entry in the address book displayed on the screen.
If a route is active, say “Replace Destination” to
replace the current destination with the address
book entry or say “Set as Waypoint” to set ad-
dress book entry as a waypoint on the current
route.
If a route is not set, route guidance is calculated
to the address book entry.
Say “Show on Map” to display the location of the
address book entry on the map.
For more information about the NISSAN Voice
Recognition System, see the vehicle Owner’s
Manual.
4-18Navigation
Page 55 of 94

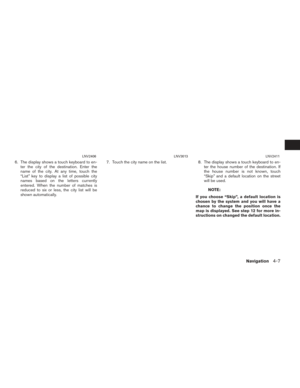
An intersection of two streets can be set as a
destination. To set an intersection as the desti-
nation:1. Press the NAV button.
2. Touch “Next Page”.
3. Touch “Intersection”.
4. Touch “Change State/Province” if the state or province displayed is not correct.
5. If necessary, enter the name of the state or province.
The display shows the touch keyboard.
“HOW TO INPUT CHARACTERS”
(page 2-10)
6. Press “List” at any time and a list of remain- ing cities will be shown. Touch the desired
city. 7. Touch “Street”.
The display shows the touch keyboard.
8. Touch the name of the desired street.
9. A list of intersecting streets will be shown if six or less exist. Otherwise, the touch key-
board will be displayed again so that the
name of the second street in the intersec-
tion can be entered. Enter the second street
name.
10. Select the intersecting street.
11. Touch “Start”. The route to the intersection will be
calculated. The center of a city can be set as a destination.
To set a city center as a destination:
1. Press the NAV button.
2. Touch “Next Page”.
3. Touch “City Center”.
4. If the state shown is not correct, touch “Change State or Province”. Otherwise,
proceed to step 7.
5. Enter the name of the state or province. The display shows the touch keyboard.
“HOW TO INPUT CHARAC-
TERS” (page 2-10)
The keyboard has an intelligent spelling
setting, so it excludes non-existing
combinations. On the top right of the
screen, the number of matches is shown.
LNV2703LNV2703
SETTING AN INTERSECTION AS A
DESTINATION SETTING A CITY CENTER AS A DES-
TINATION
Navigation4-19
Page 56 of 94
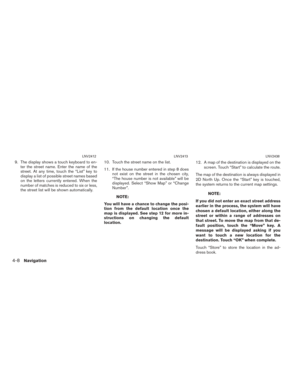
6. Touch “City”
7. Enter the name of the first street. The dis-play shows the touch keyboard.
8. Touch “Start” to calculate the route to the city center. The Navigation System receives traffic informa-
tion from SiriusXM Traffic to inform you of traffic
events and guide you to an alternate route. Traf-
fic events include accidents, road construction,
heavy traffic and other factors that affect the
route ahead.
DISPLAYING TRAFFIC EVENTS
ALONG ROUTE
When a route is active, press thebut-
ton and then touch “SiriusXM Traffic” to display
the traffic event nearest the current vehicle
location. The location and nature of the traffic
event is displayed on the screen. Three menu
options are available on the screen.
NOTE:
This feature can also be accessed using
the NISSAN Voice Recognition System (if
so equipped) by pressing the
orbutton on the steering wheel and
when prompted, saying “Information” then
“Traffic”.
LNV2704
TRAFFIC FEATURE
4-20Navigation