2017 NISSAN LEAF power steering
[x] Cancel search: power steeringPage 2 of 40

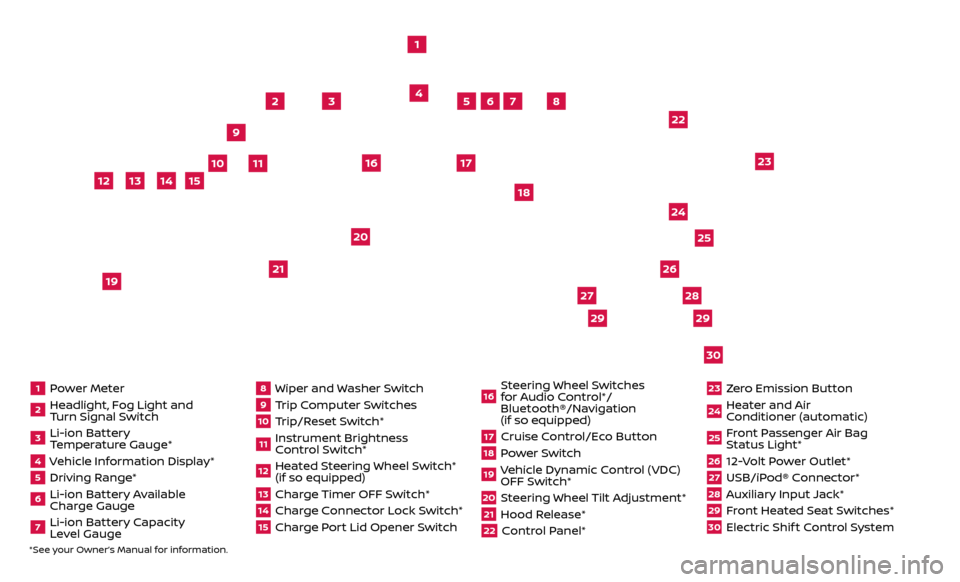
1 Power Meter2 Headlight, Fog Light and Turn Signal Switch3 Li-ion Battery Temperature Gauge*4 Vehicle Information Display*5 Driving Range*6 Li-ion Battery Available
Charge Gauge7 Li-ion Battery Capacity Level Gauge
8 Wiper and Washer Switch9 Trip Computer Switches10 Trip/Reset Switch*11 Instrument Brightness
Control Switch*12 Heated Steering Wheel Switch* (if so equipped)13 Charge Timer OFF Switch*14 Charge Connector Lock Switch*15 Charge Port Lid Opener Switch
16 Steering Wheel Switches for Audio Control*/
Bluetooth®/Navigation
(if so equipped)17 Cruise Control/Eco Button18 Power Switch19 Vehicle Dynamic Control (VDC) OFF Switch*20 Steering Wheel Tilt Adjustment*21 Hood Release*22 Control Panel*
23 Zero Emission Button24 Heater and Air Conditioner (automatic)25 Front Passenger Air Bag Status Light*26 12-Volt Power Outlet*27 USB/iPod® Connector*28 Auxiliary Input Jack*29 Front Heated Seat Switches*30 Electric Shif t Control System
1
3
4
2
5
10
6
7
22
2528
26
2930
23
24
21
9
11
8
20
18
16
17
2729
12
14
19
13
15
*See your Owner’s Manual for information.
Page 7 of 40

5
2
3
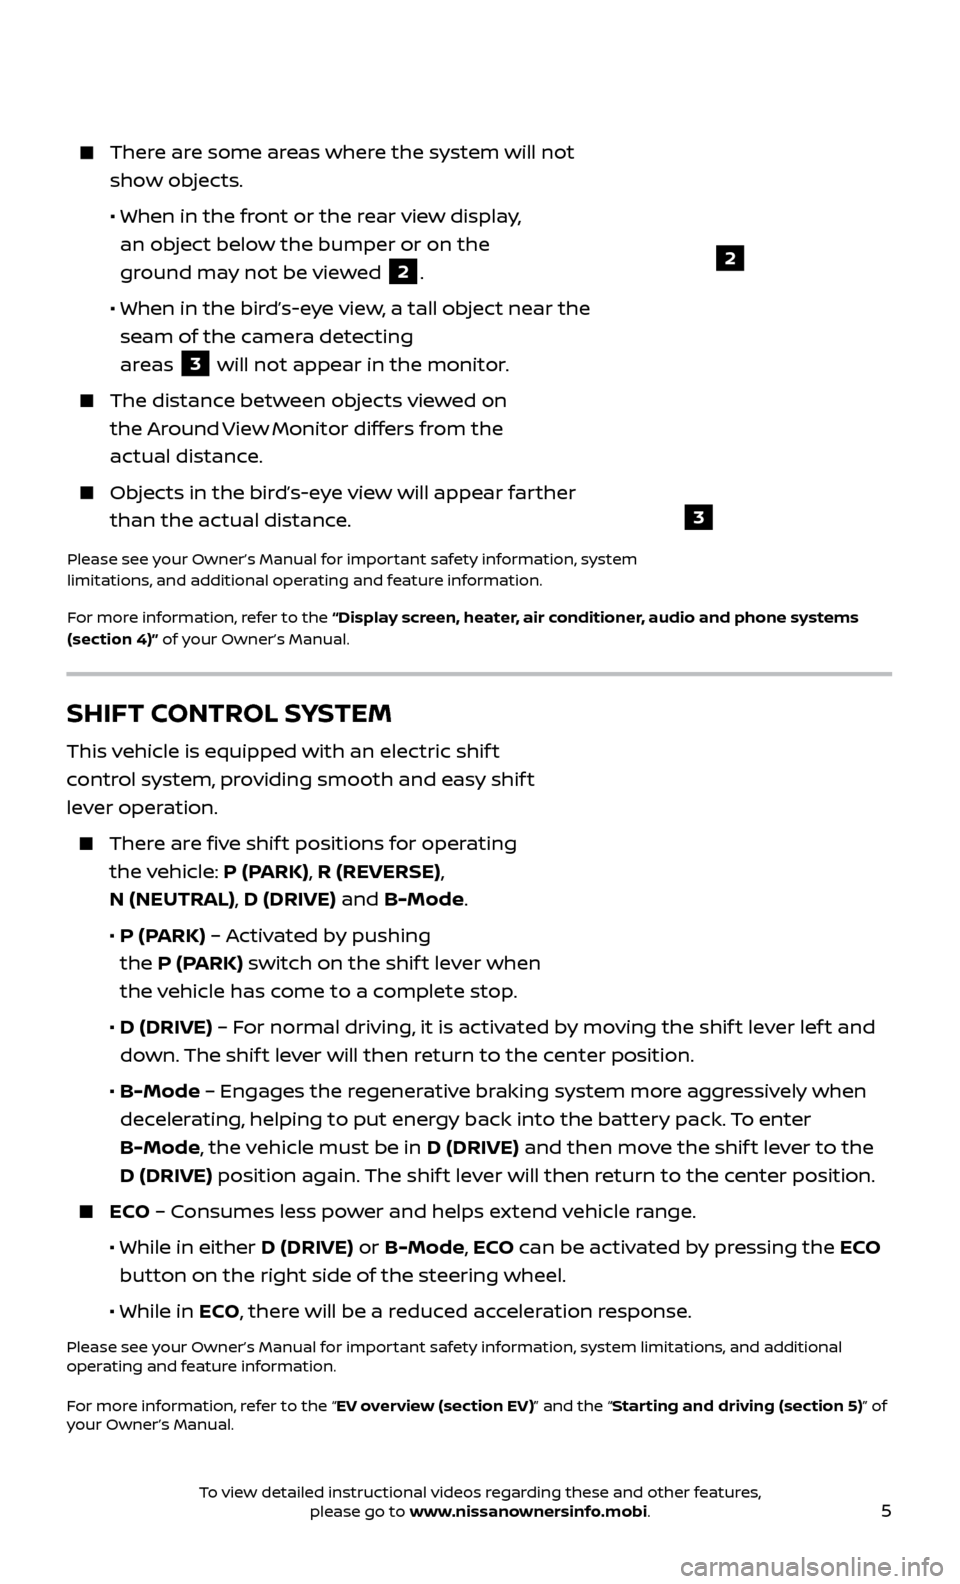
There are some areas where the system will not show objects.
• When in the fr
ont or the rear view display,
an object below the bumper or on the
ground may not be viewed
2.
•
When in the bir
d’s-eye view, a tall object near the
seam of the camera detecting
areas
3 will not appear in the monitor.
The distanc e between objects viewed on
the Around View Monitor differs from the
actual distance.
Objects in the bird’s-eye view will appear farther than the actual distance.
Please see your Owner’s Manual for important safety information, system
limitations, and additional operating and feature information.
For more information, refer to the “Display screen, heater, air conditioner, audio and phone systems
(section 4)” of your Owner’s Manual.
SHIFT CONTROL SYSTEM
This vehicle is equipped with an electric shif t
control system, providing smooth and easy shif t
lever operation.
There are five shif t positions for operating the vehicle: P (PARK), R (REVERSE),
N (NEUTRAL), D (DRIVE) and B-Mode.
•
P (P
ARK) – Activated by pushing
the P (PARK) switch on the shif t lever when
the vehicle has come to a complete stop.
•
D (DRIVE)
– For normal driving, it is activated by moving the shif t lever lef t and
down. The shif t lever will then return to the center position.
•
B-Mode
– Engages the regenerative braking system more aggressively when
decelerating, helping to put energy back into the battery pack. To enter
B-Mode, the vehicle must be in D (DRIVE) and then move the shif t lever to the
D (DRIVE) position again. The shif t lever will then return to the center position.
ECO – Consumes less power and helps extend vehicle range.
• While in either
D (DRIVE) or B-Mode, ECO can be activated by pressing the ECO
button on the right side of the steering wheel.
•
While in ECO, there will be a reduced acceleration response.
Please see your Owner’s Manual for important safety information, system limitations, and additional
operating and feature information.
For more information, refer to the “EV overview (section EV)” and the “Starting and driving (section 5)” of
your Owner’s Manual.
To view detailed instructional videos regarding these and other features, please go to www.nissanownersinfo.mobi.
Page 12 of 40

10
LI-ION BATTERY CHARGING
Before charging the Li-ion battery, see your Owner’s Manual for detailed warnings
and cautions when charging your battery.
There are three methods available to perform the charge operation: normal charge, trickle charge and quick charge (if so equipped).
NORMAL CHARGE
Perform a normal charge using the charger installed in your home.
It takes approximately 5.5-9.5 hours for the 30 kW/h Li-ion battery (if so equipped) to charge from empty to full with a 6.6 kW charger
(if so equipped).
To charge your vehicle:
•
Plac
e the power switch in the OFF position.
•
Push the char
ge port lid opener switch located on the instrument panel to the
lef t of the steering wheel.
•
Pr
ess the charge port tab and open the cap.
•
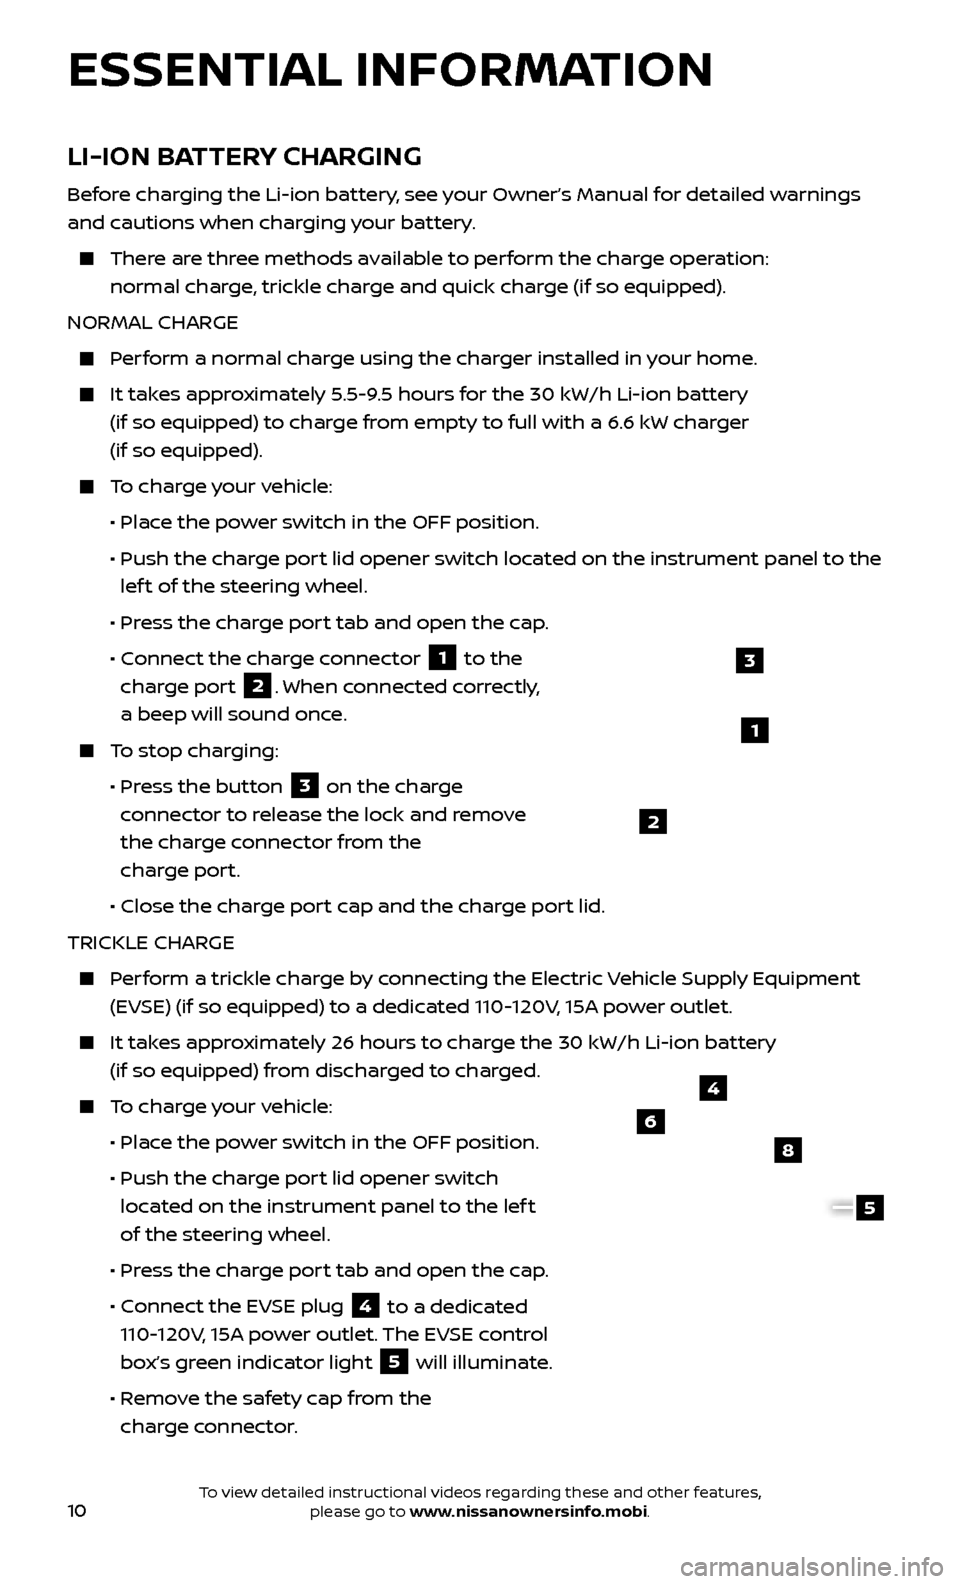
C
onnect the charge connector
1 to the
charge port 2. When connected correctly,
a beep will sound once.
To stop charging:
•
Pr
ess the button
3 on the charge
connector to release the lock and remove
the charge connector from the
charge port.
•
Close the char
ge port cap and the charge port lid.
TRICKLE CHARGE
Perform a trickle charge by connecting the Electric Vehicle Supply Equipment (EVSE) (if so equipped) to a dedicated 110-120V, 15A power outlet.
It takes approximately 26 hours to charge the 30 kW/h Li-ion battery (if so equipped) from discharged to charged.
To charge your vehicle:
•
Plac
e the power switch in the OFF position.
•
Push the char
ge port lid opener switch
located on the instrument panel to the lef t
of the steering wheel.
•
Pr
ess the charge port tab and open the cap.
•
C
onnect the EVSE plug
4 to a dedicated
110-120V, 15A power outlet. The EVSE control
box’s green indicator light
5 will illuminate.
•
R
emove the safety cap from the
charge connector.
4
6
8
5
1
2
3
ESSENTIAL INFORMATION
To view detailed instructional videos regarding these and other features, please go to www.nissanownersinfo.mobi.
Page 13 of 40

11
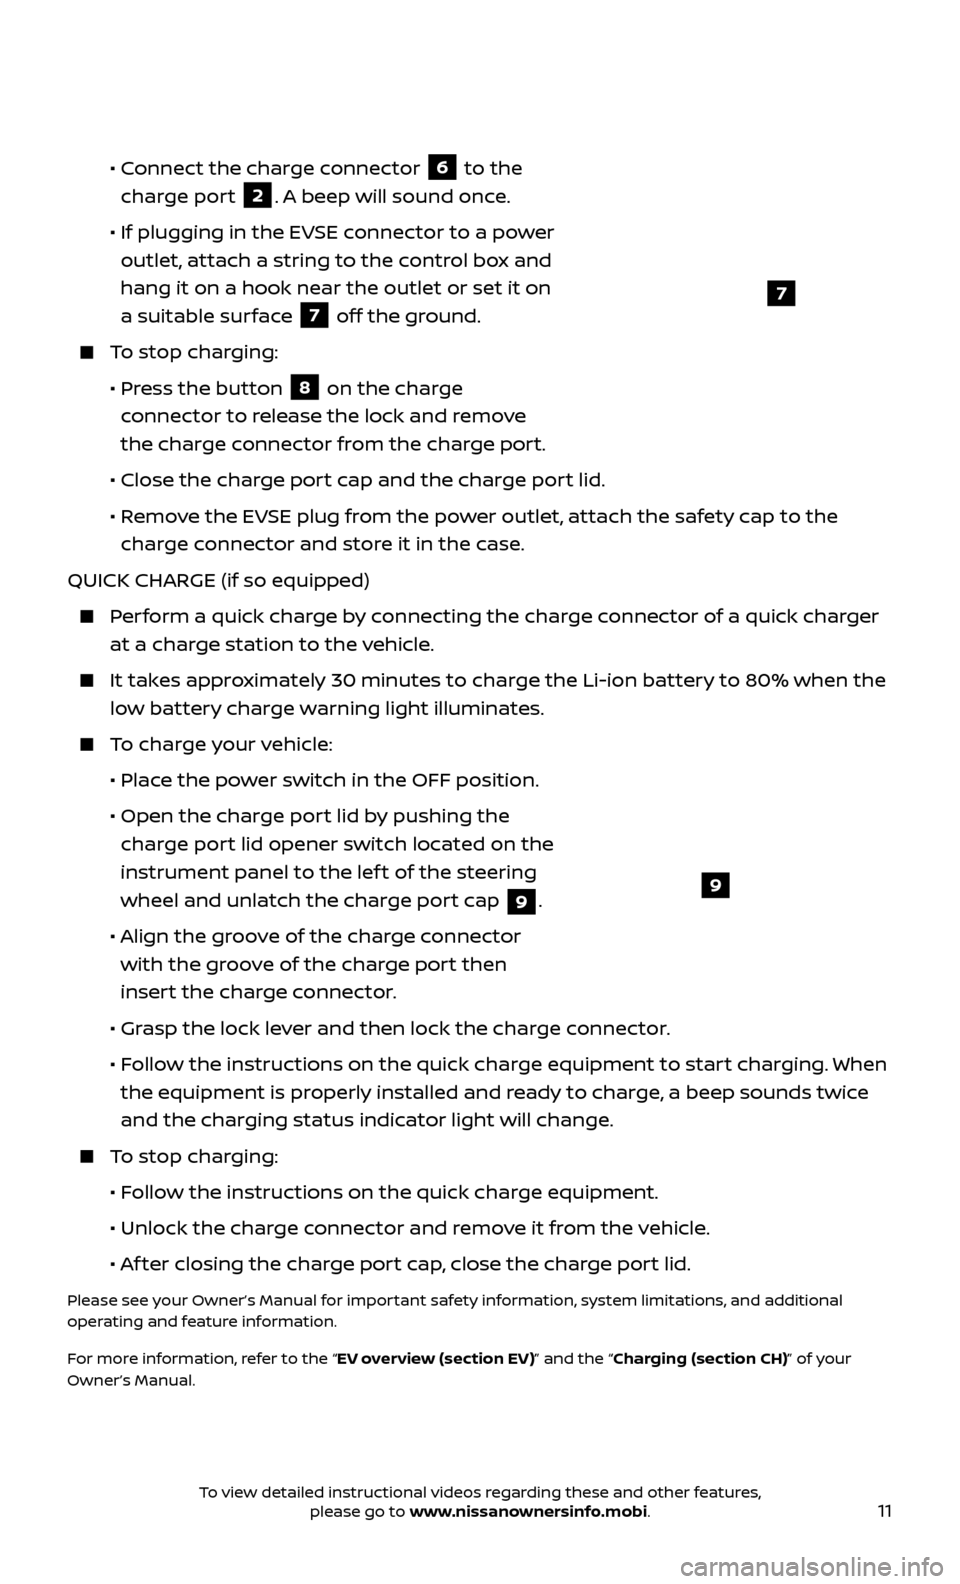
• Connect the charge connector
6 to the
charge port 2. A beep will sound once.
•
If plugging in the EV
SE connector to a power
outlet, attach a string to the control box and
hang it on a hook near the outlet or set it on
a suitable surface
7 off the ground.
To stop charging:
•
Pr
ess the button
8 on the charge
connector to release the lock and remove
the charge connector from the charge port.
•
Close the char
ge port cap and the charge port lid.
•
R
emove the EVSE plug from the power outlet, attach the safety cap to the
charge connector and store it in the case.
QUICK CHARGE (if so equipped)
Perform a quick charge by connecting the charge connector of a quick charger at a charge station to the vehicle.
It takes approximately 30 minutes to charge the Li-ion battery to 80% when the low battery charge warning light illuminates.
To charge your vehicle:
•
Plac
e the power switch in the OFF position.
•
Open the char
ge port lid by pushing the
charge port lid opener switch located on the
instrument panel to the lef t of the steering
wheel and unlatch the charge port cap
9.
•
A
lign the groove of the charge connector
with the groove of the charge port then
insert the charge connector.
•
Gr
asp the lock lever and then lock the charge connector.
•
F
ollow the instructions on the quick charge equipment to start charging. When
the equipment is properly installed and ready to charge, a beep sounds twice
and the charging status indicator light will change.
To stop charging:
•
F
ollow the instructions on the quick charge equipment.
•
Unlock the char
ge connector and remove it from the vehicle.
•
A
f ter closing the charge port cap, close the charge port lid.
Please see your Owner’s Manual for important safety information, system limitations, and additional
operating and feature information.
For more information, refer to the “EV overview (section EV)” and the “Charging (section CH)” of your
Owner’s Manual.
9
7
To view detailed instructional videos regarding these and other features, please go to www.nissanownersinfo.mobi.