2017 NISSAN LEAF navigation
[x] Cancel search: navigationPage 2 of 40
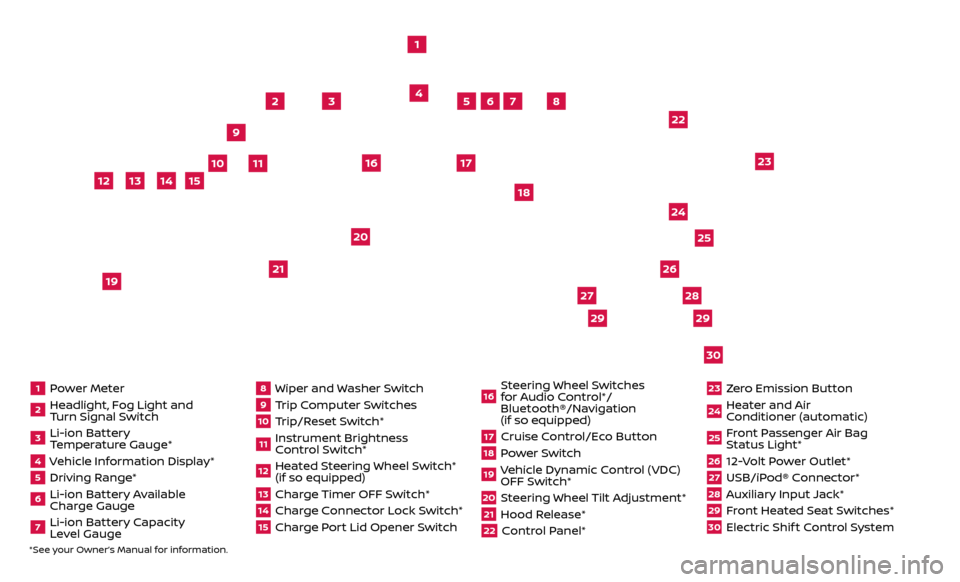
1 Power Meter2 Headlight, Fog Light and Turn Signal Switch3 Li-ion Battery Temperature Gauge*4 Vehicle Information Display*5 Driving Range*6 Li-ion Battery Available
Charge Gauge7 Li-ion Battery Capacity Level Gauge
8 Wiper and Washer Switch9 Trip Computer Switches10 Trip/Reset Switch*11 Instrument Brightness
Control Switch*12 Heated Steering Wheel Switch* (if so equipped)13 Charge Timer OFF Switch*14 Charge Connector Lock Switch*15 Charge Port Lid Opener Switch
16 Steering Wheel Switches for Audio Control*/
Bluetooth®/Navigation
(if so equipped)17 Cruise Control/Eco Button18 Power Switch19 Vehicle Dynamic Control (VDC) OFF Switch*20 Steering Wheel Tilt Adjustment*21 Hood Release*22 Control Panel*
23 Zero Emission Button24 Heater and Air Conditioner (automatic)25 Front Passenger Air Bag Status Light*26 12-Volt Power Outlet*27 USB/iPod® Connector*28 Auxiliary Input Jack*29 Front Heated Seat Switches*30 Electric Shif t Control System
1
3
4
2
5
10
6
7
22
2528
26
2930
23
24
21
9
11
8
20
18
16
17
2729
12
14
19
13
15
*See your Owner’s Manual for information.
Page 3 of 40
NEW SYSTEM FEATURESHow to Use Your LEAF’s Touch-screen Display ........................................2
NissanC onnectSM EV (if so equipped) ..................................................3
Approaching Vehicle Sound for Pedestrians (VSP) System............................3
Around View® Monitor (if so equipped)
................................................
4
Shif
t Control System
...................................................................5
Heated Seats
........................................................................\
...6
SiriusXM
Travel Link and SiriusXM Traffic (if so equipped) .............................
6
ESSENTIAL INFORMATIONCold Weather Range and Parking in Extremely Cold Weather.........................7
Quick Char ge in Cold Weather (if so equipped)........................................7
Li-ion Bat
tery Temperature Gauge and Li-ion Battery Gauges
........................8
P
ower Limitation Indicator Light ......................................................
8
Charge Port Lid/Charge Connector Lock Switch
......................................9
Li-ion Bat
tery Charging
...............................................................10
Tire Pressure Monitoring System (TPMS) with Easy-Fill Tire Alert
....................
12
Clock Set/A
djustment ................................................................
13
FIRST DRIVE FEATURESNissan Intelligent Key® System .......................................................15
Rear Hatch Release ...................................................................15
Seat Adjustments
.....................................................................16
Outside Mirror Control Switch
........................................................
16
Power Meter
.......................................................................\
...
17
Electric Vehicle (EV) System Warning Light
...........................................
17
Starting/Stopping the Electric Vehicle (EV) System
..................................
17
Headlight Control Switch
.............................................................
18
Wiper and Washer Switch
.............................................................19
Heater and Air Conditioner (automatic) (if so equipped)
.............................
20
FM/AM/SiriusXM® Satellite Radio with CD Player (if so equipped)
....................22
Cruise Control
........................................................................\
.23
USB (Universal Serial Bus) Connection Port/aux jack and iPod® Interface
...........24
SYSTEM GUIDETrip Computer .......................................................................\
.25
NissanC onnectSM Mobile Apps (if so equipped).......................................26
Hands-fr
ee Text Messaging Assistant ................................................27
Bluetooth® Hands-fr
ee Phone System ...............................................
28 S
ystem Operating Tips
.............................................................28
Bluetooth® S
ystem without Navigation (if so equipped) .............................
28
Bluetooth® S
ystem with Navigation (if so equipped)
................................30
Bluetooth® S
treaming Audio
..........................................................31
Na
vigation System (if so equipped)
...................................................33
HomeLink® Univ
ersal Transceiver (if so equipped)
....................................35
Please see your Owner’s Manual for important safety information and system operation limitations.
• A c ellular telephone should not be used for any purpose while driving so full attention may
be given to vehicle operation.
•
A
lways wear your seat belt.
•
Supplemental air bags do not r
eplace proper seat belt usage.
•
Childr
en 12 and under should always ride in the rear seat properly secured in child restraints
or seat belts according to their age and weight.
•
Do not drink and driv
e.
For more information, refer to the “Safety — Seats, seat belts and supplemental restraint system
(section 1)”, the “Display screen, heater, air conditioner, audio and phone systems (section 4)” and the
“Starting and driving (section 5)” of your Owner’s Manual and the “Audio system (section 4)” and the
“Hands-Free Phone (section 7)” of your Navigation System Owner’s Manual.
Additional information about your vehicle is also available in your Owner’s Manual,
Navigation System Owner’s Manual and at www.NissanUSA.com.
TABLE OF CONTENTS
Page 5 of 40

3
NissanConnectSM EV (if so equipped)
NissanConnect EV is a collection of telematics features that add innovation to
your daily drive.
To enroll in NissanConnect EV, create an account or log into your Nissan Owner
Portal with your Vehicle Identification Number (VIN). Under the NissanConnect EV
tab, agree to the terms and conditions and obtain your PIN and Password. Enter
this PIN and Password into your navigation unit under the NissanConnect Services
button on the main menu. Next, download the NissanConnect EV companion
app and log into it using your Nissan Owner Portal ID and password.
For full details on NissanConnect EV or to enroll your vehicle, please
visit www.nissanUSA.com/connect or call 855-426-6628.
NissanConnect EV enables you to perform remote functions from a compatible
internet-enabled smartphone or personal computer such as:
Battery status check – The status of the battery can be checked even if you are not in the vehicle.
Unplugged status and char ge status – A notification e-mail can be sent if the
charging connector is disconnected or if charging is complete.
Remote charge and remote climate control – Start battery charging, or climate controls can be set.
POIs powered by Google™ – Allows you to search for locations near your vehicle’s current location, near a plotted destination, near the map’s scroll
position or near a searched city center.
Please see your Owner’s Manual for important safety information, system limitations, and additional
operating and feature information.
For more information, refer to the “Charging (section CH)” of your Owner’s Manual and the “System
overview (section IT)” and the “NissanConnect
SM EV (section 5)” of your Navigation System
Owner’s Manual.
APPROACHING VEHICLE SOUND FOR PEDESTRIANS
(VSP) SYSTEM
The VSP system helps alert pedestrians to the presence of the vehicle when it is
being driven at a low speed.
When the v ehicle starts to move, it produces a sound. The sound stops when the
vehicle speed reaches approximately 19 mph (30 km/h) while accelerating.
Please see your Owner’s Manual for important safety information, system limitations, and additional
operating and feature information.
For more information, refer to the “EV overview (section EV)” of your Owner’s Manual.
Shortcuts and Widgets can be set up through the “Edit Menu” screen which can be accessed by touching the
“Settings” key 6 followed by the “Edit Home
Menu” key
7. This will display the “Edit Menu” screen, which allows Shortcuts
and Widgets to be moved and rearranged
8, deleted 9 and created 10.
Please see your Owner’s Manual for important safety information, system limitations, and additional
operating and feature information.
For more information, refer to your Navigation System Owner’s Manual.
To view detailed instructional videos regarding these and other features, please go to www.nissanownersinfo.mobi.
Page 6 of 40
4
NEW SYSTEM FEATURES
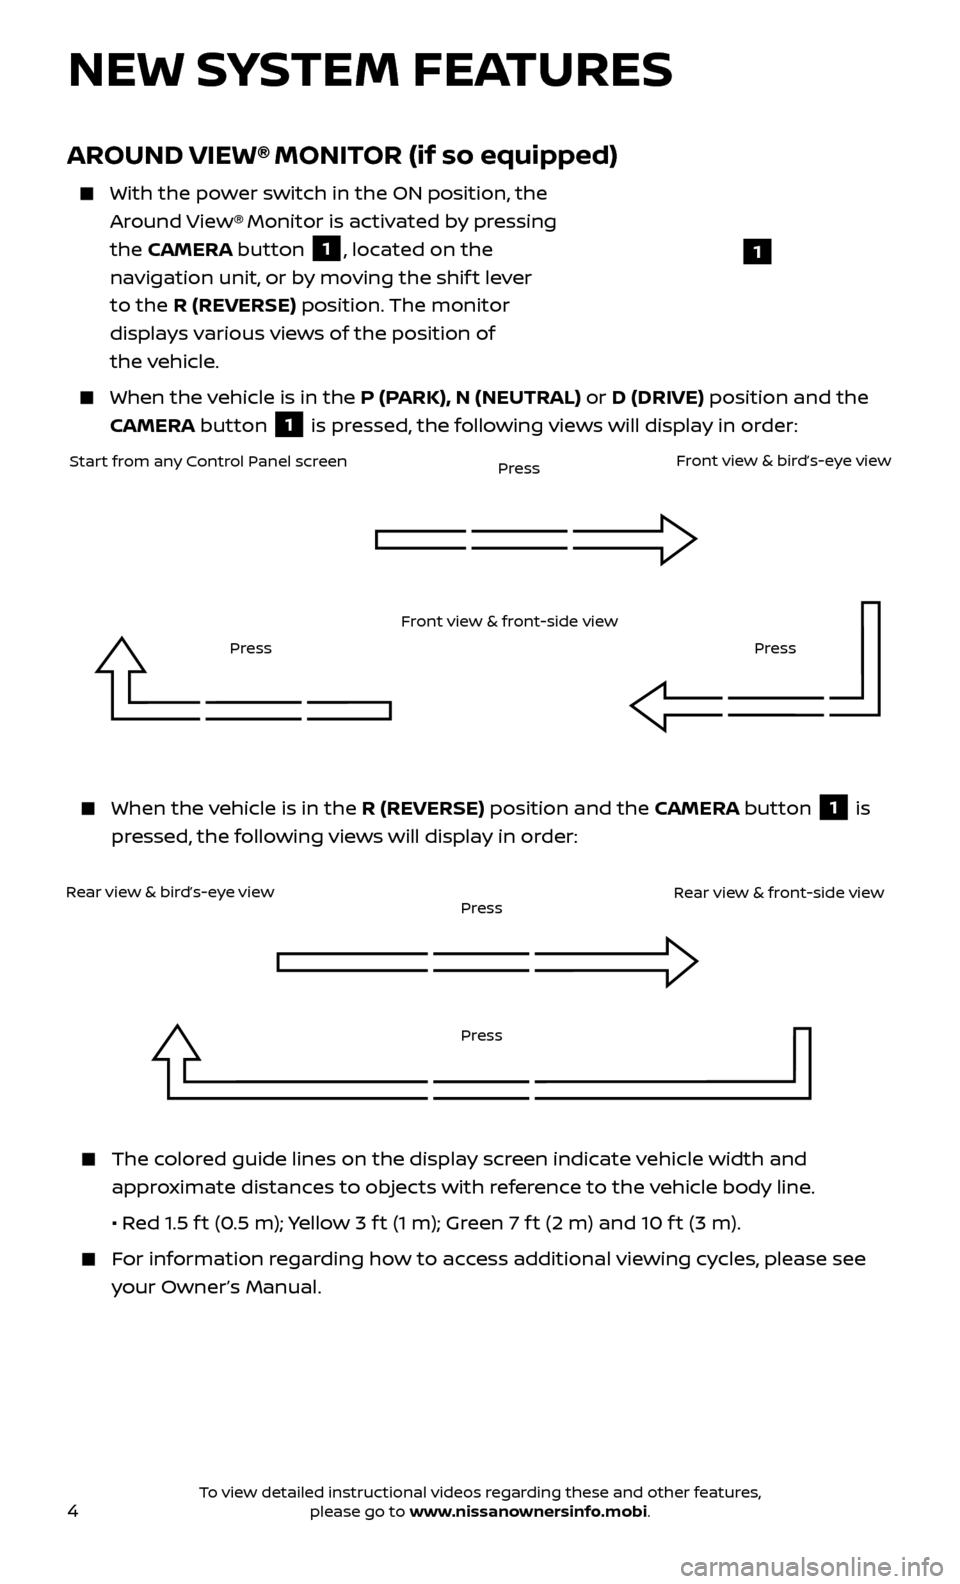
AROUND VIEW® MONITOR (if so equipped)
With the power switch in the ON position, the
Around View® Monitor is activated by pressing
the CAMERA button
1, located on the
navigation unit, or by moving the shif t lever
to the R (REVERSE) position. The monitor
displays various views of the position of
the vehicle.
When the v ehicle is in the P (PARK), N (NEUTRAL) or D (DRIVE) position and the
CAMERA button
1 is pressed, the following views will display in order:
1
When the v
ehicle is in the R (REVERSE) position and the CAMERA button
1 is
pressed, the following views will display in order:
Start from any Control Panel screen
Rear view & bird’s-eye view Front view & front-side view
Press
Press
Press Front view & bird’s-eye view
Rear view & front-side view
The colored guide lines on the display screen indicate vehicle width and approximate distances to objects with reference to the vehicle body line.
•
R
ed 1.5 f t (0.5 m); Yellow 3 f t (1 m); Green 7 f t (2 m) and 10 f t (3 m).
For information regarding how to access additional viewing cycles, please see your Owner’s Manual.
Press
Press
To view detailed instructional videos regarding these and other features, please go to www.nissanownersinfo.mobi.
Page 8 of 40

6
SiriusXM TRAVEL LINK AND SiriusXM TRAFFIC
(if so equipped)
Your vehicle’s Navigation System is equipped with SiriusXM Travel Link and SiriusXM
Traffic capabilities.
Touch the “Info”
key
to access SiriusXM
Travel Link and SiriusXM Traffic.
SiriusXM Travel Link provides access to real-
time weather information and forecasts,
nearby fuel prices, movie listings, sport scores
and stock quotes.
SiriusXM Traffic provides information that
may help to avoid delays due to traffic
incidents. Traffic jams, roadwork, road
closures around the current location, etc., are
represented graphically on the map by icons
depicting the nature of the event. Incidents
on the route are automatically displayed as they are approached.
Please see your Owner’s Manual for important safety information, system limitations, and additional
operating and feature information.
For more information, refer to the “Navigation (section 3)” and the “Viewing information (section 6)” of
your Navigation System Owner’s Manual.
NEW SYSTEM FEATURES
HEATED SEATS
The front seats and the rear outboard seats can be warmed by built-in heaters (if so equipped for rear seats).
The switches, located on the center console
1 (front seats) and on the side of the front
passenger seatback 2 (if so equipped for
rear seats), can be operated independently of
each other.
The heater is controlled by a thermostat, automatically turning the heater on and off. The indicator light will remain on as long as the switch is on.
Please see your Owner’s Manual for important safety information, system limitations, and additional
operating and feature information.
For more information, refer to the “Instruments and controls (section 2)” of your Owner’s Manual.
1
2
To view detailed instructional videos regarding these and other features, please go to www.nissanownersinfo.mobi.
Page 15 of 40
13
CLOCK SET/ADJUSTMENT
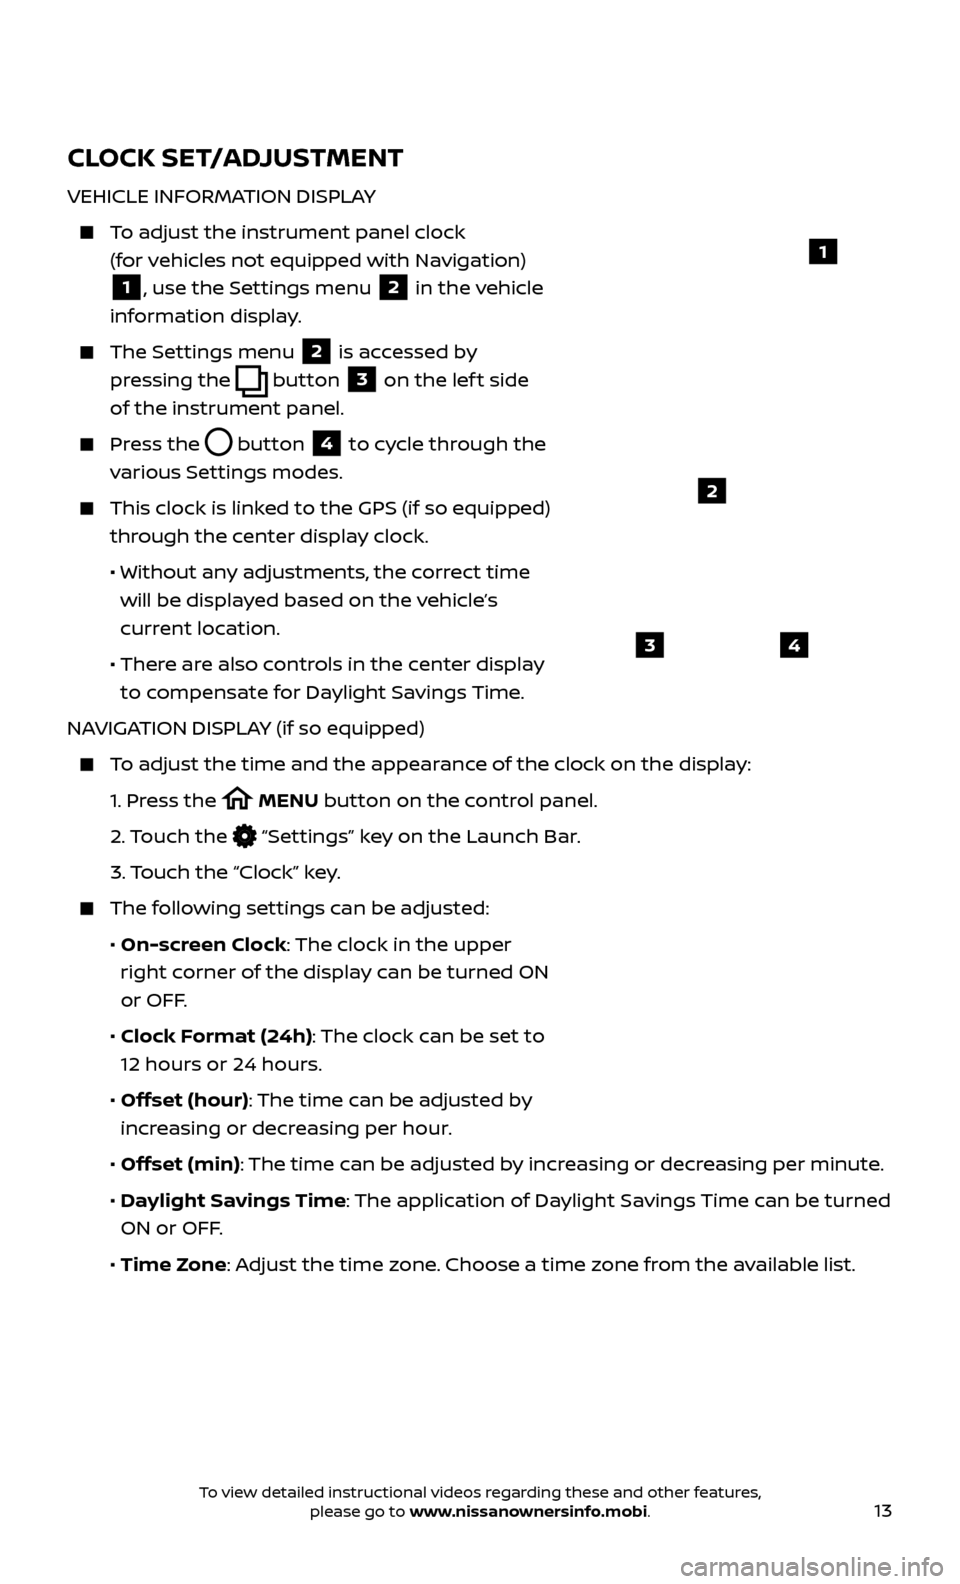
VEHICLE INFORMATION DISPLAY
To adjust the instrument panel clock (for vehicles not equipped with Navigation)
1, use the Settings menu 2 in the vehicle
information display.
The Settings menu 2 is accessed by
pressing the
button
3 on the lef t side
of the instrument panel.
Press the button
4 to cycle through the
various Settings modes.
This clock is link ed to the GPS (if so equipped)
through the center display clock.
• Without an
y adjustments, the correct time
will be displayed based on the vehicle’s
current location.
• Ther
e are also controls in the center display
to compensate for Daylight Savings Time.
NAVIGATION DISPLAY (if so equipped)
To adjust the time and the appearance of the clock on the display:
1.
Pr
ess the
MENU button on the control panel.
2.
Touch the
“Settings” key on the Launch Bar.
3.
Touch the “Clock” key.
The following settings can be adjusted:
•
On-screen Clock: The clock in the upper
right corner of the display can be turned ON
or OFF.
•
Clock Format (24h): The clock can be set to
12 hours or 24 hours.
•
Offset (hour): The time can be adjusted by
increasing or decreasing per hour.
•
Offset (min): The time can be adjusted by increasing or decreasing per minute.
•
Daylight Savings Time: The application of Daylight Savings Time can be turned
ON or OFF.
•
Time Zone: Adjust the time zone. Choose a time zone from the available list.
1
2
43
To view detailed instructional videos regarding these and other features, please go to www.nissanownersinfo.mobi.
Page 16 of 40

14
AUDIO DISPLAY
Press the ENTER/SET TING button and turn
the TUNE/SCROLL knob until “Clock”
appears on the display.
Press the ENTER/SET TING button to
select “Clock”.
Turn the TUNE/SCR OLL knob to select
“Set Time”.
Press the ENTER/SET TING button.
Turn the TUNE/SCR OLL knob to adjust the hours.
Press the ENTER/SET TING button.
Turn the TUNE/SCROLL knob to adjust the minutes.
Press the ENTER/SETTING button.
Press the BACK button to finish.
Please see your Owner’s Manual for important safety information, system limitations, and additional
operating and feature information.
For more information, refer to the “Instruments and controls (section 2)” and “Display screen, heater,
air conditioner, audio and phone systems (section 4)” of your Owner’s Manual and the “Getting started
(section 1)” of your Navigation System Owner’s Manual.
ESSENTIAL INFORMATION
To view detailed instructional videos regarding these and other features, please go to www.nissanownersinfo.mobi.
Page 25 of 40
23
To store a station in a preset, you must first select a radio band by pressing the FM•AM button
7 or XM button
8 then tune to the desired AM, FM or
satellite radio station using the TUNE/SCROLL knob
3. Next, touch and hold
the desired station preset key until you hear a beep. The channel indicator will
then display, and the sound will resume. Programing is now complete.
7 FM•
AM BUTTON Press the FM• AM button to switch between FM and AM radio screens.
8 XM BUTTON
Press the XM button to display the satellite radio screen.
9 MEDIA BUTTON Press the
MEDIA but ton to switch display options.
10 DISP BUTTON Press the
DISP but ton to turn the display on or off.
Please see your Owner’s Manual for important safety information, system limitations, and additional
operating and feature information.
For more information, refer to the “Audio system (section 4)” of your Navigation System Owner’s Manual.
CRUISE CONTROL
The cruise control system enables you to set
a constant cruising speed once the vehicle
has reached 25 mph (40 km/h).
The system wil l automatically maintain the
set speed until you tap the brake pedal,
accelerate, cancel or turn the system off.
To activate the cruise control, push the CRUISE ON/OFF switch
1 on the steering
wheel. The CRUISE indicator light in the instrument panel will illuminate.
To set a cruising speed, accelerate the vehicle to the desired speed, push the
COAST/SET switch
2 on the steering wheel and release. Take your foot off the
accelerator pedal. Your vehicle will maintain the set speed.
To reset at a faster cruising speed, push and hold the ACCEL/RES switch 3.
When the vehicle attains the desired speed, release the switch.
To reset at a slower cruising speed, push and hold the COAST/SET switch 2.
Release the switch when the vehicle slows to the desired speed.
To cancel the preset speed, push the CANCEL switch 4.
To turn off cruise control, push the CRUISE ON/OFF switch 1. The CRUISE
indicator light in the instrument panel will extinguish.
Please see your Owner’s Manual for important safety information, system limitations, and additional
operating and feature information.
For more information, refer to the “Starting and driving (section 5)” of your Owner’s Manual.
3
2
1
4
To view detailed instructional videos regarding these and other features, please go to www.nissanownersinfo.mobi.