Page 9 of 40
![NISSAN LEAF 2017 1.G Quick Reference Guide 7
QUICK CHARGE IN COLD WEATHER (if so equipped)
It may take more time to charge the Li-ion battery using the quick charger if the vehicle is parked in a cold location (for example, 32°F [0°C]) f NISSAN LEAF 2017 1.G Quick Reference Guide 7
QUICK CHARGE IN COLD WEATHER (if so equipped)
It may take more time to charge the Li-ion battery using the quick charger if the vehicle is parked in a cold location (for example, 32°F [0°C]) f](/manual-img/5/533/w960_533-8.png)
7
QUICK CHARGE IN COLD WEATHER (if so equipped)
It may take more time to charge the Li-ion battery using the quick charger if the vehicle is parked in a cold location (for example, 32°F [0°C]) for a long
period of time.
The Li-ion bat tery temperature gauge can be used to estimate the approximate
time needed to charge the Li-ion battery to 80%.
Please see your Owner’s Manual for important safety information, system limitations, and additional
operating and feature information.
For more information, refer to the “Charging (section CH)” and the “Starting and driving (section 5)” of
your Owner’s Manual.
ESSENTIAL INFORMATION
5
4
3
2
1
Li-ion battery
temperature gauge
Estimated
charge time
COLD WEATHER RANGE AND
PARKING IN EXTREMELY COLD WEATHER
COLD WEATHER RANGE
Vehicle range is reduced when the heater is used and the battery temperature
drops below 77°F (25°C).
Using the climate c ontrol system to heat the cabin when the outside
temperature is below 32°F (0°C) uses more electricity (heat pump, if so equipped)
and affects vehicle range more than using the heater at temperatures
above 32°F (0°C).
PARKING IN EXTREMELY COLD WEATHER
Do not stor e the vehicle in temperatures below -13°F (-25°C) for over seven days.
If the outside temperature is -13°F (-25°C) or lower, the Li-ion battery may freeze,
and it cannot be charged or provide power to run the vehicle.
Please see your Owner’s Manual for important safety information, system limitations, and additional
operating and feature information.
For more information, refer to the “EV overview (section EV)” and the “Starting and driving (section 5)”
of your Owner’s Manual.
More than
approximately
90 minutes
Approximately
30-90 minutes
Approximately
30 minutes
Approximately
30-60 minutes More than
approximately
60 minutes
3 or less
segments
illuminated
4-5 segments
illuminated
6-7 segments
illuminated
8-9 segments
illuminated
10 or more
segments
illuminated
2
3
4
5
1
To view detailed instructional videos regarding these and other features, please go to www.nissanownersinfo.mobi.
Page 10 of 40
8
POWER LIMITATION INDICATOR LIGHT
When the power limitation indicator light illuminates,
power provided to the traction motor is reduced.
This light il luminates in the following conditions:
• The Li-ion bat
tery available charge is extremely low.
•
The Li-ion battery temperature is very low.
• The temper
ature of the Electric Vehicle (EV) system is high (motor, inverter,
coolant system, Li-ion battery, etc.).
•
The EV system has a malfunction.
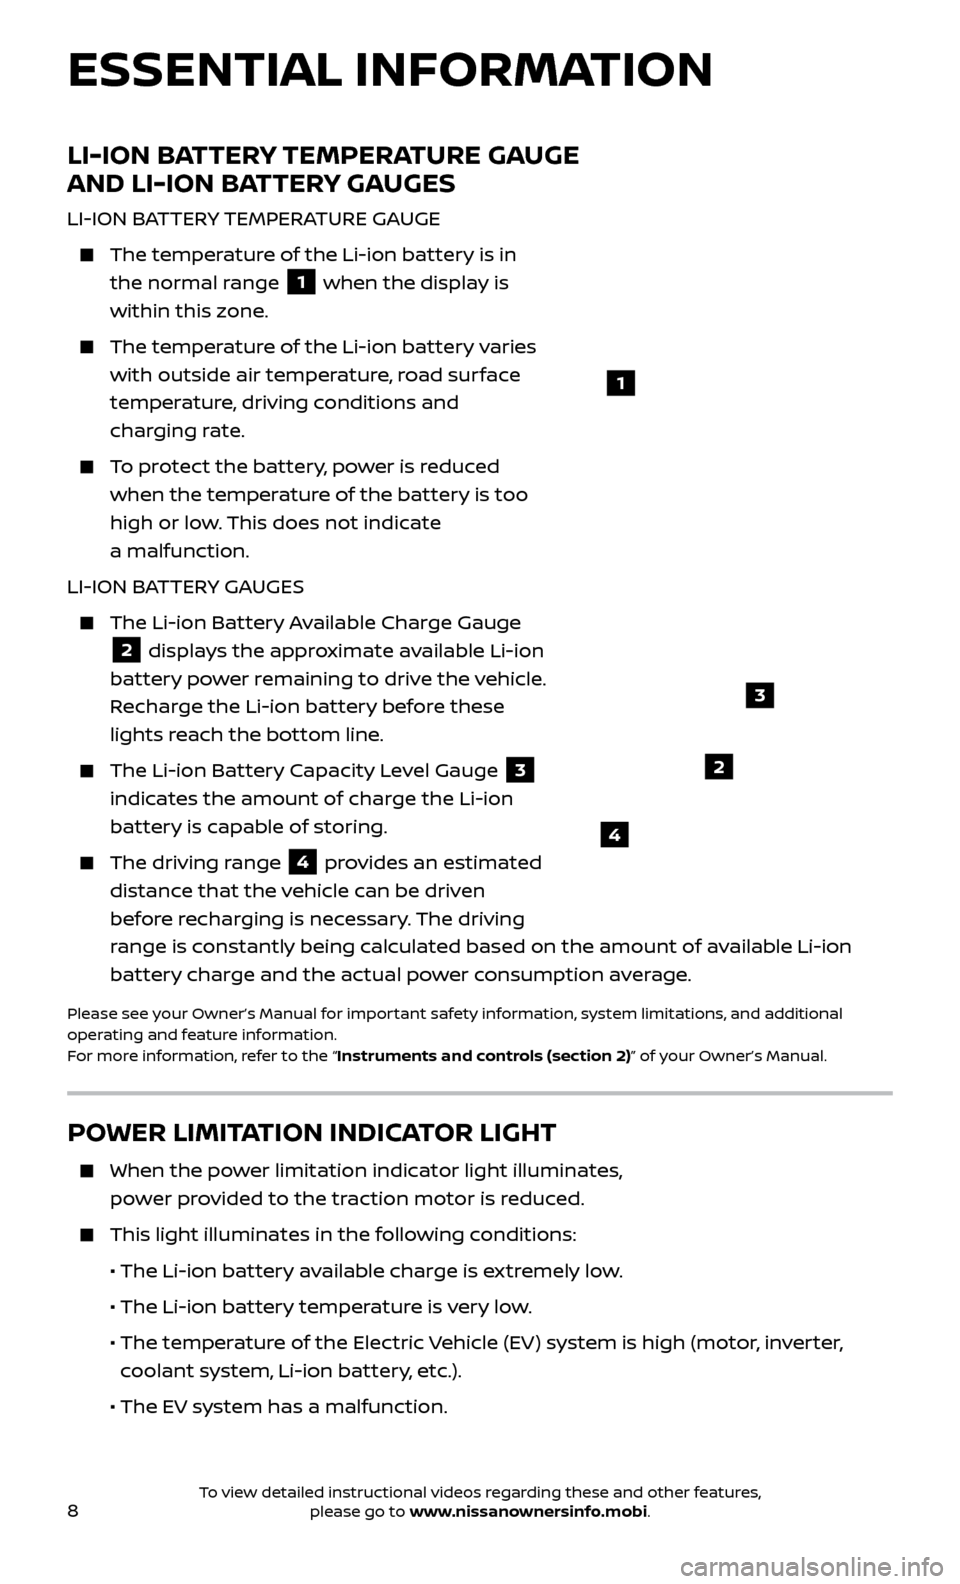
LI-ION BATTERY TEMPERATURE GAUGE
AND LI-ION BATTERY GAUGES
LI-ION BATTERY TEMPERATURE GAUGE
The temperature of the Li-ion battery is in
the normal range
1 when the display is
within this zone.
The temper ature of the Li-ion battery varies
with outside air temperature, road surface
temperature, driving conditions and
charging rate.
To protect the battery, power is reduced when the temperature of the battery is too
high or low. This does not indicate
a malfunction.
LI-ION BATTERY GAUGES
The Li-ion Bat tery Available Charge Gauge
2 displays the approximate available Li-ion
battery power remaining to drive the vehicle.
Recharge the Li-ion battery before these
lights reach the bottom line.
The Li-ion Bat tery Capacity Level Gauge
3
indicates the amount of charge the Li-ion
battery is capable of storing.
The driving r ange
4 provides an estimated
distance that the vehicle can be driven
before recharging is necessary. The driving
range is constantly being calculated based on the amount of available Li-ion
battery charge and the actual power consumption average.
Please see your Owner’s Manual for important safety information, system limitations, and additional
operating and feature information.
For more information, refer to the “Instruments and controls (section 2)” of your Owner’s Manual.
1
2
3
4
ESSENTIAL INFORMATION
To view detailed instructional videos regarding these and other features, please go to www.nissanownersinfo.mobi.
Page 11 of 40
9
If the power limitation indicator light is illuminated, follow the instructions provided on the center display.
Please see your Owner’s Manual for important safety information, system limitations, and additional
operating and feature information.
For more information, refer to the “Instruments and controls (section 2)” of your Owner’s Manual.
CHARGE PORT LID/CHARGE CONNECTOR LOCK SWITCH
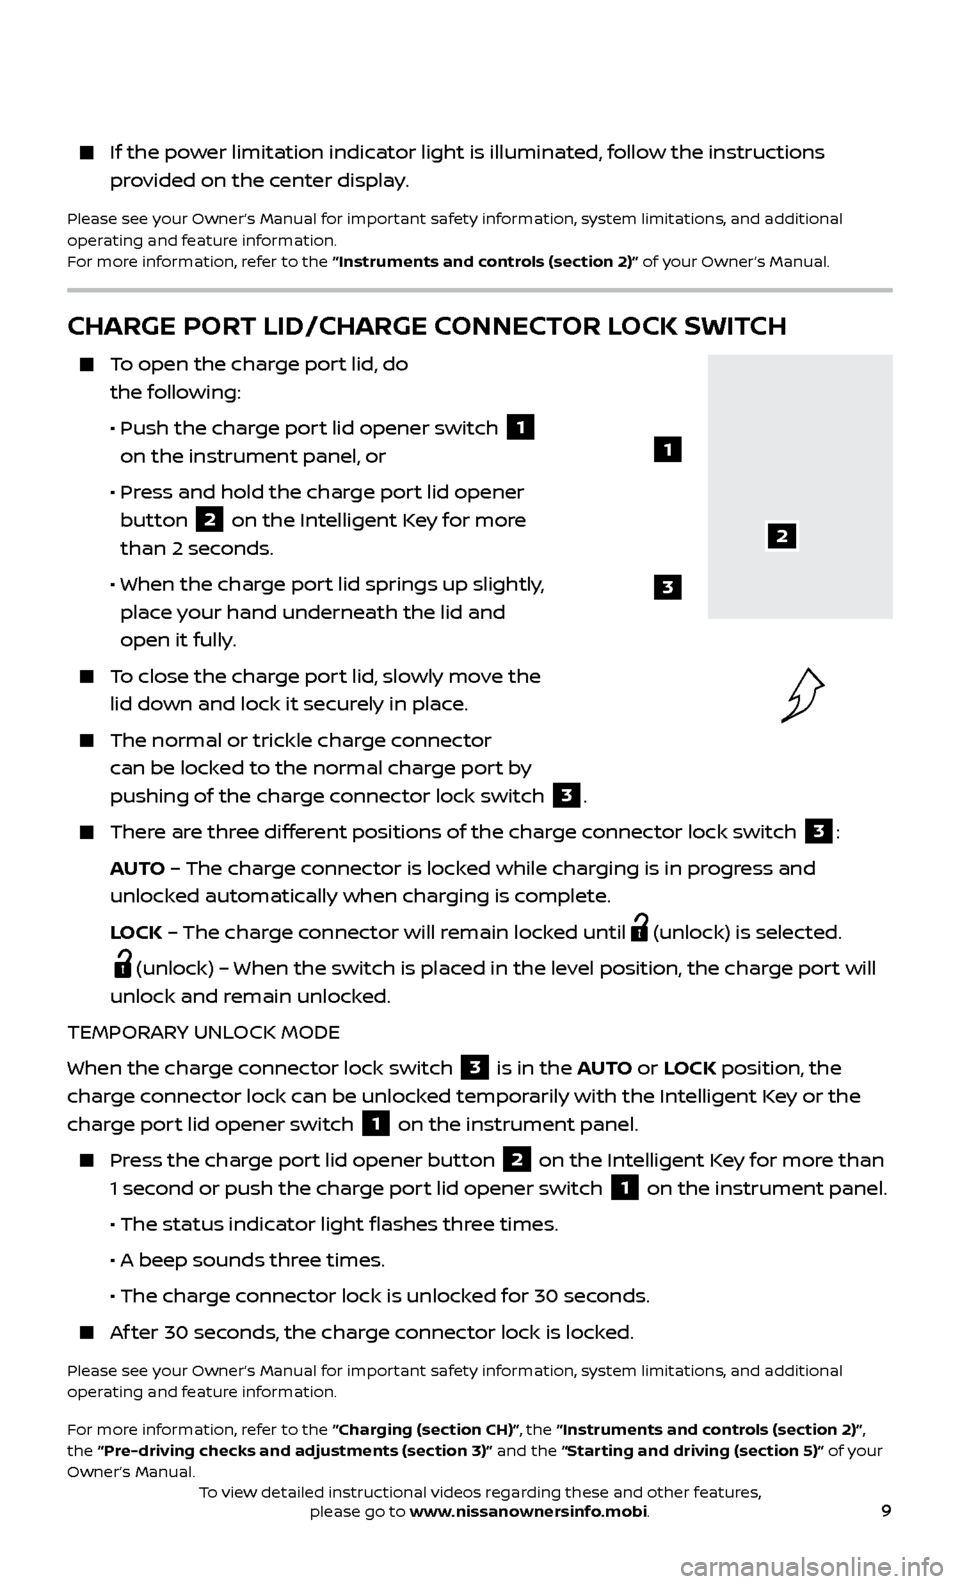
To open the charge port lid, do the following:
•
Push the char
ge port lid opener switch
1
on the instrument panel, or
•
Pr
ess and hold the charge port lid opener
button
2 on the Intelligent Key for more
than 2 seconds.
• When the char
ge port lid springs up slightly,
place your hand underneath the lid and
open it fully.
To close the charge port lid, slowly move the lid down and lock it securely in place.
The normal or trickle char ge connector
can be locked to the normal charge port by
pushing of the charge connector lock switch
3.
There are three different positions of the charge connector lock switch 3:
AUTO – The charge connector is locked while charging is in progress and
unlocked automatically when charging is complete.
L
OCK – The charge connector will remain locked until
(unlock) is selected.
(unlock) – When the switch is placed in the level position, the charge port will
unlock and remain unlocked.
TEMPORARY UNLOCK MODE
When the charge connector lock switch
3 is in the AUTO or LOCK position, the
charge connector lock can be unlocked temporarily with the Intelligent Key or the
charge port lid opener switch
1 on the instrument panel.
Press the charge port lid opener button 2 on the Intelligent Key for more than
1 second or push the charge port lid opener switch
1 on the instrument panel.
• The status indic
ator light flashes three times.
•
A beep sounds thr
ee times.
• The char
ge connector lock is unlocked for 30 seconds.
Af ter 30 seconds, the charge connector lock is locked.
Please see your Owner’s Manual for important safety information, system limitations, and additional
operating and feature information.
For more information, refer to the “Charging (section CH)”, the “Instruments and controls (section 2)”,
the “Pre-driving checks and adjustments (section 3)” and the “Starting and driving (section 5)” of your
Owner’s Manual.
2
1
3
To view detailed instructional videos regarding these and other features, please go to www.nissanownersinfo.mobi.
Page 12 of 40
10
LI-ION BATTERY CHARGING
Before charging the Li-ion battery, see your Owner’s Manual for detailed warnings
and cautions when charging your battery.
There are three methods available to perform the charge operation: normal charge, trickle charge and quick charge (if so equipped).
NORMAL CHARGE
Perform a normal charge using the charger installed in your home.
It takes approximately 5.5-9.5 hours for the 30 kW/h Li-ion battery (if so equipped) to charge from empty to full with a 6.6 kW charger
(if so equipped).
To charge your vehicle:
•
Plac
e the power switch in the OFF position.
•
Push the char
ge port lid opener switch located on the instrument panel to the
lef t of the steering wheel.
•
Pr
ess the charge port tab and open the cap.
•
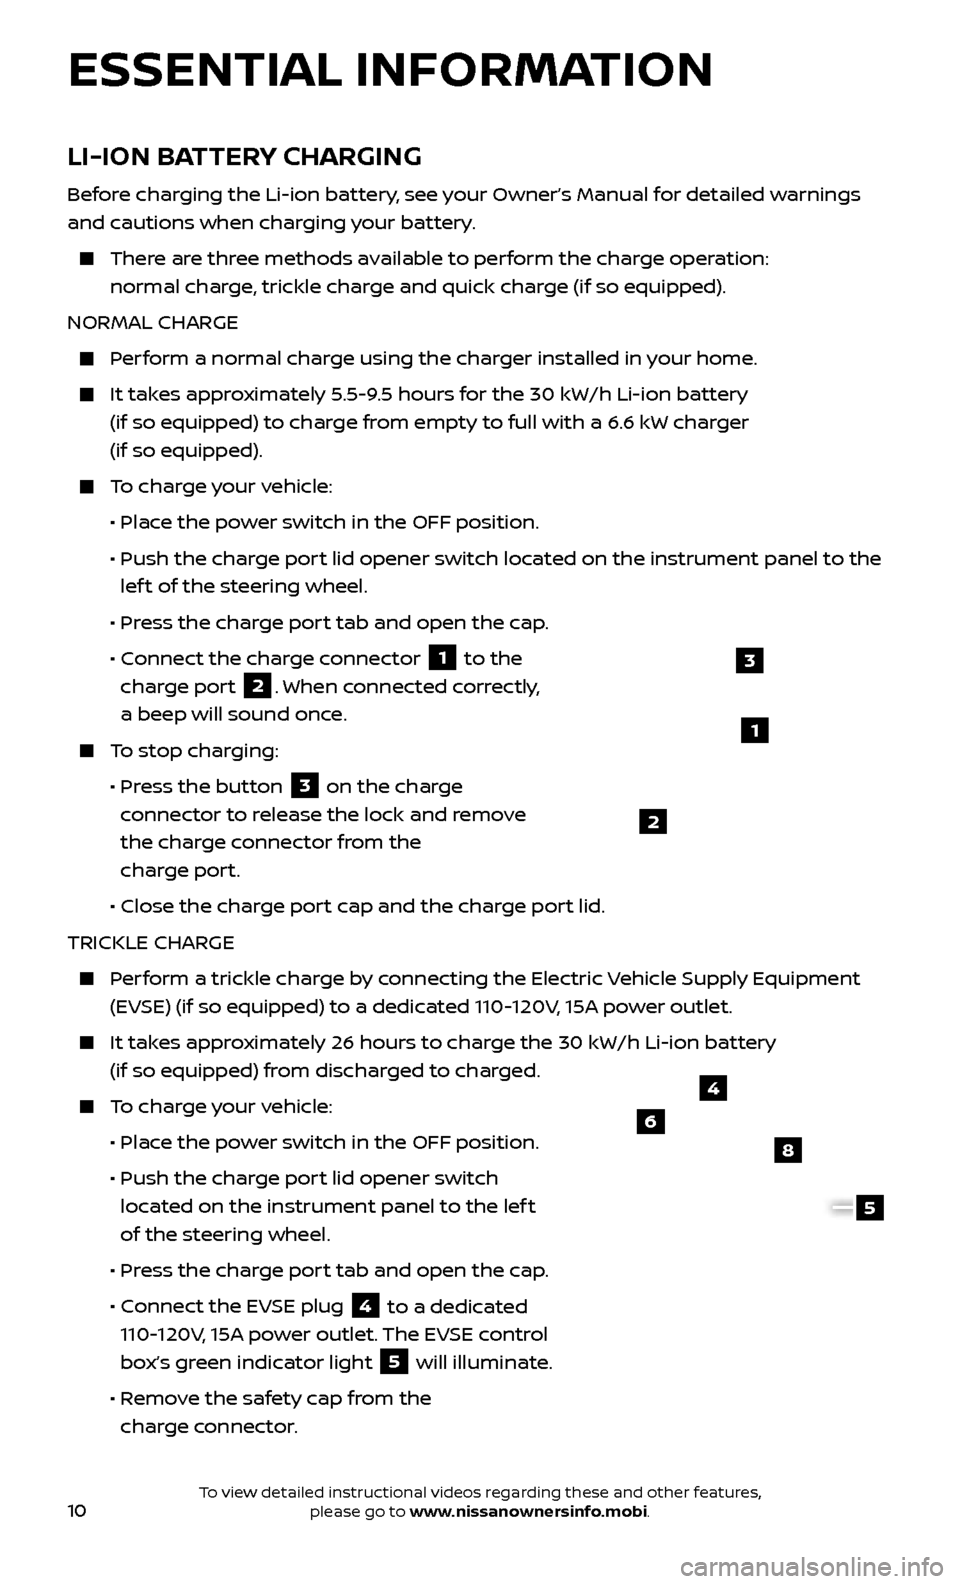
C
onnect the charge connector
1 to the
charge port 2. When connected correctly,
a beep will sound once.
To stop charging:
•
Pr
ess the button
3 on the charge
connector to release the lock and remove
the charge connector from the
charge port.
•
Close the char
ge port cap and the charge port lid.
TRICKLE CHARGE
Perform a trickle charge by connecting the Electric Vehicle Supply Equipment (EVSE) (if so equipped) to a dedicated 110-120V, 15A power outlet.
It takes approximately 26 hours to charge the 30 kW/h Li-ion battery (if so equipped) from discharged to charged.
To charge your vehicle:
•
Plac
e the power switch in the OFF position.
•
Push the char
ge port lid opener switch
located on the instrument panel to the lef t
of the steering wheel.
•
Pr
ess the charge port tab and open the cap.
•
C
onnect the EVSE plug
4 to a dedicated
110-120V, 15A power outlet. The EVSE control
box’s green indicator light
5 will illuminate.
•
R
emove the safety cap from the
charge connector.
4
6
8
5
1
2
3
ESSENTIAL INFORMATION
To view detailed instructional videos regarding these and other features, please go to www.nissanownersinfo.mobi.
Page 13 of 40
11
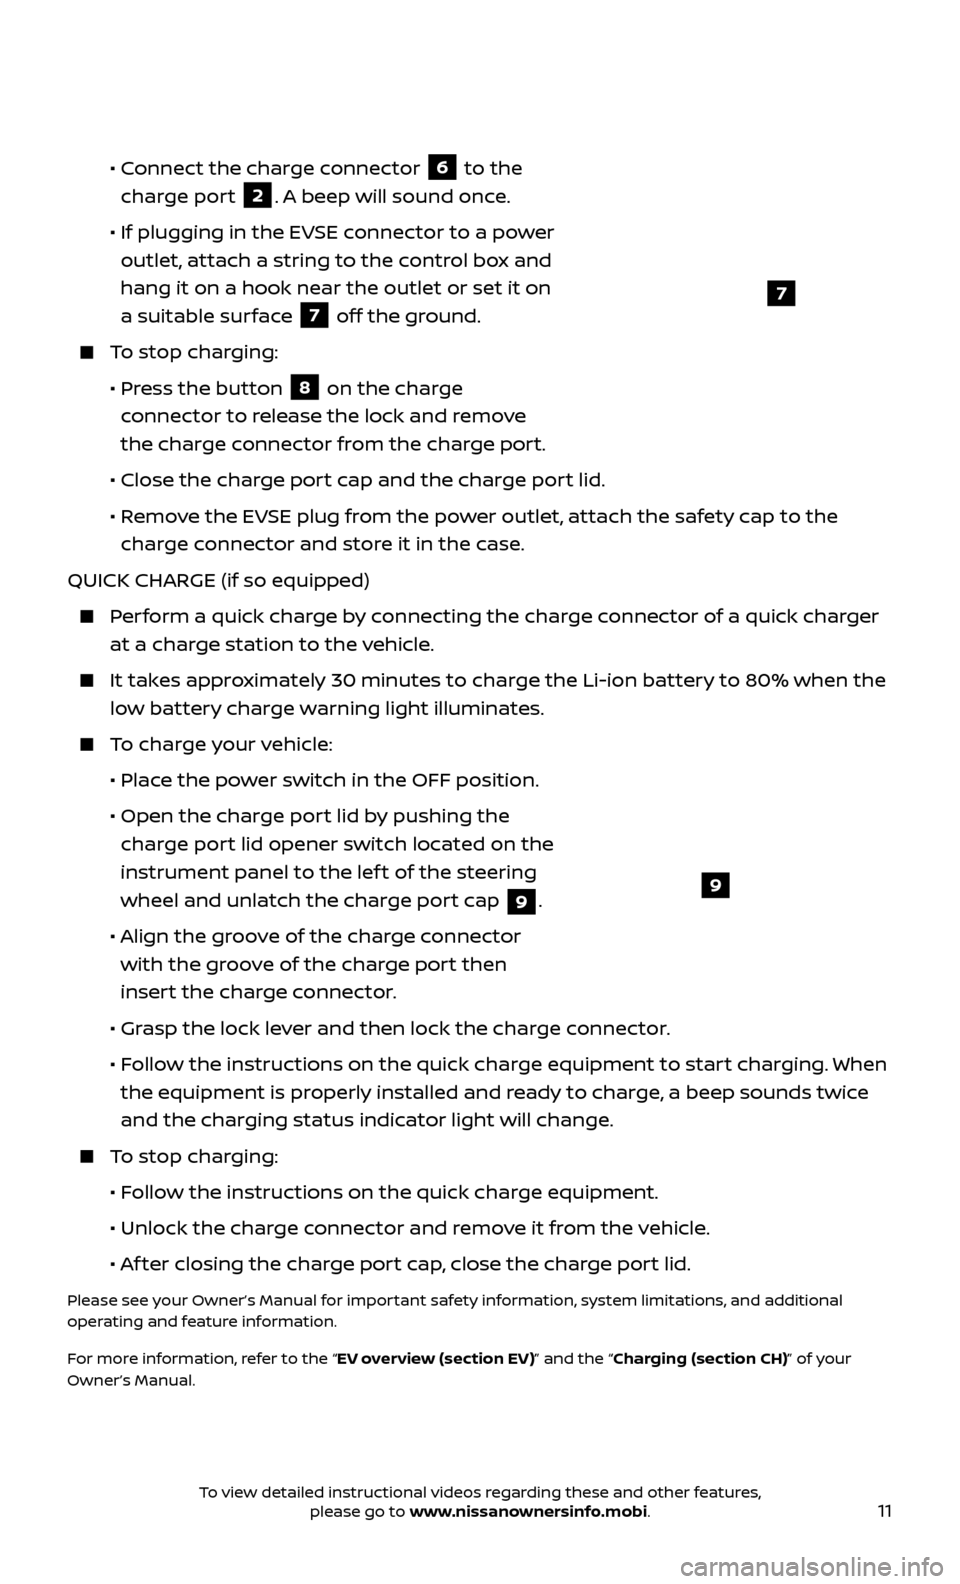
• Connect the charge connector
6 to the
charge port 2. A beep will sound once.
•
If plugging in the EV
SE connector to a power
outlet, attach a string to the control box and
hang it on a hook near the outlet or set it on
a suitable surface
7 off the ground.
To stop charging:
•
Pr
ess the button
8 on the charge
connector to release the lock and remove
the charge connector from the charge port.
•
Close the char
ge port cap and the charge port lid.
•
R
emove the EVSE plug from the power outlet, attach the safety cap to the
charge connector and store it in the case.
QUICK CHARGE (if so equipped)
Perform a quick charge by connecting the charge connector of a quick charger at a charge station to the vehicle.
It takes approximately 30 minutes to charge the Li-ion battery to 80% when the low battery charge warning light illuminates.
To charge your vehicle:
•
Plac
e the power switch in the OFF position.
•
Open the char
ge port lid by pushing the
charge port lid opener switch located on the
instrument panel to the lef t of the steering
wheel and unlatch the charge port cap
9.
•
A
lign the groove of the charge connector
with the groove of the charge port then
insert the charge connector.
•
Gr
asp the lock lever and then lock the charge connector.
•
F
ollow the instructions on the quick charge equipment to start charging. When
the equipment is properly installed and ready to charge, a beep sounds twice
and the charging status indicator light will change.
To stop charging:
•
F
ollow the instructions on the quick charge equipment.
•
Unlock the char
ge connector and remove it from the vehicle.
•
A
f ter closing the charge port cap, close the charge port lid.
Please see your Owner’s Manual for important safety information, system limitations, and additional
operating and feature information.
For more information, refer to the “EV overview (section EV)” and the “Charging (section CH)” of your
Owner’s Manual.
9
7
To view detailed instructional videos regarding these and other features, please go to www.nissanownersinfo.mobi.
Page 14 of 40
12
TIRE PRESSURE MONITORING SYSTEM (TPMS)
WITH EASY-FILL TIRE ALERT
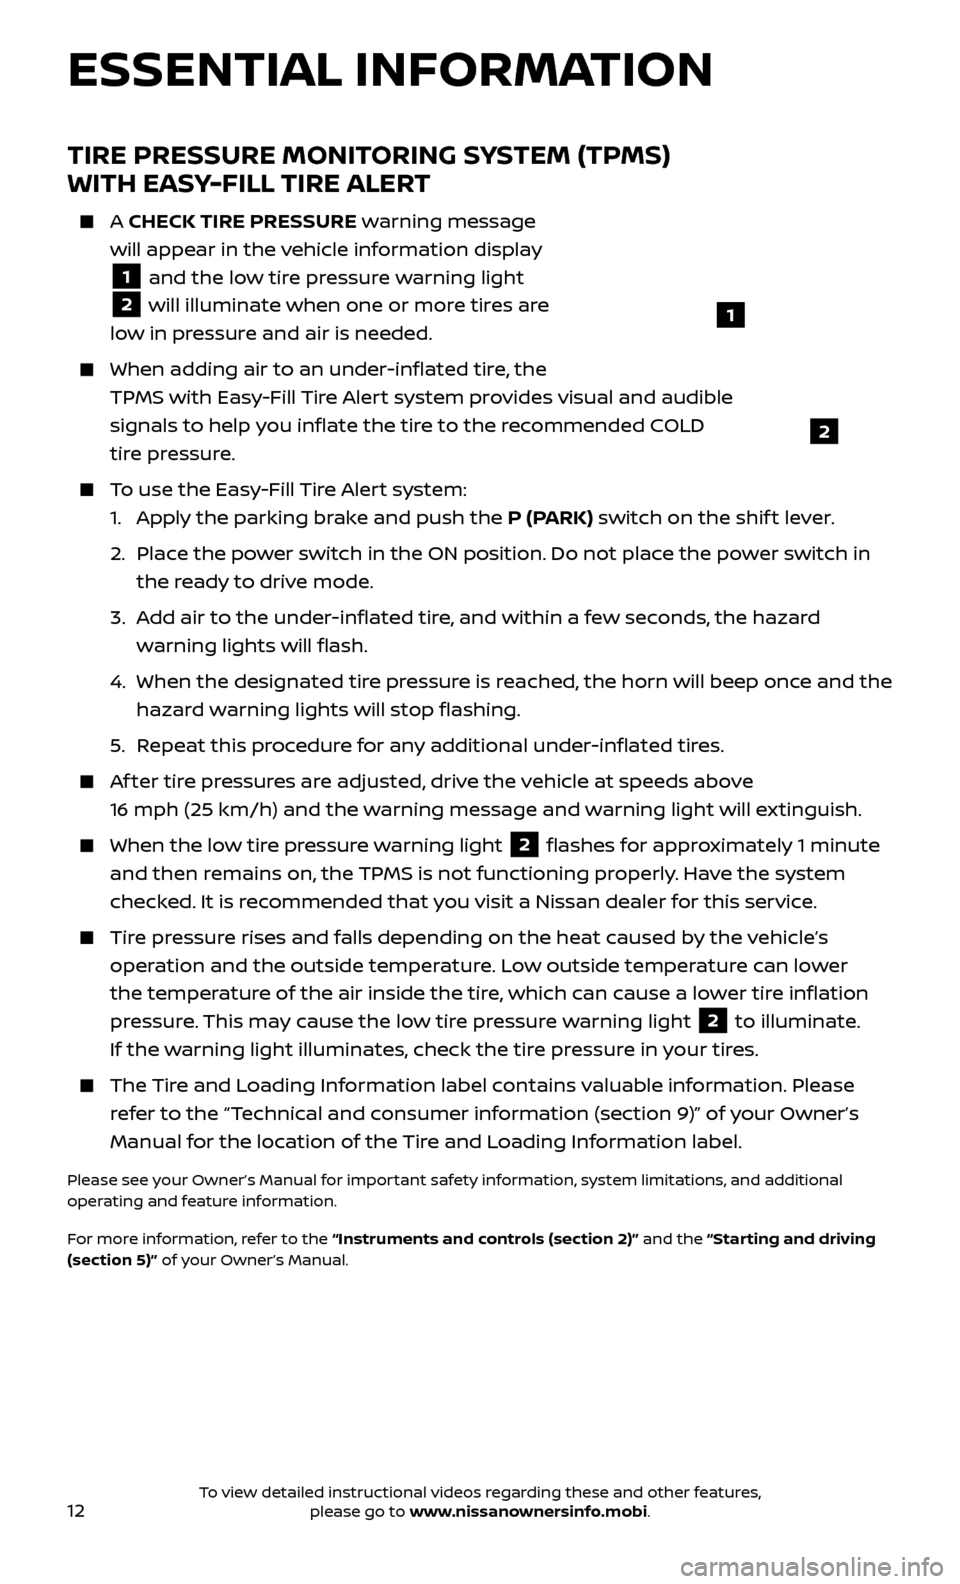
A CHECK TIRE PRESSURE warning message
will appear in the vehicle information display
1 and the low tire pressure warning light
2 will illuminate when one or more tires are
low in pressure and air is needed.
When adding air to an under -inflated tire, the
TPMS with Easy-Fill Tire Alert system provides visual and audible
signals to help you inflate the tire to the recommended COLD
tire pressure.
To use the Easy-Fill Tire Alert system: 1.
Appl
y the parking brake and push the P (PARK) switch on the shif t lever.
2.
Plac
e the power switch in the ON position. Do not place the power switch in
the ready to drive mode.
3.
A
dd air to the under-inflated tire, and within a few seconds, the hazard
warning lights will flash.
4.
When the designated tir
e pressure is reached, the horn will beep once and the
hazard warning lights will stop flashing.
5
.
R
epeat this procedure for any additional under-inflated tires.
Af ter tire pressures are adjusted, drive the vehicle at speeds above 16 mph (25 km/h) and the warning message and warning light will extinguish.
When the lo w tire pressure warning light 2 flashes for approximately 1 minute
and then remains on, the TPMS is not functioning properly. Have the system
checked. It is recommended that you visit a Nissan dealer for this service.
Tire pressure rises and falls depending on the heat caused by the vehicle’s operation and the outside temperature. Low outside temperature can lower
the temperature of the air inside the tire, which can cause a lower tire inflation
pressure. This may cause the low tire pressure warning light
2 to illuminate.
If the warning light illuminates, check the tire pressure in your tires.
The Tire and Loading Information label contains valuable information. Please refer to the “Technical and consumer information (section 9)” of your Owner’s
Manual for the location of the Tire and Loading Information label.
Please see your Owner’s Manual for important safety information, system limitations, and additional
operating and feature information.
For more information, refer to the “Instruments and controls (section 2)” and the “Starting and driving
(section 5)” of your Owner’s Manual.
ESSENTIAL INFORMATION
1
2
To view detailed instructional videos regarding these and other features, please go to www.nissanownersinfo.mobi.
Page 15 of 40
13
CLOCK SET/ADJUSTMENT
VEHICLE INFORMATION DISPLAY
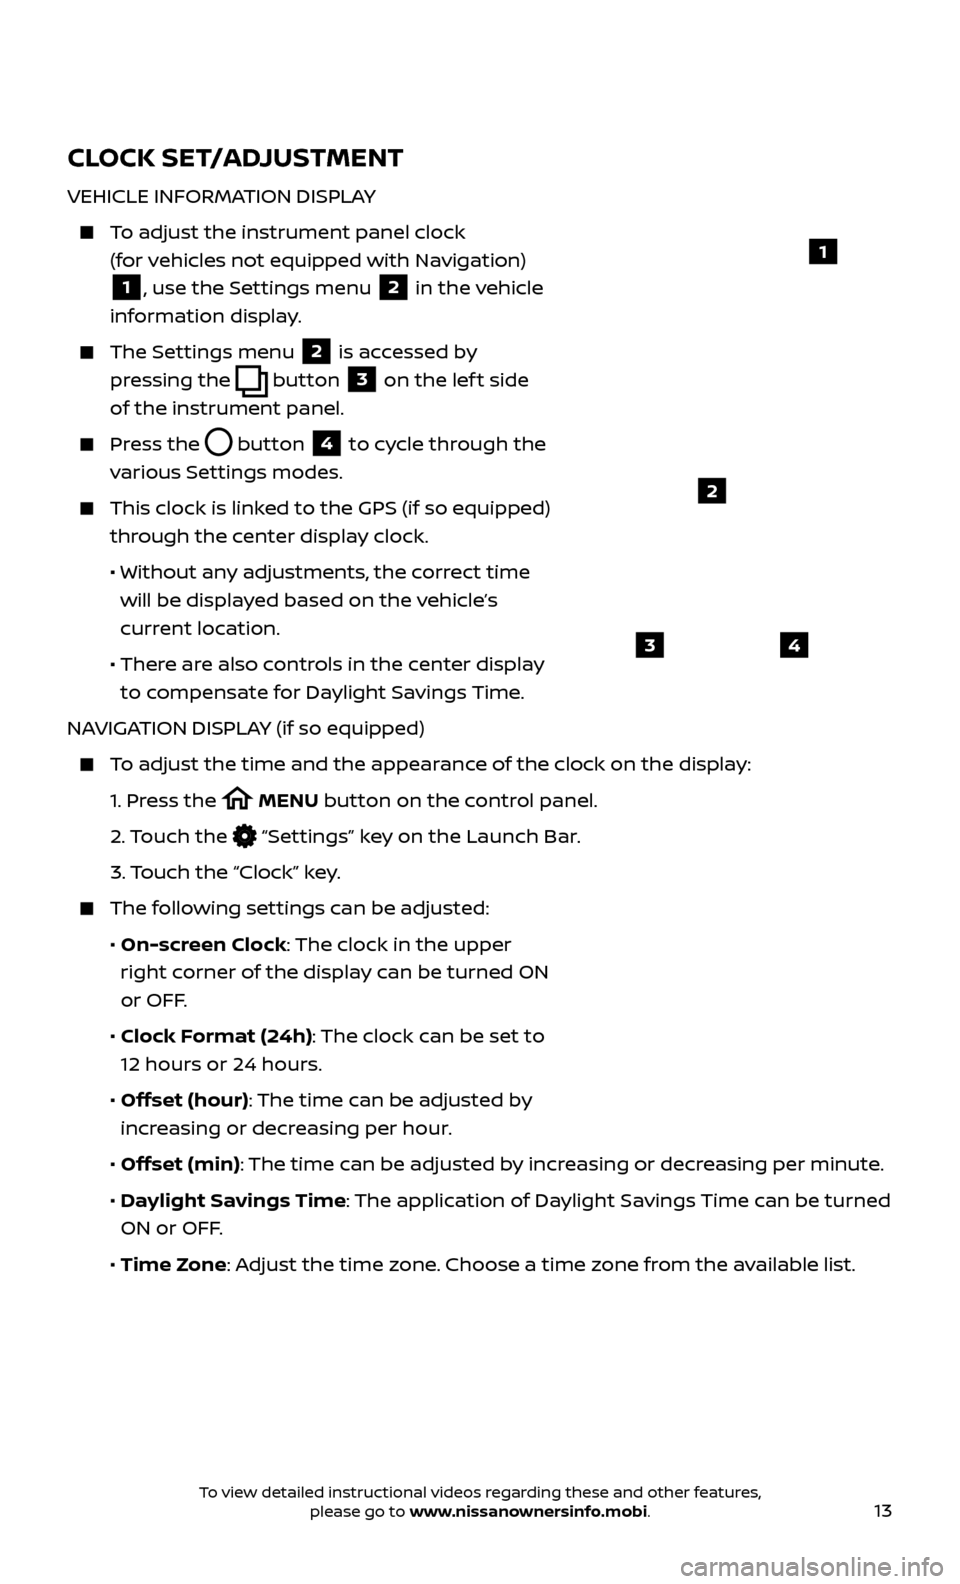
To adjust the instrument panel clock (for vehicles not equipped with Navigation)
1, use the Settings menu 2 in the vehicle
information display.
The Settings menu 2 is accessed by
pressing the
button
3 on the lef t side
of the instrument panel.
Press the button
4 to cycle through the
various Settings modes.
This clock is link ed to the GPS (if so equipped)
through the center display clock.
• Without an
y adjustments, the correct time
will be displayed based on the vehicle’s
current location.
• Ther
e are also controls in the center display
to compensate for Daylight Savings Time.
NAVIGATION DISPLAY (if so equipped)
To adjust the time and the appearance of the clock on the display:
1.
Pr
ess the
MENU button on the control panel.
2.
Touch the
“Settings” key on the Launch Bar.
3.
Touch the “Clock” key.
The following settings can be adjusted:
•
On-screen Clock: The clock in the upper
right corner of the display can be turned ON
or OFF.
•
Clock Format (24h): The clock can be set to
12 hours or 24 hours.
•
Offset (hour): The time can be adjusted by
increasing or decreasing per hour.
•
Offset (min): The time can be adjusted by increasing or decreasing per minute.
•
Daylight Savings Time: The application of Daylight Savings Time can be turned
ON or OFF.
•
Time Zone: Adjust the time zone. Choose a time zone from the available list.
1
2
43
To view detailed instructional videos regarding these and other features, please go to www.nissanownersinfo.mobi.
Page 16 of 40
14
AUDIO DISPLAY
Press the ENTER/SET TING button and turn
the TUNE/SCROLL knob until “Clock”
appears on the display.
Press the ENTER/SET TING button to
select “Clock”.
Turn the TUNE/SCR OLL knob to select
“Set Time”.
Press the ENTER/SET TING button.
Turn the TUNE/SCR OLL knob to adjust the hours.
Press the ENTER/SET TING button.
Turn the TUNE/SCROLL knob to adjust the minutes.
Press the ENTER/SETTING button.
Press the BACK button to finish.
Please see your Owner’s Manual for important safety information, system limitations, and additional
operating and feature information.
For more information, refer to the “Instruments and controls (section 2)” and “Display screen, heater,
air conditioner, audio and phone systems (section 4)” of your Owner’s Manual and the “Getting started
(section 1)” of your Navigation System Owner’s Manual.
ESSENTIAL INFORMATION
To view detailed instructional videos regarding these and other features, please go to www.nissanownersinfo.mobi.