2017 NISSAN LEAF lights
[x] Cancel search: lightsPage 38 of 268
![NISSAN LEAF 2017 1.G Navigation Manual 2. Touch [Comfort & Convenience].
Available settings items
Available setting items may vary depending on
models and specifications.
Setting itemAction
[Auto Interior Illumination] When this item is tu NISSAN LEAF 2017 1.G Navigation Manual 2. Touch [Comfort & Convenience].
Available settings items
Available setting items may vary depending on
models and specifications.
Setting itemAction
[Auto Interior Illumination] When this item is tu](/manual-img/5/531/w960_531-37.png)
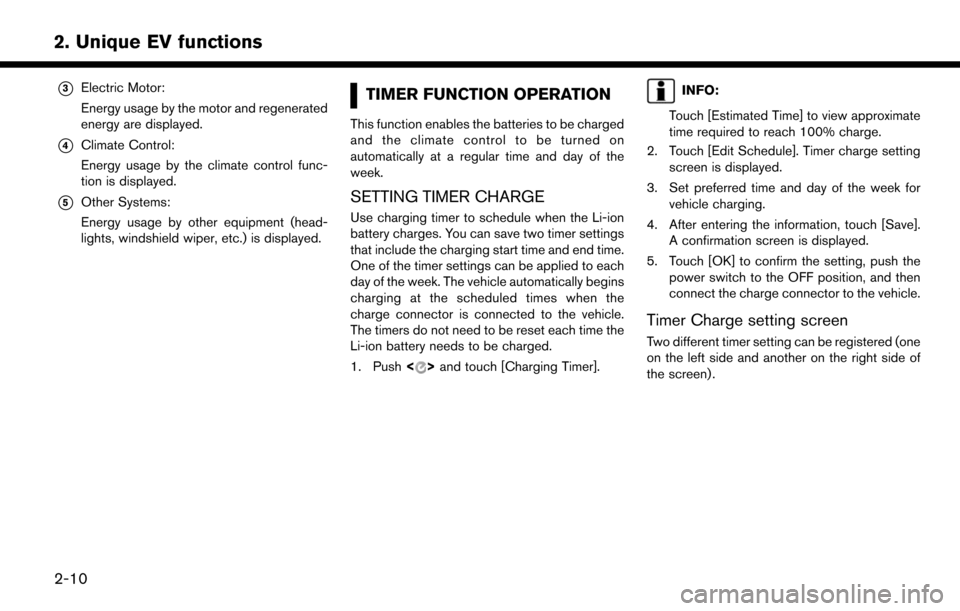
2. Touch [Comfort & Convenience].
Available settings items
Available setting items may vary depending on
models and specifications.
Setting itemAction
[Auto Interior Illumination] When this item is turned on, the interior lights will illuminate if any door is unlocked.
[Speed Sensing Wiper Interval] When this item is turned to ON, the wiper interval is adjusted automatically according to the vehicle speed.
[Light Sensitivity] Adjust the sensitivity of the automatic headlight by touching [+] or [-].
[Light Off Delay] Select the duration of the automatic headlight off timer from 0, 30, 45, 60, 90, 120, 150 and 180 second
periods.
[Selective Door Unlock] When this item is turned on, only the driver’s door is unlocked first after the door unlock operation. When
the door handle request switch on the driver’s or front passenger’s side door is pushed to be unlocked,
only the corresponding door is unlocked first. All the doors can be unlocked if the door unlock operation is
performed again within 60 seconds. When this item is turned to OFF, all the doors will be unlocked after
the door unlock operation is performed once.
[Intelligent Key Lock/Unlock] When this item is turned to ON, door lock/unlock function by pushing the door handle request switch will
be activated.
[Return All Settings to Default] Touch this item and touch [Yes] if you want to return all settings to the default.
1-18
1. Getting started
Page 52 of 268
*3Electric Motor:
Energy usage by the motor and regenerated
energy are displayed.
*4Climate Control:
Energy usage by the climate control func-
tion is displayed.
*5Other Systems:
Energy usage by other equipment (head-
lights, windshield wiper, etc.) is displayed.
TIMER FUNCTION OPERATION
This function enables the batteries to be charged
and the climate control to be turned on
automatically at a regular time and day of the
week.
SETTING TIMER CHARGE
Use charging timer to schedule when the Li-ion
battery charges. You can save two timer settings
that include the charging start time and end time.
One of the timer settings can be applied to each
day of the week. The vehicle automatically begins
charging at the scheduled times when the
charge connector is connected to the vehicle.
The timers do not need to be reset each time the
Li-ion battery needs to be charged.
1. Push<
>and touch [Charging Timer].
INFO:
Touch [Estimated Time] to view approximate
time required to reach 100% charge.
2. Touch [Edit Schedule]. Timer charge setting screen is displayed.
3. Set preferred time and day of the week for vehicle charging.
4. After entering the information, touch [Save]. A confirmation screen is displayed.
5. Touch [OK] to confirm the setting, push the power switch to the OFF position, and then
connect the charge connector to the vehicle.
Timer Charge setting screen
Two different timer setting can be registered (one
on the left side and another on the right side of
the screen) .
2-10
2. Unique EV functions
Page 53 of 268
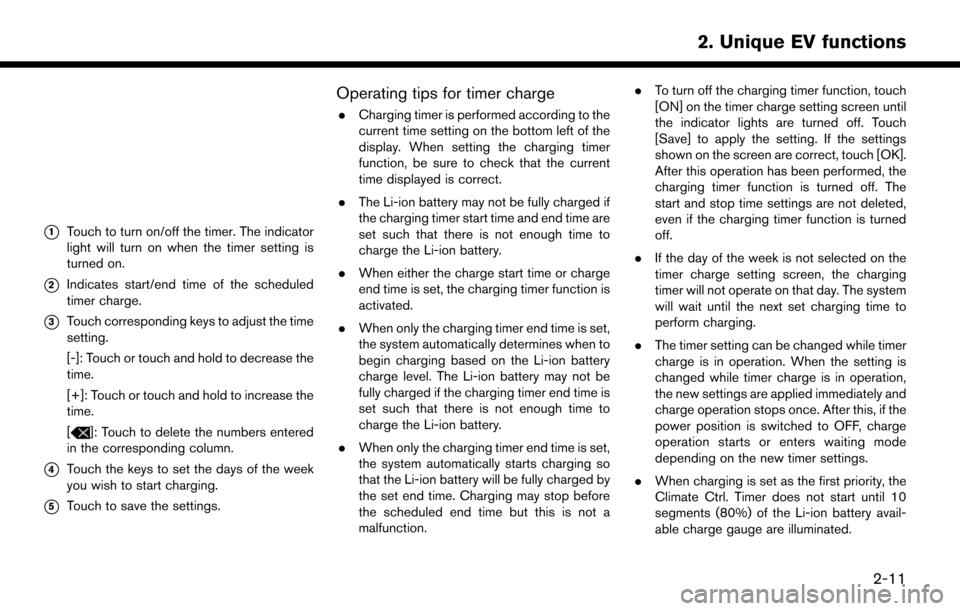
*1Touch to turn on/off the timer. The indicator
light will turn on when the timer setting is
turned on.
*2Indicates start/end time of the scheduled
timer charge.
*3Touch corresponding keys to adjust the time
setting.
[-]: Touch or touch and hold to decrease the
time.
[+]: Touch or touch and hold to increase the
time.
[
]: Touch to delete the numbers entered
in the corresponding column.
*4Touch the keys to set the days of the week
you wish to start charging.
*5Touch to save the settings.
Operating tips for timer charge
. Charging timer is performed according to the
current time setting on the bottom left of the
display. When setting the charging timer
function, be sure to check that the current
time displayed is correct.
. The Li-ion battery may not be fully charged if
the charging timer start time and end time are
set such that there is not enough time to
charge the Li-ion battery.
. When either the charge start time or charge
end time is set, the charging timer function is
activated.
. When only the charging timer end time is set,
the system automatically determines when to
begin charging based on the Li-ion battery
charge level. The Li-ion battery may not be
fully charged if the charging timer end time is
set such that there is not enough time to
charge the Li-ion battery.
. When only the charging timer end time is set,
the system automatically starts charging so
that the Li-ion battery will be fully charged by
the set end time. Charging may stop before
the scheduled end time but this is not a
malfunction. .
To turn off the charging timer function, touch
[ON] on the timer charge setting screen until
the indicator lights are turned off. Touch
[Save] to apply the setting. If the settings
shown on the screen are correct, touch [OK].
After this operation has been performed, the
charging timer function is turned off. The
start and stop time settings are not deleted,
even if the charging timer function is turned
off.
. If the day of the week is not selected on the
timer charge setting screen, the charging
timer will not operate on that day. The system
will wait until the next set charging time to
perform charging.
. The timer setting can be changed while timer
charge is in operation. When the setting is
changed while timer charge is in operation,
the new settings are applied immediately and
charge operation stops once. After this, if the
power position is switched to OFF, charge
operation starts or enters waiting mode
depending on the new timer settings.
. When charging is set as the first priority, the
Climate Ctrl. Timer does not start until 10
segments (80%) of the Li-ion battery avail-
able charge gauge are illuminated.
2-11
2. Unique EV functions
Page 56 of 268
deleted even if the Climate Ctrl. Timer
function is turned off.
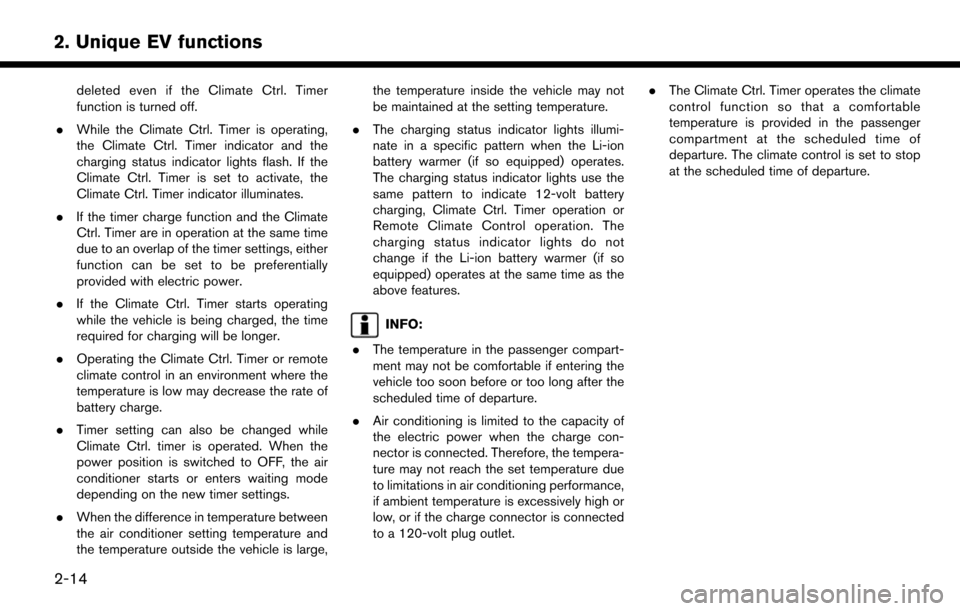
. While the Climate Ctrl. Timer is operating,
the Climate Ctrl. Timer indicator and the
charging status indicator lights flash. If the
Climate Ctrl. Timer is set to activate, the
Climate Ctrl. Timer indicator illuminates.
. If the timer charge function and the Climate
Ctrl. Timer are in operation at the same time
due to an overlap of the timer settings, either
function can be set to be preferentially
provided with electric power.
. If the Climate Ctrl. Timer starts operating
while the vehicle is being charged, the time
required for charging will be longer.
. Operating the Climate Ctrl. Timer or remote
climate control in an environment where the
temperature is low may decrease the rate of
battery charge.
. Timer setting can also be changed while
Climate Ctrl. timer is operated. When the
power position is switched to OFF, the air
conditioner starts or enters waiting mode
depending on the new timer settings.
. When the difference in temperature between
the air conditioner setting temperature and
the temperature outside the vehicle is large, the temperature inside the vehicle may not
be maintained at the setting temperature.
. The charging status indicator lights illumi-
nate in a specific pattern when the Li-ion
battery warmer (if so equipped) operates.
The charging status indicator lights use the
same pattern to indicate 12-volt battery
charging, Climate Ctrl. Timer operation or
Remote Climate Control operation. The
charging status indicator lights do not
change if the Li-ion battery warmer (if so
equipped) operates at the same time as the
above features.
INFO:
. The temperature in the passenger compart-
ment may not be comfortable if entering the
vehicle too soon before or too long after the
scheduled time of departure.
. Air conditioning is limited to the capacity of
the electric power when the charge con-
nector is connected. Therefore, the tempera-
ture may not reach the set temperature due
to limitations in air conditioning performance,
if ambient temperature is excessively high or
low, or if the charge connector is connected
to a 120-volt plug outlet. .
The Climate Ctrl. Timer operates the climate
control function so that a comfortable
temperature is provided in the passenger
compartment at the scheduled time of
departure. The climate control is set to stop
at the scheduled time of departure.
2-14
2. Unique EV functions
Page 59 of 268
BATTERY AND POWER INFORMA-
TION
Information notifying the driver of the battery and
power status can be displayed on the touch
screen display.
For detail information about the warning/indica-
tor lights, see the LEAF Owner’s Manual.
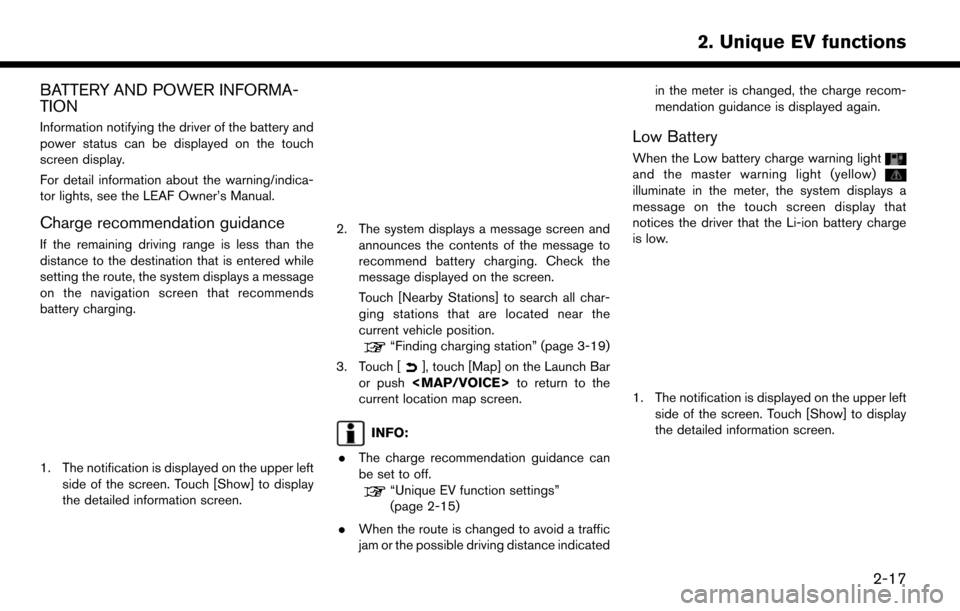
Charge recommendation guidance
If the remaining driving range is less than the
distance to the destination that is entered while
setting the route, the system displays a message
on the navigation screen that recommends
battery charging.
1. The notification is displayed on the upper leftside of the screen. Touch [Show] to display
the detailed information screen.
2. The system displays a message screen and
announces the contents of the message to
recommend battery charging. Check the
message displayed on the screen.
Touch [Nearby Stations] to search all char-
ging stations that are located near the
current vehicle position.
“Finding charging station” (page 3-19)
3. Touch [
], touch [Map] on the Launch Bar
or push
Page 60 of 268
![NISSAN LEAF 2017 1.G Navigation Manual 2. The system displays a message screen andannounces the contents of the message to
warn that the Li-ion battery charge is low.
Check the message displayed on the screen.
Touch [Nearby Stations] to se NISSAN LEAF 2017 1.G Navigation Manual 2. The system displays a message screen andannounces the contents of the message to
warn that the Li-ion battery charge is low.
Check the message displayed on the screen.
Touch [Nearby Stations] to se](/manual-img/5/531/w960_531-59.png)
2. The system displays a message screen andannounces the contents of the message to
warn that the Li-ion battery charge is low.
Check the message displayed on the screen.
Touch [Nearby Stations] to search all char-
ging stations that are located near the
current vehicle position.
“Finding charging station” (page 3-19)
3. Touch [
], touch [Map] on the Launch Bar
or push
Page 125 of 268
and/or drift.
Static and flutter: During signal interference from
buildings, large hills or due to antenna position,
usually in conjunction with increased distance
from the station transmitter, static or flutter can
be heard. This can be reduced by lowering the
treble setting to reduce the treble response.
Multipath reception: Because of the reflective
characteristics of FM signals, direct and re-
flected signals reach the receiver at the same
time. The signals may cancel each other,
resulting in momentary flutter or loss of sound.
AM radio reception
AM signals, because of their low frequency, can
bend around objects and skip along the ground.
In addition, the signals can bounce off the
ionosphere and be bent back to earth. Because
of these characteristics, AM signals are also
subject to interference as they travel from
transmitter to receiver.
Fading: Occurs while the vehicle is passing
through freeway underpasses or in areas with
many tall buildings. It can also occur for several
seconds during ionospheric turbulence even in
areas where no obstacles exist.
Static: Caused by thunderstorms, electrical
power lines, electric signs and even traffic lights.
HD RadioTMTechnology reception (for
U.S.)
HD Radio Technology reception needs to be
activated to receive HD Radio broadcasts.
“Radio Menu” (page 4-15)
This enables you to receive radio broadcasts
digitally (where available) , providing a better
quality sound with clear reception. When this
feature is not activated or HD Radio broadcasts
are not available, you will receive analog radio
(AM/FM) broadcasts.
Satellite radio reception
When the satellite radio is used for the first time
or the battery has been replaced, the satellite
radio may not work properly. This is not a
malfunction. Wait more than 10 minutes with
the satellite radio ON and the vehicle outside of
any metal or large building for the satellite radio
to receive all of the necessary data.
SiriusXM services require a subscription after
trial period and are sold separately or as a
package. The satellite service is available only in
the 48 contiguous USA and DC. SiriusXM
satellite service is also available in Canada; see
www.siriusxm.ca.
The satellite radio performance may be affected
if cargo carried on the roof blocks the satellite radio signal.
If possible, do not put cargo near the satellite
antenna.
A buildup of ice on the satellite radio antenna can
affect satellite radio performance. Remove the
ice to restore satellite radio reception.
4-3
4. Audio system
Page 250 of 268
VEHICLE ICON
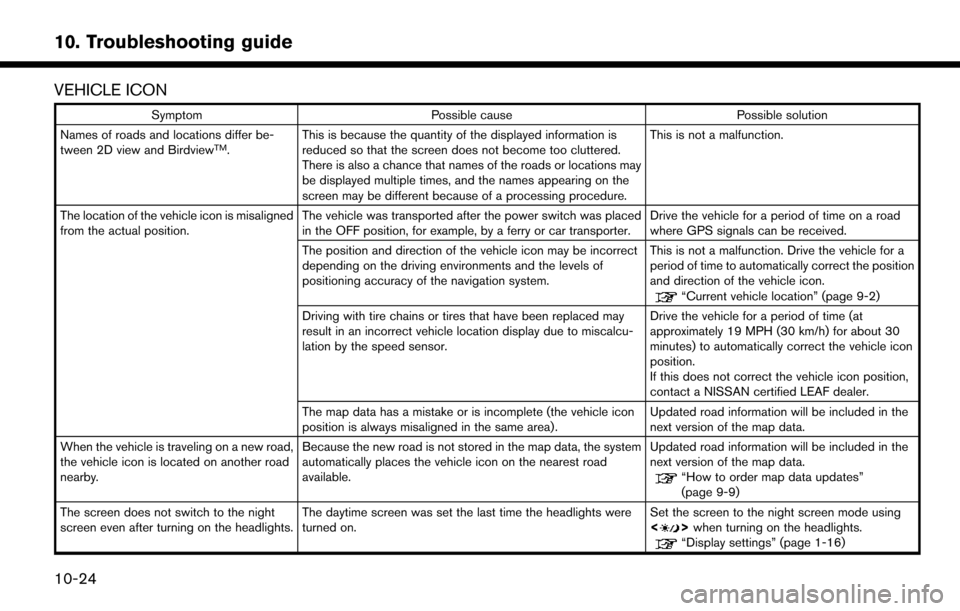
SymptomPossible cause Possible solution
Names of roads and locations differ be-
tween 2D view and Birdview
TM. This is because the quantity of the displayed information is
reduced so that the screen does not become too cluttered.
There is also a chance that names of the roads or locations may
be displayed multiple times, and the names appearing on the
screen may be different because of a processing procedure. This is not a malfunction.
The location of the vehicle icon is misaligned
from the actual position. The vehicle was transported after the power switch was placed
in the OFF position, for example, by a ferry or car transporter. Drive the vehicle for a period of time on a road
where GPS signals can be received.
The position and direction of the vehicle icon may be incorrect
depending on the driving environments and the levels of
positioning accuracy of the navigation system. This is not a malfunction. Drive the vehicle for a
period of time to automatically correct the position
and direction of the vehicle icon.
“Current vehicle location” (page 9-2)
Driving with tire chains or tires that have been replaced may
result in an incorrect vehicle location display due to miscalcu-
lation by the speed sensor. Drive the vehicle for a period of time (at
approximately 19 MPH (30 km/h) for about 30
minutes) to automatically correct the vehicle icon
position.
If this does not correct the vehicle icon position,
contact a NISSAN certified LEAF dealer.
The map data has a mistake or is incomplete (the vehicle icon
position is always misaligned in the same area) . Updated road information will be included in the
next version of the map data.
When the vehicle is traveling on a new road,
the vehicle icon is located on another road
nearby. Because the new road is not stored in the map data, the system
automatically places the vehicle icon on the nearest road
available. Updated road information will be included in the
next version of the map data.
“How to order map data updates”
(page 9-9)
The screen does not switch to the night
screen even after turning on the headlights. The daytime screen was set the last time the headlights were
turned on. Set the screen to the night screen mode using
<
>
when turning on the headlights.“Display settings” (page 1-16)
10-24
10. Troubleshooting guide