2017 NISSAN LEAF light
[x] Cancel search: lightPage 9 of 268
SAFETY INFORMATION
This system is primarily designed to help you
support pleasant driving as outlined in this
manual. However, you, the driver, must use the
system safely and properly. Information and the
availability of services may not always be up to
date. The system is not a substitute for safe,
proper and legal driving.
Before using the system, please read the
following safety information. Always use the
system as outlined in this manual.
WARNING
.To operate the system, first park the
vehicle in a safe location and set the
parking brake. Operating the system
while driving can distract the driver
and may result in a serious accident.
. Exercise extreme caution at all times
so full attention may be given to
vehicle operation. If the system
doesn’t respond immediately, please
be patient and keep your eyes on the
road. Inattentive driving may lead to a
crash resulting in serious injuries or
death. .
Do not rely on route guidance alone.
Always be sure that all driving man-
euvers are legal and safe in order to
avoid accidents.
. Do not disassemble or modify this
system. If you do, it may result in
accidents, fire or electrical shock.
. If you notice any foreign objects in
the system hardware, spill liquid on
the system or notice smoke or a smell
coming from it, stop using the system
immediately and contact a NISSAN
certified LEAF dealer. Ignoring such
conditions may lead to accidents, fire
or electrical shock.
CAUTION
.Some jurisdictions may have laws
limiting the use of video screens
while driving. Use this system only
where it is legal to do so.
. Extreme temperature conditions [be-
low �í48F( �í208C) and above 1588F
(708C)] could affect the performance
of the system. .
The display screen may break if it is
hit with a hard or sharp object. If the
display screen breaks, do not touch
it. Doing so could result in an injury.
NOTE:
. Do not keep the system running with
the READY to drive indicator light OFF.
Doing so may discharge the 12-volt
battery. When you use the navigation
system, always make sure the READY
to drive indicator light is ON.
. Completing the NissanConnect
SMEV
registration is necessary to use Nissan-
Connect
SMEV related functions. Nis-
sanConnectSMEV services may not be
available in some regions.
. To check the Li-ion battery charging
status or to use the remote heater and
air conditioner using an internet en-
abled smart phone or personal compu-
ter, the following conditions must be
met:
— The vehicle must be located in a
cellular phone or smart phone cover-
age area.
0-3
0. Introduction
Page 10 of 268
—The internet enabled cellular phone
or smart phone must be located in a
cellular phone or smart phone cover-
age area.
— The computer must be connected to
the internet.
— A cellular phone must be used to
communicate with the vehicle.
— A cellular phone capable of text
messaging must be used to receive
text message regarding vehicle
charge status.
. When the remote heater and air condi-
tioner is set, the system operates the
heater and air conditioner to adjust the
in-cabin temperature to a set tempera-
ture.
. When the charge connector is discon-
nected from the vehicle, the heater and
air conditioner operates using vehicle
Li-ion battery electric power.
. If the remote heater and air conditioner
function and Li-ion battery charging are
performed at the same time, Li-ion
battery charging will take longer than
usual due to the power used to heat or
cool the vehicle. .
Certain remote functions require a
compatible smart phone, which is not
included with vehicle.
. NissanConnect
SMEV information sys-
tem features are included through a
subscription service which requires
owner consent to activate. The sub-
scription must be active to use these
features.
. NissanConnect
SMEV communications
may be received at a verified e-mail
address or by SMS/text messaging-
enabled cellular phone.
. Standard text rates and/or data usage
may apply depending on your carrier.
TRADEMARKS
Windows�Šand Windows Media�Šare registered
trademarks or trademarks of Microsoft Corpora-
tion in the United States of America and/or other
countries.
Windows Media Player:
This product is protected by certain intellectual
property right of Microsoft. Use or distribution of
such technology outside of this product is
prohibited without a license from Microsoft.
“Made for iPod” and “Made for iPhone” mean
that an electronic accessory has been designed
to connect specifically to iPod
�Šor iPhone�Š,
respectively, and has been certified by the
developer to meet Apple performance stan-
dards. Apple is not responsible for the operation
of this device or its compliance with safety and
regulatory standards. Please note that the use of
this accessory with iPod
�Šor iPhone�Šmay affect
wireless performance.
Apple, the Apple logo, iPhone
�Š,iPod�Š,iPod
classic�Š, iPod nano�Š, and iPod touch�Šare
trademarks of Apple Inc., registered in the U.S.
and other countries. Lightning is a trademark of
Apple Inc. App Store is a service mark of Apple
0-4
0. Introduction
Page 25 of 268
STEERING WHEEL SWITCHES
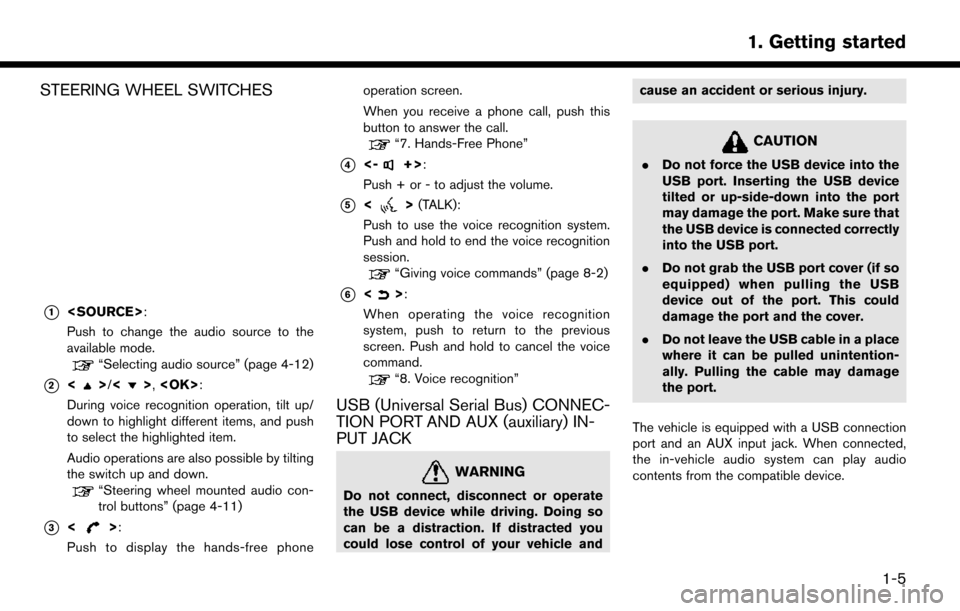
*1
Push to change the audio source to the
available mode.
“Selecting audio source” (page 4-12)
*2<>/<>,
During voice recognition operation, tilt up/
down to highlight different items, and push
to select the highlighted item.
Audio operations are also possible by tilting
the switch up and down.
“Steering wheel mounted audio con-
trol buttons” (page 4-11)
*3<>:
Push to display the hands-free phone operation screen.
When you receive a phone call, push this
button to answer the call.
“7. Hands-Free Phone”
*4<-+>:
Push + or - to adjust the volume.
*5<> (TALK):
Push to use the voice recognition system.
Push and hold to end the voice recognition
session.
“Giving voice commands” (page 8-2)
*6<>:
When operating the voice recognition
system, push to return to the previous
screen. Push and hold to cancel the voice
command.
“8. Voice recognition”
USB (Universal Serial Bus) CONNEC-
TION PORT AND AUX (auxiliary) IN-
PUT JACK
WARNING
Do not connect, disconnect or operate
the USB device while driving. Doing so
can be a distraction. If distracted you
could lose control of your vehicle and cause an accident or serious injury.
CAUTION
.
Do not force the USB device into the
USB port. Inserting the USB device
tilted or up-side-down into the port
may damage the port. Make sure that
the USB device is connected correctly
into the USB port.
. Do not grab the USB port cover (if so
equipped) when pulling the USB
device out of the port. This could
damage the port and the cover.
. Do not leave the USB cable in a place
where it can be pulled unintention-
ally. Pulling the cable may damage
the port.
The vehicle is equipped with a USB connection
port and an AUX input jack. When connected,
the in-vehicle audio system can play audio
contents from the compatible device.
1-5
1. Getting started
Page 31 of 268
![NISSAN LEAF 2017 1.G Navigation Manual ADJUSTING SETTINGS
Touch adjustment keys, such as [-]/[+], etc., to
adjust each item. Each time a key is touched, the
indicator moves along the bar.
For items with [ON] indicator, touch the menu
item NISSAN LEAF 2017 1.G Navigation Manual ADJUSTING SETTINGS
Touch adjustment keys, such as [-]/[+], etc., to
adjust each item. Each time a key is touched, the
indicator moves along the bar.
For items with [ON] indicator, touch the menu
item](/manual-img/5/531/w960_531-30.png)
ADJUSTING SETTINGS
Touch adjustment keys, such as [-]/[+], etc., to
adjust each item. Each time a key is touched, the
indicator moves along the bar.
For items with [ON] indicator, touch the menu
item to turn on/off the setting. The indicator light
will turn on when the setting is turned on.
HOW TO INPUT LETTERS AND
NUMBERS
Basic operations to enter letters and numbers
are explained here.
Character and number input screens vary
depending on the conditions.
Alphabet input screen
*1Entered characters are displayed.
*2Touch to delete the last character entered.
Touch and hold to delete all the characters
entered.
*3Touch to change the type of keyboard.
[A-Z]: Displays alphabet input screen.
[
]: Displays symbol input screen.
[123]: Displays number input screen.
*4Touch to switch between the uppercase
and lowercase character input screen.
*5Touch to enter a space.
*6Touch to enter a character.
*7Touch to confirm the entry.
Number input screen
*1Entered characters are displayed.
*2Touch to delete the last number entered.
Touch and hold to delete all the characters
entered.
*3Touch to enter a number.
*4Touch to confirm the entry.
HOW TO VIEW AND OPERATE
HOME MENU SCREEN
Push
Page 37 of 268
![NISSAN LEAF 2017 1.G Navigation Manual Available setting items
Setting item Action
[Audio Volume] Adjusts the volume level of theaudio system.
[Guidance Vo-
lume] Adjusts the volume level of the
guidance voice and the voice
recognition sys NISSAN LEAF 2017 1.G Navigation Manual Available setting items
Setting item Action
[Audio Volume] Adjusts the volume level of theaudio system.
[Guidance Vo-
lume] Adjusts the volume level of the
guidance voice and the voice
recognition sys](/manual-img/5/531/w960_531-36.png)
Available setting items
Setting item Action
[Audio Volume] Adjusts the volume level of theaudio system.
[Guidance Vo-
lume] Adjusts the volume level of the
guidance voice and the voice
recognition system voice re-
sponses.
[Ringtone] Adjusts the volume level of the ringtone of incoming calls.
[Incoming Call] Adjusts the incoming call vo- lume.
[Outgoing Call] Adjusts the outgoing call vo- lume.
[NissanConnect
EV] Adjusts the volume level of
“text-to-speech” for text mes-
saging and NissanConnect
SM
EV announcements.
[Button Beeps] Turns on/off the button beep sound and alarm for a prohib-
ited operations.
[Guidance Voice] Turns on/off the voice gui- dance.
LANGUAGE AND UNIT SETTINGS
This changes the display language and measure-
ment unit used in the system.
1. Touch [Settings] on the Launch Bar.
2. Touch [Language & Units].
Available setting items
Setting item Action
[Select Lan-
guage]Selects the system language.
The language setting is applied
to the touch screen display,
voice announcements, the
voice recognition system.
[Select Units] Selects the system unit. The unit setting can also be applied
to the information vehicle dis-
play.
INFO:
Do not push the power switch while changing
the language.
CLOCK SETTINGS
Clock settings of the system can be changed.
1. Touch [Settings] on the Launch Bar.
2. Touch [Clock]. Available setting items
Setting item Action
[On-screen
Clock]
Sets the clock display on/off.
When this item is on, the clock
display appears.
[Clock Format
(24h)] Turns on/off the 24-hour display
mode. When turned off, the
clock is set to the 12-hour
mode.
[Offset (hour)] Adjusts the offset value (hour).
[Offset (min)] Adjusts the offset value (min- utes) .
[Daylight Sav-
ings Time] Turns on/off the daylight saving
time setting.
[Time Zone] Select an appropriate time zone from the list. When selecting
[Auto], the system selects the
time zone automatically.
COMFORT & CONVENIENCE SET-
TINGS
Various settings for comfort and convenience
can be changed. Setting can be changed only
when the power switch is pushed to the ON
position
1. Touch [Settings] on the Launch Bar.
1-17
1. Getting started
Page 38 of 268
![NISSAN LEAF 2017 1.G Navigation Manual 2. Touch [Comfort & Convenience].
Available settings items
Available setting items may vary depending on
models and specifications.
Setting itemAction
[Auto Interior Illumination] When this item is tu NISSAN LEAF 2017 1.G Navigation Manual 2. Touch [Comfort & Convenience].
Available settings items
Available setting items may vary depending on
models and specifications.
Setting itemAction
[Auto Interior Illumination] When this item is tu](/manual-img/5/531/w960_531-37.png)
2. Touch [Comfort & Convenience].
Available settings items
Available setting items may vary depending on
models and specifications.
Setting itemAction
[Auto Interior Illumination] When this item is turned on, the interior lights will illuminate if any door is unlocked.
[Speed Sensing Wiper Interval] When this item is turned to ON, the wiper interval is adjusted automatically according to the vehicle speed.
[Light Sensitivity] Adjust the sensitivity of the automatic headlight by touching [+] or [-].
[Light Off Delay] Select the duration of the automatic headlight off timer from 0, 30, 45, 60, 90, 120, 150 and 180 second
periods.
[Selective Door Unlock] When this item is turned on, only the driver’s door is unlocked first after the door unlock operation. When
the door handle request switch on the driver’s or front passenger’s side door is pushed to be unlocked,
only the corresponding door is unlocked first. All the doors can be unlocked if the door unlock operation is
performed again within 60 seconds. When this item is turned to OFF, all the doors will be unlocked after
the door unlock operation is performed once.
[Intelligent Key Lock/Unlock] When this item is turned to ON, door lock/unlock function by pushing the door handle request switch will
be activated.
[Return All Settings to Default] Touch this item and touch [Yes] if you want to return all settings to the default.
1-18
1. Getting started
Page 52 of 268
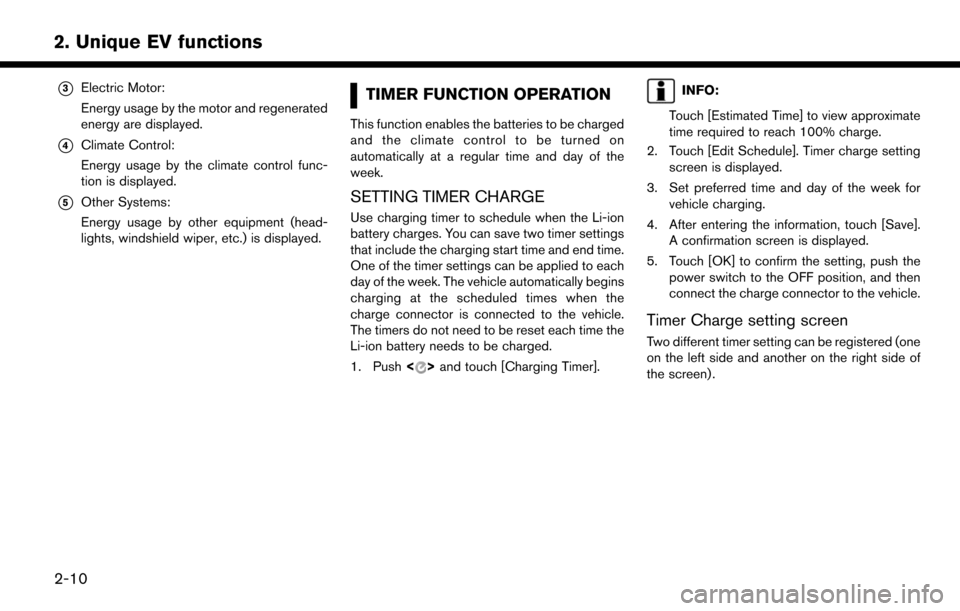
*3Electric Motor:
Energy usage by the motor and regenerated
energy are displayed.
*4Climate Control:
Energy usage by the climate control func-
tion is displayed.
*5Other Systems:
Energy usage by other equipment (head-
lights, windshield wiper, etc.) is displayed.
TIMER FUNCTION OPERATION
This function enables the batteries to be charged
and the climate control to be turned on
automatically at a regular time and day of the
week.
SETTING TIMER CHARGE
Use charging timer to schedule when the Li-ion
battery charges. You can save two timer settings
that include the charging start time and end time.
One of the timer settings can be applied to each
day of the week. The vehicle automatically begins
charging at the scheduled times when the
charge connector is connected to the vehicle.
The timers do not need to be reset each time the
Li-ion battery needs to be charged.
1. Push<
>and touch [Charging Timer].
INFO:
Touch [Estimated Time] to view approximate
time required to reach 100% charge.
2. Touch [Edit Schedule]. Timer charge setting screen is displayed.
3. Set preferred time and day of the week for vehicle charging.
4. After entering the information, touch [Save]. A confirmation screen is displayed.
5. Touch [OK] to confirm the setting, push the power switch to the OFF position, and then
connect the charge connector to the vehicle.
Timer Charge setting screen
Two different timer setting can be registered (one
on the left side and another on the right side of
the screen) .
2-10
2. Unique EV functions
Page 53 of 268
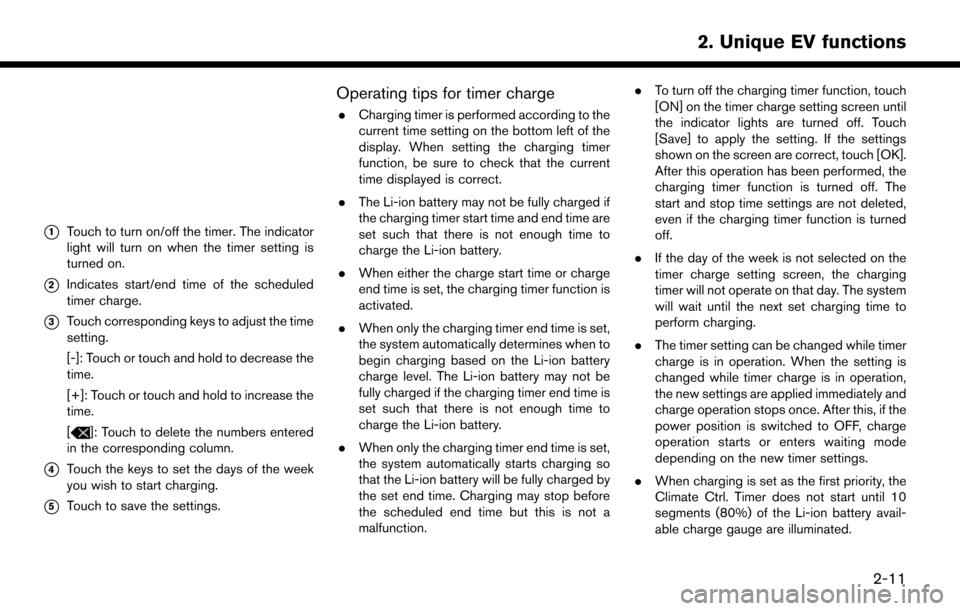
*1Touch to turn on/off the timer. The indicator
light will turn on when the timer setting is
turned on.
*2Indicates start/end time of the scheduled
timer charge.
*3Touch corresponding keys to adjust the time
setting.
[-]: Touch or touch and hold to decrease the
time.
[+]: Touch or touch and hold to increase the
time.
[
]: Touch to delete the numbers entered
in the corresponding column.
*4Touch the keys to set the days of the week
you wish to start charging.
*5Touch to save the settings.
Operating tips for timer charge
. Charging timer is performed according to the
current time setting on the bottom left of the
display. When setting the charging timer
function, be sure to check that the current
time displayed is correct.
. The Li-ion battery may not be fully charged if
the charging timer start time and end time are
set such that there is not enough time to
charge the Li-ion battery.
. When either the charge start time or charge
end time is set, the charging timer function is
activated.
. When only the charging timer end time is set,
the system automatically determines when to
begin charging based on the Li-ion battery
charge level. The Li-ion battery may not be
fully charged if the charging timer end time is
set such that there is not enough time to
charge the Li-ion battery.
. When only the charging timer end time is set,
the system automatically starts charging so
that the Li-ion battery will be fully charged by
the set end time. Charging may stop before
the scheduled end time but this is not a
malfunction. .
To turn off the charging timer function, touch
[ON] on the timer charge setting screen until
the indicator lights are turned off. Touch
[Save] to apply the setting. If the settings
shown on the screen are correct, touch [OK].
After this operation has been performed, the
charging timer function is turned off. The
start and stop time settings are not deleted,
even if the charging timer function is turned
off.
. If the day of the week is not selected on the
timer charge setting screen, the charging
timer will not operate on that day. The system
will wait until the next set charging time to
perform charging.
. The timer setting can be changed while timer
charge is in operation. When the setting is
changed while timer charge is in operation,
the new settings are applied immediately and
charge operation stops once. After this, if the
power position is switched to OFF, charge
operation starts or enters waiting mode
depending on the new timer settings.
. When charging is set as the first priority, the
Climate Ctrl. Timer does not start until 10
segments (80%) of the Li-ion battery avail-
able charge gauge are illuminated.
2-11
2. Unique EV functions