2017 NISSAN LEAF ECO mode
[x] Cancel search: ECO modePage 25 of 268

STEERING WHEEL SWITCHES
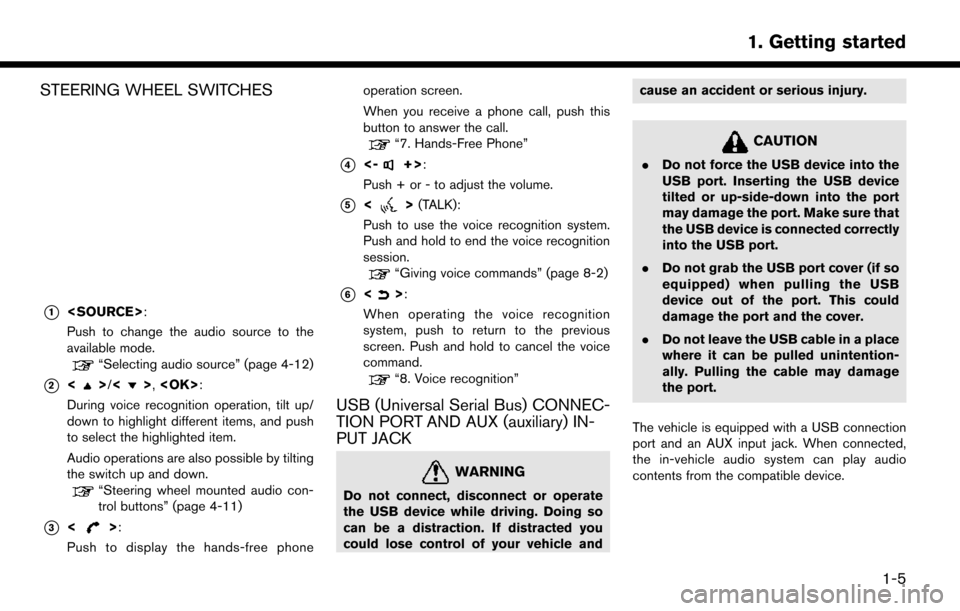
*1
Push to change the audio source to the
available mode.
“Selecting audio source” (page 4-12)
*2<>/<>,
During voice recognition operation, tilt up/
down to highlight different items, and push
to select the highlighted item.
Audio operations are also possible by tilting
the switch up and down.
“Steering wheel mounted audio con-
trol buttons” (page 4-11)
*3<>:
Push to display the hands-free phone operation screen.
When you receive a phone call, push this
button to answer the call.
“7. Hands-Free Phone”
*4<-+>:
Push + or - to adjust the volume.
*5<> (TALK):
Push to use the voice recognition system.
Push and hold to end the voice recognition
session.
“Giving voice commands” (page 8-2)
*6<>:
When operating the voice recognition
system, push to return to the previous
screen. Push and hold to cancel the voice
command.
“8. Voice recognition”
USB (Universal Serial Bus) CONNEC-
TION PORT AND AUX (auxiliary) IN-
PUT JACK
WARNING
Do not connect, disconnect or operate
the USB device while driving. Doing so
can be a distraction. If distracted you
could lose control of your vehicle and cause an accident or serious injury.
CAUTION
.
Do not force the USB device into the
USB port. Inserting the USB device
tilted or up-side-down into the port
may damage the port. Make sure that
the USB device is connected correctly
into the USB port.
. Do not grab the USB port cover (if so
equipped) when pulling the USB
device out of the port. This could
damage the port and the cover.
. Do not leave the USB cable in a place
where it can be pulled unintention-
ally. Pulling the cable may damage
the port.
The vehicle is equipped with a USB connection
port and an AUX input jack. When connected,
the in-vehicle audio system can play audio
contents from the compatible device.
1-5
1. Getting started
Page 29 of 268

DISPLAYING STATUS SCREEN
Push
the system.
Each time
displayed on the lower part of the screen
switches to display climate control, energy
information and navigation route information.
There are different status screens displayed
depending on various factors, such as the
currently active mode, whether a destination
has been set or not, etc.
TOUCH PANEL OPERATION
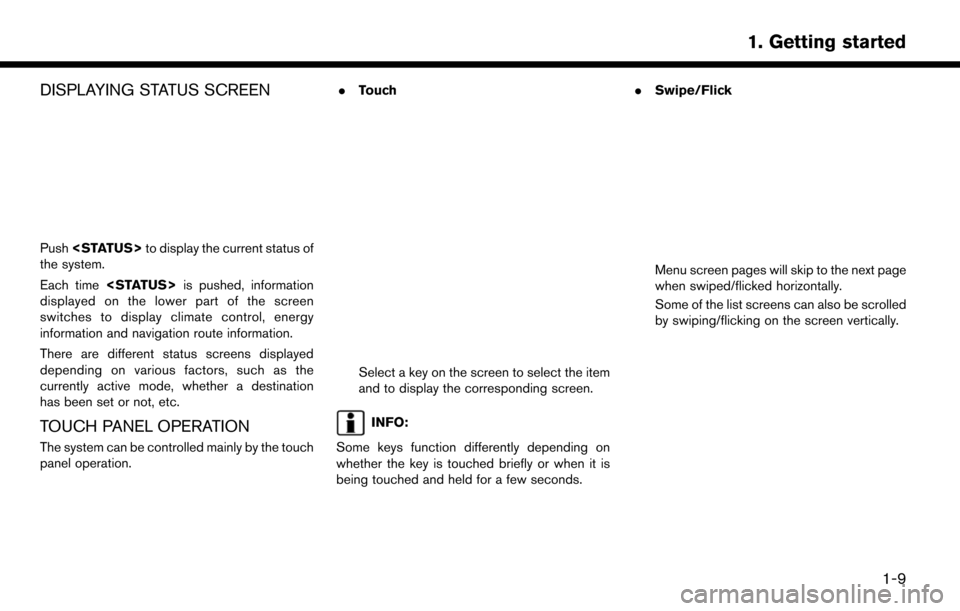
The system can be controlled mainly by the touch
panel operation. .
Touch
Select a key on the screen to select the item
and to display the corresponding screen.
INFO:
Some keys function differently depending on
whether the key is touched briefly or when it is
being touched and held for a few seconds. .
Swipe/Flick
Menu screen pages will skip to the next page
when swiped/flicked horizontally.
Some of the list screens can also be scrolled
by swiping/flicking on the screen vertically.
1-9
1. Getting started
Page 36 of 268
![NISSAN LEAF 2017 1.G Navigation Manual [Clock]Displays the clock adjust-
ment screen.
“Clock settings”
(page 1-17)
[Edit Home Menu] Displays the menu editing screen.
“Customizing
HOME MENU
screen”
(page 1-12)
[NissanConnect EV] Dis NISSAN LEAF 2017 1.G Navigation Manual [Clock]Displays the clock adjust-
ment screen.
“Clock settings”
(page 1-17)
[Edit Home Menu] Displays the menu editing screen.
“Customizing
HOME MENU
screen”
(page 1-12)
[NissanConnect EV] Dis](/manual-img/5/531/w960_531-35.png)
[Clock]Displays the clock adjust-
ment screen.
“Clock settings”
(page 1-17)
[Edit Home Menu] Displays the menu editing screen.
“Customizing
HOME MENU
screen”
(page 1-12)
[NissanConnect EV] Displays the NissanCon- nect
SMEV settings
screen.
“NissanConnectSM
EV settings”
(page 5-11)
[Voice Recognition] Displays the voice recog- nition system settings
screen.
“Voice recognition
settings”
(page 8-18)
[Camera]
(if so equipped) Displays the Camera
setting screen.
See LEAF Owner’s Man-
ual for details of the
monitor system. [Comfort & Conveni-
ence]
Displays Comfort & Con-
venience settings screen.
“Comfort & Conve-
nience settings”
(page 1-17)
[Language & Units] Displays the Language and Units settings screen.
“Language and unit
settings”
(page 1-17)
DISPLAY SETTINGS
Menu items to adjust display settings are
available.
1. Touch [Settings] on the Launch Bar.
2. Touch [Display].
3. Touch a preferred adjustment item andadjust to the preferred setting. Available setting items
Setting item Action
[Display] Turns the screen off.
Pushing and holding <
>
will also turn off the screen.
Push the <
>to turn the
screen back on.
[Brightness] Adjusts the brightness of the display.
[Contrast] Adjusts the contrast of the dis- play.
[Background
Color] Changes the background color
of the map screen. Select the
color mode from [Day] and
[Night].
Pushing
<
>will also
change the background color.
VOLUME AND BEEPS SETTINGS
The volume of various functions including audio,
phone, navigation voice guidance, and system
beeps can be adjusted.
1. Touch [Settings] on the Launch Bar.
2. Touch [Volume & Beeps].
1-16
1. Getting started
Page 37 of 268
![NISSAN LEAF 2017 1.G Navigation Manual Available setting items
Setting item Action
[Audio Volume] Adjusts the volume level of theaudio system.
[Guidance Vo-
lume] Adjusts the volume level of the
guidance voice and the voice
recognition sys NISSAN LEAF 2017 1.G Navigation Manual Available setting items
Setting item Action
[Audio Volume] Adjusts the volume level of theaudio system.
[Guidance Vo-
lume] Adjusts the volume level of the
guidance voice and the voice
recognition sys](/manual-img/5/531/w960_531-36.png)
Available setting items
Setting item Action
[Audio Volume] Adjusts the volume level of theaudio system.
[Guidance Vo-
lume] Adjusts the volume level of the
guidance voice and the voice
recognition system voice re-
sponses.
[Ringtone] Adjusts the volume level of the ringtone of incoming calls.
[Incoming Call] Adjusts the incoming call vo- lume.
[Outgoing Call] Adjusts the outgoing call vo- lume.
[NissanConnect
EV] Adjusts the volume level of
“text-to-speech” for text mes-
saging and NissanConnect
SM
EV announcements.
[Button Beeps] Turns on/off the button beep sound and alarm for a prohib-
ited operations.
[Guidance Voice] Turns on/off the voice gui- dance.
LANGUAGE AND UNIT SETTINGS
This changes the display language and measure-
ment unit used in the system.
1. Touch [Settings] on the Launch Bar.
2. Touch [Language & Units].
Available setting items
Setting item Action
[Select Lan-
guage]Selects the system language.
The language setting is applied
to the touch screen display,
voice announcements, the
voice recognition system.
[Select Units] Selects the system unit. The unit setting can also be applied
to the information vehicle dis-
play.
INFO:
Do not push the power switch while changing
the language.
CLOCK SETTINGS
Clock settings of the system can be changed.
1. Touch [Settings] on the Launch Bar.
2. Touch [Clock]. Available setting items
Setting item Action
[On-screen
Clock]
Sets the clock display on/off.
When this item is on, the clock
display appears.
[Clock Format
(24h)] Turns on/off the 24-hour display
mode. When turned off, the
clock is set to the 12-hour
mode.
[Offset (hour)] Adjusts the offset value (hour).
[Offset (min)] Adjusts the offset value (min- utes) .
[Daylight Sav-
ings Time] Turns on/off the daylight saving
time setting.
[Time Zone] Select an appropriate time zone from the list. When selecting
[Auto], the system selects the
time zone automatically.
COMFORT & CONVENIENCE SET-
TINGS
Various settings for comfort and convenience
can be changed. Setting can be changed only
when the power switch is pushed to the ON
position
1. Touch [Settings] on the Launch Bar.
1-17
1. Getting started
Page 38 of 268
![NISSAN LEAF 2017 1.G Navigation Manual 2. Touch [Comfort & Convenience].
Available settings items
Available setting items may vary depending on
models and specifications.
Setting itemAction
[Auto Interior Illumination] When this item is tu NISSAN LEAF 2017 1.G Navigation Manual 2. Touch [Comfort & Convenience].
Available settings items
Available setting items may vary depending on
models and specifications.
Setting itemAction
[Auto Interior Illumination] When this item is tu](/manual-img/5/531/w960_531-37.png)
2. Touch [Comfort & Convenience].
Available settings items
Available setting items may vary depending on
models and specifications.
Setting itemAction
[Auto Interior Illumination] When this item is turned on, the interior lights will illuminate if any door is unlocked.
[Speed Sensing Wiper Interval] When this item is turned to ON, the wiper interval is adjusted automatically according to the vehicle speed.
[Light Sensitivity] Adjust the sensitivity of the automatic headlight by touching [+] or [-].
[Light Off Delay] Select the duration of the automatic headlight off timer from 0, 30, 45, 60, 90, 120, 150 and 180 second
periods.
[Selective Door Unlock] When this item is turned on, only the driver’s door is unlocked first after the door unlock operation. When
the door handle request switch on the driver’s or front passenger’s side door is pushed to be unlocked,
only the corresponding door is unlocked first. All the doors can be unlocked if the door unlock operation is
performed again within 60 seconds. When this item is turned to OFF, all the doors will be unlocked after
the door unlock operation is performed once.
[Intelligent Key Lock/Unlock] When this item is turned to ON, door lock/unlock function by pushing the door handle request switch will
be activated.
[Return All Settings to Default] Touch this item and touch [Yes] if you want to return all settings to the default.
1-18
1. Getting started
Page 46 of 268

DISPLAYING ESTIMATED DRIVING
RANGE
The estimated driving range including the current
position or the destination is displayed on the
map screen depending on the charging status of
the vehicle. A destination or a waypoint can be
set on this screen.
INFO:
The estimated driving range map shows the
predicted area the vehicle can reach on the basis
of the estimated driving range that is indicated in
the meter. Driving habits, the actual road
environment (hills, etc.) , and traffic conditions
(traffic jams, etc.) will affect the actual available
range.
To display the estimated driving range, push
<
> and touch [Driving Range].
INFO:
Models with Li-ion battery warmer:
The estimated driving range will increase or
decrease when the air conditioner, heater or Li-
ion battery warmer is turned on or off, or the
vehicle is shifted between D (Drive) and ECO, or
when any other accessory is turned on or off
based on driving.
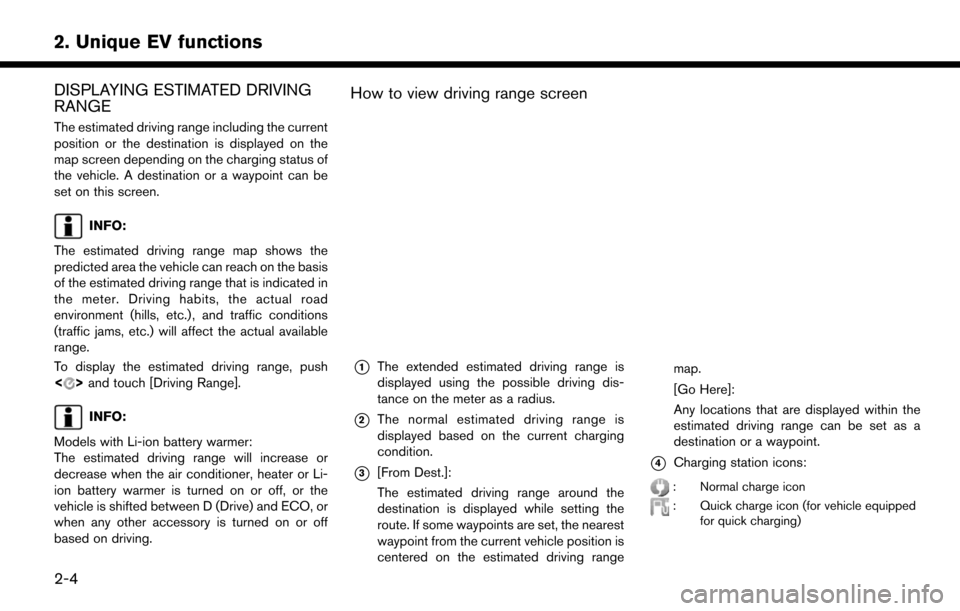
How to view driving range screen
*1The extended estimated driving range is
displayed using the possible driving dis-
tance on the meter as a radius.
*2The normal estimated driving range is
displayed based on the current charging
condition.
*3[From Dest.]:
The estimated driving range around the
destination is displayed while setting the
route. If some waypoints are set, the nearest
waypoint from the current vehicle position is
centered on the estimated driving range map.
[Go Here]:
Any locations that are displayed within the
estimated driving range can be set as a
destination or a waypoint.*4Charging station icons:
: Normal charge icon
: Quick charge icon (for vehicle equipped
for quick charging)
2-4
2. Unique EV functions
Page 109 of 268

4. Touch a preferred events from the list tocheck the detailed information and the map.
Displaying urgent traffic information
When an urgent event is found around the
current vehicle location, a message pops up
automatically on the touch screen display with a
voice announcement.
The message includes the icon, event type, event
information and the direct distance from the
current location to the event.
INFO:
. Urgent traffic information is displayed re-
gardless of whether [Use Traffic Info] func-
tion is on or off.
“Traffic information setting”
(page 3-50)
. When there are multiple urgent events, the
event with the shortest direct distance from
the current location is displayed.
. If the urgent event is on the recommended
route, and if a detour is found, the detour
route notification screen is displayed when
the vehicle approaches the detour point.
Traffic information on map
With a subscription to SiriusXM Traffic service,
traffic information is displayed on both 2D map
and Birdview
TMmap screen.“Notes on SiriusXM Traffic information”
(page 6-9)
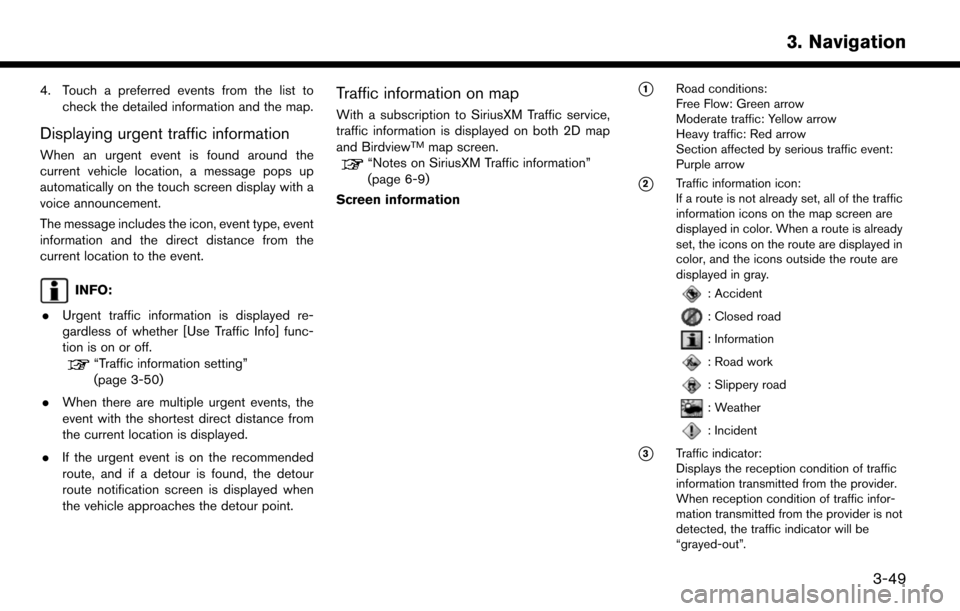
Screen information
*1Road conditions:
Free Flow: Green arrow
Moderate traffic: Yellow arrow
Heavy traffic: Red arrow
Section affected by serious traffic event:
Purple arrow
*2Traffic information icon:
If a route is not already set, all of the traffic
information icons on the map screen are
displayed in color. When a route is already
set, the icons on the route are displayed in
color, and the icons outside the route are
displayed in gray.
: Accident
: Closed road
: Information
: Road work
: Slippery road
: Weather
: Incident
*3Traffic indicator:
Displays the reception condition of traffic
information transmitted from the provider.
When reception condition of traffic infor-
mation transmitted from the provider is not
detected, the traffic indicator will be
“grayed-out”.
3-49
3. Navigation
Page 135 of 268
![NISSAN LEAF 2017 1.G Navigation Manual The radio screen can be viewed and operated on
the touch screen display.
*1[AM Menu]/[FM Menu]/[SXM Menu]:
Touch to display the radio menu screen.
“Radio Menu” (page 4-15)
*2[Source]:
Touch to dis NISSAN LEAF 2017 1.G Navigation Manual The radio screen can be viewed and operated on
the touch screen display.
*1[AM Menu]/[FM Menu]/[SXM Menu]:
Touch to display the radio menu screen.
“Radio Menu” (page 4-15)
*2[Source]:
Touch to dis](/manual-img/5/531/w960_531-134.png)
The radio screen can be viewed and operated on
the touch screen display.
*1[AM Menu]/[FM Menu]/[SXM Menu]:
Touch to display the radio menu screen.
“Radio Menu” (page 4-15)
*2[Source]:
Touch to display the audio source screen to
select the other audio source.
“Selecting audio source” (page 4-12)
*3Preset number:
A preset number is displayed if the current
frequency is stored as a preset station or
channel.
*4Audio source indicator:
Indicates the currently selected audio
source.
*5Reception information display:
Reception information currently available
such as frequency, station, or channel name,
etc. are displayed.
*6Turn direction indicator:
When a route to the destination is set,
turning direction and the distance to the
next turn is displayed.
*7TAG indicator (for U.S.):
TAG indicator is displayed if the iTunes�Š
Tagging information exists in the HD broad-
cast receiving.
“Radio Menu” (page 4-15)
*8Preset list:
To listen to a preset station, touch the
corresponding key in the preset list. Touch [
< ] or [ > ] to scroll the preset list. Touch and
hold one of the keys in the preset list to store
the station or channel currently tuned to.
“Presetting” (page 4-14)
*9Mode indicator (for U.S.):
On AM and FM screens, HD Radio icon will
appear when HD mode setting is turned on.
“Radio Menu” (page 4-15)
“Live” will appear when in ballgame mode
during reception of the HD broadcast.
INFO:
. An icon indicating the signal strength ap-
pears on the SXM screen.
. HD Radio (for U.S.) reception needs to be
activated to receive HD Radio broadcasts.
This enables you to receive radio broadcasts
digitally (where available) , providing a better
quality sound with clear reception. When this feature is not activated or HD Radio broad-
casts are not available, you will receive
analog radio (AM/FM) broadcasts.
“Radio Menu” (page 4-15)
Radio operation
Radio activation and band selection:
To listen to the radio, turn on the audio system
and select a preferred radio band by pushing
or
radio on the audio source menu screen.
“Selecting audio source” (page 4-12)
INFO:
When the stereo broadcast signal is weak, the
radio will automatically change from stereo to
monaural reception.
Tuning:
To tune to stations/channels manually, push
repeatedly until the preferred station/channel is
selected. With SXM, when the button is pushed
for 0.5 seconds or more, channels will be
skipped until the button is released.
For SXM radio:
4-13
4. Audio system