2017 NISSAN LEAF change time
[x] Cancel search: change timePage 3 of 268
FOREWORD
Thank you for purchasing a NISSAN vehicle.
This user’s manual is for NissanConnectSMwith
Navigation, Mobile Apps and EV offered in your
NISSAN vehicle.
Operation instructions for the following systems
are included in this manual.
. EV-specific functions
. Audio
. Hands-Free Phone
. NissanConnect
SMMobile Apps
. NissanConnect
SMEV
. Navigation
. Voice recognition
. Information and settings viewable on the
system
Please read this manual carefully to ensure safe
operation of NissanConnect
SMwith Navigation,
Mobile Apps and EV.
. Because of possible specification changes
and optional equipment, some sections of
this manual may not apply to your vehicle. .
All information, specifications and illustra-
tions in this manual are those in effect at the
time of printing. NISSAN reserves the right to
change specifications or design at any time
without notice.
. Do not remove this manual from the vehicle
when selling this vehicle. The next user of the
system may need the manual.
Page 26 of 268
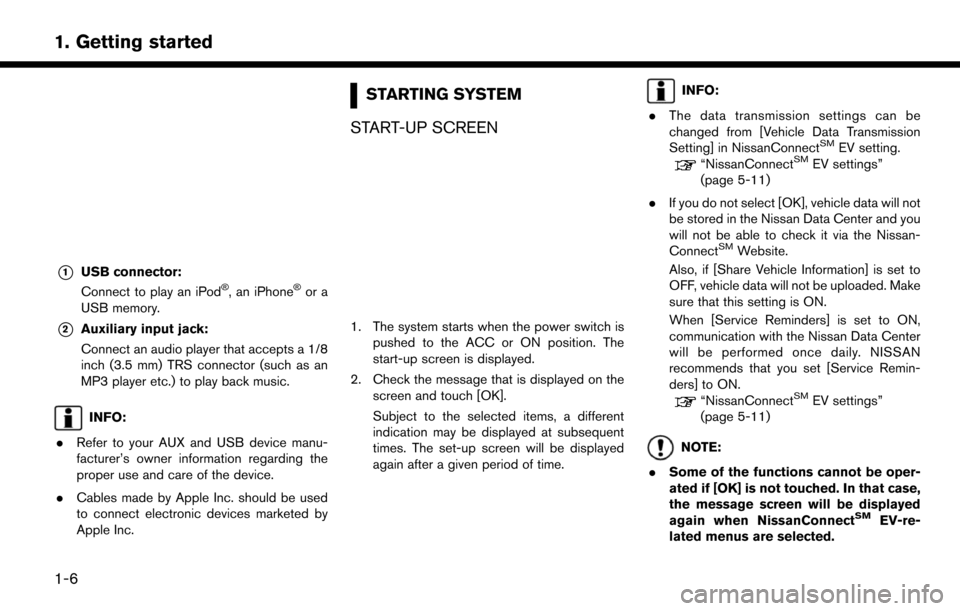
*1USB connector:
Connect to play an iPod�Š, an iPhone�Šor a
USB memory.
*2Auxiliary input jack:
Connect an audio player that accepts a 1/8
inch (3.5 mm) TRS connector (such as an
MP3 player etc.) to play back music.
INFO:
. Refer to your AUX and USB device manu-
facturer’s owner information regarding the
proper use and care of the device.
. Cables made by Apple Inc. should be used
to connect electronic devices marketed by
Apple Inc.
STARTING SYSTEM
START-UP SCREEN
1. The system starts when the power switch is pushed to the ACC or ON position. The
start-up screen is displayed.
2. Check the message that is displayed on the screen and touch [OK].
Subject to the selected items, a different
indication may be displayed at subsequent
times. The set-up screen will be displayed
again after a given period of time.
INFO:
. The data transmission settings can be
changed from [Vehicle Data Transmission
Setting] in NissanConnect
SMEV setting.“NissanConnectSMEV settings”
(page 5-11)
. If you do not select [OK], vehicle data will not
be stored in the Nissan Data Center and you
will not be able to check it via the Nissan-
Connect
SMWebsite.
Also, if [Share Vehicle Information] is set to
OFF, vehicle data will not be uploaded. Make
sure that this setting is ON.
When [Service Reminders] is set to ON,
communication with the Nissan Data Center
will be performed once daily. NISSAN
recommends that you set [Service Remin-
ders] to ON.
“NissanConnectSMEV settings”
(page 5-11)
NOTE:
. Some of the functions cannot be oper-
ated if [OK] is not touched. In that case,
the message screen will be displayed
again when NissanConnect
SMEV-re-
lated menus are selected.
1-6
1. Getting started
Page 31 of 268
![NISSAN LEAF 2017 1.G Navigation Manual ADJUSTING SETTINGS
Touch adjustment keys, such as [-]/[+], etc., to
adjust each item. Each time a key is touched, the
indicator moves along the bar.
For items with [ON] indicator, touch the menu
item NISSAN LEAF 2017 1.G Navigation Manual ADJUSTING SETTINGS
Touch adjustment keys, such as [-]/[+], etc., to
adjust each item. Each time a key is touched, the
indicator moves along the bar.
For items with [ON] indicator, touch the menu
item](/manual-img/5/531/w960_531-30.png)
ADJUSTING SETTINGS
Touch adjustment keys, such as [-]/[+], etc., to
adjust each item. Each time a key is touched, the
indicator moves along the bar.
For items with [ON] indicator, touch the menu
item to turn on/off the setting. The indicator light
will turn on when the setting is turned on.
HOW TO INPUT LETTERS AND
NUMBERS
Basic operations to enter letters and numbers
are explained here.
Character and number input screens vary
depending on the conditions.
Alphabet input screen
*1Entered characters are displayed.
*2Touch to delete the last character entered.
Touch and hold to delete all the characters
entered.
*3Touch to change the type of keyboard.
[A-Z]: Displays alphabet input screen.
[
]: Displays symbol input screen.
[123]: Displays number input screen.
*4Touch to switch between the uppercase
and lowercase character input screen.
*5Touch to enter a space.
*6Touch to enter a character.
*7Touch to confirm the entry.
Number input screen
*1Entered characters are displayed.
*2Touch to delete the last number entered.
Touch and hold to delete all the characters
entered.
*3Touch to enter a number.
*4Touch to confirm the entry.
HOW TO VIEW AND OPERATE
HOME MENU SCREEN
Push
Page 37 of 268
![NISSAN LEAF 2017 1.G Navigation Manual Available setting items
Setting item Action
[Audio Volume] Adjusts the volume level of theaudio system.
[Guidance Vo-
lume] Adjusts the volume level of the
guidance voice and the voice
recognition sys NISSAN LEAF 2017 1.G Navigation Manual Available setting items
Setting item Action
[Audio Volume] Adjusts the volume level of theaudio system.
[Guidance Vo-
lume] Adjusts the volume level of the
guidance voice and the voice
recognition sys](/manual-img/5/531/w960_531-36.png)
Available setting items
Setting item Action
[Audio Volume] Adjusts the volume level of theaudio system.
[Guidance Vo-
lume] Adjusts the volume level of the
guidance voice and the voice
recognition system voice re-
sponses.
[Ringtone] Adjusts the volume level of the ringtone of incoming calls.
[Incoming Call] Adjusts the incoming call vo- lume.
[Outgoing Call] Adjusts the outgoing call vo- lume.
[NissanConnect
EV] Adjusts the volume level of
“text-to-speech” for text mes-
saging and NissanConnect
SM
EV announcements.
[Button Beeps] Turns on/off the button beep sound and alarm for a prohib-
ited operations.
[Guidance Voice] Turns on/off the voice gui- dance.
LANGUAGE AND UNIT SETTINGS
This changes the display language and measure-
ment unit used in the system.
1. Touch [Settings] on the Launch Bar.
2. Touch [Language & Units].
Available setting items
Setting item Action
[Select Lan-
guage]Selects the system language.
The language setting is applied
to the touch screen display,
voice announcements, the
voice recognition system.
[Select Units] Selects the system unit. The unit setting can also be applied
to the information vehicle dis-
play.
INFO:
Do not push the power switch while changing
the language.
CLOCK SETTINGS
Clock settings of the system can be changed.
1. Touch [Settings] on the Launch Bar.
2. Touch [Clock]. Available setting items
Setting item Action
[On-screen
Clock]
Sets the clock display on/off.
When this item is on, the clock
display appears.
[Clock Format
(24h)] Turns on/off the 24-hour display
mode. When turned off, the
clock is set to the 12-hour
mode.
[Offset (hour)] Adjusts the offset value (hour).
[Offset (min)] Adjusts the offset value (min- utes) .
[Daylight Sav-
ings Time] Turns on/off the daylight saving
time setting.
[Time Zone] Select an appropriate time zone from the list. When selecting
[Auto], the system selects the
time zone automatically.
COMFORT & CONVENIENCE SET-
TINGS
Various settings for comfort and convenience
can be changed. Setting can be changed only
when the power switch is pushed to the ON
position
1. Touch [Settings] on the Launch Bar.
1-17
1. Getting started
Page 39 of 268
CONNECTING BLUETOOTH�ŠDE-
VICE
Your vehicle is equipped with the Bluetooth�Š
Hands-Free Phone System and Bluetooth�Š
audio player. If you are an owner of a compatible
Bluetooth�Šenabled cellular phone or Bluetooth�Š
audio device, you can set up the wireless
connection between your cellular phone and
the in-vehicle phone module or Bluetooth
�Šaudio
and in-vehicle audio module. With Bluetooth�Š
wireless technology, you can make or receive a
telephone call with your cellular phone in your
pocket and listen to Bluetooth
�Šaudio.
Connecting cellular phone/audio de-
vice
To use the Bluetooth�Šdevice with the in-vehicle
system for the first time, the device connection
operation is required.
1. Touch [Settings] on the Launch Bar.
2. Touch [Bluetooth] and touch [Connect De- vice]. A message is displayed.
3. Touch [Yes] to connect a cellular phone. Touch [No] to connect an audio device and
operate as guided by the system. (Opera-
tions may differ depending on the device.)
NOTE:
Some cellular phones or other devices may
cause interference or a buzzing noise to
come from the audio system speakers.
Storing the device in a different location
may reduce or eliminate the noise.
INFO:
. Up to 5 Bluetooth
�Šdevices can be con-
nected. If 5 devices are already connected,
one of the devices must first be deleted
before another device can be connected.
“Bluetooth�Šsettings” (page 1-19)
. The pairing procedure of the cellular phone
varies according to each cellular phone. See
the cellular phone Owner’s Manual for the
details.
. Visit www.nissanusa.com/bluetooth/ for a
recommended Bluetooth
�Šdevice.
Bluetooth�Šsettings
The Bluetooth�Šsettings can be changed ac-
cording to the your preference.
1. Touch [Settings] on the Launch Bar.
2. Touch [Bluetooth]. 3. Touch a preferred item.
Available setting items
Setting item Action
[Bluetooth] Turns the Bluetooth�Šcon-
nection to the vehicle on/off.
[Connect Device] Bluetooth�Šdevices can be
connected to the in-vehicle
system.
[Select BT De-
vice] Registered Bluetooth�Šde-
vices are shown on the list.
Select a device you wish to use
from the list. You can also edit
the name, delete registered
devices or display information
of the registered device.
[Edit Bluetooth
Information] The in-vehicle system name
and the PIN code can be
changed. A device address
can also be viewed.
INFO:
From [Edit Bluetooth Information], the device
name that appears on the screen can be
changed and be renamed from the name set as
default to the preferred name (such as “Steve’s
Car” for example) .
1-19
1. Getting started
Page 48 of 268
4. Push
Page 53 of 268
*1Touch to turn on/off the timer. The indicator
light will turn on when the timer setting is
turned on.
*2Indicates start/end time of the scheduled
timer charge.
*3Touch corresponding keys to adjust the time
setting.
[-]: Touch or touch and hold to decrease the
time.
[+]: Touch or touch and hold to increase the
time.
[
]: Touch to delete the numbers entered
in the corresponding column.
*4Touch the keys to set the days of the week
you wish to start charging.
*5Touch to save the settings.
Operating tips for timer charge
. Charging timer is performed according to the
current time setting on the bottom left of the
display. When setting the charging timer
function, be sure to check that the current
time displayed is correct.
. The Li-ion battery may not be fully charged if
the charging timer start time and end time are
set such that there is not enough time to
charge the Li-ion battery.
. When either the charge start time or charge
end time is set, the charging timer function is
activated.
. When only the charging timer end time is set,
the system automatically determines when to
begin charging based on the Li-ion battery
charge level. The Li-ion battery may not be
fully charged if the charging timer end time is
set such that there is not enough time to
charge the Li-ion battery.
. When only the charging timer end time is set,
the system automatically starts charging so
that the Li-ion battery will be fully charged by
the set end time. Charging may stop before
the scheduled end time but this is not a
malfunction. .
To turn off the charging timer function, touch
[ON] on the timer charge setting screen until
the indicator lights are turned off. Touch
[Save] to apply the setting. If the settings
shown on the screen are correct, touch [OK].
After this operation has been performed, the
charging timer function is turned off. The
start and stop time settings are not deleted,
even if the charging timer function is turned
off.
. If the day of the week is not selected on the
timer charge setting screen, the charging
timer will not operate on that day. The system
will wait until the next set charging time to
perform charging.
. The timer setting can be changed while timer
charge is in operation. When the setting is
changed while timer charge is in operation,
the new settings are applied immediately and
charge operation stops once. After this, if the
power position is switched to OFF, charge
operation starts or enters waiting mode
depending on the new timer settings.
. When charging is set as the first priority, the
Climate Ctrl. Timer does not start until 10
segments (80%) of the Li-ion battery avail-
able charge gauge are illuminated.
2-11
2. Unique EV functions
Page 55 of 268
![NISSAN LEAF 2017 1.G Navigation Manual 4. After entering the information, touch [Save].A confirmation screen is displayed.
5. Touch [OK] to confirm the setting, push the power switch to the OFF position, and then
connect the charge connect NISSAN LEAF 2017 1.G Navigation Manual 4. After entering the information, touch [Save].A confirmation screen is displayed.
5. Touch [OK] to confirm the setting, push the power switch to the OFF position, and then
connect the charge connect](/manual-img/5/531/w960_531-54.png)
4. After entering the information, touch [Save].A confirmation screen is displayed.
5. Touch [OK] to confirm the setting, push the power switch to the OFF position, and then
connect the charge connector to the vehicle.
Climate Ctrl. Timer setting screen
*1Touch to turn on/off the timer. The indicator
light will turn on when the timer setting is
turned on.
*2Shows the set departure time. Climate
Control system will be activated in order
that the vehicle compartment will be cooled/
heated to the set temperature and turn off
itself by the departure time.
*3Touch corresponding keys to adjust the time
setting.
[-]: Touch or touch and hold to decrease the
time. [+]: Touch or touch and hold to increase the
time.
[
]: Touch to delete the numbers entered.
*4Touch the keys to set the days of the week
you wish to activate the Climate Control
system.
*5Touch to save the setting.
Priority setting between timer charge
and Climate Ctrl. Timer
If the timer charge function and the Climate Ctrl.
Timer function are in operation at the same time
due to an overlap of the timer settings, either
function can be set to be preferentially provided
with electric power.
1. Push
<
>and touch [Climate Ctrl. Timer].
2. Touch [Timer With Priority]. Priority setting screen is displayed.
3. Select the preferred setting. Available settings
Setting item Result
[Charging
Timer]
When charging is set as the
first priority, the Climate Ctrl.
Timer does not start until 10
segments (80%) of the Li-ion
battery available charge gauge
are illuminated.
[Clim. Ctrl.
Timer] When the Climate Control is
set as the first priority, the
Climate Control system will
start to operate when the re-
maining Li-ion battery power
displayed in the meter reaches
2 segments (15%) or higher.
Operating tips for using Climate Ctrl.
Timer
.
Temperature setting for the Climate Ctrl. can
be changed from [Timer / Remote - Set
Climate Temp].
. The Climate Ctrl. Timer will only start when
the power switch is in the OFF position.
Always place the power switch in the OFF
position after the Climate Ctrl. Timer is set.
. To turn off the Climate Ctrl. Timer function,
touch [ON] until the indicator light turns off.
The start and stop time settings will not be
2-13
2. Unique EV functions