Page 17 of 28
 (if so equipped)
1 DRIVE MODE SELECT BUTTON Press the
D-MODE button 1 to switch the display to the Drive mode. While
in the Drive mode, s")
15
2
1
3
4
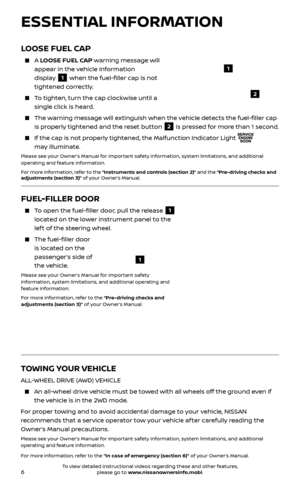
DRIVE MODE (with Integrated Control System) (if so equipped)
1 DRIVE MODE SELECT BUTTON Press the
D-MODE button 1 to switch the display to the Drive mode. While
in the Drive mode, set-up functions, drive information and ECO information
can be displayed and adjusted.
Your vehicle’s Integrated Control System allows vehicle performance to be
adjusted by selecting from three drive modes: NORMAL, SPORT or ECO .
NORMAL
2 drive mode is recommended for normal, everyday driving.
SPORT
3 drive mode is recommended for an enhanced performance feel.
Fuel economy may be reduced.
ECO
4 drive mode is recommended for maximum fuel economy.
Performance may be reduced.
Please see your Owner’s Manual for important safety information, system limitations, and additional
operating and feature information.
For more information, refer to the “Instruments and controls (section 2)”, the “Heater, air conditioner,
audio and phone systems (section 4)” and the “Starting and driving (section 5)” of your Owner’s Manual.
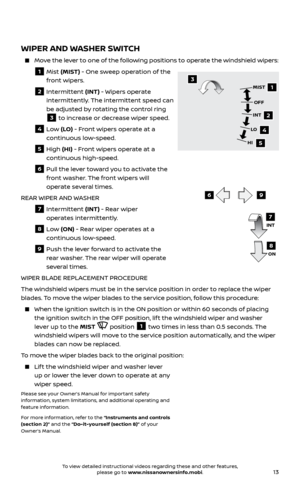
7 AIR INT AKE BUTTON Press the air intake button to change the air circulation from the air
recirculation mode to the outside air circulation mode.
When the air r ecirculation indicator light illuminates, the flowing air is
recirculated inside the vehicle. This system is used to avoid outside odors and
to help adjust the inside vehicle temperature more effectively.
The air recirculation mode cannot be activated when the climate control system is in the front defroster mode or the front defroster and foot
outlet mode .
When the outside air cir culation indicator light
illuminates, the flowing
air is drawn from outside the vehicle.
8 A/C BUTTON Press the A/C button to manually turn the A/C on or off.
9 OFF BUTTON Press the OFF button to turn the climate control system off.
Please see your Owner’s Manual for important safety information, system limitations, and additional
operating and feature information.
For more information, refer to the “Instruments and controls (section 2)”, the “Heater, air conditioner,
audio and phone systems (section 4)” and the “Starting and driving (section 5)” of your Owner’s Manual.
To view detailed instructional videos regarding these and other features, please go to www.nissanownersinfo.mobi.
Page 18 of 28

1 ON•OFF BUTTON/VOL (volume) CONTROL KNOB
Press the ON•OFF button to turn the system on or off.
Turn the V OL")
16
21
56
3
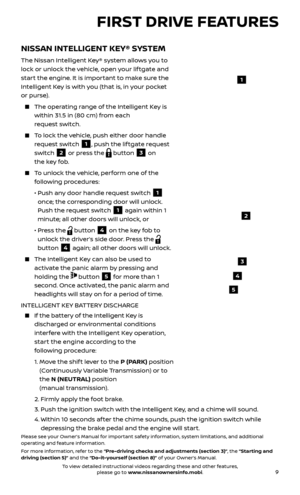
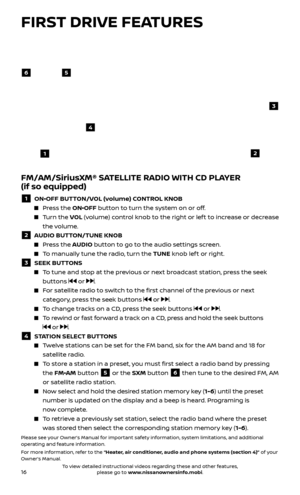
FM/AM/SiriusXM® SATELLITE RADIO WITH CD PLAYER
(if so equipped)
1 ON•OFF BUTTON/VOL (volume) CONTROL KNOB
Press the ON•OFF button to turn the system on or off.
Turn the V OL (volume) control knob to the right or lef t to increase or decrease
the volume.
2 AUDIO BUTTON/TUNE KNOB
Press the AUDIO button to go to the audio settings screen.
To manually tune the radio, turn the TUNE knob lef t or right.
3 SEEK BUT TONS
To tune and stop at the previous or next broadcast station, press the seek
buttons
or .
For satellite radio to switch to the first channel of the previous or next category, press the seek buttons
or .
To change tracks on a CD, press the seek buttons or .
To rewind or fast forward a track on a CD, press and hold the seek buttons
or .
4 STATION SELECT BUTTONS
Twelve stations can be set for the FM band, six for the AM band and 18 for
satellite radio.
To store a station in a preset, you must first select a radio band by pressing the FM•AM button
5 or the SXM button 6 then tune to the desired FM, AM
or satellite radio station.
Now select and hold the desired station memory key (1-6) until the preset number is updated on the display and a beep is heard. Programing is
now complete.
To retrieve a previously set station, select the radio band where the preset was stored then select the corresponding station memory key (1-6).
Please see your Owner’s Manual for important safety information, system limitations, and additional
operating and feature information.
For more information, refer to the “Heater, air conditioner, audio and phone systems (section 4)” of your
Owner’s Manual.
4
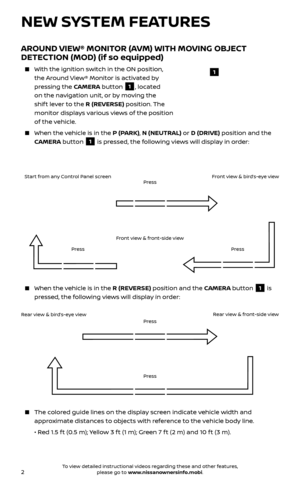
FIRST DRIVE FEATURES
To view detailed instructional videos regarding these and other features, please go to www.nissanownersinfo.mobi.
Page 19 of 28
.
The system wil l automatically maintain the
set speed")
17
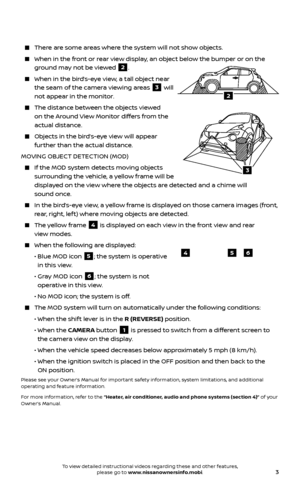
CRUISE CONTROL
The cruise control system enables you to set
a constant cruising speed once the vehicle
has reached 25 mph (40 km/h).
The system wil l automatically maintain the
set speed until you tap the brake pedal,
accelerate, cancel or turn the system off.
To activate the cruise control, push the CRUISE ON/OFF switch
1 on the steering
wheel. The CRUISE indicator light in the
instrument panel will illuminate.
To set a cruising speed, accelerate the vehicle to the desired speed, push the COAST/SET switch
2 on the steering wheel and release. Take your foot off the
accelerator pedal. Your vehicle will maintain the set speed.
To reset at a faster cruising speed, push and hold the ACCEL/RES switch 3 on
the steering wheel. When the vehicle attains the desired speed, release
the switch.
To reset at a slower cruising speed, push and hold the COAST/SET switch 2 on
the steering wheel. Release the switch when the vehicle slows to the
desired speed.
To cancel the preset speed, push the CANCEL switch 4 on the steering wheel.
To turn off cruise control, push the CRUISE ON/OFF switch 1 on the steering
wheel. The CRUISE indicator light in the instrument panel will extinguish.
Please see your Owner’s Manual for important safety information, system limitations, and additional
operating and feature information.
For more information, refer to the “Starting and driving (section 5)” of your Owner’s Manual.
43
2
1
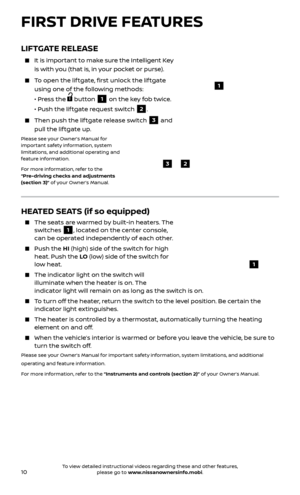
SEAT ADJUSTMENTS
To slide the seat forward or backward, pull up on the lever
1 under the front of the seat
and slide forward or backward. Release the
lever to lock the seat in position.
To recline the seatback, pull up on the lever
2 and lean back. To bring the seatback forward, pull the lever up and lean your
body forward. Release the lever to lock the seatback in position.
SEAT LIFTER (driver’s seat)
To adjust the seat height, pull up or push down on the adjusting lever
3 repeatedly.Please see your Owner’s Manual for important safety information, system limitations, and additional
operating and feature information.
For more information, refer to the “Safety — Seats, seat belts and supplemental restraint system
(section 1)” of your Owner’s Manual.
123
To view detailed instructional videos regarding these and other features, please go to www.nissanownersinfo.mobi.
Page 20 of 28

18
TRIP COMPUTER
With the ignition switch in the ON position, trip
computer
1 modes can be selected by pushing
the trip computer mode switch
2 on the
instrument panel. The following modes can be
selected in the display:
Trip A – measures the distance of one specific trip.
Trip B – measures the distance of a second specific trip.
Current Fuel Consumption – displays the current fuel consumption.
Distance to Empty (dte ) – displays the estimated distance to empty the vehicle
can be driven before refueling.
Average Fuel Consumption – displays the average fuel consumption since the
last reset.
Torque Vectoring AWD (AWD model) – displays the current amount of torque distributed to each wheel.
Push the trip computer mode switch
2 for approximately 1 second to reset the
currently displayed trip odometer to zero.
Please see your Owner’s Manual for important safety information, system limitations, and additional
operating and feature information.
For more information, refer to the “Instruments and controls (section 2)” of your Owner’s Manual.
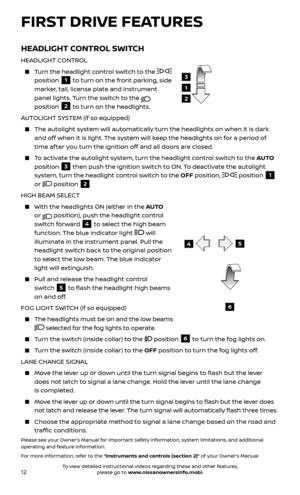
SYSTEM GUIDE
TEXT MESSAGING*
This system al lows for sending and receiving
text messages through the vehicle’s interface.
Using predefined or custom messages, send a text to an entry stored in your Bluetooth®
Hands-free Phone System.
Once enabled, the text message, sender and delivery time are shown on the control panel
display when the vehicle speed is less than 5 mph (8 km/h).
Text messages have the option of being read aloud at all vehicle speeds.
Many cellular phones may require special permission to enable text messaging. Check the cellular phone’s screen during Bluetooth® pairing. For some cellular
phones, you need to enable “Notifications” in the cellular phone’s Bluetooth®
menu for text messages to appear on the touch-screen display. For more
information and instructions, refer to your cellular phone’s Owner’s Manual.
Text message integration requires that the celllular phone support Message Access Profile (MAP) for both receiving and sending text messages. Some cellular
phones may not support all text messaging features. Please see
www.NissanUSA.com/bluetooth for compatibility information as well as your
device’s Owner’s Manual.
* Laws in some jurisdictions may restrict the use of “Text-to-Speech”. Some of the applications and features, such as social networking and texting, may also be restricted. Check local regulations for any
requirements before using these features.
Please see your Owner’s Manual for important safety information, system limitations, and additional
operating and feature information.
For more information, refer to the “Heater, air conditioner, audio and phone systems (section 4)” of your
Owner’s Manual.
2
1
To view detailed instructional videos regarding these and other features, please go to www.nissanownersinfo.mobi.
Page 21 of 28

Your vehicle may be equipped with NissanConnectSM Mobile Apps, allowing you
to control various compatible smartphone applications through the vehicl")
19
NISSANCONNECTSM MOBILE APPS (if so equipped)
Your vehicle may be equipped with NissanConnectSM Mobile Apps, allowing you
to control various compatible smartphone applications through the vehicle’s
display screen. A basic package is included for a period of time from the original
in-service date of the vehicle.
To enroll in NissanConnectSM Mobile Apps:
1.
Cr
eate a Nissan Owner Portal account at owners.nissanusa.com.
•
Mak
e sure to include your vehicle’s VIN when creating your account.
2. Under the NissanConnect Mobile Apps tab, select the red button next to
Manage Subscription to enroll.
3.
Ne
xt, download the NissanConnect
SM Mobile Apps companion app from
Google Play or the Apple App Store. Log into the companion app using your
Nissan Owner Portal ID and password.
4.
Launch the app
, select “United States”, and accept the Terms and Conditions.
5
.
Selec
t “Sign In”, then sign in with the email username and password you
created when registering on the Nissan Owner Portal website.
Pair your cellular phone to the vehicle.
•
F
or Android® devices, the smartphone must be connected through the
Bluetooth® Hands-free Phone system.
•
F
or iPhone® on vehicles WITH Navigation, the device must be connected to
the vehicle’s USB port using your cellular phone’s USB cable.
You can select which apps you want activated in the vehicle from the
NissanConnectSM Mobile Apps companion app by selecting “Manage My Apps”.
Some apps shown in the companion app may not appear in your vehicle
depending on availability for your model.
Some applications require you to have the app downloaded and installed
on your cellular phone, while others require you to enter your username and
password to log in. Not all apps shown on the NissanConnect app site are
available on all models.
To help identify specific apps available for your vehicle or to contact a specialist
via chat, please visit www.NissanUSA.com/connect/support.
Your available apps will only appear on the screen when your smartphone is
connected to both the vehicle and the Internet. For additional information on
connecting your device, see your Owner’s
Manual or visit
www.NissanUSA.com/bluetooth.
The NissanConnectSM app must be running
on your device and the Connected icon
1
must be green before using your apps. If the
Disconnected icon
2 is displayed, press the
APPS button 3 multiple times to ensure the
connection is established.
To access your apps with the vehicle controls,
start your vehicle and then press the APPS
button
3 on the control panel. The system may take a few seconds to boot up
before the APPS button
3 is enabled. This is normal. If available, your apps can be accessed once the vehicle and cellular phone are
connected through the NissanConnectSM Mobile Apps companion app.Please see your Owner’s Manual for important safety information, system limitations, and additional
operating and feature information.
For more information, refer to the “Heater, air conditioner, audio and phone systems (section 4)” of your
Owner’s Manual.
3
1
2
To view detailed instructional videos regarding these and other features, please go to www.nissanownersinfo.mobi.
Page 22 of 28

20To view detailed instructional videos regarding these and other features, please go to www.nissanownersinfo.mobi.
BLUETOOTH® HANDS-FREE PHONE SYSTEM*
A cellular telephone should not be used while driving so full attention may be
given to vehicle operation.
SYSTEM OPERATING TIPS
Press the button on the steering wheel to
interrupt the voice prompts at any time and
speak a command af ter the tone.
To use the system faster, you may speak the second level commands with the main menu
command on the main menu. For example,
press the
button on the steering wheel,
and af ter the tone, say “Call Redial”.
The “Help” c ommand can be used to hear a
list of available commands at any time.
Reduce background noise as much as possible by closing windows and pointing
HVAC vents away from the ceiling.
Speak naturally without long pauses and without raising your voice.
To cancel a Voice Recognition session, simply wait 5 seconds, say “Cancel” or “Quit”, or press and hold the
button on the
steering wheel for 5 seconds.
To increase or decrease the volume of the voice prompts, push the volume control switches + or - on the steering wheel or turn the volume control knob on
the audio system while the audio system is responding.
*Some jurisdictions prohibit the use of cellular telephones while driving.
Please see your Owner’s Manual for important safety information, system limitations, and additional
operating and feature information.
For more information, refer to the “Heater, air conditioner, audio and phone systems (section 4)” of your
Owner’s Manual.
BLUETOOTH® SYSTEM WITHOUT NAVIGATION* (if so equipped)
CONNECTING PROCEDURE
The vehicle must be stationary when connecting the cellular phone.
1.
Press the
button on the steering wheel. The system announces the
available commands.
2.
Sa
y: “Connect Phone”. The system acknowledges the command and announces
the next set of available commands.
3.
Sa
y: “Add Phone”. The system acknowledges the command and asks you to
initiate connecting from the cellular phone handset.
4.
Initiate c
onnecting from the cellular phone:
The connecting procedure varies according to each cellular phone model. For detailed connecting instructions and a list of compatible cellular phones,
please visit www.NissanUSA.com/bluetooth.
SYSTEM GUIDE
Page 23 of 28

5
.
Sa
y a name for the cellular phone when the system asks you to p")
21
When prompted for a PIN, enter “1234” from the handset. (The PIN is assigned by NISSAN and cannot be changed.)
5
.
Sa
y a name for the cellular phone when the system asks you to provide one. You
can give the cellular phone a name of your choice.
6
.
A
f ter connecting the cellular phone, press the
button on the steering wheel
for 1.5 seconds to activate Siri® Eyes Free.
PHONEBOOK SETUP
The phone book stores up to 1,000 entries for each cellular phone paired with
the system.
Depending on y our cellular phone, the system may automatically download
your cellular phone’s entire phonebook to the vehicle’s Bluetooth® system.
If the phonebook does not do wnload automatically, entries can be
individually downloaded.
To manually download entries:
1. Pr
ess the
button on the steering wheel.
2. A
f ter the tone, say “Phonebook”.
3.
A
f ter the next tone, say “Transfer Entry”. The system acknowledges the
command and asks you to initiate the transfer from the cellular phone
handset. The new contact phone number will be transferred from the cellular
phone to the vehicle.
• The tr
ansfer procedure varies according to each cellular phone. See your
cellular phone’s Owner’s Manual for details. You can also visit
www.NissanUSA.com/bluetooth for instructions on transferring phone
numbers from Nissan-recommended cellular phones.
4.
The system r
epeats the number and prompts you for the next command.
When you have finished entering numbers or transferring an entry,
choose “Store”.
5
.
The system c
onfirms the name, location and number.
MAKING A CALL FROM THE PHONEBOOK
In some cases, names stored using all UPPERCASE letters may not be recognized by
the Voice Recognition system.
1. Pr
ess the
button on the steering wheel.
2. A
f ter waiting for the tone, say “Call”.
3
.
A
f ter the next tone, speak the name of a phonebook entry. For example,
“Michael Smith”.
4. C
onfirm the correct name is recognized by saying “Dial” af ter the tone.
MAKING A CALL BY PHONE NUMBER
1. Pr
ess the
button on the steering wheel. A tone will sound.
2.
Sa
y: “Call”. The system acknowledges the command and announces the next set
of available commands.
To view detailed instructional videos regarding these and other features, please go to www.nissanownersinfo.mobi.
Page 24 of 28

Send predefined or custom text messages through your vehicle’s Bluetooth® system.
Receive texts through your vehicle’s Bluetooth®")
22
BLUETOOTH® SYSTEM WITH NAVIGATION* (if so equipped)
Send predefined or custom text messages through your vehicle’s Bluetooth® system.
Receive texts through your vehicle’s Bluetooth® system that can be read to you.
Bluetooth® S treaming Audio allows you to
use a compatible Bluetooth® cellular phone
to play audio files on your device. Your
compatible cellular phone can be connected
to the vehicle’s audio system, allowing audio
files to play through the vehicle’s speakers.
CONNECTING PROCEDURE
1. Pr
ess the
button on the control panel.
2.
T
ouch the “Settings” key
1.
3.
T
ouch the “Phone & Bluetooth” key
2.
4.
T
ouch the “Connect New Device” key
3.
5
.
Initiate the c
onnecting process from the
handset. The system will
display the message:
“Is PIN XXXXXX displa
yed on your
Bluetooth device?”
If the PIN is displa
yed on your Bluetooth®
device, select “ Yes” to complete the
connecting process.
1
3. Say: “Phone Number”. The system acknowledges the command and announces the next set of available commands.
4. Sa
y the number you wish to call starting with the area code in single digit format.
5
.
When y
ou have finished speaking the phone number, the system repeats it back
and announces the available commands.
6
.
Sa
y: “Dial”. The system acknowledges the command and makes the call.
RECEIVING/ENDING A CALL
When you receive a cellular phone call, a ring tone sounds through the audio system.
To accept the call, press the button on the steering wheel.
To reject the call, press the button on the steering wheel.
To hang up the cellular phone at the end of a call or to disconnect during call placement, press the
button on the steering wheel.
*Some jurisdictions prohibit the use of cellular telephones while driving.
Please see your Owner’s Manual for important safety information, system limitations, and additional
operating and feature information.
For more information, refer to the “Heater, air conditioner, audio and phone systems (section 4)” of your
Owner’s Manual or please visit www.NissanUSA.com/bluetooth.
SYSTEM GUIDE
3
2
To view detailed instructional videos regarding these and other features, please go to www.nissanownersinfo.mobi.