2017 NISSAN JUKE engine
[x] Cancel search: enginePage 125 of 416
2-46Instruments and controls
The heater is controlled by a thermostat,
automatically turning the heater on and off.
The indicator light will remain on as long as
the switch is on.
When the vehicle’s interior is warmed, or
before you leave the vehicle, be sure to turn
off the switch.
SIC4525
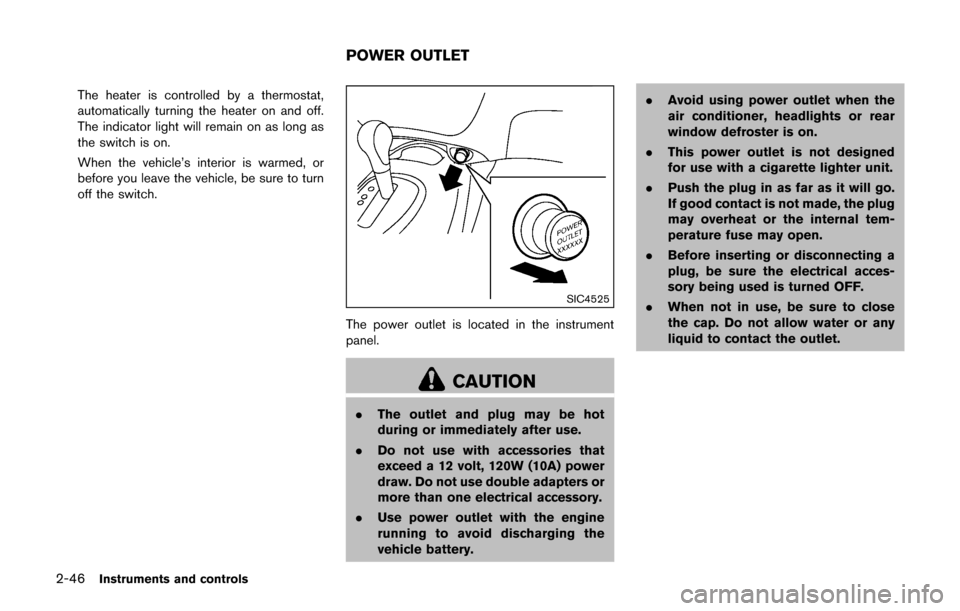
The power outlet is located in the instrument
panel.
CAUTION
.The outlet and plug may be hot
during or immediately after use.
. Do not use with accessories that
exceed a 12 volt, 120W (10A) power
draw. Do not use double adapters or
more than one electrical accessory.
. Use power outlet with the engine
running to avoid discharging the
vehicle battery. .
Avoid using power outlet when the
air conditioner, headlights or rear
window defroster is on.
. This power outlet is not designed
for use with a cigarette lighter unit.
. Push the plug in as far as it will go.
If good contact is not made, the plug
may overheat or the internal tem-
perature fuse may open.
. Before inserting or disconnecting a
plug, be sure the electrical acces-
sory being used is turned OFF.
. When not in use, be sure to close
the cap. Do not allow water or any
liquid to contact the outlet.
POWER OUTLET
Page 133 of 416

2-54Instruments and controls
If the moonroof does not operate
If the moonroof does not operate properly,
perform the following procedure to initialize the
moonroof operation system.
1. If the moonroof is open, close it fully byrepeatedly pushing the switch toward
*2.
2. Push and hold the switch toward
*2to
tilt the moonroof up.
3. Release the moonroof switch after the moonroof moves slightly up and down.
4. Push and hold the switch toward
*1to
fully tilt the moonroof down.
5. Check if the moonroof switch operates normally.
If the moonroof does not operate properly after
performing the procedure above, have your
moonroof checked and repaired. It is recom-
mended you visit a NISSAN dealer for this
service.
CAUTION
Do not use for extended periods of time
with the engine stopped. This could
result in a discharged battery.
SIC4572
MAP LIGHTS (if so equipped)
Operate the map light switch to turn the map
light on or off.
*1: ON position
*2: OFF position
INTERIOR LIGHTS
Page 146 of 416

TROUBLESHOOTING GUIDE
SymptomPossible causeAction to take
When pushing the ignition switch
to stop the engine The P position selecting warning light in the
meter illuminates and the inside warning chime
sounds continuously (Continuously Variable
Transmission models) . The shift lever is not in the P (Park)
position.
Shift the shift lever to the P (Park) position.
When shifting the shift lever to the
P (Park) position. The inside warning chime sounds continuously
(Continuously Variable Transmission models) . The ignition switch is in the ACC or ON
position.Push the ignition switch to the OFF posi-
tion.
When opening the driver’s door
to get out of the vehicle The inside warning chime sounds continuously. The ignition switch is in the ACC
position.Push the ignition switch to the OFF posi-
tion.
When closing the door after get-
ting out of the vehicle The Intelligent Key system warning light in the
meter blinks in yellow, and the outside chime
sounds 3 times and the inside warning chime
sounds for a few seconds.
The ignition switch is in the ACC or ON
position.
Push the ignition switch to the OFF posi-
tion.
The P position selecting warning light in the
meter illuminates and the outside chime
sounds continuously (Continuously Variable
Transmission models) . The ignition switch is in the ACC or OFF
position and the shift lever is not in the P
(Park) position.
Move the shift lever to the P (Park) position
and push the ignition switch to the OFF
position.
When closing the door with the
inside lock knob turned to LOCK The outside chime sounds for a few seconds
and all the doors unlock.
The Intelligent Key is inside the vehicle.
Carry the Intelligent Key with you.
When pushing the request switch
or the LOCK
button on the
Intelligent Key to lock the door The outside chime sounds for a few seconds. The Intelligent Key is inside the vehicle.
Carry the Intelligent Key with you.
A door is not closed securely. Close the door securely.
When pushing the ignition switch
to start the engine The Intelligent Key system warning light in the
meter blinks in green.
The battery charge is low.Replace the battery with a new one. (See
“Intelligent Key battery replacement” (P.8-
20) .)
The Intelligent Key system warning light in the
meter blinks in yellow and the inside warning
chime sounds for a few seconds. The Intelligent Key is not in the vehicle.
Carry the Intelligent Key with you.
When pushing the ignition switch The Intelligent Key system warning light in the
meter illuminates in yellow. It warns of a malfunction with the
Intelligent Key system.It is recommended that you contact a
NISSAN dealer.
Pre-driving checks and adjustments3-11
Page 150 of 416
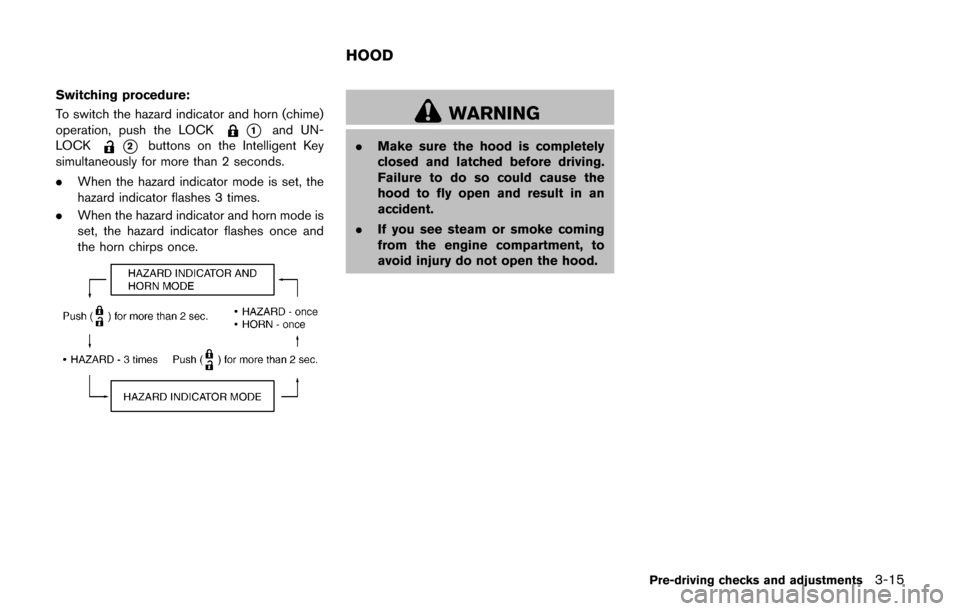
Switching procedure:
To switch the hazard indicator and horn (chime)
operation, push the LOCK
*1and UN-
LOCK
*2buttons on the Intelligent Key
simultaneously for more than 2 seconds.
. When the hazard indicator mode is set, the
hazard indicator flashes 3 times.
. When the hazard indicator and horn mode is
set, the hazard indicator flashes once and
the horn chirps once.
WARNING
.Make sure the hood is completely
closed and latched before driving.
Failure to do so could cause the
hood to fly open and result in an
accident.
. If you see steam or smoke coming
from the engine compartment, to
avoid injury do not open the hood.
Pre-driving checks and adjustments3-15
HOOD
Page 151 of 416

3-16Pre-driving checks and adjustments
JVP0338X
When opening the hood:
1. Pull the hood release handle
*1located
below the instrument panel; the hood will
then spring up slightly.
2. Locate the lever
*2in between the hood
and grille, and pull the lever up with your
fingertips.
3. Raise the hood
*3.
4. Remove the support rod
*4and insert it
into the slot
*5.
Hold the coated part
*Awhen removing or
resetting the support rod. Avoid direct
contact with the metal parts, as they may
be hot immediately after the engine has been stopped.
When closing the hood:
1. While supporting the hood, return the
support rod to its original position.
2. Slowly lower the hood to about 8 to 12 in (20 to 30 cm) above the hood lock, then let
it drop.
3. Make sure it is securely latched.
WARNING
. Always be sure the liftgate has been
closed securely to prevent it from
opening while driving.
. Do not drive with the liftgate open.
This could allow dangerous exhaust
gases to be drawn into the vehicle.
See “Exhaust gas (carbon monox-
ide)” (P.5-2) of this manual.
. Do not leave children unattended
inside the vehicle. They could un-
knowingly activate switches or con-
trols. Unattended children could
become involved in serious acci-
dents.
. Make sure that all passengers have
their hands, etc. inside the vehicle
before closing the liftgate.
LIFTGATE
Page 153 of 416
3-18Pre-driving checks and adjustments
SPA2336
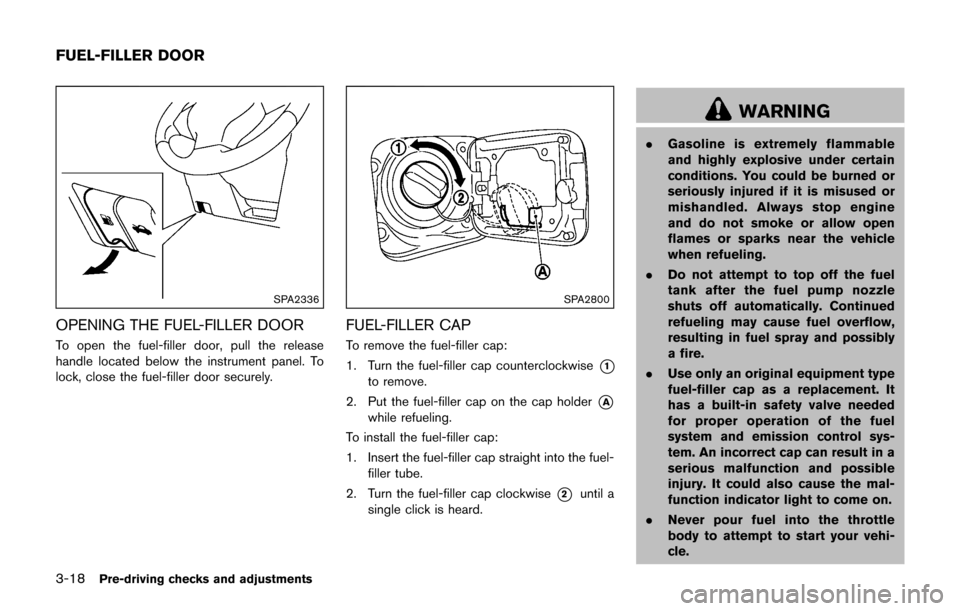
OPENING THE FUEL-FILLER DOOR
To open the fuel-filler door, pull the release
handle located below the instrument panel. To
lock, close the fuel-filler door securely.
SPA2800
FUEL-FILLER CAP
To remove the fuel-filler cap:
1. Turn the fuel-filler cap counterclockwise
*1
to remove.
2. Put the fuel-filler cap on the cap holder
*A
while refueling.
To install the fuel-filler cap:
1. Insert the fuel-filler cap straight into the fuel- filler tube.
2. Turn the fuel-filler cap clockwise
*2until a
single click is heard.
WARNING
. Gasoline is extremely flammable
and highly explosive under certain
conditions. You could be burned or
seriously injured if it is misused or
mishandled. Always stop engine
and do not smoke or allow open
flames or sparks near the vehicle
when refueling.
. Do not attempt to top off the fuel
tank after the fuel pump nozzle
shuts off automatically. Continued
refueling may cause fuel overflow,
resulting in fuel spray and possibly
a fire.
. Use only an original equipment type
fuel-filler cap as a replacement. It
has a built-in safety valve needed
for proper operation of the fuel
system and emission control sys-
tem. An incorrect cap can result in a
serious malfunction and possible
injury. It could also cause the mal-
function indicator light to come on.
. Never pour fuel into the throttle
body to attempt to start your vehi-
cle.
FUEL-FILLER DOOR
Page 163 of 416
4-4Heater, air conditioner, audio and phone systems
When you use this system, make sure the
engine is running.
If you use the system with the engine not
running (ignition ON or ACC) for a long
time, it will discharge the battery, and the
engine will not start.
Reference symbols:
“Example” — Words marked in quotes refer to a
key shown only on the display. These keys can
be selected by touching the screen.
HOW TO USE TOUCH SCREEN
CAUTION
.The glass screen on the liquid
crystal display may break if it is hit
with a hard or sharp object. If the
glass screen breaks, do not touch it.
Doing so could result in an injury.
. To clean the display, never use a
rough cloth, alcohol, benzine, thin-
ner or any kind of solvent or paper
towel with a chemical cleaning
agent. They will scratch or deterio-
rate the panel.
. Do not splash any liquid such as
water or car fragrance on the dis-
play. Contact with liquid will cause the system to malfunction.
To help ensure safe driving, some functions
cannot be operated while driving.
The on-screen functions that are not available
while driving will be “grayed out” or muted.
Park the vehicle in a safe location and then
operate the navigation system.
WARNING
. ALWAYS give your full attention to
driving.
. Avoid using vehicle features that
could distract you. If distracted,
you could lose control of your
vehicle and cause an accident.JVH1248X
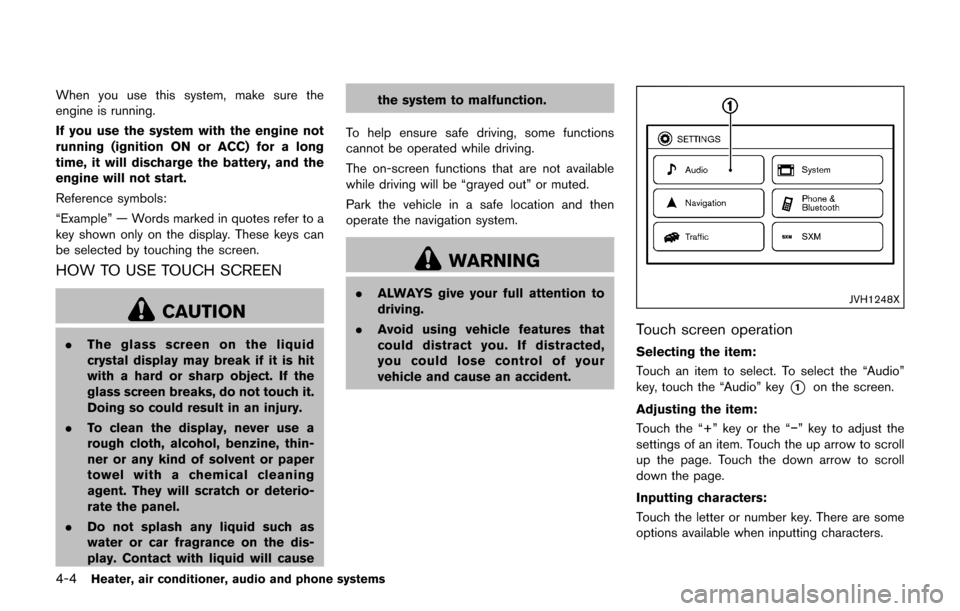
Touch screen operation
Selecting the item:
Touch an item to select. To select the “Audio”
key, touch the “Audio” key
*1on the screen.
Adjusting the item:
Touch the “+” key or the “�í” key to adjust the
settings of an item. Touch the up arrow to scroll
up the page. Touch the down arrow to scroll
down the page.
Inputting characters:
Touch the letter or number key. There are some
options available when inputting characters.
Page 178 of 416
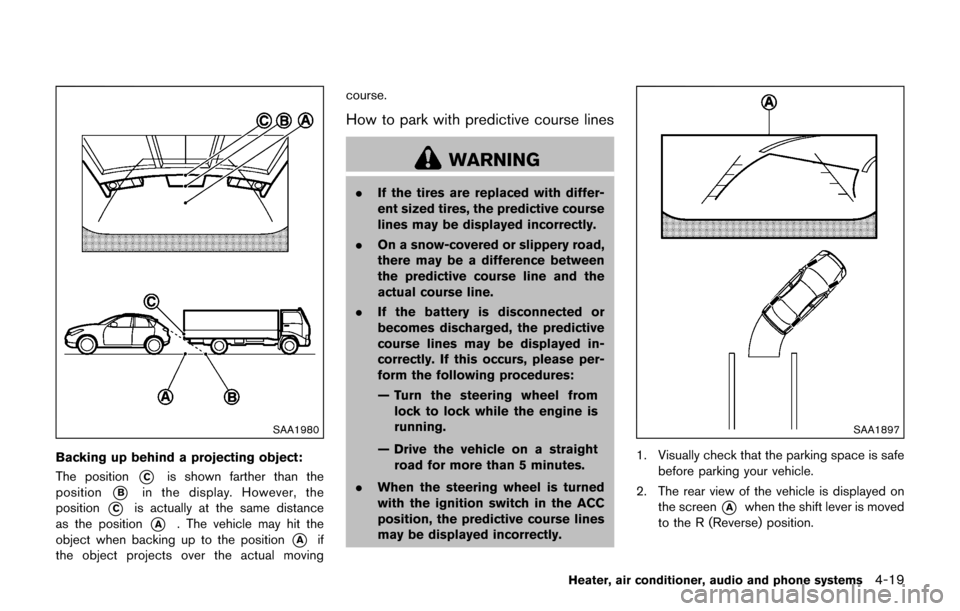
SAA1980
Backing up behind a projecting object:
The position
*Cis shown farther than the
position
*Bin the display. However, the
position
*Cis actually at the same distance
as the position
*A. The vehicle may hit the
object when backing up to the position
*Aif
the object projects over the actual moving course.
How to park with predictive course lines
WARNING
.
If the tires are replaced with differ-
ent sized tires, the predictive course
lines may be displayed incorrectly.
. On a snow-covered or slippery road,
there may be a difference between
the predictive course line and the
actual course line.
. If the battery is disconnected or
becomes discharged, the predictive
course lines may be displayed in-
correctly. If this occurs, please per-
form the following procedures:
— Turn the steering wheel from
lock to lock while the engine is
running.
— Drive the vehicle on a straight road for more than 5 minutes.
. When the steering wheel is turned
with the ignition switch in the ACC
position, the predictive course lines
may be displayed incorrectly.
SAA1897
1. Visually check that the parking space is safe
before parking your vehicle.
2. The rear view of the vehicle is displayed on the screen
*Awhen the shift lever is moved
to the R (Reverse) position.
Heater, air conditioner, audio and phone systems4-19