2017 NISSAN JUKE clock
[x] Cancel search: clockPage 205 of 416

4-46Heater, air conditioner, audio and phone systems
Balance adjusts the sound between the left
and right speakers. Fade adjusts the sound
between the front and rear speakers.
Select the “Bass”, “Treble”, “Balance” or
“Fade” using the TUNE·FOLDER knob, and
then push the ENTER/SETTING button.
Turn the TUNE·FOLDER knob to adjust the
Bass, Treble, balance and Fade of the
screen to the preferred level. Push the
ENTER/SETTING button to apply the
setting.
. Speed Sensitive Vol.
To change the Speed Sensitive Volume
(Speed Sensitive Vol.) level from off (0) to
5, turn the TUNE·FOLDER knob.
. AUX Vol.
Controls the volume level of incoming sound
when an auxiliary device is connected to the
system. Choose a setting between +1 and
+3 or choose 0 to disable the feature
entirely.
. Brightness and Contrast
Adjust the brightness and contrast of the
screen.
Select “Brightness” or “Contrast” using the
TUNE·FOLDER knob and then push the
ENTER/SETTING button. Turn the
TUNE·FOLDER knob to adjust the bright-
ness and contrast of the screen to the preferred level. Push the ENTER/SETTING
button to apply the setting.
. Clock Adjust
Adjust the clock according to the following
procedure.
1) Select “Clock Adjust” using the
TUNE·FOLDER knob and then push
the ENTER/SETTING button.
2) Adjust the hour with the TUNE·FOLDER knob and then push the ENTER/
SETTING button.
3) Adjust the minute with the TUNE·FOLDER knob and then push
the ENTER/SETTING button.
24 hour clock is not available.
. On-Screen Clock
When this item is turned on, a clock is
always displayed in the upper right corner of
the screen.
Select the “On-Screen Clock” using the
TUNE·FOLDER knob and then push the
ENTER/SETTING button. You can toggle
between ON and OFF using the
TUNE·FOLDER knob.
. RDS Display (if so equipped)
RDS (radio data system) information can be
shown on the display. Select “RDS Display”
using the TUNE·FOLDER knob and then
push the ENTER/SETTING button. You can toggle between ON and OFF using the
TUNE·FOLDER knob. Push the ENTER/
SETTING button to apply the setting.
. Language Select
The language settings can be changed.
Select “Language Select” using the
TUNE·FOLDER knob and then push the
ENTER/SETTING button. Use the
TUNE·FOLDER knob to select the preferred
language. Push the ENTER/SETTING but-
ton to apply the setting.
DISP button:
Display of the screen can be canceled by
pushing the
button. You can still listen to
music that is being played back even while the
screen display is turned off. If you want to
display the screen again, push the
button
once more. Pushing some of the audio source
buttons will also turn the screen back on and
display the screens of the corresponding
sources.
MEDIA button:
Pushing the
button will switch the audio
source as follows:
USB/iPod ?Bluetooth Audio ?AUX ?USB/
iPod
Page 213 of 416

4-54Heater, air conditioner, audio and phone systems
Audio main operation
The audio system operates when the ignition
switch is placed in the ON or ACC position.
Head unit:
The auto loudness circuit enhances the low and
high frequency ranges automatically.
Power button / VOL (volume) control
knob:
Push the Power button/VOL (volume) control
knob to turn on and off the audio system.
Turn the Power button/VOL (volume) control
knob to adjust the volume.
Audio settings:
The settings screen will appear when pushing
the ENTER/SETTING button.
The following items are available in the settings
screen.
. Bluetooth
It is possible to set the Bluetooth
�Šsettings.
For details of the Bluetooth�Šsettings, see
“Bluetooth�Šsettings” (P.4-88).
. Bass, Treble, Balance and Fade
Controls the sound of the audio system.
Balance adjusts the sound between the left
and right speakers. Fade adjusts the sound
between the front and rear speakers.
Select the “Bass”, “Treble”, “Balance” or “Fade” using the TUNE·SCROLL control
knob and then push the ENTER/SETTING
button. Turn the TUNE·SCROLL control
knob to adjust the Bass, Treble, balance
and Fade of the screen to the preferred
level. Push the ENTER/SETTING button to
apply the setting.
. Brightness and Contrast
Adjust the brightness and contrast of the
screen.
Select the “Brightness” or “Contrast” using
the TUNE·SCROLL control knob and then
push the ENTER/SETTING button. Turn the
TUNE·SCROLL control knob to adjust the
brightness and contrast of the screen to the
preferred level. Push the ENTER/SETTING
button to apply the setting.
. Clock Adjust
Adjust the clock according to the following
procedure.
1) Select “Clock Adjust” using the TU-
NE·SCROLL control knob and then
push the ENTER/SETTING button.
2) Adjust the hour with the TUNE·SCROLL control knob and then push the ENTER/
SETTING button.
3) Adjust the minute with the TUNE·SC- ROLL control knob and then push the
ENTER/SETTING button. 24 hour clock is not available.
. On-Screen Clock
When this item is turned on, a clock is
always displayed in the upper right corner of
the screen.
Select the “On-Screen Clock” using the
TUNE·SCROLL control knob and then push
the ENTER/SETTING button. You can tog-
gle between ON and OFF using the
TUNE·SCROLL control knob.
. RDS Display (if so equipped)
RDS (radio data system) information can be
shown on the display. Select “RDS Display”
using the TUNE·SCROLL control knob and
then push the ENTER/SETTING button. You
can toggle between ON and OFF using the
TUNE·SCROLL control knob. Push the
ENTER/SETTING button to apply the
setting.
. Speed Sensitive Vol.
To change the Speed Sensitive Volume
(Speed Sensitive Vol.) level from off (0) to
5, turn the TUNE·SCROLL control knob.
. AUX Vol.
Controls the volume level of incoming sound
when an auxiliary device is connected to the
system. Choose a setting between +1 and
+3 or choose 0 to disable the feature
entirely.
Page 234 of 416

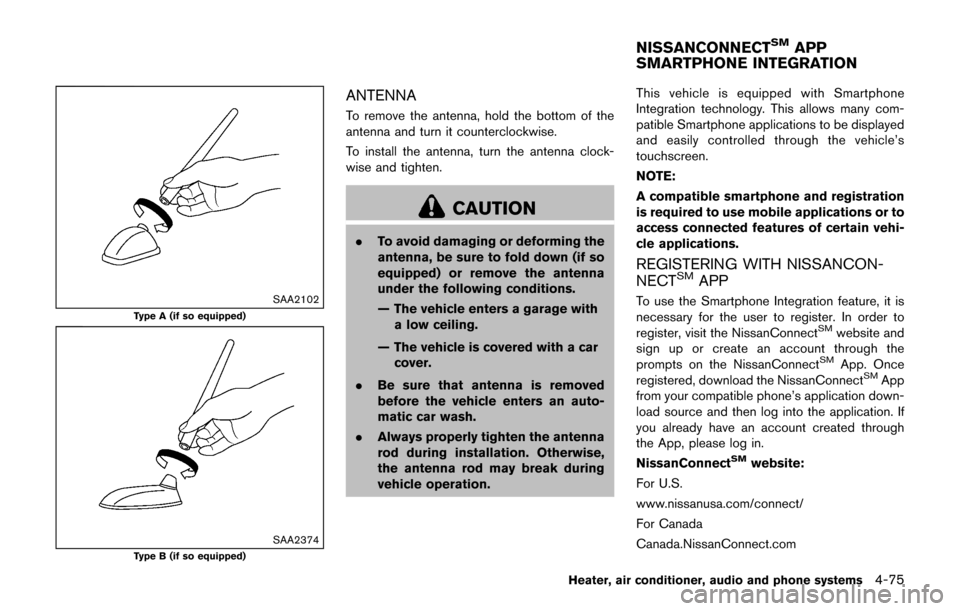
SAA2102
Type A (if so equipped)
SAA2374Type B (if so equipped)
ANTENNA
To remove the antenna, hold the bottom of the
antenna and turn it counterclockwise.
To install the antenna, turn the antenna clock-
wise and tighten.
CAUTION
.To avoid damaging or deforming the
antenna, be sure to fold down (if so
equipped) or remove the antenna
under the following conditions.
— The vehicle enters a garage with
a low ceiling.
— The vehicle is covered with a car cover.
. Be sure that antenna is removed
before the vehicle enters an auto-
matic car wash.
. Always properly tighten the antenna
rod during installation. Otherwise,
the antenna rod may break during
vehicle operation. This vehicle is equipped with Smartphone
Integration technology. This allows many com-
patible Smartphone applications to be displayed
and easily controlled through the vehicle’s
touchscreen.
NOTE:
A compatible smartphone and registration
is required to use mobile applications or to
access connected features of certain vehi-
cle applications.
REGISTERING WITH NISSANCON-
NECTSMAPP
To use the Smartphone Integration feature, it is
necessary for the user to register. In order to
register, visit the NissanConnect
SMwebsite and
sign up or create an account through the
prompts on the NissanConnect
SMApp. Once
registered, download the NissanConnectSMApp
from your compatible phone’s application down-
load source and then log into the application. If
you already have an account created through
the App, please log in.
NissanConnect
SMwebsite:
For U.S.
www.nissanusa.com/connect/
For Canada
Canada.NissanConnect.com
Heater, air conditioner, audio and phone systems4-75
NISSANCONNECTSMAPP
SMARTPHONE INTEGRATION
Page 308 of 416

SCE0504
2. Loosen each wheel nut one or two turns byturning it counterclockwise with the wheel
nut wrench. Do not remove the wheel
nuts until the tire is off the ground.
3. To lift the vehicle, securely hold the jack lever and rod with both hands as shown above.
Carefully raise the vehicle until the tire clears
the ground. Remove the wheel nuts, and
then remove the tire.
SCE0933
Installing the spare tire
The spare tire is designed for emergency
use. (See specific instructions under the
heading “Wheels and tires” (P.8-28) .)
1. Clean any mud or dirt from the surfacebetween the wheel and hub.
2. Carefully put the spare tire on and tighten the wheel nuts finger tight. Check that all the
wheel nuts contact the wheel surface
horizontally.
3. With the wheel nut wrench, tighten wheel nuts alternately and evenly in the sequence
illustrated (
*1,*2,*3,*4,*5) , more
than 2 times, until they are tight.
In case of emergency6-7
Page 332 of 416

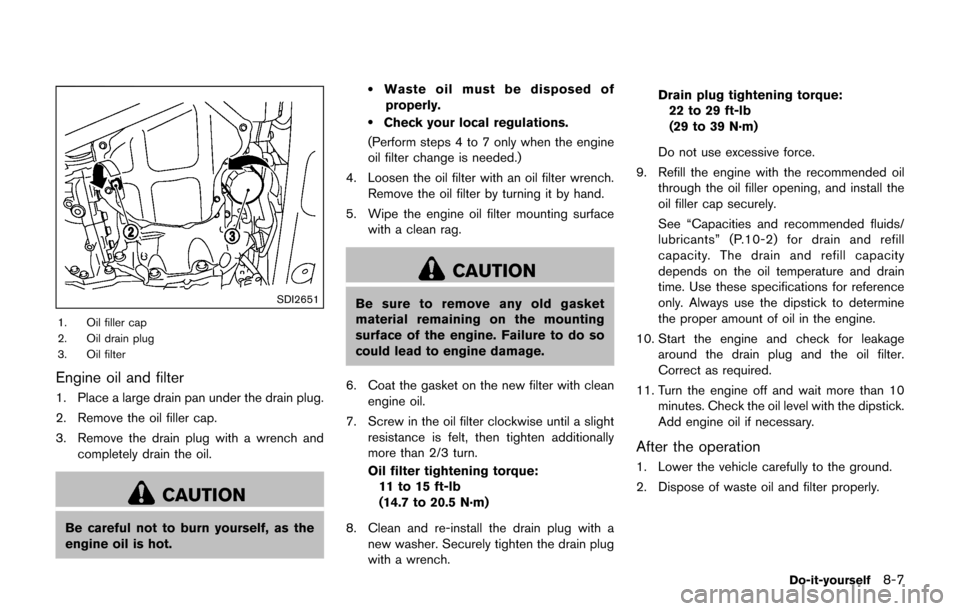
SDI2651
1. Oil filler cap
2. Oil drain plug
3. Oil filter
Engine oil and filter
1. Place a large drain pan under the drain plug.
2. Remove the oil filler cap.
3. Remove the drain plug with a wrench andcompletely drain the oil.
CAUTION
Be careful not to burn yourself, as the
engine oil is hot.
.Waste oil must be disposed of
properly.
.Check your local regulations.
(Perform steps 4 to 7 only when the engine
oil filter change is needed.)
4. Loosen the oil filter with an oil filter wrench. Remove the oil filter by turning it by hand.
5. Wipe the engine oil filter mounting surface with a clean rag.
CAUTION
Be sure to remove any old gasket
material remaining on the mounting
surface of the engine. Failure to do so
could lead to engine damage.
6. Coat the gasket on the new filter with clean engine oil.
7. Screw in the oil filter clockwise until a slight resistance is felt, then tighten additionally
more than 2/3 turn.
Oil filter tightening torque:11 to 15 ft-lb
(14.7 to 20.5 N·m)
8. Clean and re-install the drain plug with a new washer. Securely tighten the drain plug
with a wrench. Drain plug tightening torque:
22 to 29 ft-lb
(29 to 39 N·m)
Do not use excessive force.
9. Refill the engine with the recommended oil through the oil filler opening, and install the
oil filler cap securely.
See “Capacities and recommended fluids/
lubricants” (P.10-2) for drain and refill
capacity. The drain and refill capacity
depends on the oil temperature and drain
time. Use these specifications for reference
only. Always use the dipstick to determine
the proper amount of oil in the engine.
10. Start the engine and check for leakage around the drain plug and the oil filter.
Correct as required.
11. Turn the engine off and wait more than 10 minutes. Check the oil level with the dipstick.
Add engine oil if necessary.
After the operation
1. Lower the vehicle carefully to the ground.
2. Dispose of waste oil and filter properly.
Do-it-yourself8-7