Page 163 of 478
●The doors are unlocked by the key fob, a key
or the power door lock switch while all doors
are closed and the ignition switch is in the
OFF position.
● The driver’s door is opened and then closed
while the key is removed from the ignition
switch.
● The key is removed from the ignition switch
while all doors are closed. The lights will turn off while the timer is activated
when:
● The driver’s door is locked by the key fob, a
key, or the power door lock switch.
● The ignition switch is turned ON.
The lights will turn off automatically after a period
of time while doors are open to prevent the bat-
tery from becoming discharged.
When the switch is in the OFF position
�3, the
interior lights do not illuminate, regardless of door
position.
CAUTION
Do not use for extended periods of time
with the engine stopped. This could result
in a discharged battery.
Type B (if so equipped)
LIC0792
Type C (if so equipped)
LIC0630
2-54Instruments and controls
Page 165 of 478

PROGRAMMING HOMELINK®
If you have any questions or are having difficulty
programming your HomeLink® buttons, refer to
the HomeLink® web site at: www.homelink.com
or call 1-800-355-3515.
NOTE:
Place the ignition switch in the ACC posi-
tion when programming HomeLink®. It is
also recommended that a new battery be
placed in the hand-held transmitter of the
device being programmed to HomeLink®
for quicker programming and accurate
transmission of the radio-frequency.1. Position the end of your hand-held transmit- ter 1–3 in (2–8 cm) away from the
HomeLink® surface, keeping the
HomeLink® indicator light
�1in view. 2. Using both hands, simultaneously press and
hold the desired HomeLink® button and
hand-held transmitter button. DO NOT re-
lease until the HomeLink® indicator light�1
flashes slowly and then rapidly. When the
indicator light flashes rapidly, both buttons
may be released. (The rapid flashing indi-
cates successful programming.)
NOTE:
Some devices may require you to replace
Step 2 with the cycling procedure noted in
“Programming HomeLink® for Canadian
customers and gate openers” in this sec-
tion. 3. Press and hold the programmed
HomeLink® button and observe the indica-
tor light.
● If the indicator light�1is
solid/continuous, programming is
complete and your device should acti-
vate when the HomeLink® button is
pressed and released.
● If the indicator light
�1blinks rapidly for
2 seconds and then turns to a
solid/continuous light, continue
with Steps 4-6 for a rolling code device.
A second person may make the following
steps easier. Use a ladder or other device.
LIC2365LIC2366
2-56Instruments and controls
Page 173 of 478

LOCKING WITH INSIDE LOCK
KNOB
To lock the door without the key, move the inside
lock knob to the lock position
�1, then close the
door.
To unlock the door without the key, move the
inside lock knob to the unlock position
�2.
LOCKING WITH POWER DOOR
LOCK SWITCH (if so equipped)
To lock all the doors without a key, push the door
lock switch (driver’s or front passenger’s side) to
the lock position
�1. When locking the door this
way, be certain not to leave the key inside the
vehicle.
To unlock all the doors without a key, push the
door lock switch (driver’s or front passenger’s
side) to the unlock position
�2.
Lockout protection
When the power door lock switch (driver’s or
front passenger’s side) is moved to the lock
position with the key in the ignition switch and any
door opens, all doors will lock and then unlock
automatically. This helps to prevent the keys from
being accidently locked inside the vehicle.
Inside lock
LPD0298
Driver’s side
WPD0381
3-4Pre-driving checks and adjustments
Page 174 of 478
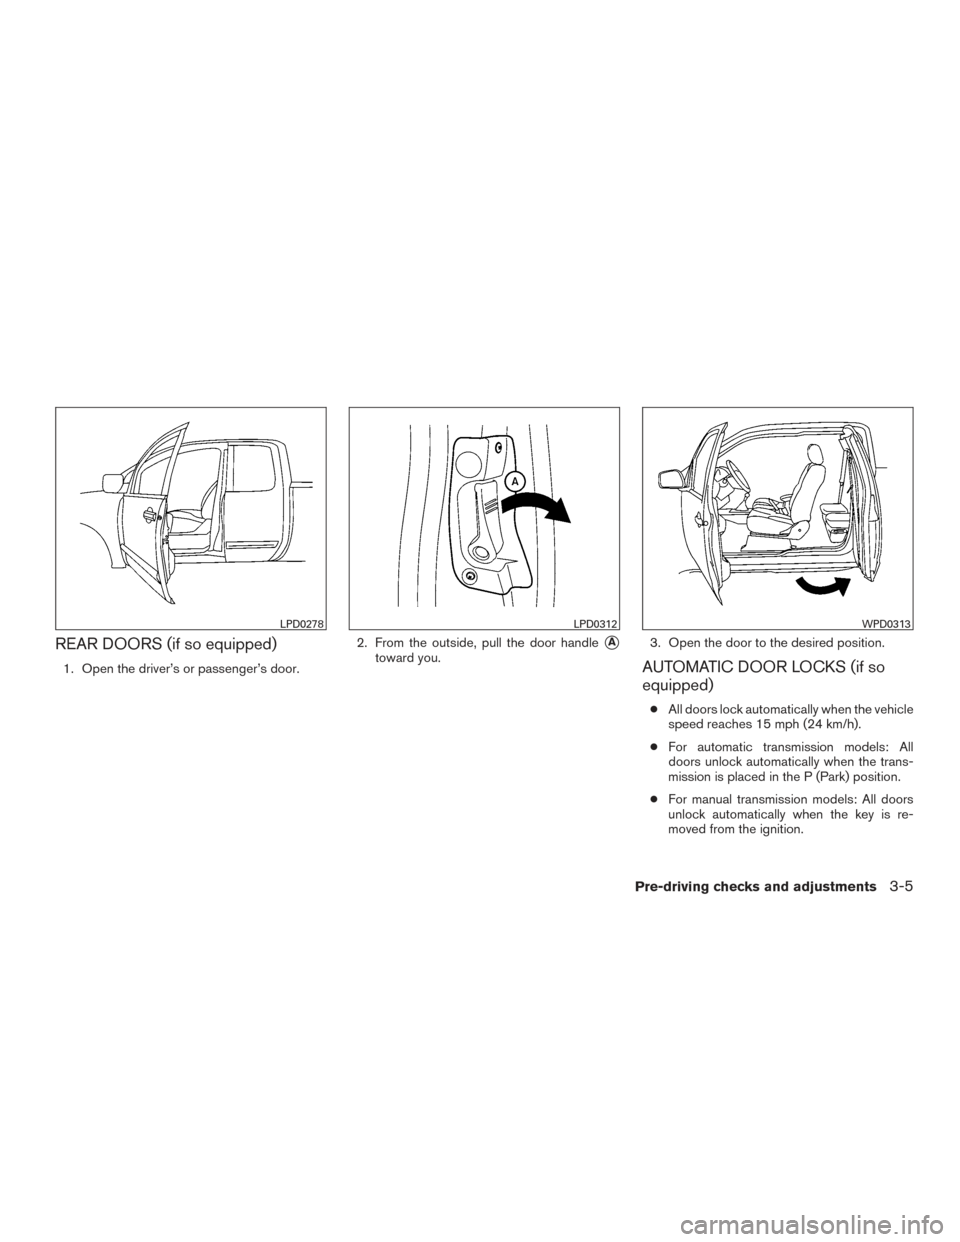
REAR DOORS (if so equipped)
1. Open the driver’s or passenger’s door.2. From the outside, pull the door handle
�A
toward you.
3. Open the door to the desired position.AUTOMATIC DOOR LOCKS (if so
equipped)
●
All doors lock automatically when the vehicle
speed reaches 15 mph (24 km/h).
● For automatic transmission models: All
doors unlock automatically when the trans-
mission is placed in the P (Park) position.
● For manual transmission models: All doors
unlock automatically when the key is re-
moved from the ignition.
LPD0278LPD0312WPD0313
Pre-driving checks and adjustments3-5
Page 175 of 478

Child safety locks help prevent the rear doors
from being opened accidentally, especially when
small children are in the vehicle.
The child safety lock lev")
CHILD SAFETY REAR DOOR LOCK
(if so equipped)
Child safety locks help prevent the rear doors
from being opened accidentally, especially when
small children are in the vehicle.
The child safety lock levers are located on the
edge of the rear doors.
When the lever is in the LOCK position, the
door can be opened only from the outside.
WARNING
●Radio waves could adversely affect
electric medical equipment. Those who
use a pacemaker should contact the
electric medical equipment manufac-
turer for the possible influences before
use.
● The remote keyless entry key fob trans-
mits radio waves when the buttons are
pressed. The FAA advises radio waves
may affect aircraft navigation and com-
munication systems. Do not operate the
remote keyless entry key fob while on
an airplane. Make sure the buttons are
not operated unintentionally when the
unit is stored for a flight.
It is possible to lock/unlock all doors, turn the
interior light on, and activate the panic alarm by
using the key fob from outside the vehicle.
Be sure to remove the key from the vehicle
before locking the doors.
The key fob can operate at a distance of approxi-
mately 33 ft (10 m) from the vehicle. The effective
distance depends upon the conditions around
the vehicle. As many as five key fobs can be used with one
vehicle. For information concerning the purchase
and use of additional key fobs, it is recommended
that you visit a NISSAN dealer.
The key fob will not function when:
● the battery is discharged
● the distance between the vehicle and the
key fob is over 33 ft (10 m)
The panic alarm will not activate when the
key is in the ignition switch.
CAUTION
Listed below are conditions or occur-
rences which will damage the key fob:
● Do not allow the key fob, which con-
tains electrical components, to come
into contact with water or salt water.
This could affect the system function.
● Do not drop the key fob.
● Do not strike the key fob sharply
against another object.
● Do not change or modify the key fob.
● Wetting may damage the key fob. If the
key fob gets wet, immediately wipe until
it is completely dry.WPD0037
REMOTE KEYLESS ENTRY SYSTEM
(if so equipped)
3-6Pre-driving checks and adjustments
Page 176 of 478

● Do not attach the key fob with a key
holder that contains a magnet.
● Do not place the")
●Do not place the key fob for an ex-
tended period in an area where tem-
peratures exceed 140°F (60°C)
● Do not attach the key fob with a key
holder that contains a magnet.
● Do not place the key fob near equip-
ment that produces a magnetic field,
such as a TV, audio equipment and per-
sonal computers.
If a key fob is lost or stolen, NISSAN rec-
ommends erasing the ID code of that key
fob. This will prevent the key fob from
unauthorized use to unlock the vehicle.
For information regarding the erasing
procedure, it is recommended that you
visit a NISSAN dealer.
HOW TO USE REMOTE KEYLESS
ENTRY SYSTEM
Locking doors
1. Close all windows.
2. Remove the key from the ignition switch.
3. Close the hood and all doors.
4. Press the
button on the key fob. All
the doors lock. The hazard warning lights
flash twice and the horn beeps once to
indicate all doors are locked. ●
When the
button is pressed with
all doors locked, the hazard warning lights
flash twice and the horn beeps once as a
reminder that the doors are already
locked.
● If a door is open and you press
the
button, the doors will lock
but the horn will not beep and the hazard
lights will not flash.
The horn may or may not beep. For additional
information, refer to “Silencing the horn beep
feature” in this section.
LPD0209
Pre-driving checks and adjustments3-7
Page 177 of 478

Unlocking doors
Press thebutton on the key fob once.
● Only the driver’s door unlocks.
● The hazard warning lights flash once if all
doors are completely closed with the ignition
switch in any position except the ON posi-
tion.
● The interior lights illuminate for a period of
time when the interior light switch is in the
normal operation position. Press the
button on the key fob again
within 5 seconds.
● All doors unlock.
● The hazard warning lights flash once if all
doors are completely closed.
The interior lights can be turned off without wait-
ing by inserting the key into the ignition switch
and placing the ignition switch in the ON or
START position, locking the doors with the key
fob or pushing the interior light switch to the OFF
position.
Auto relock
When thebutton on the key fob is
pressed, all doors will lock automatically within
1 minute unless one of the following operations is
performed:
● Any door is opened.
● A key is inserted into the ignition switch and
the switch is cycled from OFF to ON.
Opening windows (if so equipped)
The key fob allows you to open windows
equipped with automatic operation.
● To open the windows, press the
but-
ton on the key fob for longer than 3 sec-
onds after all doors are unlocked.
The door windows will open while pressing
the
button on the key fob.
The door windows cannot be closed by
using the key fob.
WPD0158
3-8Pre-driving checks and adjustments
Page 184 of 478

To access the vanity mirror, pull the sun visor
down and flip open the mirror cover. Some vanity
mirrors are illuminated and turn on when the
mirror cover is open.
MANU")
VANITY MIRRORS (if so equipped)
To access the vanity mirror, pull the sun visor
down and flip open the mirror cover. Some vanity
mirrors are illuminated and turn on when the
mirror cover is open.
MANUAL ANTI-GLARE REARVIEW
MIRROR (if so equipped)
Use the night position�1to reduce glare from
the headlights of vehicles behind you at night.
Use the day position
�2when driving in daylight
hours.
WARNING
Use the night position only when neces-
sary, because it reduces rear view clarity.
AUTOMATIC ANTI-GLARE
REARVIEW MIRROR (if so equipped)
The inside mirror is designed so that it automati-
cally dims during night time conditions and ac-
cording to the intensity of the headlights of the
vehicle following you. The automatic anti-glare
feature is activated when the ignition switch is in
the ON position.
The indicator light
�2will illuminate when the
automatic anti-glare feature is operating.
NOTE:
Do not hang any objects over the sensors
�1or apply glass cleaner to the sensors.
Doing so will reduce the sensitivity of the
sensors, resulting in improper operation.WPD0307WPD0126
MIRRORS
Pre-driving checks and adjustments3-15