2017 NISSAN ARMADA key
[x] Cancel search: keyPage 3 of 36
NEW SYSTEM FEATURESAround View® Monitor (AVM) (if so equipped) ...............................................2
Blind Spot Warning (BSW) (if so equipped)...................................................4
Forward Emergency Braking (FEB) (if so equipped) .........................................4
Predictive Forward Collision Warning (PFCW) (if so equipped)...............................4
Lane Departure Warning (LDW) and Lane Departure Prevention (LDP) (if so equipped) ....5
Backup Collision Intervention (BCI) (if so equipped).........................................5
NavTraffic and NavWeather (if so equipped).................................................6
ESSENTIAL INFORMATIONTire Pressure Monitoring System (TPMS) .....................................................7
Fuel-filler Door .......................................................................\
.........7
Loose Fuel Cap........................................................................\
.......8
Clock Set/Adjustment .......................................................................\
8
FIRST DRIVE FEATURESNissan Intelligent Key® System ..............................................................9
Power Lif tgate Release (if so equipped) ....................................................10
Power Front Seat Adjustments ..............................................................11
2ND Row Seat Adjustments (if so equipped)..................................................11
3RD Row Power Folding Seats (if so equipped) ...............................................12
Starting/Stopping the Engine ...............................................................12
Automatic Drive Positioner (if so equipped) .................................................13
Power Moonroof (if so equipped)............................................................13
Headlight Control Switch ....................................................................14
Outside Mirror Control Switch ...............................................................15
Wiper and Washer Switch....................................................................15
Heater and Air Conditioner (automatic) .....................................................16
Rear Heater and Air Conditioner.............................................................18
AM/FM/SiriusXM® Satellite Radio with CD/DVD Player . . . . . . . . . . . . . . . . . . . . . . . . . . . . . . . . . . . .\
. .19
USB (Universal Serial Bus) Connection Port/Aux Jack and iPod® Interface
................20
Cruise Control (if so equipped)..............................................................20
Intelligent Cruise Control (ICC) (if so equipped)..............................................21
Power Outlets........................................................................\
.......22
SYSTEM GUIDEVehicle Information Display.................................................................23
Bluetooth® Streaming Audio................................................................23
Bluetooth® Hands-free Phone System .....................................................24 System Operating Tips ..................................................................24
Navigation System........................................................................\
..28
DVD Entertainment System (if so equipped) ...............................................29
HomeLink® Universal Transceiver (if so equipped)...........................................31
TABLE OF CONTENTS
Please see your Owner’s Manual for important safety information and system
operation limitations.
• A cellular telephone should not be used for any purpose while driving so full attention may be given to vehicle operation.• Always wear your seat belt.• Supplemental air bags do not replace proper seat belt usage. • Children 12 and under should always ride in the rear seat properly secured in child restraints or seat belts according to their age and weight. • Do not drink and drive.
For more information, refer to the “Safety — Seats, seat belts and supplemental restraint system
(section 1)”, the “Monitor, climate, audio, phone and voice recognition systems (section 4)” and the
“Starting and driving (section 5)” of your Owner’s Manual.
Additional information about your vehicle is also available in your Owner’s Manual, Navigation System Owner’s Manual and at www.NissanUSA.com.
Page 10 of 36
8
CLOCK SET/ADJUSTMENT
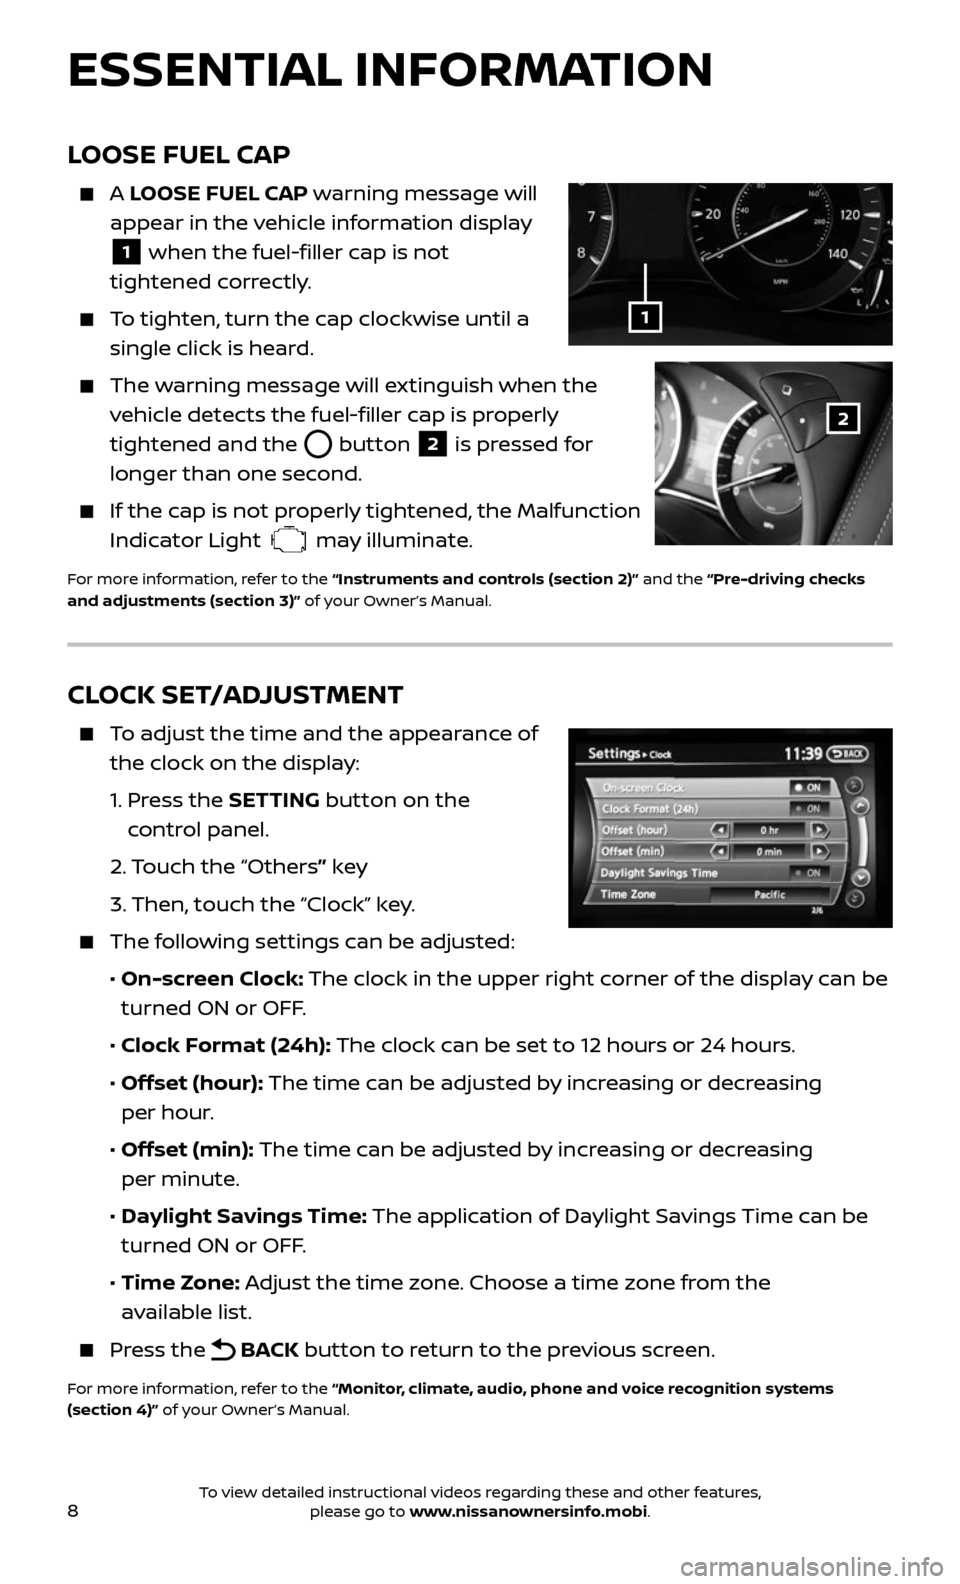
To adjust the time and the appearance of
the clock on the display:
1. Press the SETTING button on the
control panel.
2. Touch the “Others” key
3. Then, touch the “Clock” key.
The following settings can be adjusted:
• On-screen Clock: The clock in the upper right corner of the display can be
turned ON or OFF.
• Clock Format (24h): The clock can be set to 12 hours or 24 hours.
• Offset (hour): The time can be adjusted by increasing or decreasing
per hour.
• Offset (min): The time can be adjusted by increasing or decreasing
per minute.
• Daylight Savings Time: The application of Daylight Savings Time can be
turned ON or OFF.
• Time Zone: Adjust the time zone. Choose a time zone from the
available list.
Press the BACK button to return to the previous screen.
For more information, refer to the “Monitor, climate, audio, phone and voice recognition systems
(section 4)” of your Owner’s Manual.
ESSENTIAL INFORMATION
LOOSE FUEL CAP
A LOOSE FUEL CAP warning message will
appear in the vehicle information display
1 when the fuel-filler cap is not
tightened correctly.
To tighten, turn the cap clockwise until a
single click is heard.
The warning message will extinguish when the
vehicle detects the fuel-filler cap is properly
tightened and the
button 2 is pressed for
longer than one second.
If the cap is not properly tightened, the Malfunction
Indicator Light may illuminate.
For more information, refer to the “Instruments and controls (section 2)” and the “Pre-driving checks
and adjustments (section 3)” of your Owner’s Manual.
1
2
To view detailed instructional videos regarding these and other features, please go to www.nissanownersinfo.mobi.
Page 11 of 36
9
NISSAN INTELLIGENT KEY® SYSTEM
The Nissan Intelligent Key® System allows you to lock or unlock the vehicle,
open the lif tgate and start the engine. It is important to make sure the
Intelligent Key is with you (that is, in your pocket or purse).
REMOTE ENGINE START* (if so equipped)
The remote engine start operating range is approximately 200 f t (60 m)
from the vehicle. The effective operating range may be shorter due to
environmental conditions or obstacles between you and the vehicle.
For the remote engine start to function, the vehicle must be in the P (PARK)
position with the ignition off and all the doors closed and locked.
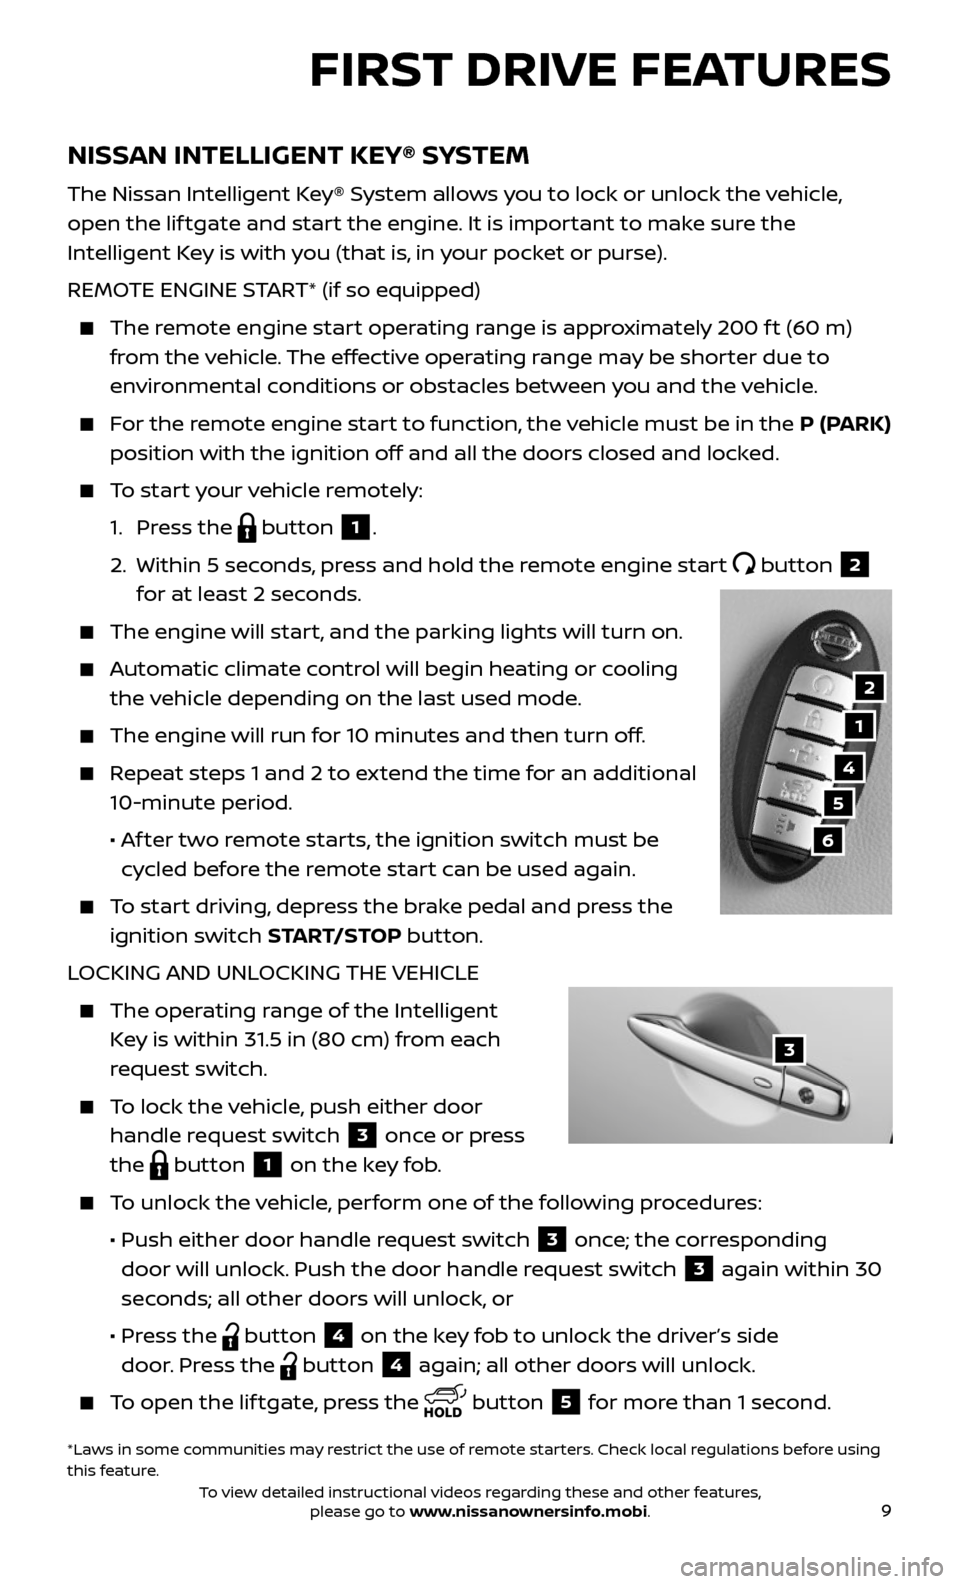
To start your vehicle remotely:
1. Press the button 1.
2. Within 5 sec onds, press and hold the remote engine start button 2
for at least 2 seconds.
The engine wil l start, and the parking lights will turn on.
Automatic climate control will begin heating or cooling
the vehicle depending on the last used mode.
The engine will run for 10 minutes and then turn off.
Repeat steps 1 and 2 to extend the time for an additional
10-minute period.
• Af ter two remote starts, the ignition switch must be
cycled before the remote start can be used again.
To start driving, depress the brake pedal and press the
ignition switch START/STOP button.
LOCKING AND UNLOCKING THE VEHICLE
The oper ating range of the Intelligent
Key is within 31.5 in (80 cm) from each
request switch.
To lock the vehicle, push either door
handle request switch 3 once or press
the
button 1 on the key fob.
To unlock the vehicle, perform one of the following procedures:
• Push either door hand le request switch 3 once; the corresponding
door will unlock. Push the door handle request switch
3 again within 30
seconds; all other doors will unlock, or
• Press the button 4 on the key fob to unlock the driver’s side
door. Press the
button 4 again; all other doors will unlock.
To open the lif tgate, press the button 5 for more than 1 second.
FIRST DRIVE FEATURES
1
4
5
6
*Laws in some communities may restrict the use of remote starters. Check local regulations before using
this feature.
2
3
To view detailed instructional videos regarding these and other features, please go to www.nissanownersinfo.mobi.
Page 12 of 36
10
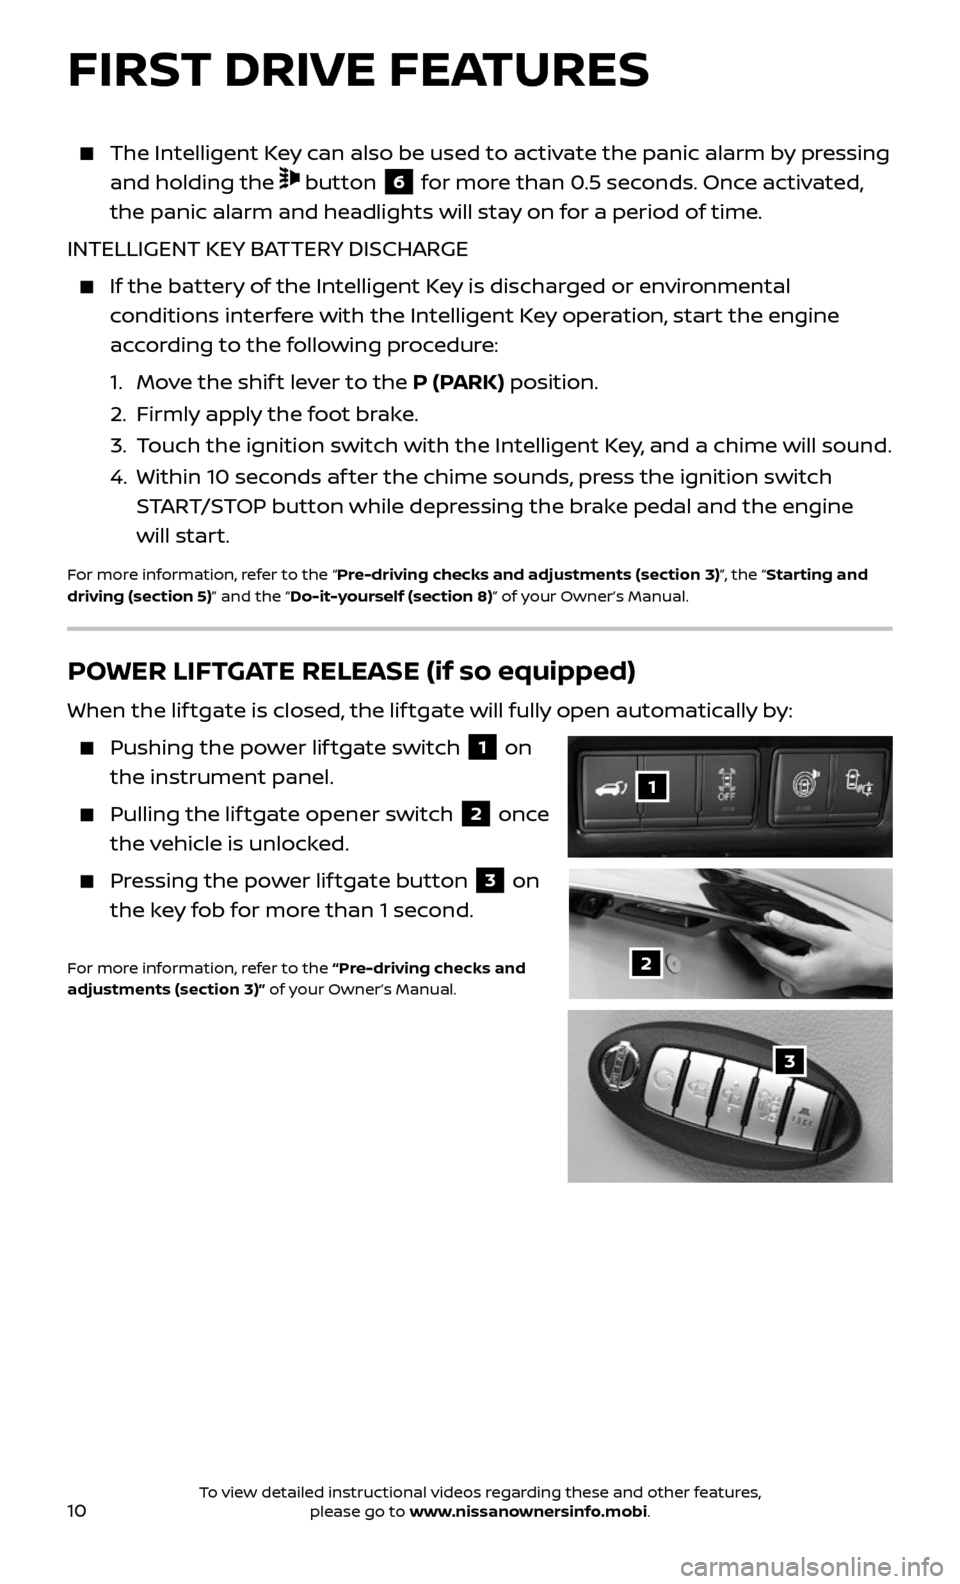
The Intelligent Key can also be used to activate the panic alarm by pressing
and holding the button 6 for more than 0.5 seconds. Once activated,
the panic alarm and headlights will stay on for a period of time.
INTELLIGENT KEY BATTERY DISCHARGE
If the bat tery of the Intelligent Key is discharged or environmental
conditions interfere with the Intelligent Key operation, start the engine
according to the following procedure:
1. Move the shif t lever to the P (PARK) position.
2. Firml y apply the foot brake.
3. Touch the ignition switch with the Intelligent Key, and a chime will sound.
4. Within 10 sec onds af ter the chime sounds, press the ignition switch
START/STOP button while depressing the brake pedal and the engine
will start.
For more information, refer to the “Pre-driving checks and adjustments (section 3)”, the “Starting and
driving (section 5)” and the “Do-it-yourself (section 8)” of your Owner’s Manual.
FIRST DRIVE FEATURES
POWER LIFTGATE RELEASE (if so equipped)
When the lif tgate is closed, the lif tgate will fully open automatically by:
Pushing the power lif tgate switch 1 on
the instrument panel.
Pulling the lif tgate opener switch 2 once
the vehicle is unlocked.
Pressing the power lif tgate button 3 on
the key fob for more than 1 second.
For more information, refer to the “Pre-driving checks and
adjustments (section 3)” of your Owner’s Manual.2
1
3
To view detailed instructional videos regarding these and other features, please go to www.nissanownersinfo.mobi.
Page 15 of 36
13
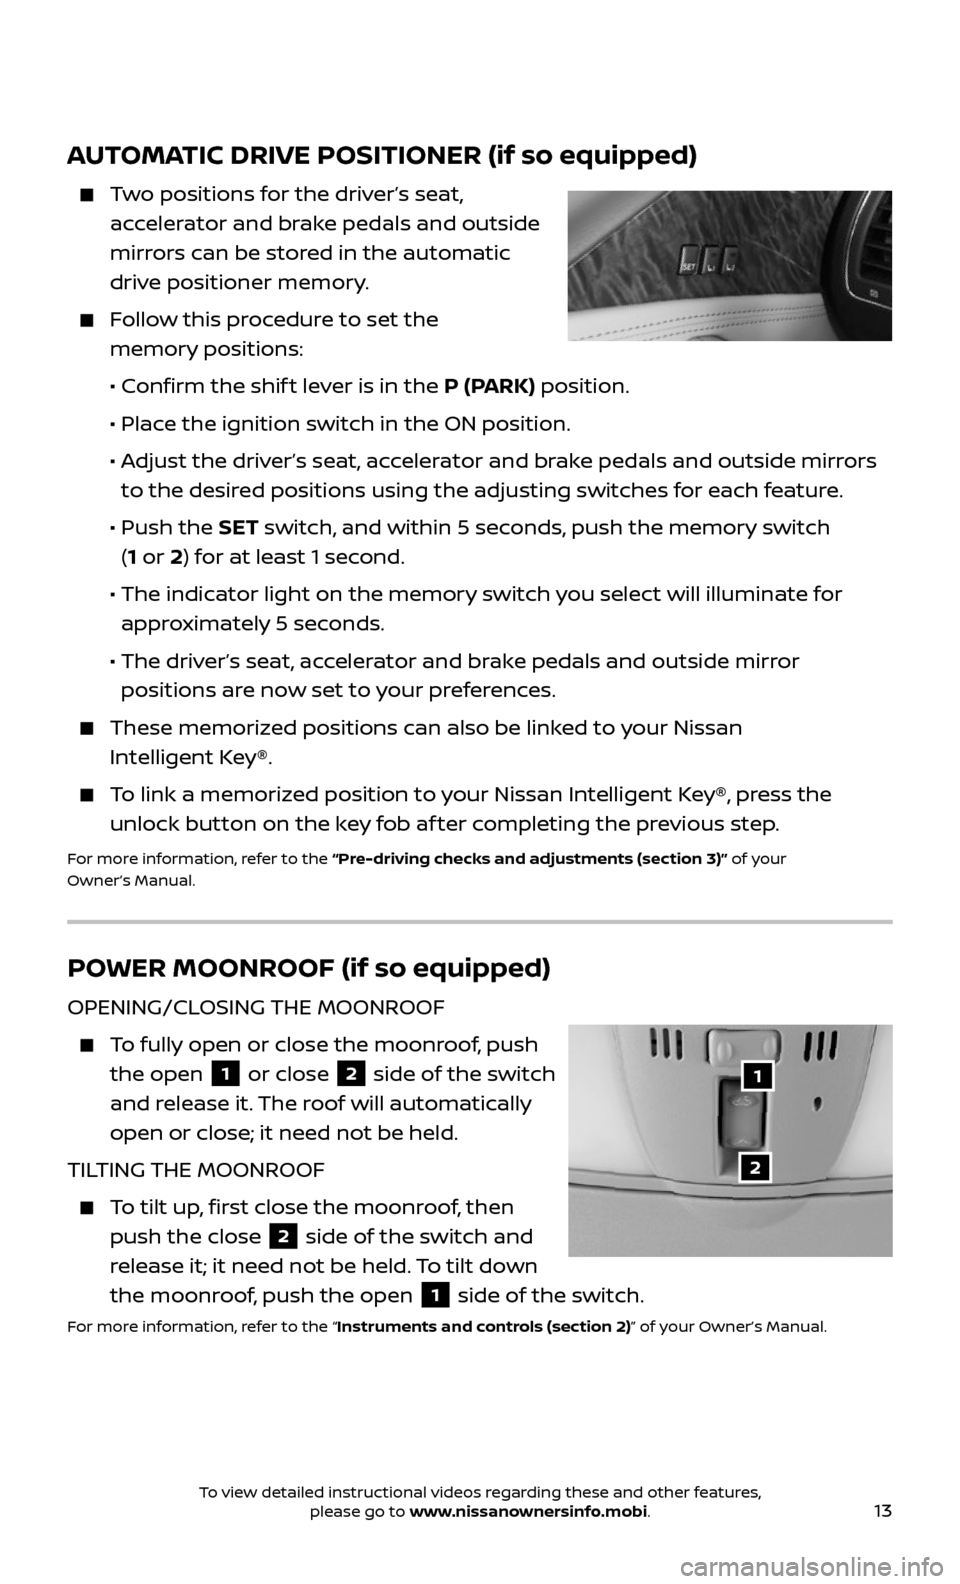
AUTOMATIC DRIVE POSITIONER (if so equipped)
Two positions for the driver’s seat,
accelerator and brake pedals and outside
mirrors can be stored in the automatic
drive positioner memory.
Follow this procedure to set the
memory positions:
• Confirm the shif t lever is in the P (PARK) position.
• Place the ignition switch in the ON position.
• Adjust the driver’s seat, accelerator and brake pedals and outside mirrors
to the desired positions using the adjusting switches for each feature.
• Push the SET switch, and within 5 seconds, push the memory switch
(1 or 2) for at least 1 second.
• The indic ator light on the memory switch you select will illuminate for
approximately 5 seconds.
• The driver’s seat, accelerator and brake pedals and outside mirror
positions are now set to your preferences.
These memoriz ed positions can also be linked to your Nissan
Intelligent Key®.
To link a memorized position to your Nissan Intelligent Key®, press the
unlock button on the key fob af ter completing the previous step.
For more information, refer to the “Pre-driving checks and adjustments (section 3)” of your
Owner’s Manual.
POWER MOONROOF (if so equipped)
OPENING/CLOSING THE MOONROOF
To fully open or close the moonroof, push
the open 1 or close 2 side of the switch
and release it. The roof will automatically
open or close; it need not be held.
TILTING THE MOONROOF
To tilt up, first close the moonroof, then
push the close 2 side of the switch and
release it; it need not be held. To tilt down
the moonroof, push the open
1 side of the switch.
For more information, refer to the “Instruments and controls (section 2)” of your Owner’s Manual.
1
2
To view detailed instructional videos regarding these and other features, please go to www.nissanownersinfo.mobi.
Page 25 of 36
23
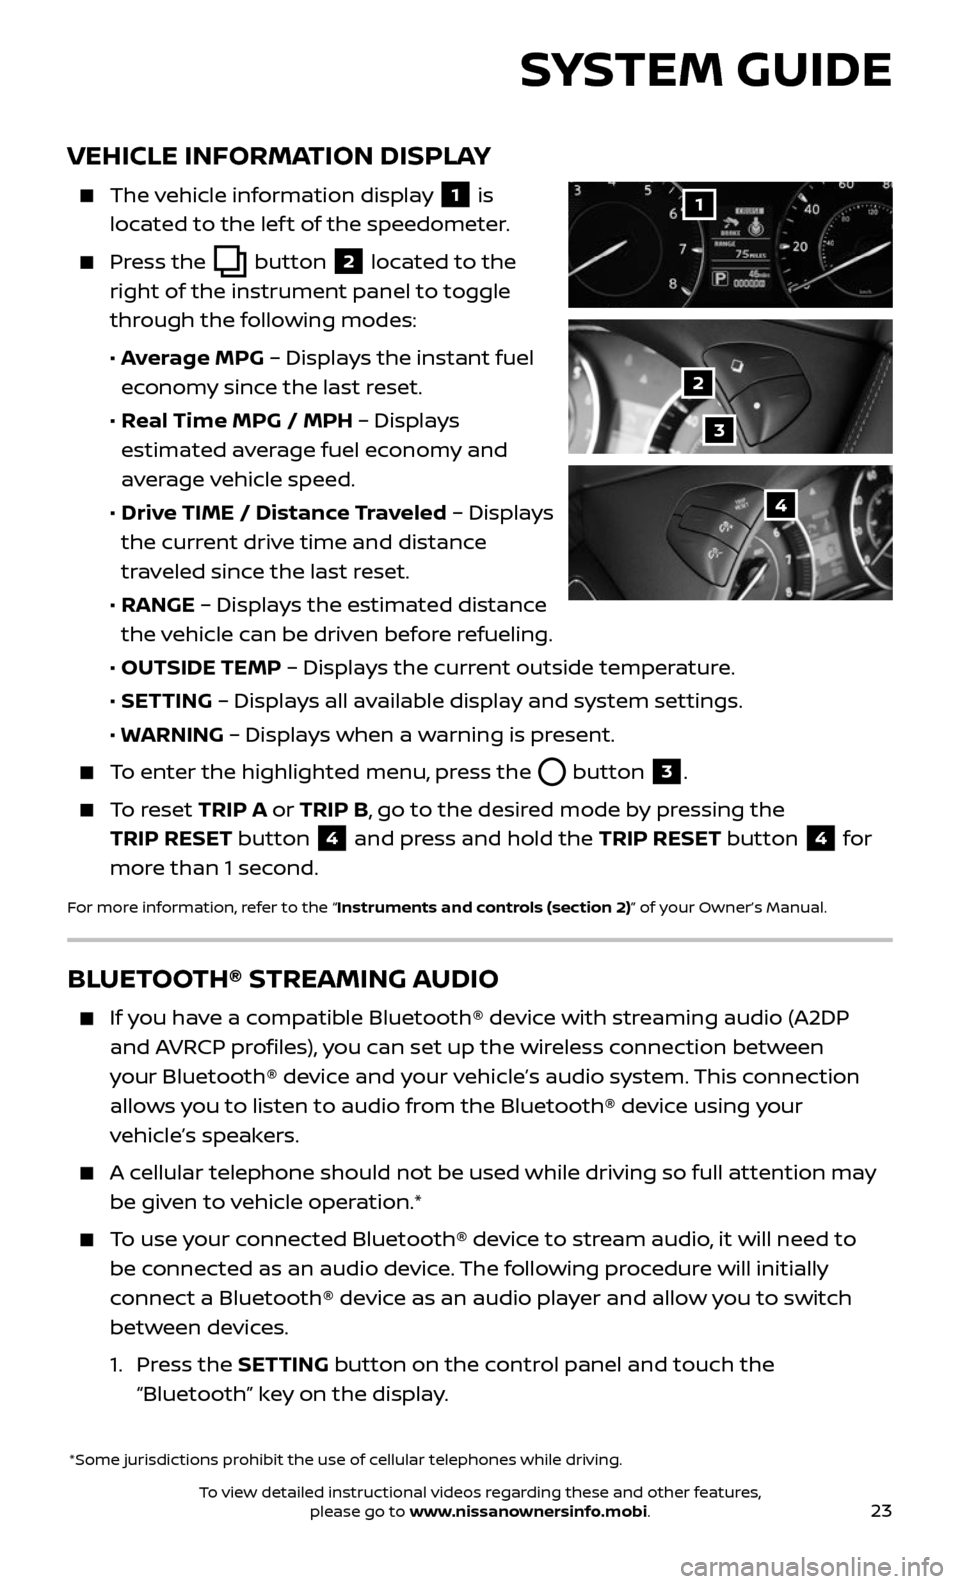
VEHICLE INFORMATION DISPLAY
The vehicle information display 1 is
located to the lef t of the speedometer.
Press the button 2 located to the
right of the instrument panel to toggle
through the following modes:
• Average MPG – Displays the instant fuel
economy since the last reset.
• Real Time MPG / MPH – Displays
estimated average fuel economy and
average vehicle speed.
• Drive TIME / Distance Traveled – Displays
the current drive time and distance
traveled since the last reset.
• RANGE – Displays the estimated distance
the vehicle can be driven before refueling.
• OUTSIDE TEMP – Displays the current outside temperature.
• SETTING – Displays all available display and system settings.
• WARNING – Displays when a warning is present.
To enter the highlighted menu, press the button 3.
To reset TRIP A or TRIP B, go to the desired mode by pressing the
TRIP RESET button
4 and press and hold the TRIP RESET button 4 for
more than 1 second.
For more information, refer to the “Instruments and controls (section 2)” of your Owner’s Manual.
*Some jurisdictions prohibit the use of cellular telephones while driving.
1
2
3
4
SYSTEM GUIDE
BLUETOOTH® STREAMING AUDIO
If you have a compatible Bluetooth® device with streaming audio (A2DP
and AVRCP profiles), you can set up the wireless connection between
your Bluetooth® device and your vehicle’s audio system. This connection
allows you to listen to audio from the Bluetooth® device using your
vehicle’s speakers.
A cellular telephone should not be used while driving so full attention may
be given to vehicle operation.*
To use your connected Bluetooth® device to stream audio, it will need to
be connected as an audio device. The following procedure will initially
connect a Bluetooth® device as an audio player and allow you to switch
between devices.
1. Press the SETTING button on the control panel and touch the
“Bluetooth” key on the display.
To view detailed instructional videos regarding these and other features, please go to www.nissanownersinfo.mobi.
Page 27 of 36
25
The “Help” command can be used to hear a
list of available commands at any time.
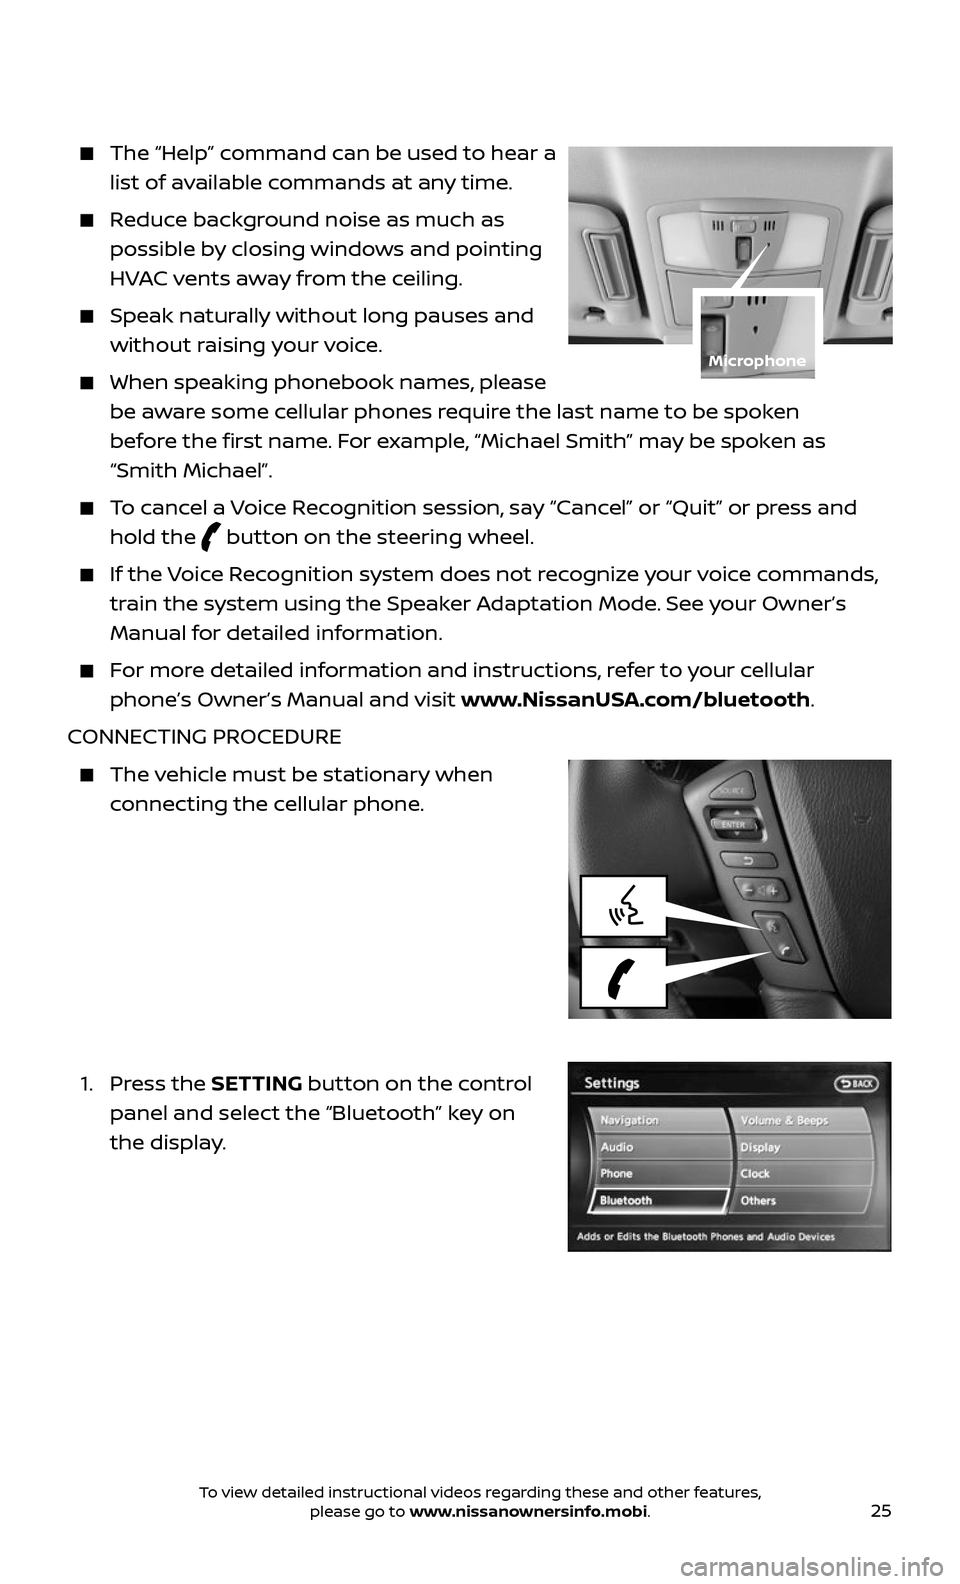
Reduce background noise as much as
possible by closing windows and pointing
HVAC vents away from the ceiling.
Speak naturally without long pauses and
without raising your voice.
When speaking phonebook names, please
be aware some cellular phones require the last name to be spoken
before the first name. For example, “Michael Smith” may be spoken as
“Smith Michael”.
To cancel a Voice Recognition session, say “Cancel” or “Quit” or press and
hold the button on the steering wheel.
If the Voice Recognition system does not recognize your voice commands,
train the system using the Speaker Adaptation Mode. See your Owner’s
Manual for detailed information.
For more detailed information and instructions, refer to your cellular
phone’s Owner’s Manual and visit www.NissanUSA.com/bluetooth.
CONNECTING PROCEDURE
The vehicle must be stationary when
connecting the cellular phone.
1. Press the SETTING button on the control
panel and select the “Bluetooth” key on
the display.
Microphone
To view detailed instructional videos regarding these and other features, please go to www.nissanownersinfo.mobi.
Page 28 of 36
26
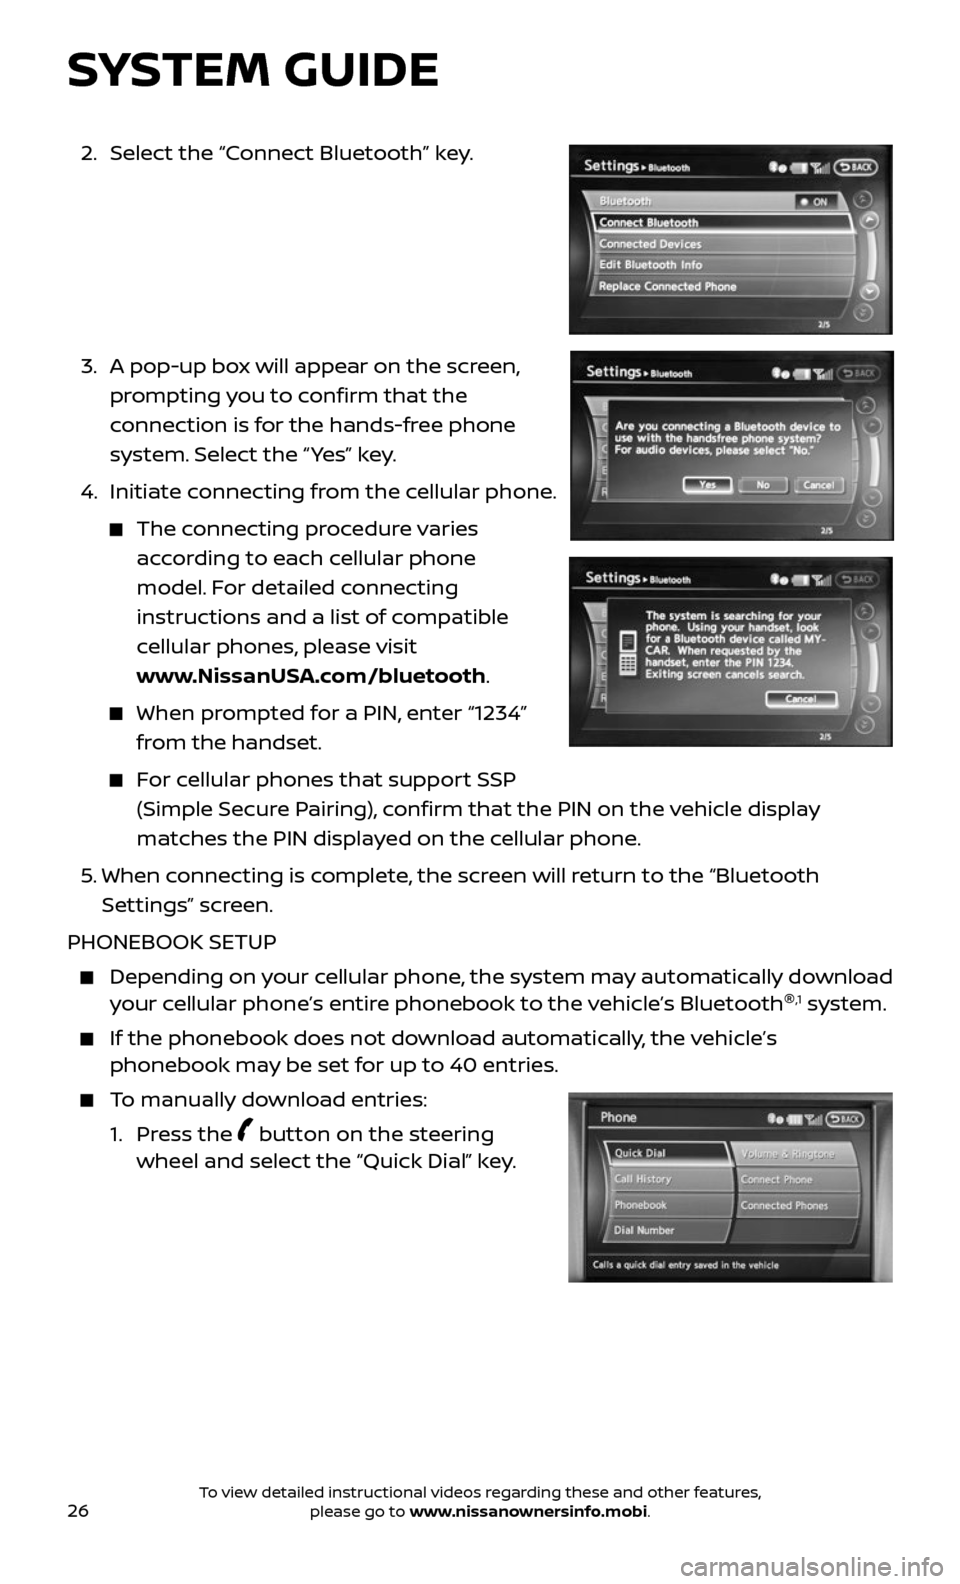
2. Select the “Connect Bluetooth” key.
3. A pop-up bo x will appear on the screen,
prompting you to confirm that the
connection is for the hands-free phone
system. Select the “ Yes” key.
4. Initiate c onnecting from the cellular phone.
The connecting procedure varies
according to each cellular phone
model. For detailed connecting
instructions and a list of compatible
cellular phones, please visit
www.NissanUSA.com/bluetooth.
When prompted for a PIN, enter “1234”
from the handset.
For cellular phones that support SSP
(Simple Secure Pairing), confirm that the PIN on the vehicle display
matches the PIN displayed on the cellular phone.
5. When connecting is complete, the screen will return to the “Bluetooth
Settings” screen.
PHONEBOOK SETUP
Depending on y our cellular phone, the system may automatically download your cellular phone’s entire phonebook to the vehicle’s Bluetooth ®,1 system.
If the phonebook does not do
wnload automatically, the vehicle’s phonebook may be set for up to 40 entries.
To manually download entries:
1. Press the button on the steering wheel and select the “Quick Dial” key.
SYSTEM GUIDE
To view detailed instructional videos regarding these and other features, please go to www.nissanownersinfo.mobi.