2017 NISSAN ARMADA air condition
[x] Cancel search: air conditionPage 2 of 36
*See your Owner’s Manual for information.
12
4
3
5
14151617
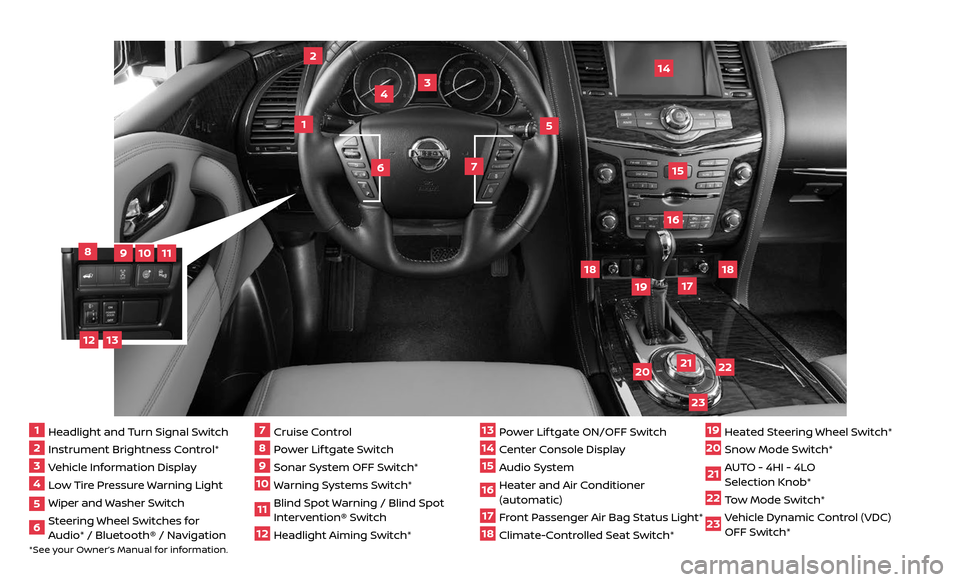
1 Headlight and Turn Signal Switch2 Instrument Brightness Control*3 Vehicle Information Display4 Low Tire Pressure Warning Light5 Wiper and Washer Switch6 Steering Wheel Switches for
Audio* / Bluetooth® / Navigation
7 Cruise Control8 Power Lif tgate Switch9 Sonar System OFF Switch*
10 Warning Systems Switch*
11 Blind Spot Warning / Blind Spot
Intervention® Switch
12 Headlight Aiming Switch*
13 Power Lif tgate ON/OFF Switch
14 Center Console Display
15 Audio System
16 Heater and Air Conditioner
(automatic)
17 Front Passenger Air Bag Status Light*
18 Climate-Controlled Seat Switch*
19 Heated Steering Wheel Switch*
20 Snow Mode Switch*
21 AUTO - 4HI - 4LO
Selection Knob*
22 Tow Mode Switch*
23 Vehicle Dynamic Control (VDC)
OFF Switch*
812
10
11
23
2019
18
18
21
22
6
7
13 9
Page 3 of 36
NEW SYSTEM FEATURESAround View® Monitor (AVM) (if so equipped) ...............................................2
Blind Spot Warning (BSW) (if so equipped)...................................................4
Forward Emergency Braking (FEB) (if so equipped) .........................................4
Predictive Forward Collision Warning (PFCW) (if so equipped)...............................4
Lane Departure Warning (LDW) and Lane Departure Prevention (LDP) (if so equipped) ....5
Backup Collision Intervention (BCI) (if so equipped).........................................5
NavTraffic and NavWeather (if so equipped).................................................6
ESSENTIAL INFORMATIONTire Pressure Monitoring System (TPMS) .....................................................7
Fuel-filler Door .......................................................................\
.........7
Loose Fuel Cap........................................................................\
.......8
Clock Set/Adjustment .......................................................................\
8
FIRST DRIVE FEATURESNissan Intelligent Key® System ..............................................................9
Power Lif tgate Release (if so equipped) ....................................................10
Power Front Seat Adjustments ..............................................................11
2ND Row Seat Adjustments (if so equipped)..................................................11
3RD Row Power Folding Seats (if so equipped) ...............................................12
Starting/Stopping the Engine ...............................................................12
Automatic Drive Positioner (if so equipped) .................................................13
Power Moonroof (if so equipped)............................................................13
Headlight Control Switch ....................................................................14
Outside Mirror Control Switch ...............................................................15
Wiper and Washer Switch....................................................................15
Heater and Air Conditioner (automatic) .....................................................16
Rear Heater and Air Conditioner.............................................................18
AM/FM/SiriusXM® Satellite Radio with CD/DVD Player . . . . . . . . . . . . . . . . . . . . . . . . . . . . . . . . . . . .\
. .19
USB (Universal Serial Bus) Connection Port/Aux Jack and iPod® Interface
................20
Cruise Control (if so equipped)..............................................................20
Intelligent Cruise Control (ICC) (if so equipped)..............................................21
Power Outlets........................................................................\
.......22
SYSTEM GUIDEVehicle Information Display.................................................................23
Bluetooth® Streaming Audio................................................................23
Bluetooth® Hands-free Phone System .....................................................24 System Operating Tips ..................................................................24
Navigation System........................................................................\
..28
DVD Entertainment System (if so equipped) ...............................................29
HomeLink® Universal Transceiver (if so equipped)...........................................31
TABLE OF CONTENTS
Please see your Owner’s Manual for important safety information and system
operation limitations.
• A cellular telephone should not be used for any purpose while driving so full attention may be given to vehicle operation.• Always wear your seat belt.• Supplemental air bags do not replace proper seat belt usage. • Children 12 and under should always ride in the rear seat properly secured in child restraints or seat belts according to their age and weight. • Do not drink and drive.
For more information, refer to the “Safety — Seats, seat belts and supplemental restraint system
(section 1)”, the “Monitor, climate, audio, phone and voice recognition systems (section 4)” and the
“Starting and driving (section 5)” of your Owner’s Manual.
Additional information about your vehicle is also available in your Owner’s Manual, Navigation System Owner’s Manual and at www.NissanUSA.com.
Page 18 of 36
16
FIRST DRIVE FEATURES
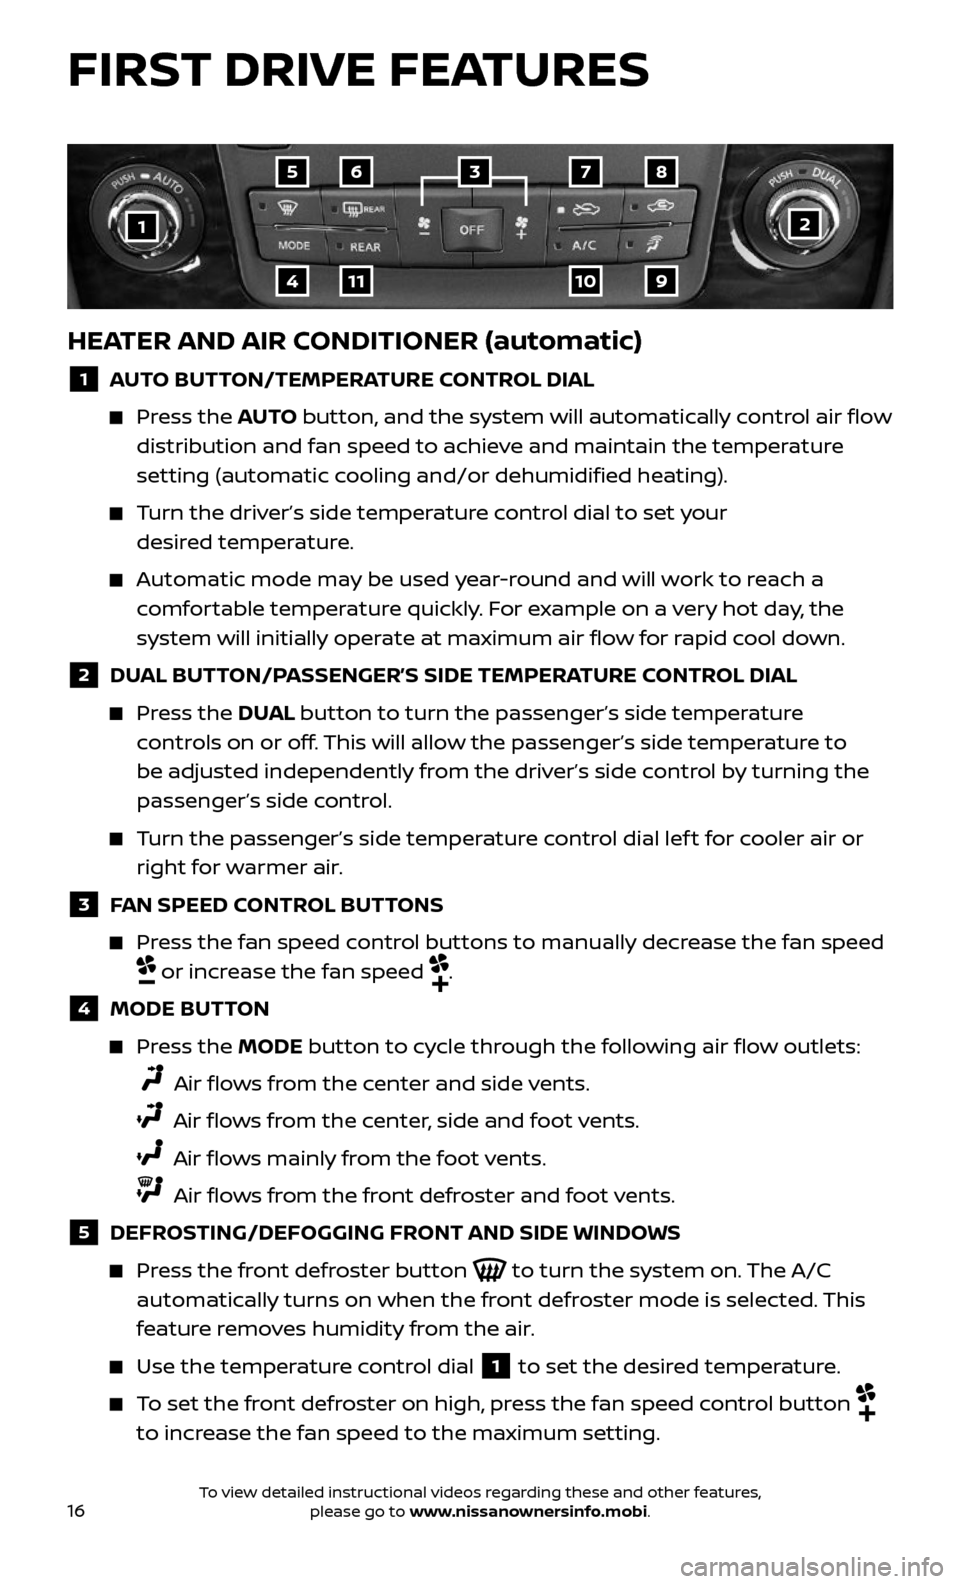
HEATER AND AIR CONDITIONER (automatic)
1 AUTO BUTTON/TEMPERATURE CONTROL DIAL
Press the AUTO button, and the system will automatically control air flow
distribution and fan speed to achieve and maintain the temperature
setting (automatic cooling and/or dehumidified heating).
Turn the driver’s side temperature control dial to set your
desired temperature.
Automatic mode may be used year-round and will work to reach a
comfortable temperature quickly. For example on a very hot day, the
system will initially operate at maximum air flow for rapid cool down.
2 DUAL BUTTON/PASSENGER’S SIDE TEMPERATURE CONTROL DIAL
Press the DUAL button to turn the passenger’s side temperature
controls on or off. This will allow the passenger’s side temperature to
be adjusted independently from the driver’s side control by turning the
passenger’s side control.
Turn the passenger’s side temperature control dial lef t for cooler air or
right for warmer air.
3 FAN SPEED CONTROL BUTTONS
Press the fan speed control buttons to manually decrease the fan speed
or increase the fan speed .
4 MODE BUTTON
Press the MODE button to cycle through the following air flow outlets:
Air flows from the center and side vents.
Air flows from the center, side and foot vents.
Air flows mainly from the foot vents.
Air flows from the front defroster and foot vents.
5 DEFROSTING/DEFOGGING FRONT AND SIDE WINDOWS
Press the front defroster button to turn the system on. The A/C
automatically turns on when the front defroster mode is selected. This
feature removes humidity from the air.
Use the temper ature control dial 1 to set the desired temperature.
To set the front defroster on high, press the fan speed control button
to increase the fan speed to the maximum setting.
1
9
8765
4
3
2
1011
To view detailed instructional videos regarding these and other features, please go to www.nissanownersinfo.mobi.
Page 19 of 36
17
6 REAR WINDOW AND OUTSIDE MIRROR DEFROSTER SWITCH
Push the rear window and outside mirror defroster switch REAR to
turn the system on or off.
This func tion automatically turns off af ter approximately 15 minutes.
7 OUTSIDE AIR CIRCULATION BUTTON
Press the outside air circulation button 7 to draw outside air into
the passenger compartment.
Push the air r ecirculation button 8 to recirculate interior air inside
the vehicle.
The air recirculation mode cannot be activated when the air conditioner
is in the front defroster mode.
This mode helps to adjust the inside v ehicle temperature more effectively.
To automatically control air intake inside the vehicle, press and hold
either the outside air circulation button
7 or the air recirculation
button
8 (whichever indicator light is illuminated). Both of the
indicator lights will flash twice, and then the air intake will switch to
automatic control.
9 UPPER VENT BUTTON
When the upper v ent button is pressed, the air flow against the
driver’s or passenger’s upper body becomes gentle. The indicator light
on the button will illuminate.
In this mode, air from the upper vent flows to control the cabin
temperature without blowing air directly on the occupants.
10 A/C BUTTON
Press the A/C button to manually turn the A/C on or off.
When on, this system not only provides cooler air but also removes
humidity from the air to help avoid window fogging.
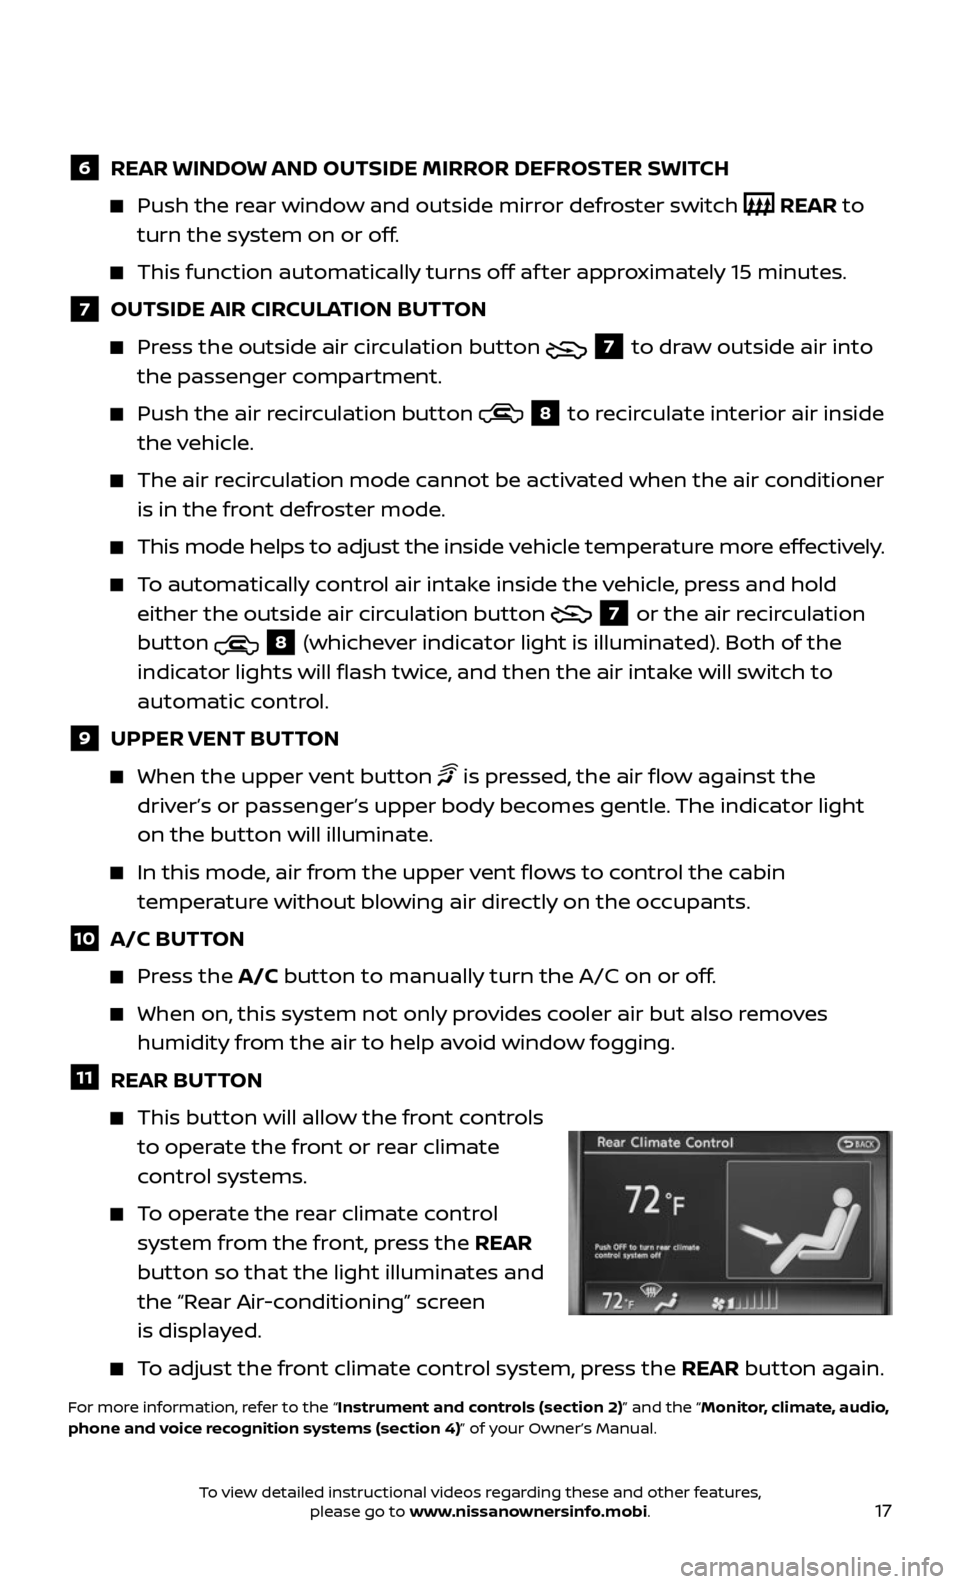
11 REAR BUTTON
This button will allow the front controls
to operate the front or rear climate
control systems.
To operate the rear climate control
system from the front, press the REAR
button so that the light illuminates and
the “Rear Air-conditioning” screen
is displayed.
To adjust the front climate control system, press the REAR button again.
For more information, refer to the “Instrument and controls (section 2)” and the “Monitor, climate, audio,
phone and voice recognition systems (section 4)” of your Owner’s Manual.
To view detailed instructional videos regarding these and other features, please go to www.nissanownersinfo.mobi.
Page 20 of 36
18
FIRST DRIVE FEATURES
REAR HEATER AND AIR CONDITIONER
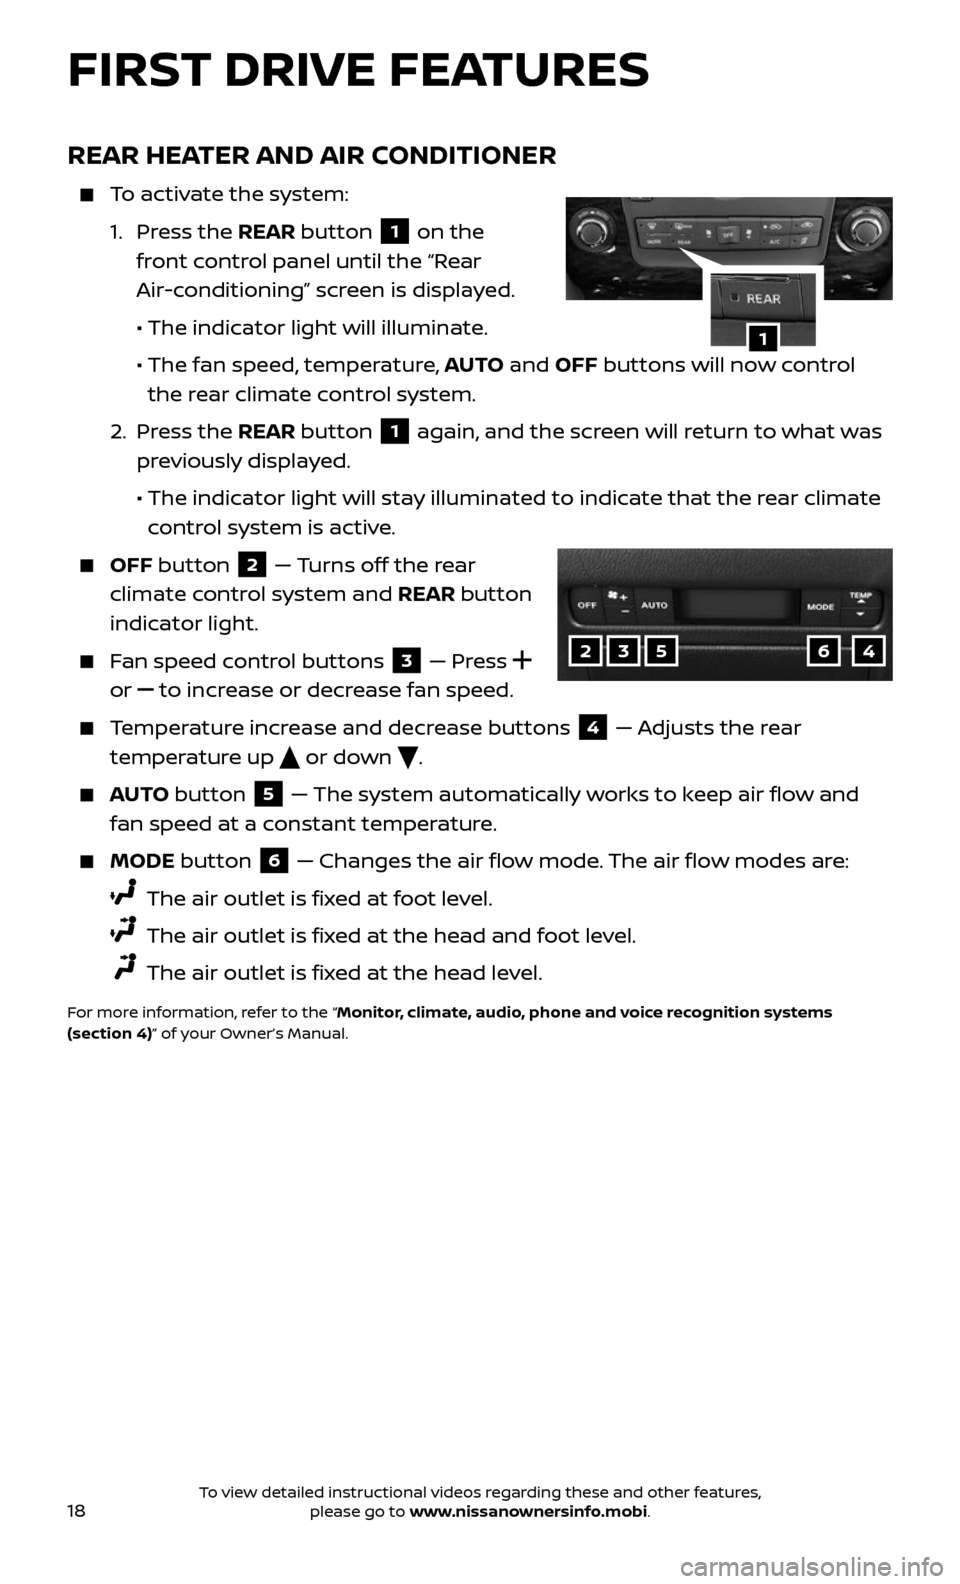
To activate the system:
1. Press the REAR button 1 on the
front control panel until the “Rear
Air-conditioning” screen is displayed.
• The indicator light will illuminate.
• The fan speed , temperature, AUTO and OFF buttons will now control
the rear climate control system.
2. Press the REAR button 1 again, and the screen will return to what was
previously displayed.
• The indic ator light will stay illuminated to indicate that the rear climate
control system is active.
OFF button 2 — Turns off the rear
climate control system and REAR button
indicator light.
Fan speed control buttons 3 — Press
or
to increase or decrease fan speed.
Temperature increase and decrease buttons 4 — Adjusts the rear
temperature up
or down .
AUTO button 5 — The system automatically works to keep air flow and
fan speed at a constant temperature.
MODE button 6 — Changes the air flow mode. The air flow modes are:
The air outlet is fixed at foot level.
The air outlet is fixed at the head and foot level.
The air outlet is fixed at the head level.
For more information, refer to the “Monitor, climate, audio, phone and voice recognition systems
(section 4)” of your Owner’s Manual.
1
23564
To view detailed instructional videos regarding these and other features, please go to www.nissanownersinfo.mobi.
Page 31 of 36
29
6 Multi-Function Controller
a. ENTER button– Press to select the highlighted item on the screen. If
this button is pressed while a map is displayed, the map menu screen
is displayed.
b. Main dir ectional buttons – Press to move across the map, highlight an
item on the screen or adjust a setting.
c. Additional directional buttons – Press to move across the map or
highlight an item on the character input screen.
d. C enter dial – Turn the dial to highlight an item on the screen, adjust a
setting or adjust the map scale.
7 Information (INFO) – Press to display the vehicle, traffic (if so equipped),
weather (if so equipped) or voice recognition information.
8 S TAT U S – Press multiple times to display audio information with either
the air conditioner status, fuel economy or navigation directions.
9 SETTING – Press to access the system settings.
10 BACK – Press to return to the previous screen. In a settings screen, this
button can also be used to apply the setting. In a character input screen,
this button can also delete the characters that have been entered.
11 VOICE – Press to hear the current voice guidance for a programed route.
For more information, refer to your Navigation System Owner’s Manual.
DVD ENTERTAINMENT SYSTEM
(if so equipped)
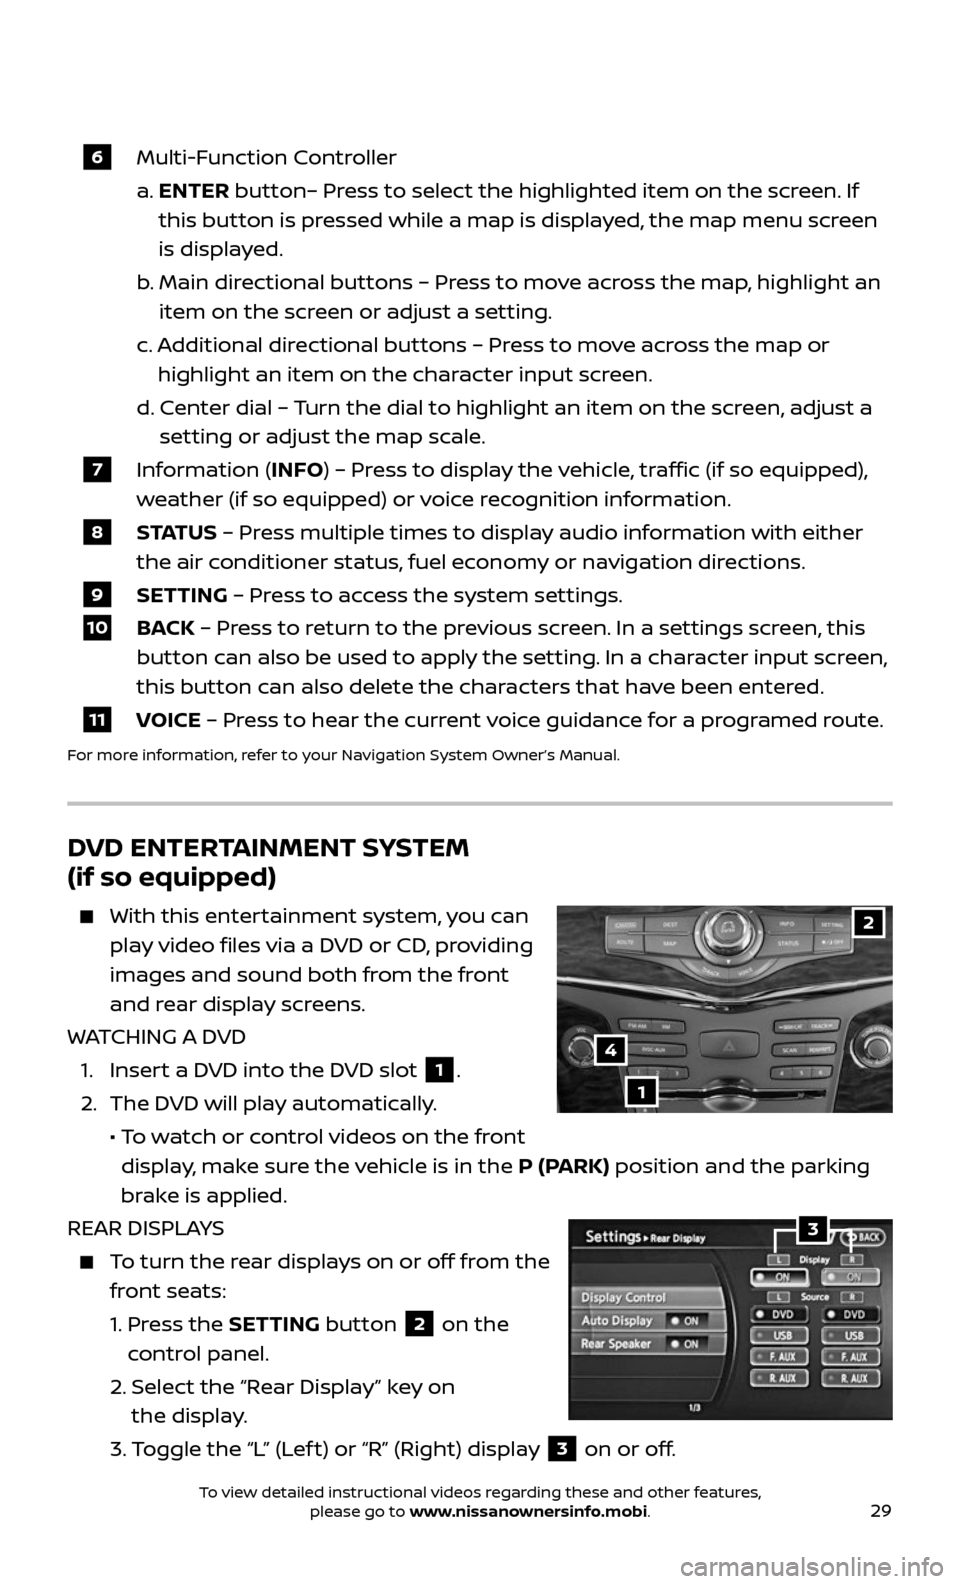
With this enter tainment system, you can
play video files via a DVD or CD, providing
images and sound both from the front
and rear display screens.
WATCHING A DVD
1. Insert a DVD into the DVD slot 1.
2. The DVD will play automatically.
• To watch or control videos on the front
display, make sure the vehicle is in the P (PARK) position and the parking
brake is applied.
REAR DISPLAYS
To turn the rear displays on or off from the
front seats:
1. Press the SETTING button 2 on the
control panel.
2. Selec t the “Rear Display” key on
the display.
3. Toggle the “L” (Lef t) or “R” (Right) display 3 on or off.
2
1
4
3
To view detailed instructional videos regarding these and other features, please go to www.nissanownersinfo.mobi.